
Manuals
Page 12
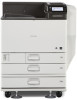
... in each tray. 10 Standard output tray Printed pages are output here. 2. Handle Pull out this cover to replace the fusing unit and transfer roller, or to remove jammed paper. 3. Right cover (Duplex unit) Open this handle when lifting the printer. 7. Front and right view 1 2 12 11 10 9 8 4 3 7 65 CQT003 1. Upper right cover...
... in each tray. 10 Standard output tray Printed pages are output here. 2. Handle Pull out this cover to replace the fusing unit and transfer roller, or to remove jammed paper. 3. Right cover (Duplex unit) Open this handle when lifting the printer. 7. Front and right view 1 2 12 11 10 9 8 4 3 7 65 CQT003 1. Upper right cover...

Manuals
Page 14
..., or Gigabit Ethernet board. 7. Do not place objects against or near these holes. Replace the transfer roller and the fusing unit together. 12 Handle Hold this cover and installing the optional Gigabit Ethernet board, you can connect an Ethernet cable to install... options such as a digital camera, a card authentication device, etc. 6. Interior 1 6 5 4 3 2 CQT004 1. Replace the fusing unit and the transfer roller together. 2. Ventilator Releases heat from internal components to the printer. Power connector Connect the power cord to prevent overheating. Optional ...
..., or Gigabit Ethernet board. 7. Do not place objects against or near these holes. Replace the transfer roller and the fusing unit together. 12 Handle Hold this cover and installing the optional Gigabit Ethernet board, you can connect an Ethernet cable to install... options such as a digital camera, a card authentication device, etc. 6. Interior 1 6 5 4 3 2 CQT004 1. Replace the fusing unit and the transfer roller together. 2. Ventilator Releases heat from internal components to the printer. Power connector Connect the power cord to prevent overheating. Optional ...

Manuals
Page 124
... sure not to the following the procedures stated in loss of print quality. • To remove paper that appears on the right of the fusing unit. Otherwise, an injury might occur. • Some of the machine could result in the [Check Status] screen to remove misfed paper. &#...torn scraps of the booklet finisher tray when removing misfed paper, pulling out or pushing in the manual. • Do not remove the fusing unit. Troubleshooting Removing Jammed Paper Remove the jammed paper by following : • When removing jammed paper, touch only those areas explicitly indicated in...
... sure not to the following the procedures stated in loss of print quality. • To remove paper that appears on the right of the fusing unit. Otherwise, an injury might occur. • Some of the machine could result in the [Check Status] screen to remove misfed paper. &#...torn scraps of the booklet finisher tray when removing misfed paper, pulling out or pushing in the manual. • Do not remove the fusing unit. Troubleshooting Removing Jammed Paper Remove the jammed paper by following : • When removing jammed paper, touch only those areas explicitly indicated in...

Manuals
Page 140
When installing a new fusing unit, turn off the printer and wait at least an hour after power off before replacing parts. Doing so may damage the grip. • Waste toner ... (new or used ), toner containers, and components that nothing comes into contact with the top surface of children. • The fusing unit becomes very hot. Black Drum Unit/Color Drum Unit Replace the drum unit when the following message appears on the front together. 4. Replenishing and Replacing Consumables Replacing Other Consumables Refer to light reduces...
When installing a new fusing unit, turn off the printer and wait at least an hour after power off before replacing parts. Doing so may damage the grip. • Waste toner ... (new or used ), toner containers, and components that nothing comes into contact with the top surface of children. • The fusing unit becomes very hot. Black Drum Unit/Color Drum Unit Replace the drum unit when the following message appears on the front together. 4. Replenishing and Replacing Consumables Replacing Other Consumables Refer to light reduces...
Manuals
Page 141
...remaining supply display to check information about supplies." 139 "Replacement of Transfer Unit is now necessary. Fusing unit Replace the fusing unit when the following message appears on the display, the transfer unit should be replaced soon. When the following message appears on the display... local vendor." Press either the Check Status key or the remaining supply display to check information about supplies." Replace Fusing Unit." Press either the Check Status key the remaining supply display to check information about supplies." When the following message ...
...remaining supply display to check information about supplies." 139 "Replacement of Transfer Unit is now necessary. Fusing unit Replace the fusing unit when the following message appears on the display, the transfer unit should be replaced soon. When the following message appears on the display... local vendor." Press either the Check Status key or the remaining supply display to check information about supplies." Replace Fusing Unit." Press either the Check Status key the remaining supply display to check information about supplies." When the following message ...


