Manuals
Page 6
... When Printer is Jammed...225 Paper Misfeed Message (A)...227 4 Maintaining the Printer Replacing the Print Cartridge...147 Replacing the Waste Toner Bottle...154 Replacing the Intermediate Transfer Unit...161 Replacing the Maintenance Kit...172 Cautions When Cleaning...179 Cleaning the Toner Density Sensor...180 Cleaning the Friction Pad and the Paper Feed Roller...
... When Printer is Jammed...225 Paper Misfeed Message (A)...227 4 Maintaining the Printer Replacing the Print Cartridge...147 Replacing the Waste Toner Bottle...154 Replacing the Intermediate Transfer Unit...161 Replacing the Maintenance Kit...172 Cautions When Cleaning...179 Cleaning the Toner Density Sensor...180 Cleaning the Friction Pad and the Paper Feed Roller...
Manuals
Page 7
Appendix Moving and Transporting the Printer...237 Moving the Printer in a Short Distance...238 Consumables...239 Print Cartridge...239 Waste Toner Bottle...240 Intermediate Transfer Unit...240 Maintenance Kit...241 Specifications...242 Mainframe...242 Options...245 Trademarks...249 INDEX...251 5 Misfeed Tray 1...227 Misfeed Bypass Tray...229 Paper Misfeed Message (B)...231 Paper Misfeed Message (Y)...234 Paper Misfeed Message (Z)...235 11.
Appendix Moving and Transporting the Printer...237 Moving the Printer in a Short Distance...238 Consumables...239 Print Cartridge...239 Waste Toner Bottle...240 Intermediate Transfer Unit...240 Maintenance Kit...241 Specifications...242 Mainframe...242 Options...245 Trademarks...249 INDEX...251 5 Misfeed Tray 1...227 Misfeed Bypass Tray...229 Paper Misfeed Message (B)...231 Paper Misfeed Message (Y)...234 Paper Misfeed Message (Z)...235 11.
Manuals
Page 21
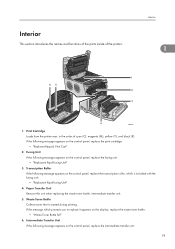
... Roller If the following message appears on the display, replace the waste toner bottle. • "Waste Toner Bottle full" 6. Intermediate Transfer Unit If the following message appears on the control panel, replace the intermediate transfer unit: 19 Interior This section introduces the names and functions of the parts inside of cyan (C), magenta (M), yellow (Y), and black (K). Print...
... Roller If the following message appears on the display, replace the waste toner bottle. • "Waste Toner Bottle full" 6. Intermediate Transfer Unit If the following message appears on the control panel, replace the intermediate transfer unit: 19 Interior This section introduces the names and functions of the parts inside of cyan (C), magenta (M), yellow (Y), and black (K). Print...

Manuals
Page 159
Close the bottle cap. Replacing the Waste Toner Bottle CBK135 To prevent the waste toner bottle touching the intermediate transfer unit, do not lift the bottle while pulling it out. 7 CBK136 6. CBK160 157
Close the bottle cap. Replacing the Waste Toner Bottle CBK135 To prevent the waste toner bottle touching the intermediate transfer unit, do not lift the bottle while pulling it out. 7 CBK136 6. CBK160 157

Manuals
Page 160
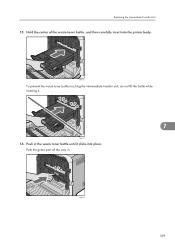
Push in . 158 Leave the cap open. 7 CBK150 To prevent the waste toner bottle touching the intermediate transfer unit, do not lift the bottle while inserting it clicks into the printer body. CBK151 8. 7. Hold the center of the new waste toner bottle, and then carefully insert it halfway into place. Push the green part all the way in the waste toner bottle until it . Maintaining the Printer CBK161 7.
Push in . 158 Leave the cap open. 7 CBK150 To prevent the waste toner bottle touching the intermediate transfer unit, do not lift the bottle while inserting it clicks into the printer body. CBK151 8. 7. Hold the center of the new waste toner bottle, and then carefully insert it halfway into place. Push the green part all the way in the waste toner bottle until it . Maintaining the Printer CBK161 7.
Manuals
Page 163
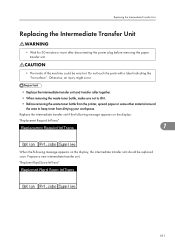
...:IntTrans" Replacemnt Requird:IntTrans 7 When the following message appears on the display, the intermediate transfer unit should be very hot. Replacing the Intermediate Transfer Unit Replacing the Intermediate Transfer Unit • Wait for 30 minutes or more after disconnecting the power plug before removing the paper transfer unit. • The inside of the machine could be replaced soon. Do not touch...
...:IntTrans" Replacemnt Requird:IntTrans 7 When the following message appears on the display, the intermediate transfer unit should be very hot. Replacing the Intermediate Transfer Unit Replacing the Intermediate Transfer Unit • Wait for 30 minutes or more after disconnecting the power plug before removing the paper transfer unit. • The inside of the machine could be replaced soon. Do not touch...

Manuals
Page 165
CBK133 5. Replacing the Intermediate Transfer Unit 4. Hold the center of the waste toner bottle, and then carefully pull it out. 163 Pull the waste toner bottle halfway out, grab the bottle, and then pull it straight out. 7 CBK134 CBK135 To prevent the waste toner bottle touching the intermediate transfer unit, do not lift the bottle while pulling it out horizontally.
CBK133 5. Replacing the Intermediate Transfer Unit 4. Hold the center of the waste toner bottle, and then carefully pull it out. 163 Pull the waste toner bottle halfway out, grab the bottle, and then pull it straight out. 7 CBK134 CBK135 To prevent the waste toner bottle touching the intermediate transfer unit, do not lift the bottle while pulling it out horizontally.

Manuals
Page 166
CBK138 164 Loosen the finger screws on both ends of sliders, and then pull the intermediate transfer unit until it stops. Hold the finger screws of the intermediate transfer unit. 1 2 1 2 7 CBK137 7. Maintaining the Printer CBK136 6. 7.
CBK138 164 Loosen the finger screws on both ends of sliders, and then pull the intermediate transfer unit until it stops. Hold the finger screws of the intermediate transfer unit. 1 2 1 2 7 CBK137 7. Maintaining the Printer CBK136 6. 7.

Manuals
Page 167
CBK139 CBK140 7 Holding the levers on both ends of the intermediate transfer unit. Replacing the Intermediate Transfer Unit 8. Hold the green parts at both side, carefully pull out the intermediate transfer unit. 2 1 CBK141 165
CBK139 CBK140 7 Holding the levers on both ends of the intermediate transfer unit. Replacing the Intermediate Transfer Unit 8. Hold the green parts at both side, carefully pull out the intermediate transfer unit. 2 1 CBK141 165

Manuals
Page 168
Then, while taking care not to remove the attachment. 166 CBK145 Remove the covering sheet. Open the box containing the new intermediate transfer unit and remove the top cover. 7. Maintaining the Printer 9. CBK143 10. While holding the frame of the intermediate transfer unit steady with one hand, use your other hand to pull the side tab outwards and then upwards to touch the belt area, lift the new intermediate transfer unit from its box using the grips on both sides. 7 CBK144 11.
Then, while taking care not to remove the attachment. 166 CBK145 Remove the covering sheet. Open the box containing the new intermediate transfer unit and remove the top cover. 7. Maintaining the Printer 9. CBK143 10. While holding the frame of the intermediate transfer unit steady with one hand, use your other hand to pull the side tab outwards and then upwards to touch the belt area, lift the new intermediate transfer unit from its box using the grips on both sides. 7 CBK144 11.

Manuals
Page 169
CBK129 7 12. Hold the intermediate transfer unit by the green parts at both ends, and then push the unit straight into the printer body until it can go no further. CBK252 167 Replacing the Intermediate Transfer Unit CBK146 Do not touch the transfer belt.
CBK129 7 12. Hold the intermediate transfer unit by the green parts at both ends, and then push the unit straight into the printer body until it can go no further. CBK252 167 Replacing the Intermediate Transfer Unit CBK146 Do not touch the transfer belt.

Manuals
Page 170
Maintaining the Printer CBK147 13. Tighten the finger screws on both ends of the intermediate transfer unit. 2 1 2 1 7 CBK148 14. CBK149 168 7. Remove the transfer belt cover.
Maintaining the Printer CBK147 13. Tighten the finger screws on both ends of the intermediate transfer unit. 2 1 2 1 7 CBK148 14. CBK149 168 7. Remove the transfer belt cover.
Manuals
Page 171
Replacing the Intermediate Transfer Unit 15. CBK150 To prevent the waste toner bottle touching the intermediate transfer unit, do not lift the bottle while inserting it clicks into the printer body. Push in . Push the green part all the way in the waste toner bottle until it . 7 CBK151 16. Hold the center of the waste toner bottle, and then carefully insert into place. CBK152 169
Replacing the Intermediate Transfer Unit 15. CBK150 To prevent the waste toner bottle touching the intermediate transfer unit, do not lift the bottle while inserting it clicks into the printer body. Push in . Push the green part all the way in the waste toner bottle until it . 7 CBK151 16. Hold the center of the waste toner bottle, and then carefully insert into place. CBK152 169

Manuals
Page 173
Close the front cover with both hands carefully. Replacing the Intermediate Transfer Unit CBK156 7 171 18.
Close the front cover with both hands carefully. Replacing the Intermediate Transfer Unit CBK156 7 171 18.

Manuals
Page 207
...nearing the end of its service life. Replacmnt Rqrd:Fusing Unit You need to replace the intermediate transfer unit soon. Replcmnt Rqrd Soon:IntTrans You will need to replace the intermediate transfer unit. Authentication from the SD card failed. The printer cannot ...Print Cartridge". Replacemnt Requird:IntTrans You need to obtain a new intermediate transfer unit. For details, see p.57 "Installing the Interface Units". Contact your sales or service representative to replace the intermediate transfer unit. For details, see p.172 "Replacing the Maintenance Kit". Repl...
...nearing the end of its service life. Replacmnt Rqrd:Fusing Unit You need to replace the intermediate transfer unit soon. Replcmnt Rqrd Soon:IntTrans You will need to replace the intermediate transfer unit. Authentication from the SD card failed. The printer cannot ...Print Cartridge". Replacemnt Requird:IntTrans You need to obtain a new intermediate transfer unit. For details, see p.57 "Installing the Interface Units". Contact your sales or service representative to replace the intermediate transfer unit. For details, see p.172 "Replacing the Maintenance Kit". Repl...
Manuals
Page 208
... job has already been printed or deleted. 9. Set the Fusing Unit correctly. Set the Intermediate Transfer Unit correctly. The intermediate transfer unit may not be installed correctly. For details, see p.161 "Replacing the Intermediate Transfer Unit" for Print cartridge installation. Press Exit on the network. There is... displayed after re-installation, contact your sales or service representative. Turn the printer off and re-install the intermediate transfer unit. The waste toner bottle may not be installed correctly. For details, see p.172 "Replacing the Maintenance Kit...
... job has already been printed or deleted. 9. Set the Fusing Unit correctly. Set the Intermediate Transfer Unit correctly. The intermediate transfer unit may not be installed correctly. For details, see p.161 "Replacing the Intermediate Transfer Unit" for Print cartridge installation. Press Exit on the network. There is... displayed after re-installation, contact your sales or service representative. Turn the printer off and re-install the intermediate transfer unit. The waste toner bottle may not be installed correctly. For details, see p.172 "Replacing the Maintenance Kit...
Manuals
Page 242
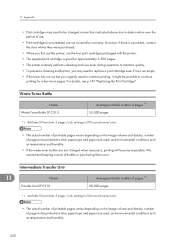
... printable pages varies depending on the image volume and density, number of pages to deterioration over the period of bottles or purchasing them soon. Intermediate Transfer Unit 11 Name Transfer Unit SP C310 Average printable number of pages *1 90,000 pages *1 A4/letter 5% test chart, 3 pages / job, printing in 50% monochrome/color. • The actual number...
... printable pages varies depending on the image volume and density, number of pages to deterioration over the period of bottles or purchasing them soon. Intermediate Transfer Unit 11 Name Transfer Unit SP C310 Average printable number of pages *1 90,000 pages *1 A4/letter 5% test chart, 3 pages / job, printing in 50% monochrome/color. • The actual number...
Manuals
Page 243
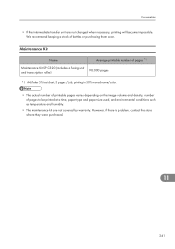
Maintenance Kit Name Average printable number of pages *1 Maintenance Kit SP C320 (includes a fusing unit and transcription roller) 90,000 pages *1 A4/letter 5% test chart, 3 pages / job, printing in 50% monochrome/color. • The actual number of printable pages varies ..., and environmental conditions such as temperature and humidity. • The maintenance kit are not changed when necessary, printing will become impossible. Consumables • If the intermediate transfer unit are not covered by warranty.
Maintenance Kit Name Average printable number of pages *1 Maintenance Kit SP C320 (includes a fusing unit and transcription roller) 90,000 pages *1 A4/letter 5% test chart, 3 pages / job, printing in 50% monochrome/color. • The actual number of printable pages varies ..., and environmental conditions such as temperature and humidity. • The maintenance kit are not changed when necessary, printing will become impossible. Consumables • If the intermediate transfer unit are not covered by warranty.
Manuals
Page 253
... connection 69 Ethernet configuration 79 Ethernet port 17 Ethernet speed 85 Exterior 15 F Friction pad 182 Front cover 15 Front cover open lever 17 Fusing unit 19 G Gigabit Ethernet board 57 Gradation correction sheet 194 Gradation correction value 191, 195 Guide to the printer 15, 17, 19, 21 H Hard disk ... board 62, 77 IEEE 802.1X 98 device certificate 98 Enabling SSL 99 Ethernet 100 site certificate 98 wireless LAN 102 Installing options 45 Interface units 57 Interior 19 Intermediate transfer unit 19, 161, 240 IP address 79 J Job reset key 21 L Label paper 110 251
... connection 69 Ethernet configuration 79 Ethernet port 17 Ethernet speed 85 Exterior 15 F Friction pad 182 Front cover 15 Front cover open lever 17 Fusing unit 19 G Gigabit Ethernet board 57 Gradation correction sheet 194 Gradation correction value 191, 195 Guide to the printer 15, 17, 19, 21 H Hard disk ... board 62, 77 IEEE 802.1X 98 device certificate 98 Enabling SSL 99 Ethernet 100 site certificate 98 wireless LAN 102 Installing options 45 Interface units 57 Interior 19 Intermediate transfer unit 19, 161, 240 IP address 79 J Job reset key 21 L Label paper 110 251
Manuals
Page 254
... message (A 227 Paper misfeed message (B 231 Paper misfeed message (Y 234 Paper misfeed message (Z 235 Paper size 134 Paper transfer unit 19 Paper type 131 Parallel cable connection 77 Place to install 26 Plain paper 108 Power connector 17 Power indicator 22 Power ... Rear view 17 Recycled paper 113 Registration roller 185 Remaining paper indicator 15 Removing the packaging materials 30 Replacing the intermediate transfer unit............161 Replacing the transfer roller 161 Replacing the waste toner bottle 154 S Scroll keys 21 SD card slots 17 SDRAM module 51 Security...
... message (A 227 Paper misfeed message (B 231 Paper misfeed message (Y 234 Paper misfeed message (Z 235 Paper size 134 Paper transfer unit 19 Paper type 131 Parallel cable connection 77 Place to install 26 Plain paper 108 Power connector 17 Power indicator 22 Power ... Rear view 17 Recycled paper 113 Registration roller 185 Remaining paper indicator 15 Removing the packaging materials 30 Replacing the intermediate transfer unit............161 Replacing the transfer roller 161 Replacing the waste toner bottle 154 S Scroll keys 21 SD card slots 17 SDRAM module 51 Security...


