Manuals
Page 3
... the CD-ROMs 12 Reading the HTML Manuals That You Install on the Power...36 Turning off the Power...38 Selecting the Display Language...42 Test Printing...43 3. TABLE OF CONTENTS How to Read This Manual...6 Symbols...6 Model-Specific Information...7 Positions of WARNING and CAUTION Labels 8 Power Switch Symbols...9 Manuals for...
... the CD-ROMs 12 Reading the HTML Manuals That You Install on the Power...36 Turning off the Power...38 Selecting the Display Language...42 Test Printing...43 3. TABLE OF CONTENTS How to Read This Manual...6 Symbols...6 Model-Specific Information...7 Positions of WARNING and CAUTION Labels 8 Power Switch Symbols...9 Manuals for...
Manuals
Page 27
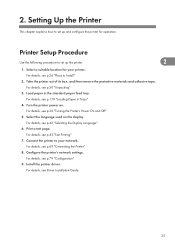
For details, see p.119 "Loading Paper in the standard paper feed tray. For details, see p.43 "Test Printing" 7. Load paper in Trays" 4. Turn the printer power on the display. For details, see Driver Installation Guide. 25 Select a suitable location for operation. Select ... p.26 "Place to set up the printer. 2 1. Connect the printer to set up and configure the printer for your network. Install the printer driver. Print a test page.
For details, see p.119 "Loading Paper in the standard paper feed tray. For details, see p.43 "Test Printing" 7. Load paper in Trays" 4. Turn the printer power on the display. For details, see Driver Installation Guide. 25 Select a suitable location for operation. Select ... p.26 "Place to set up the printer. 2 1. Connect the printer to set up and configure the printer for your network. Install the printer driver. Print a test page.

Manuals
Page 45
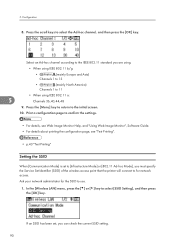
... initial screen. • If printing is an error message, see if an error message appears on the display. Press the [ ] or [ ] key to select [List/Test Print], and then press the [OK] key. 3. Test Printing Test Printing Print a test print in order to the computer. 1. The configuration page will be printed. 4. it does not...
... initial screen. • If printing is an error message, see if an error message appears on the display. Press the [ ] or [ ] key to select [List/Test Print], and then press the [OK] key. 3. Test Printing Test Printing Print a test print in order to the computer. 1. The configuration page will be printed. 4. it does not...

Manuals
Page 52
..., see "Adjusting Printing Position". • For details about printing the configuration page, see "Test Printing". • For details about loading paper onto the paper tray, see "Loading Paper in Trays". • p.43 "Test Printing" • p.119 "Loading Paper in Trays" • p.197 "Adjusting Printing Position... paper feed unit. If you can check whether the paper feed unit is properly installed by printing the configuration page from the [List/Test Print] menu. Installing Options 5. There are three upright pins on the underside of the printer, and then carefully lower the printer. ...
..., see "Adjusting Printing Position". • For details about printing the configuration page, see "Test Printing". • For details about loading paper onto the paper tray, see "Loading Paper in Trays". • p.43 "Test Printing" • p.119 "Loading Paper in Trays" • p.197 "Adjusting Printing Position... paper feed unit. If you can check whether the paper feed unit is properly installed by printing the configuration page from the [List/Test Print] menu. Installing Options 5. There are three upright pins on the underside of the printer, and then carefully lower the printer. ...
Manuals
Page 56
...Settings for the Printer", Driver Installation Guide. 1. Turn off the power, and then unplug the power cable. 54 For details, see "Test Printing". • p.43 "Test Printing" • p.54 "Installing the Hard Disk" Installing the Hard Disk • Before touching the hard disk, touch something metal ... MB Total 512 MB 768 MB • If the memory unit is properly installed: Print the configuration page from the [List/Test Print] menu. Static electricity can check the memory unit is not properly installed, repeat this procedure. If it properly even after reinstallation...
...Settings for the Printer", Driver Installation Guide. 1. Turn off the power, and then unplug the power cable. 54 For details, see "Test Printing". • p.43 "Test Printing" • p.54 "Installing the Hard Disk" Installing the Hard Disk • Before touching the hard disk, touch something metal ... MB Total 512 MB 768 MB • If the memory unit is properly installed: Print the configuration page from the [List/Test Print] menu. Static electricity can check the memory unit is not properly installed, repeat this procedure. If it properly even after reinstallation...

Manuals
Page 58
... • For details on the configuration page. • If the hard disk is properly installed: Print the configuration page from the [List/Test Print] menu. Installing Options 1 2 3 CBK201 Be sure to set the hard disk parallel with the printer. • After finishing installation, ...you will see "Hard Disk" for "Device Connection" on printing the configuration page, see "Test Printing". • p.43 "Test Printing" 56 If you cannot install it is installed properly, you can check the hard disk is not properly installed, repeat this ...
... • For details on the configuration page. • If the hard disk is properly installed: Print the configuration page from the [List/Test Print] menu. Installing Options 1 2 3 CBK201 Be sure to set the hard disk parallel with the printer. • After finishing installation, ...you will see "Hard Disk" for "Device Connection" on printing the configuration page, see "Test Printing". • p.43 "Test Printing" 56 If you cannot install it is installed properly, you can check the hard disk is not properly installed, repeat this ...
Manuals
Page 61
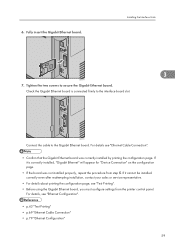
...cannot be installed correctly even after reattempting installation, contact your sales or service representative. • For details about printing the configuration page, see "Test Printing". • Before using the Gigabit Ethernet board, you must configure settings from step 5. Fully insert the Gigabit Ethernet board. Check the ... two screws to secure the Gigabit Ethernet board. Installing the Interface Units 3 CBK074 7. For details see "Ethernet Configuration". • p.43 "Test Printing" • p.69 "Ethernet Cable Connection" • p.79 "Ethernet Configuration" 59 6.
...cannot be installed correctly even after reattempting installation, contact your sales or service representative. • For details about printing the configuration page, see "Test Printing". • Before using the Gigabit Ethernet board, you must configure settings from step 5. Fully insert the Gigabit Ethernet board. Check the ... two screws to secure the Gigabit Ethernet board. Installing the Interface Units 3 CBK074 7. For details see "Ethernet Configuration". • p.43 "Test Printing" • p.69 "Ethernet Cable Connection" • p.79 "Ethernet Configuration" 59 6.
Manuals
Page 64
... correctly even after reattempting installation, contact your sales or service representative. • For details about printing the configuration page, see "Wireless LAN Configuration". • p.43 "Test Printing" • p.88 "Wireless LAN Configuration" Installing the IEEE 1284 Interface Board • Before beginning work, ground yourself by printing the configuration page. For details...
... correctly even after reattempting installation, contact your sales or service representative. • For details about printing the configuration page, see "Wireless LAN Configuration". • p.43 "Test Printing" • p.88 "Wireless LAN Configuration" Installing the IEEE 1284 Interface Board • Before beginning work, ground yourself by printing the configuration page. For details...

Manuals
Page 66
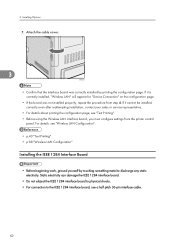
.... If it cannot be installed correctly even after reattempting installation, contact your sales or service representative. • For details about printing the configuration page, see "Test Printing". • p.43 "Test Printing" 64 Installing Options 5. Tighten the two screws to the interface board slot. 3.
.... If it cannot be installed correctly even after reattempting installation, contact your sales or service representative. • For details about printing the configuration page, see "Test Printing". • p.43 "Test Printing" 64 Installing Options 5. Tighten the two screws to the interface board slot. 3.

Manuals
Page 69
... unit: Make sure [Machine Data Encryption] appears in "System Reference". • If the card is in use. For details about printing the configuration page, see "Test Printing". • p.43 "Test Printing" 67
... unit: Make sure [Machine Data Encryption] appears in "System Reference". • If the card is in use. For details about printing the configuration page, see "Test Printing". • p.43 "Test Printing" 67
Manuals
Page 84
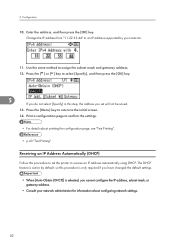
... cannot configure the IP address, subnet mask, or gateway address. • Consult your network administrator for information about printing the configuration page, see "Test Printing". • p.43 "Test Printing" Receiving an IP Address Automatically (DHCP) Follow this procedure is only required if you set the printer to confirm the settings. • For...
... cannot configure the IP address, subnet mask, or gateway address. • Consult your network administrator for information about printing the configuration page, see "Test Printing". • p.43 "Test Printing" Receiving an IP Address Automatically (DHCP) Follow this procedure is only required if you set the printer to confirm the settings. • For...
Manuals
Page 86
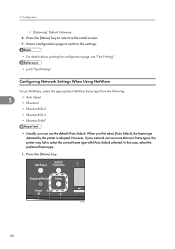
... can use more than two frame types, the printer may fail to confirm the settings. • For details about printing the configuration page, see "Test Printing". • p.43 "Test Printing" Configuring Network Settings When Using NetWare To use the default (Auto Select). Press the [Menu] key to return to the initial screen...
... can use more than two frame types, the printer may fail to confirm the settings. • For details about printing the configuration page, see "Test Printing". • p.43 "Test Printing" Configuring Network Settings When Using NetWare To use the default (Auto Select). Press the [Menu] key to return to the initial screen...

Manuals
Page 87
... default setting, [Auto Select]. Ethernet Configuration 2. Press the [Menu] key to return to confirm the settings. • For details about printing the configuration page, see "Test Printing". • p.43 "Test Printing" Setting the Ethernet Speed You can set the speed that the printer will use , and then press the [OK] key. 6.
... default setting, [Auto Select]. Ethernet Configuration 2. Press the [Menu] key to return to confirm the settings. • For details about printing the configuration page, see "Test Printing". • p.43 "Test Printing" Setting the Ethernet Speed You can set the speed that the printer will use , and then press the [OK] key. 6.

Manuals
Page 89
... Speed], and then press the [OK] key. 5 5. Press the [ ] or [ ] key to confirm the settings. • For details about printing the configuration page, see "Test Printing". • p.43 "Test Printing" 87 Press the [ ] or [ ] key to select [Host Interface], and then press the [OK] key. 3. Ethernet Configuration 2. Press the [ ] or [ ] key to...
... Speed], and then press the [OK] key. 5 5. Press the [ ] or [ ] key to confirm the settings. • For details about printing the configuration page, see "Test Printing". • p.43 "Test Printing" 87 Press the [ ] or [ ] key to select [Host Interface], and then press the [OK] key. 3. Ethernet Configuration 2. Press the [ ] or [ ] key to...
Manuals
Page 92
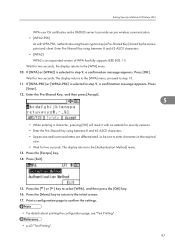
...; For details, see Web Image Monitor Help, and "Using Web Image Monitor", Software Guide. • For details about printing the configuration page, see "Test Printing". • p.43 "Test Printing" Setting the SSID When [Communication Mode] is set , you must specify the Service Set Identifier (SSID) of the wireless access point that the...
...; For details, see Web Image Monitor Help, and "Using Web Image Monitor", Software Guide. • For details about printing the configuration page, see "Test Printing". • p.43 "Test Printing" Setting the SSID When [Communication Mode] is set , you must specify the Service Set Identifier (SSID) of the wireless access point that the...

Manuals
Page 93
... ASCII 0 × 20-0 × 7e (32 bytes). 4. For details, see Web Image Monitor Help. • For details about printing the configuration page, see "Test Printing". • p.43 "Test Printing" Confirming Wireless Network Connectivity After you have installed the Wireless LAN interface unit, use the following procedure to the initial screen. 5 5. Press the...
... ASCII 0 × 20-0 × 7e (32 bytes). 4. For details, see Web Image Monitor Help. • For details about printing the configuration page, see "Test Printing". • p.43 "Test Printing" Confirming Wireless Network Connectivity After you have installed the Wireless LAN interface unit, use the following procedure to the initial screen. 5 5. Press the...

Manuals
Page 96
Press the [ ] or [ ] key to the initial screen. 10. Consult your network administrator for information about printing the configuration page, see "Test Printing". • p.43 "Test Printing" Setting WPA In the case of using 64-bit WEP, up to 26 hexadecimal characters or 13 ASCII characters can be used. • Up ...
Press the [ ] or [ ] key to the initial screen. 10. Consult your network administrator for information about printing the configuration page, see "Test Printing". • p.43 "Test Printing" Setting WPA In the case of using 64-bit WEP, up to 26 hexadecimal characters or 13 ASCII characters can be used. • Up ...
Manuals
Page 99
...] is selected in step 9, a confirmation message appears. The display returns to confirm the settings. • For details about printing the configuration page, see "Test Printing". • p.43 "Test Printing" 97 Wait for two seconds. If [WPA-PSK] or [WPA2-PSK] is selected in step 9, a confirmation message appears. The display returns to the...
...] is selected in step 9, a confirmation message appears. The display returns to confirm the settings. • For details about printing the configuration page, see "Test Printing". • p.43 "Test Printing" 97 Wait for two seconds. If [WPA-PSK] or [WPA2-PSK] is selected in step 9, a confirmation message appears. The display returns to the...
Manuals
Page 193
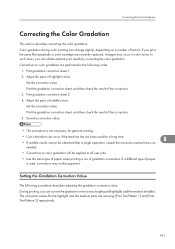
..., you print the same file repeatedly or print cartridge was recently replaced, changes may not be applied to color gradation are set using [Print Test Pattern 1] and [Print Test Pattern 2] respectively. 191 If a different type of paper is not necessary for a long time. • If suitable results cannot be obtained after a single...
..., you print the same file repeatedly or print cartridge was recently replaced, changes may not be applied to color gradation are set using [Print Test Pattern 1] and [Print Test Pattern 2] respectively. 191 If a different type of paper is not necessary for a long time. • If suitable results cannot be obtained after a single...
Manuals
Page 195
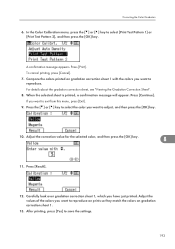
... color, and then press the [OK] key. 8 11. Press [Print]. Press the [ ] or [ ] key to select the color you want to select [Print Test Pattern 1] or [Print Test Pattern 2], and then press the [OK] key. To cancel printing, press [Cancel]. 7. If you want to exit from this menu, press [Exit]. 9. In the...
... color, and then press the [OK] key. 8 11. Press [Print]. Press the [ ] or [ ] key to select the color you want to select [Print Test Pattern 1] or [Print Test Pattern 2], and then press the [OK] key. To cancel printing, press [Cancel]. 7. If you want to exit from this menu, press [Exit]. 9. In the...


