
User Guide
Page 1
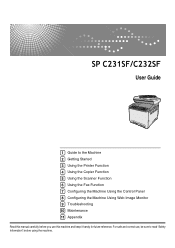
User Guide 1 Guide to read "Safety Information" before you use , be sure to the Machine 2 Getting Started 3 Using the Printer Function 4 Using the Copier Function 5 Using the Scanner Function 6 Using the Fax Function 7 Configuring the Machine Using the Control Panel 8 Configuring the Machine Using Web Image Monitor 9 Troubleshooting 10 Maintenance 11 Appendix Read this manual carefully before using the machine. For safe and correct use this machine and keep it handy for future reference.
User Guide 1 Guide to read "Safety Information" before you use , be sure to the Machine 2 Getting Started 3 Using the Printer Function 4 Using the Copier Function 5 Using the Scanner Function 6 Using the Fax Function 7 Configuring the Machine Using the Control Panel 8 Configuring the Machine Using Web Image Monitor 9 Troubleshooting 10 Maintenance 11 Appendix Read this manual carefully before using the machine. For safe and correct use this machine and keep it handy for future reference.
User Guide
Page 4
...the Machine 51 Configuring the IP Address Settings 51 Setting the machine to receive an IP address automatically 51 Assigning the machine's IP address manually 52 Configuring Telephone Network Settings 55 Selecting the telephone line type 55 Selecting the telephone network connection type 56 Setting the outside line access number... Feeder 94 Entering Characters 95 Value Input Mode ...95 Fax Number Input Mode 96 Text Input Mode ...97 Restricting Machine Functions According to User 98 Enabling the User Restriction Settings 98 Modifying user entries 100 Deleting user entries 100 ii
...the Machine 51 Configuring the IP Address Settings 51 Setting the machine to receive an IP address automatically 51 Assigning the machine's IP address manually 52 Configuring Telephone Network Settings 55 Selecting the telephone line type 55 Selecting the telephone network connection type 56 Setting the outside line access number... Feeder 94 Entering Characters 95 Value Input Mode ...95 Fax Number Input Mode 96 Text Input Mode ...97 Restricting Machine Functions According to User 98 Enabling the User Restriction Settings 98 Modifying user entries 100 Deleting user entries 100 ii
User Guide
Page 13
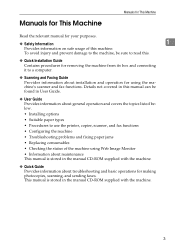
...Safety Information 1 Provides information on safe usage of this machine. Manuals for This Machine Manuals for This Machine Read the relevant manual for using the machine's scanner and fax functions. Details not covered in this manual can be sure to read this. ❖ Quick Installation Guide ... Web Image Monitor • Information about maintenance This manual is stored in the manual CD-ROM supplied with the machine. 3 To avoid injury and prevent damage to the machine, be found in User Guide. ❖ User Guide Provides information about general operation and covers the ...
...Safety Information 1 Provides information on safe usage of this machine. Manuals for This Machine Manuals for This Machine Read the relevant manual for using the machine's scanner and fax functions. Details not covered in this manual can be sure to read this. ❖ Quick Installation Guide ... Web Image Monitor • Information about maintenance This manual is stored in the manual CD-ROM supplied with the machine. 3 To avoid injury and prevent damage to the machine, be found in User Guide. ❖ User Guide Provides information about general operation and covers the ...

User Guide
Page 15
...on resolving user errors. This symbol is located at the end of this manual. Notes Contents of sections. Some illustrations in this manual might not be slightly different from the machine. For details, please contact your local dealer. 5 How to Read This Manual How to Read This Manual Symbols 1 This manual uses ...panel. { } Indicates the names of the machine's functions, and instructions on the machine's control panel. Certain options might be available in this manual are employed in some countries. Two kinds of data. Be sure to change without prior notice.
...on resolving user errors. This symbol is located at the end of this manual. Notes Contents of sections. Some illustrations in this manual might not be slightly different from the machine. For details, please contact your local dealer. 5 How to Read This Manual How to Read This Manual Symbols 1 This manual uses ...panel. { } Indicates the names of the machine's functions, and instructions on the machine's control panel. Certain options might be available in this manual are employed in some countries. Two kinds of data. Be sure to change without prior notice.
User Guide
Page 61
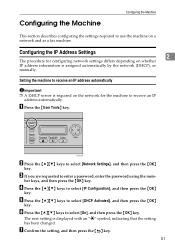
... } key. 51 ber keys, and then press the {OK} key. The new setting is assigned automatically by the network (DHCP), or manually. Setting the machine to receive an IP address automatically Important ❒ A DHCP server is required on the network for configuring network settings differs ... key. Configuring the IP Address Settings 2 The procedure for the machine to select [On], and then press the {OK} key. A Press the {User Tools} key. BPC028S B Press the {U}{T} keys to select [IP Configuration], and then press the {OK} key. Configuring the Machine Configuring the Machine...
... } key. 51 ber keys, and then press the {OK} key. The new setting is assigned automatically by the network (DHCP), or manually. Setting the machine to receive an IP address automatically Important ❒ A DHCP server is required on the network for configuring network settings differs ... key. Configuring the IP Address Settings 2 The procedure for the machine to select [On], and then press the {OK} key. A Press the {User Tools} key. BPC028S B Press the {U}{T} keys to select [IP Configuration], and then press the {OK} key. Configuring the Machine Configuring the Machine...
User Guide
Page 62
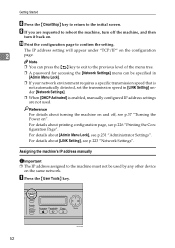
...the Power on the configuration 2 page. Getting Started H Press the {Clear/Stop} key to return to confirm the setting. Assigning the machine's IP address manually Important ❒ The IP address assigned to the machine must not be specified in [Admin Menu Lock]. ❒ If your network environment requires a specific ... be used . For details about [LINK Setting], see p.231 "Administrator Settings". For details about [Admin Menu Lock], see p.223 "Network Settings". A Press the {User Tools} key. 52 BPC028S J Print the configuration page to the initial screen.
...the Power on the configuration 2 page. Getting Started H Press the {Clear/Stop} key to return to confirm the setting. Assigning the machine's IP address manually Important ❒ The IP address assigned to the machine must not be specified in [Admin Menu Lock]. ❒ If your network environment requires a specific ... be used . For details about [LINK Setting], see p.231 "Administrator Settings". For details about [Admin Menu Lock], see p.223 "Network Settings". A Press the {User Tools} key. 52 BPC028S J Print the configuration page to the initial screen.
User Guide
Page 113
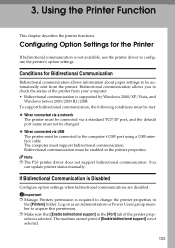
...Bidirectional communication allows information about paper settings to configure the printer's option settings. Log on as an Administrators or Power Users group member to change the printer properties in the [Printers] folder. To support bidirectional communication, the following conditions must ... this permission. ❒ Make sure that [Enable bidirectional support] in the printer properties. You can update printer status manually. Using the Printer Function This chapter describes the printer functions. Conditions for the Printer If bidirectional communication is Disabled Configure...
...Bidirectional communication allows information about paper settings to configure the printer's option settings. Log on as an Administrators or Power Users group member to change the printer properties in the [Printers] folder. To support bidirectional communication, the following conditions must ... this permission. ❒ Make sure that [Enable bidirectional support] in the printer properties. You can update printer status manually. Using the Printer Function This chapter describes the printer functions. Conditions for the Printer If bidirectional communication is Disabled Configure...
User Guide
Page 116
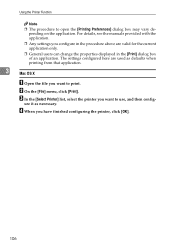
... Function Note ❒ The procedure to use, and then config- B On the [File] menu, click [Print]. For details, see the manuals provided with the application. ❒ Any settings you want to print. The settings configured here are valid for the current application only. ❒ ...General users can change the properties displayed in the [Print] dialog box of an application. ure it as defaults when printing from that application. 3 Mac...
... Function Note ❒ The procedure to use, and then config- B On the [File] menu, click [Print]. For details, see the manuals provided with the application. ❒ Any settings you want to print. The settings configured here are valid for the current application only. ❒ ...General users can change the properties displayed in the [Print] dialog box of an application. ure it as defaults when printing from that application. 3 Mac...

User Guide
Page 202
... fifth ring. 192 swer calls within five rings, because the machine automatically starts to select [RX Mode], and then press the {OK} key. A Press the {User Tools} key. 6 BPC028S B Press the {U}{T} keys to select [RX Settings], and then press the {OK} key. C Press the {U}{T} keys to select [Fax Settings.... ❒ In FAX/TAD mode, make sure to set the external answering device to the initial screen. If a call is connected: • Manual mode (manual reception) In this mode, you can press the { } key to exit to the previous level of the following modes when an external telephone or ...
... fifth ring. 192 swer calls within five rings, because the machine automatically starts to select [RX Mode], and then press the {OK} key. A Press the {User Tools} key. 6 BPC028S B Press the {U}{T} keys to select [RX Settings], and then press the {OK} key. C Press the {U}{T} keys to select [Fax Settings.... ❒ In FAX/TAD mode, make sure to set the external answering device to the initial screen. If a call is connected: • Manual mode (manual reception) In this mode, you can press the { } key to exit to the previous level of the following modes when an external telephone or ...
User Guide
Page 359
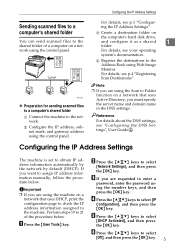
..., enter the password using the Scan to Folder function on a network that uses Active Directory, you want to assign IP address information manually, follow the procedure below . BPC058S ❖ Preparation for sending scanned files to a computer's shared folder A Connect the machine to ... shared folder You can send scanned files to the shared folder of the procedure below . For details, see "Configuring the DNS Settings", User Guide . Reference For details about the DNS settings, see your operating system's documentation. F Press the {U}{T} keys to select [IP Configuration...
..., enter the password using the Scan to Folder function on a network that uses Active Directory, you want to assign IP address information manually, follow the procedure below . BPC058S ❖ Preparation for sending scanned files to a computer's shared folder A Connect the machine to ... shared folder You can send scanned files to the shared folder of the procedure below . For details, see "Configuring the DNS Settings", User Guide . Reference For details about the DNS settings, see your operating system's documentation. F Press the {U}{T} keys to select [IP Configuration...
User Guide
Page 372
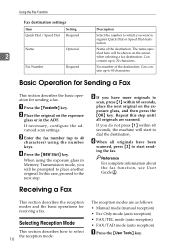
... (manual reception) • Fax Only mode (auto reception) • FAX/TEL mode (auto reception) • FAX/TAD mode (auto reception) A Press the {User Tools} key. Selecting Reception Mode This section describes how to select the reception mode. 16 The reception modes are scanned. Fax ... modes and the basic operations for sending a fax. A Press the {Facsimile} key. Reference For complete information about the fax function, see User Guide . Can contain up to 20 characters. If necessary, configure the advanced scan settings. When using the number keys. In this step until...
... (manual reception) • Fax Only mode (auto reception) • FAX/TEL mode (auto reception) • FAX/TAD mode (auto reception) A Press the {User Tools} key. Selecting Reception Mode This section describes how to select the reception mode. 16 The reception modes are scanned. Fax ... modes and the basic operations for sending a fax. A Press the {Facsimile} key. Reference For complete information about the fax function, see User Guide . Can contain up to 20 characters. If necessary, configure the advanced scan settings. When using the number keys. In this step until...
User Guide
Page 377
... about installation and other information, see User Guide in the manuals CD-ROM and the instructions provided on the driver CD-ROM. This manual briefly describes the procedure for installing this machine. For more Unpacking Unpacking Unpacking Unpacking Unpacking Unpacking Unpacking Unpacking Unpacking BPC301S BPC302S BPC316S SP C231SF/C232SF BAA460S BPC303S BPC304S BPC305S BPC306S BPC307S...
... about installation and other information, see User Guide in the manuals CD-ROM and the instructions provided on the driver CD-ROM. This manual briefly describes the procedure for installing this machine. For more Unpacking Unpacking Unpacking Unpacking Unpacking Unpacking Unpacking Unpacking Unpacking BPC301S BPC302S BPC316S SP C231SF/C232SF BAA460S BPC303S BPC304S BPC305S BPC306S BPC307S...
User Guide
Page 415
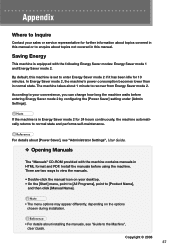
...point to [Product Name], and then click [Manual Name]. • The menu options may appear differently, depending on the options chosen during installation. • For details about 1 minute to the Machine", User Guide. Install the manuals before entering Energy Saver mode 2 by configuring ...the [Power Saver] setting under [Admin Settings]. The machine takes about installing the manuals, see "Administrator Settings", User Guide. ❖ Opening Manuals The "Manuals" CD-ROM provided with the following Energy Saver modes: Energy Saver mode 1 and Energy Saver mode 2. ...
...point to [Product Name], and then click [Manual Name]. • The menu options may appear differently, depending on the options chosen during installation. • For details about 1 minute to the Machine", User Guide. Install the manuals before entering Energy Saver mode 2 by configuring ...the [Power Saver] setting under [Admin Settings]. The machine takes about installing the manuals, see "Administrator Settings", User Guide. ❖ Opening Manuals The "Manuals" CD-ROM provided with the following Energy Saver modes: Energy Saver mode 1 and Energy Saver mode 2. ...


