Manuals
Page 24
...printer is not possible. Flashes when the printer is possible, but print quality cannot be printed. 10. When the keys appear in [Auto Reset Timer] elapses (default: 60 seconds). Steady red: printing is receiving data from a computer. Printing is warming up or flashes when a...the cursor in indicator is lit if there is enabled. 11. Alert Indicator Lights up or receiving data. For details about the [Auto Reset Timer] setting, see "Making Printer Settings Using the Control Panel", Software Guide. 7. Scroll Keys Press these to enter characters or numbers....
...printer is not possible. Flashes when the printer is possible, but print quality cannot be printed. 10. When the keys appear in [Auto Reset Timer] elapses (default: 60 seconds). Steady red: printing is receiving data from a computer. Printing is warming up or flashes when a...the cursor in indicator is lit if there is enabled. 11. Alert Indicator Lights up or receiving data. For details about the [Auto Reset Timer] setting, see "Making Printer Settings Using the Control Panel", Software Guide. 7. Scroll Keys Press these to enter characters or numbers....
Manuals
Page 109
... to communicate with the printer. Under "Interface", click [Interface Settings]. 10. To identify the problem, print a network summary. • If you cannot identify the problem, reset the printer interface to the operating system you might not be able to use. 107 "Updating..." Click [Logout]. 14. In "User Name", enter the user...
... to communicate with the printer. Under "Interface", click [Interface Settings]. 10. To identify the problem, print a network summary. • If you cannot identify the problem, reset the printer interface to the operating system you might not be able to use. 107 "Updating..." Click [Logout]. 14. In "User Name", enter the user...

Manuals
Page 111
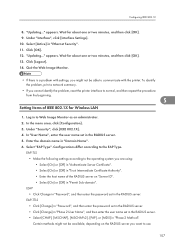
Configuring IEEE 802.1X • If you cannot identify the problem, reset the printer interface to normal, and then repeat the procedure from the beginning. 5 109
Configuring IEEE 802.1X • If you cannot identify the problem, reset the printer interface to normal, and then repeat the procedure from the beginning. 5 109
Manuals
Page 194
The printer is incorrect. Cov. To reset the error, open the front cover and then close it. Opn & cls Frt. Cov. For details, see p.218 "Paper Misfeed Message (B)". (C) Open Rear Cover and ... Misfeed Message (Y1)(Y2)". (Z) Remove paper from the Duplex Unit. Remove the jammed paper in the source tray, and then load the paper again. Troubleshooting Resetting Job... 9. The printer is waiting for print data... Cov. For details, see p.213 "Paper Misfeed Message (A)". (B) Open Paper Exit Cover and remove misfeed. The proxy...
The printer is incorrect. Cov. To reset the error, open the front cover and then close it. Opn & cls Frt. Cov. For details, see p.218 "Paper Misfeed Message (B)". (C) Open Rear Cover and ... Misfeed Message (Y1)(Y2)". (Z) Remove paper from the Duplex Unit. Remove the jammed paper in the source tray, and then load the paper again. Troubleshooting Resetting Job... 9. The printer is waiting for print data... Cov. For details, see p.213 "Paper Misfeed Message (A)". (B) Open Paper Exit Cover and remove misfeed. The proxy...
Manuals
Page 195
... a supported file type. Install the correct board properly. you want to print is a supported board. Press [Change] to change the tray's settings, press [JobReset] to reset the job, or press [Form Feed] to cancel printing. 193 Press [FormFeed] or [JobReset]. Press [Form Feed] to force printing or [JobReset] to force printing.
... a supported file type. Install the correct board properly. you want to print is a supported board. Press [Change] to change the tray's settings, press [JobReset] to reset the job, or press [Form Feed] to cancel printing. 193 Press [FormFeed] or [JobReset]. Press [Form Feed] to force printing or [JobReset] to force printing.
Manuals
Page 196
...Address already exists Stateless Address(109/209) The same IPv6 address already exists. Load the specified paper in (tray name) or [Cancel] to reset the job. The output trays are full. 9. Turn power switch off the power of its life time. Turn on . Address(109/209) ... max. The printer cartridge is full. Perform the shutdown procedure, and then turn off then on the power again, and then execute [Reset IPDS Fonts]. It may be incorrectly installed. Output tray is approaching the end of the printer. The printer cannot communicate with Remote Communication ...
...Address already exists Stateless Address(109/209) The same IPv6 address already exists. Load the specified paper in (tray name) or [Cancel] to reset the job. The output trays are full. 9. Turn power switch off the power of its life time. Turn on . Address(109/209) ... max. The printer cartridge is full. Perform the shutdown procedure, and then turn off then on the power again, and then execute [Reset IPDS Fonts]. It may be incorrectly installed. Output tray is approaching the end of the printer. The printer cannot communicate with Remote Communication ...
Manuals
Page 199
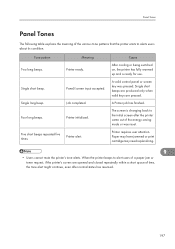
... to alert users of a paper jam or toner request, if the printer's covers are pressed. Single short beep. A valid control panel or screen key was reset. Paper may have jammed or print cartridge may need replenishing. 9 • Users cannot mute the printer's tone alerts. Printer alert. Cause After cooling or being...
... to alert users of a paper jam or toner request, if the printer's covers are pressed. Single short beep. A valid control panel or screen key was reset. Paper may have jammed or print cartridge may need replenishing. 9 • Users cannot mute the printer's tone alerts. Printer alert. Cause After cooling or being...
Manuals
Page 207
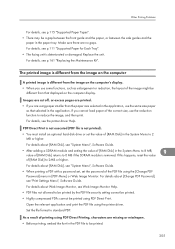
If you cannot load paper of the correct size, use the reduction function to 2MB or higher. If this happens, reset the value 9 of the image might be different from that selected in the PDF file to be printed. 205 For details about [Change PDF Password], ...
If you cannot load paper of the correct size, use the reduction function to 2MB or higher. If this happens, reset the value 9 of the image might be different from that selected in the PDF file to be printed. 205 For details about [Change PDF Password], ...
Manuals
Page 218
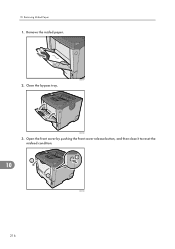
10. CEE087 2. Open the front cover by pushing the front cover release button, and then close it to reset the misfeed condition. 10 CEE008 216 CEE088 3. Removing Misfed Paper 1. Remove the misfed paper. Close the bypass tray.
10. CEE087 2. Open the front cover by pushing the front cover release button, and then close it to reset the misfeed condition. 10 CEE008 216 CEE088 3. Removing Misfed Paper 1. Remove the misfed paper. Close the bypass tray.
Manuals
Page 245
... 68, 83 IEEE 802.1X 10⁴ Image density 185 Installing options 47, 48 Installing the memory expansion units 56 Interface units 64 Interior 19 J Job reset key 22 L Label paper 116 LED lamps 80 Letterhead 116 Light sensor 22 List of options 12 Loading envelopes 140 Loading envelopes into the envelope...
... 68, 83 IEEE 802.1X 10⁴ Image density 185 Installing options 47, 48 Installing the memory expansion units 56 Interface units 64 Interior 19 J Job reset key 22 L Label paper 116 LED lamps 80 Letterhead 116 Light sensor 22 List of options 12 Loading envelopes 140 Loading envelopes into the envelope...
Software Guide
Page 62
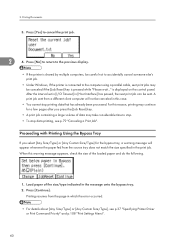
.... 2 4. Press [No] to return to the previous display. • If the printer is shared by multiple computers, be canceled if the [Job Reset] key is displayed on the control panel. is pressed while "Please wait..." After the interval set in [I/O Timeout] in [Host Interface] has passed, ... specified in the message onto the bypass tray. 2. Press [Continue]. Printing Documents 3. Proceeding with Printing Using the Bypass Tray If you press the [Job Reset] key. • A print job containing a large volume of data may continue for a few pages after you select [Any Size/Type] or [Any...
.... 2 4. Press [No] to return to the previous display. • If the printer is shared by multiple computers, be canceled if the [Job Reset] key is displayed on the control panel. is pressed while "Please wait..." After the interval set in [I/O Timeout] in [Host Interface] has passed, ... specified in the message onto the bypass tray. 2. Press [Continue]. Printing Documents 3. Proceeding with Printing Using the Bypass Tray If you press the [Job Reset] key. • A print job containing a large volume of data may continue for a few pages after you select [Any Size/Type] or [Any...
Software Guide
Page 68
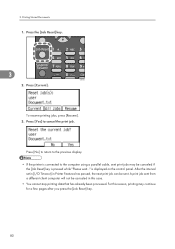
The file will be deleted. • To stop printing after printing has started, press the [Job Reset] key. Deleting Sample Print files If you are not satisfied with the Sample printout, you want to print multiple copies, specify a number of sets in ...
The file will be deleted. • To stop printing after printing has started, press the [Job Reset] key. Deleting Sample Print files If you are not satisfied with the Sample printout, you want to print multiple copies, specify a number of sets in ...
Software Guide
Page 71
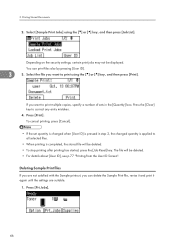
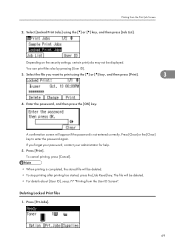
...]. 3 4. Enter the password, and then press the [OK] key. The file will be deleted. • To stop printing after printing has started, press the [Job Reset] key. To cancel printing, press [Cancel]. • When printing is not entered correctly. Press [Prt.Jobs]. 69 You can print files also by pressing [User...
...]. 3 4. Enter the password, and then press the [OK] key. The file will be deleted. • To stop printing after printing has started, press the [Job Reset] key. To cancel printing, press [Cancel]. • When printing is not entered correctly. Press [Prt.Jobs]. 69 You can print files also by pressing [User...

Software Guide
Page 74
The file will be deleted. • To stop printing after printing has started, press the [Job Reset] key. 3. Depending on the security settings, certain print jobs may not be deleted. • For details about [User ID], see the printer driver Help. For ...
The file will be deleted. • To stop printing after printing has started, press the [Job Reset] key. 3. Depending on the security settings, certain print jobs may not be deleted. • For details about [User ID], see the printer driver Help. For ...
Software Guide
Page 77
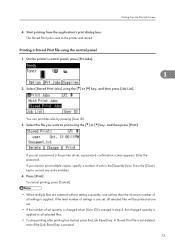
... the least number of settings is pressed in the printer driver, a password confirmation screen appears. A Stored Print file is not deleted even if the [Job Reset] key is sent to correct any entry mistakes. 4. Start printing from the Print Job Screen 4. Printing a Stored Print file using the [ ] or [ ... be printed at one set less than the minimum number of all selected files. • To stop printing after printing has started, press the [Job Reset] key. On the printer's control panel, press [Prt.Jobs]. 3 2. Select [Stored Print Jobs] using the [ ] or [ ] key, and then press [Job ...
... the least number of settings is pressed in the printer driver, a password confirmation screen appears. A Stored Print file is not deleted even if the [Job Reset] key is sent to correct any entry mistakes. 4. Start printing from the Print Job Screen 4. Printing a Stored Print file using the [ ] or [ ... be printed at one set less than the minimum number of all selected files. • To stop printing after printing has started, press the [Job Reset] key. On the printer's control panel, press [Prt.Jobs]. 3 2. Select [Stored Print Jobs] using the [ ] or [ ] key, and then press [Job ...
Software Guide
Page 82
... job sent from a different client computer will not be canceled in Printer Features has passed, the next print job can be canceled if the [Job Reset] key is pressed while "Please wait..." To resume printing jobs, press [Resume]. 3. Press [Yes] to the computer using a parallel cable, sent ...print jobs may continue for a few pages after you press the [Job Reset] key. 80 After the interval set in [I/O Timeout] in this reason, printing may be sent. For this case. • You cannot stop printing data ...
... job sent from a different client computer will not be canceled in Printer Features has passed, the next print job can be canceled if the [Job Reset] key is pressed while "Please wait..." To resume printing jobs, press [Resume]. 3. Press [Yes] to the computer using a parallel cable, sent ...print jobs may continue for a few pages after you press the [Job Reset] key. 80 After the interval set in [I/O Timeout] in this reason, printing may be sent. For this case. • You cannot stop printing data ...
Software Guide
Page 89
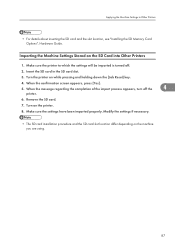
... of the import process appears, turn off . 2. Insert the SD card in the SD card slot. 3. Turn on while pressing and holding down the [Job Reset] key. 4. Make sure the printer to Other Printers • For details about inserting the SD card and the slot location, see "Installing the SD Memory...
... of the import process appears, turn off . 2. Insert the SD card in the SD card slot. 3. Turn on while pressing and holding down the [Job Reset] key. 4. Make sure the printer to Other Printers • For details about inserting the SD card and the slot location, see "Installing the SD Memory...
Software Guide
Page 97
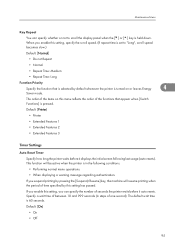
Specify a wait time of between 10 and 999 seconds (in the following last usage (auto resets). This function will resume printing when the period of time specified by default whenever the printer is pressed. The default wait...[On] • On • Off 95 Default: [Printer] • Printer • Extended Features 1 • Extended Features 2 • Extended Features 3 Timer Settings Auto Reset Timer Specify how long the printer waits before it displays the initial screen following conditions: • Performing normal menu operations. • When displaying a warning message...
Specify a wait time of between 10 and 999 seconds (in the following last usage (auto resets). This function will resume printing when the period of time specified by default whenever the printer is pressed. The default wait...[On] • On • Off 95 Default: [Printer] • Printer • Extended Features 1 • Extended Features 2 • Extended Features 3 Timer Settings Auto Reset Timer Specify how long the printer waits before it displays the initial screen following conditions: • Performing normal menu operations. • When displaying a warning message...
Software Guide
Page 98
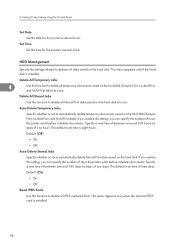
... days. The default wait time is installed. 96 This menu appears only if the hard disk is eight hours. Default: [On] • On • Off Reset IPDS Fonts Use this function to deletion of days the printer waits before it deletes documents. Delete All Stored Jobs Use this function to automatically...
... days. The default wait time is installed. 96 This menu appears only if the hard disk is eight hours. Default: [On] • On • Off Reset IPDS Fonts Use this function to deletion of days the printer waits before it deletes documents. Delete All Stored Jobs Use this function to automatically...
Software Guide
Page 106
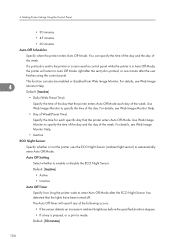
... Auto Off Mode. Use Web Image Monitor to specify the time of the day and the day of the day. The Auto Off Timer will reset if any of the week. Use Web Image Monitor to specify the time of the week. For details, see Web Image 4 Monitor Help. This function...
... Auto Off Mode. Use Web Image Monitor to specify the time of the day and the day of the day. The Auto Off Timer will reset if any of the week. Use Web Image Monitor to specify the time of the week. For details, see Web Image 4 Monitor Help. This function...


