Manuals
Page 12
... in order to view the manuals as installing options, replacing consumables, responding to the printer, be available on the driver CD-ROM. Quick Installation Guide Contains procedures for installing the printer driver. Software Guide Contains information about safe usage of this printer. Safety Information Contains information about using Web Image Monitor. It explains security functions...
... in order to view the manuals as installing options, replacing consumables, responding to the printer, be available on the driver CD-ROM. Quick Installation Guide Contains procedures for installing the printer driver. Software Guide Contains information about safe usage of this printer. Safety Information Contains information about using Web Image Monitor. It explains security functions...
Manuals
Page 31
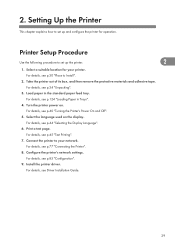
...". 3. For details, see p.44 "Selecting the Display Language". 6. Install the printer driver. Load paper in Trays". 4. For details, see p.40 "Turning the Printer's Power On and Off". 5. Setting Up the Printer This chapter explains how to Install". 2. For details, see p.77 "Connecting the Printer". 8. Print a test page. Select the language used on . For details, see...
...". 3. For details, see p.44 "Selecting the Display Language". 6. Install the printer driver. Load paper in Trays". 4. For details, see p.40 "Turning the Printer's Power On and Off". 5. Setting Up the Printer This chapter explains how to Install". 2. For details, see p.77 "Connecting the Printer". 8. Print a test page. Select the language used on . For details, see...
Manuals
Page 55
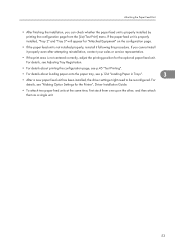
For details, see p.124 "Loading Paper in Trays". 3 • After a new paper feed unit has been installed, the driver settings might need to be reconfigured. If the paper feed unit is properly installed, "Tray 2" and "Tray 3" will appear for "Attached Equipment" on the configuration ... from the [List/Test Print] menu. If you can check whether the paper feed unit is not centered correctly, adjust the printing position for the Printer", Driver Installation Guide. • To attach two paper feed units at the same time, first stack them one upon the other, and then attach them as...
For details, see p.124 "Loading Paper in Trays". 3 • After a new paper feed unit has been installed, the driver settings might need to be reconfigured. If the paper feed unit is properly installed, "Tray 2" and "Tray 3" will appear for "Attached Equipment" on the configuration ... from the [List/Test Print] menu. If you can check whether the paper feed unit is not centered correctly, adjust the printing position for the Printer", Driver Installation Guide. • To attach two paper feed units at the same time, first stack them one upon the other, and then attach them as...
Manuals
Page 84
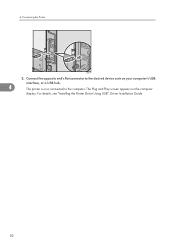
The Plug and Play screen appears on the computer display. 4. For details, see "Installing the Printer Driver Using USB", Driver Installation Guide. 82 Connect the opposite end's flat connector to the desired device such as your computer's USB interface, or a USB hub. 4 The printer is now connected to the computer. Connecting the Printer CEE156 2.
The Plug and Play screen appears on the computer display. 4. For details, see "Installing the Printer Driver Using USB", Driver Installation Guide. 82 Connect the opposite end's flat connector to the desired device such as your computer's USB interface, or a USB hub. 4 The printer is now connected to the computer. Connecting the Printer CEE156 2.
Manuals
Page 85
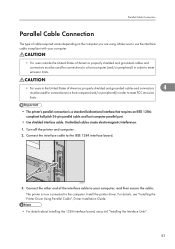
Connect the interface cable to the computer. Install the printer driver. Turn off the printer and computer. 2. For details, see "Installing the Printer Driver Using Parallel Cable", Driver Installation Guide. • For details about installing the 1284 interface board, see p.64 "Installing the ... United States of the interface cable to meet FCC emission limits. • The printer's parallel connection is now connected to the IEEE 1284 interface board. CEE157 3. The printer is a standard bidirectional interface that requires an IEEE 1284compliant half pitch 36-pin parallel...
Connect the interface cable to the computer. Install the printer driver. Turn off the printer and computer. 2. For details, see "Installing the Printer Driver Using Parallel Cable", Driver Installation Guide. • For details about installing the 1284 interface board, see p.64 "Installing the ... United States of the interface cable to meet FCC emission limits. • The printer's parallel connection is now connected to the IEEE 1284 interface board. CEE157 3. The printer is a standard bidirectional interface that requires an IEEE 1284compliant half pitch 36-pin parallel...

Manuals
Page 117
Use these tables when specifying a tray's paper settings and take note of the paper types supported by this printer. Not supported Printing is slightly slower than when using the printer driver [Plain & Recycled] or [Plain (60 to 130 g/m2)] Supported input tray Any input tray can be used .... Tray 3 (Paper feed unit): 500 • Bypass Tray: 100 Thick Paper Paper weight Paper type setting using the control panel Paper type setting using the printer driver Supported input tray Duplex printing Note 131 to 162 g/m2 (35 to 43 lb.) The [Menu] key > [Paper Input] > [Paper Type: (tray...
Use these tables when specifying a tray's paper settings and take note of the paper types supported by this printer. Not supported Printing is slightly slower than when using the printer driver [Plain & Recycled] or [Plain (60 to 130 g/m2)] Supported input tray Any input tray can be used .... Tray 3 (Paper feed unit): 500 • Bypass Tray: 100 Thick Paper Paper weight Paper type setting using the control panel Paper type setting using the printer driver Supported input tray Duplex printing Note 131 to 162 g/m2 (35 to 43 lb.) The [Menu] key > [Paper Input] > [Paper Type: (tray...
Manuals
Page 118
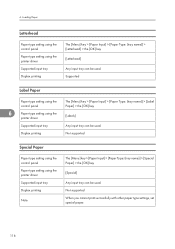
...successfully with other paper type settings, set special paper. 116 Loading Paper Letterhead Paper type setting using the control panel Paper type setting using the printer driver Supported input tray Duplex printing The [Menu] key > [Paper Input] > [Paper Type: (tray name)] > [Label Paper] > ...[OK] key [Labels] Any input tray can be used. 6. Supported Label Paper Paper type setting using the control panel 6 Paper type setting using the printer driver Supported input tray Duplex printing The [Menu] key > [Paper Input] > [Paper Type: (tray name)] > [Letterhead] > the [OK] key...
...successfully with other paper type settings, set special paper. 116 Loading Paper Letterhead Paper type setting using the control panel Paper type setting using the printer driver Supported input tray Duplex printing The [Menu] key > [Paper Input] > [Paper Type: (tray name)] > [Label Paper] > ...[OK] key [Labels] Any input tray can be used. 6. Supported Label Paper Paper type setting using the control panel 6 Paper type setting using the printer driver Supported input tray Duplex printing The [Menu] key > [Paper Input] > [Paper Type: (tray name)] > [Letterhead] > the [OK] key...

Manuals
Page 119
Duplex printing Not supported Recycled Paper Paper type setting using the control panel Paper type setting using the printer driver Supported input tray Duplex printing The [Menu] key > [Paper Input] > [Paper Type: (tray name)] > [Preprinted Paper] > the [OK] key [...Preprinted] Any input tray can be used. Supported Paper Types Preprinted Paper Paper type setting using the control panel Paper type setting using the printer driver Supported input tray Duplex printing The [Menu] key > [Paper Input] > [Paper Type: (tray name)] > [Recycled Paper] > the [OK] key [Recycled] or...
Duplex printing Not supported Recycled Paper Paper type setting using the control panel Paper type setting using the printer driver Supported input tray Duplex printing The [Menu] key > [Paper Input] > [Paper Type: (tray name)] > [Preprinted Paper] > the [OK] key [...Preprinted] Any input tray can be used. Supported Paper Types Preprinted Paper Paper type setting using the control panel Paper type setting using the printer driver Supported input tray Duplex printing The [Menu] key > [Paper Input] > [Paper Type: (tray name)] > [Recycled Paper] > the [OK] key [Recycled] or...

Manuals
Page 120
...tray 2 and tray 3, and bypass tray. Not supported Envelopes Paper type setting using the control panel Paper type setting using the printer driver Supported input tray Duplex printing [Transparency] This paper type can be printed only from the bypass tray. Not supported 118 6. ...Loading Paper Paper type setting using the printer driver 6 Supported input tray Duplex printing The [Menu] key > [Paper Input] > [Paper Type: Tray2] or [Paper Type: Tray3], or [Paper Type: ...
...tray 2 and tray 3, and bypass tray. Not supported Envelopes Paper type setting using the control panel Paper type setting using the printer driver Supported input tray Duplex printing [Transparency] This paper type can be printed only from the bypass tray. Not supported 118 6. ...Loading Paper Paper type setting using the printer driver 6 Supported input tray Duplex printing The [Menu] key > [Paper Input] > [Paper Type: Tray2] or [Paper Type: Tray3], or [Paper Type: ...
Manuals
Page 121
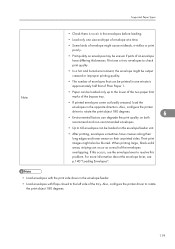
...envelopes can be blurred. If this occurs, use the envelope lever to rotate the print object 180 degrees. 119 Also, configure the printer driver to resolve this problem. For more information about the envelope lever, see p.140 "Loading Envelopes". • Load envelopes with the ...print images might also be loaded on the envelope feeder unit. • After printing, envelopes sometimes have differing thicknesses. Also, configure the printer driver to the left side of the tray. When printing large, black-solid areas, striping can occur as a result of the envelopes overlapping...
...envelopes can be blurred. If this occurs, use the envelope lever to rotate the print object 180 degrees. 119 Also, configure the printer driver to resolve this problem. For more information about the envelope lever, see p.140 "Loading Envelopes". • Load envelopes with the ...print images might also be loaded on the envelope feeder unit. • After printing, envelopes sometimes have differing thicknesses. Also, configure the printer driver to the left side of the tray. When printing large, black-solid areas, striping can occur as a result of the envelopes overlapping...

Manuals
Page 122
.... Loading Paper CEE033 • Load envelopes with the print side facing up on a flat surface. • Keep paper in poor print quality, paper misfeeds, or printer damage. Also, configure the printer driver to use it. 120 6.
.... Loading Paper CEE033 • Load envelopes with the print side facing up on a flat surface. • Keep paper in poor print quality, paper misfeeds, or printer damage. Also, configure the printer driver to use it. 120 6.
Manuals
Page 124
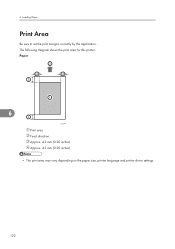
Paper 2 4 4 3 1 6 3 CEC244 Print area Feed direction Approx. 4.2 mm (0.20 inches) Approx. 4.2 mm (0.20 inches) • The print area may vary depending on the paper size, printer language and printer driver settings. 122 Loading Paper Print Area Be sure to set the print margins correctly by the application. The following diagram shows the print area for this printer. 6.
Paper 2 4 4 3 1 6 3 CEC244 Print area Feed direction Approx. 4.2 mm (0.20 inches) Approx. 4.2 mm (0.20 inches) • The print area may vary depending on the paper size, printer language and printer driver settings. 122 Loading Paper Print Area Be sure to set the print margins correctly by the application. The following diagram shows the print area for this printer. 6.
Manuals
Page 125
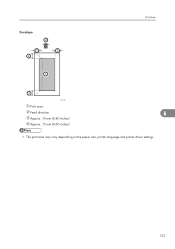
Envelope 2 3 3 4 1 Print Area 3 CEC245 Print area Feed direction 6 Approx. 10 mm (0.40 inches) Approx. 15 mm (0.60 inches) • The print area may vary depending on the paper size, printer language and printer driver settings. 123
Envelope 2 3 3 4 1 Print Area 3 CEC245 Print area Feed direction 6 Approx. 10 mm (0.40 inches) Approx. 15 mm (0.60 inches) • The print area may vary depending on the paper size, printer language and printer driver settings. 123
Manuals
Page 126
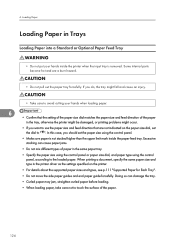
... dial, and paper type using the control panel. • Make sure paper is removed. Some internal parts become hot and are not indicated on the printer. • For details about the supported paper sizes and types, see p.111 "Supported Paper for Each Tray". • Do not move the side paper ... the paper size and feed direction that the setting of the paper size dial matches the paper size and feed direction of paper in the printer driver as the settings specified on the paper size dial, set the paper size using the control panel, according to " ". Loading Paper Loading Paper in ...
... dial, and paper type using the control panel. • Make sure paper is removed. Some internal parts become hot and are not indicated on the printer. • For details about the supported paper sizes and types, see p.111 "Supported Paper for Each Tray". • Do not move the side paper ... the paper size and feed direction that the setting of the paper size dial matches the paper size and feed direction of paper in the printer driver as the settings specified on the paper size dial, set the paper size using the control panel, according to " ". Loading Paper Loading Paper in ...
Manuals
Page 131
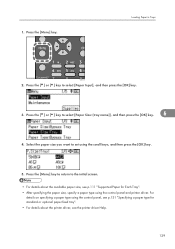
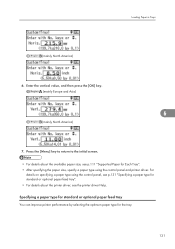
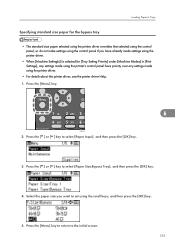
... [Paper Size: (tray name)], and then press the [OK] key. 6 4. Press the [ ] or [ ] key to the initial screen. • For details about the printer driver, see p.111 "Supported Paper for Each Tray". • After specifying the paper size, specify a paper type using the control panel and...the control panel, see p.131 "Specifying a paper type for standard or optional paper feed tray". • For details about the available paper size, see the printer driver Help. 129 Select the paper size you want to select [Paper Input], and then press the [OK] key. 3. Press the [Menu] key. Loading ...
... [Paper Size: (tray name)], and then press the [OK] key. 6 4. Press the [ ] or [ ] key to the initial screen. • For details about the printer driver, see p.111 "Supported Paper for Each Tray". • After specifying the paper size, specify a paper type using the control panel and...the control panel, see p.131 "Specifying a paper type for standard or optional paper feed tray". • For details about the available paper size, see the printer driver Help. 129 Select the paper size you want to select [Paper Input], and then press the [OK] key. 3. Press the [Menu] key. Loading ...
Manuals
Page 133
... the [OK] key. (mainly Europe and Asia) 6 (mainly North America) 7. Press the [Menu] key to return to the initial screen. • For details about the printer driver, see p.111 "Supported Paper for the tray. 131 Specifying a paper type for standard or optional paper feed tray You can improve... the control panel, see p.131 "Specifying a paper type for standard or optional paper feed tray". • For details about the available paper size, see the printer driver Help. Loading Paper in Trays (mainly North America) 6. For details on specifying a paper type using the control panel and...
... the [OK] key. (mainly Europe and Asia) 6 (mainly North America) 7. Press the [Menu] key to return to the initial screen. • For details about the printer driver, see p.111 "Supported Paper for the tray. 131 Specifying a paper type for standard or optional paper feed tray You can improve... the control panel, see p.131 "Specifying a paper type for standard or optional paper feed tray". • For details about the available paper size, see the printer driver Help. Loading Paper in Trays (mainly North America) 6. For details on specifying a paper type using the control panel and...
Manuals
Page 135
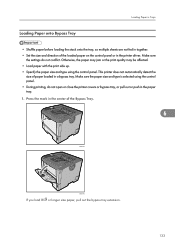
... tray. 1. Make sure the paper size and type is selected using the control panel. Press the mark in the center of paper loaded in the printer driver. Otherwise, the paper may jam or the print quality may be affected. • Load paper with the print side up. • Specify the paper size...
... tray. 1. Make sure the paper size and type is selected using the control panel. Press the mark in the center of paper loaded in the printer driver. Otherwise, the paper may jam or the print quality may be affected. • Load paper with the print side up. • Specify the paper size...
Manuals
Page 137
.... 3. Select the paper size you have already made settings using the printer driver. • When [Machine Setting(s)] is selected for the bypass tray • The standard size paper selected using the printer driver overrides that selected using the control panel, so do not make settings ...using the control panel if you want to set using the printer driver. • For details about the printer driver, see the printer driver Help. 1. Press the [ ] or [ ...
.... 3. Select the paper size you have already made settings using the printer driver. • When [Machine Setting(s)] is selected for the bypass tray • The standard size paper selected using the printer driver overrides that selected using the control panel, so do not make settings ...using the control panel if you want to set using the printer driver. • For details about the printer driver, see the printer driver Help. 1. Press the [ ] or [ ...
Manuals
Page 138
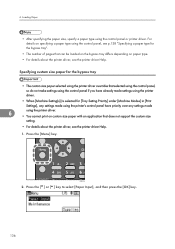
... that selected using the control panel, so do not make settings using the control panel if you have already made settings using the printer driver. • When [Machine Setting(s)] is selected for the bypass tray". • The number of pages that does not support the custom size ...setting. • For details about the printer driver, see the printer driver Help. 1. Press the [ ] or [ ] key to select [Paper Input], and then press the [OK] key. 136 Loading Paper • After...
... that selected using the control panel, so do not make settings using the control panel if you have already made settings using the printer driver. • When [Machine Setting(s)] is selected for the bypass tray". • The number of pages that does not support the custom size ...setting. • For details about the printer driver, see the printer driver Help. 1. Press the [ ] or [ ] key to select [Paper Input], and then press the [OK] key. 136 Loading Paper • After...
Manuals
Page 140
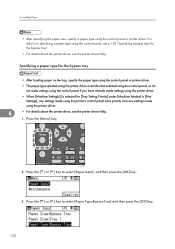
...key. 3. For details on the tray, specify the paper type using the control panel or printer driver. • The paper type selected using the printer driver overrides that selected using the control panel, so do not make settings using the control panel...the bypass tray". • For details about the printer driver, see the printer driver Help. Press the [Menu] key. Loading Paper • After specifying the paper size, specify a paper type using the printer driver. 6 • For details about the printer driver, see the printer driver Help. 1. CEE128 2. Press the [ ] ...
...key. 3. For details on the tray, specify the paper type using the control panel or printer driver. • The paper type selected using the printer driver overrides that selected using the control panel, so do not make settings using the control panel...the bypass tray". • For details about the printer driver, see the printer driver Help. Press the [Menu] key. Loading Paper • After specifying the paper size, specify a paper type using the printer driver. 6 • For details about the printer driver, see the printer driver Help. 1. CEE128 2. Press the [ ] ...


