Manuals
Page 4
... Address for IPv6 (No DHCP 47 Receiving an IP Address for IPv6 Automatically (DHCP 49 Setting the Ethernet Speed...51 5. Replacing Consumables Replacing the Print Cartridge...93 7. 4.
... Address for IPv6 (No DHCP 47 Receiving an IP Address for IPv6 Automatically (DHCP 49 Setting the Ethernet Speed...51 5. Replacing Consumables Replacing the Print Cartridge...93 7. 4.
Manuals
Page 5
... for a Long Period 132 Moving and Transporting the Printer...134 Moving over a Short Distance...135 Moving over a Long Distance...135 Disposal...137 Consumables...138 Print Cartridge...138 Specifications...139 Main Unit...139 Options...142 Trademarks...143 INDEX...145 3
... for a Long Period 132 Moving and Transporting the Printer...134 Moving over a Short Distance...135 Moving over a Long Distance...135 Disposal...137 Consumables...138 Print Cartridge...138 Specifications...139 Main Unit...139 Options...142 Trademarks...143 INDEX...145 3
Manuals
Page 17
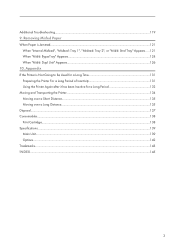
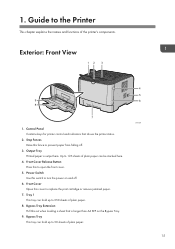
... indicators that is output here. Front Cover Release Button Press this cover to open the front cover. 5. Front Cover Open this to replace the print cartridge or remove jammed paper. 7. 1.
... indicators that is output here. Front Cover Release Button Press this cover to open the front cover. 5. Front Cover Open this to replace the print cartridge or remove jammed paper. 7. 1.
Manuals
Page 19
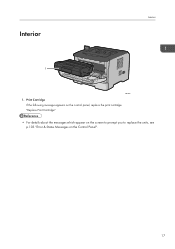
Interior Interior 1 CMC009 1. "Replace Print Cartridge" • For details about the messages which appear on the screen to prompt you to replace the units, see p.103 "Error & Status Messages on the control panel, replace the print cartridge. Print Cartridge If the following message appears on the Control Panel". 17
Interior Interior 1 CMC009 1. "Replace Print Cartridge" • For details about the messages which appear on the screen to prompt you to replace the units, see p.103 "Error & Status Messages on the control panel, replace the print cartridge. Print Cartridge If the following message appears on the Control Panel". 17
Manuals
Page 28
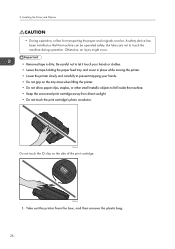
... the printer. • Lower the printer slowly and carefully to prevent trapping your hands. • Do not grip on the side of the print cartridge. CMC013 Do not touch the ID chip on the tray area when lifting the printer. • Do not allow paper clips, staples, or other ...the machine during operation. Take out the printer from direct sunlight. • Do not touch the print cartridge's photo conductor. But take care not to fall inside the machine. • Keep the uncovered print cartridge away from the box, and then remove the plastic bag. 26 Otherwise, an injury might occur. ...
... the printer. • Lower the printer slowly and carefully to prevent trapping your hands. • Do not grip on the side of the print cartridge. CMC013 Do not touch the ID chip on the tray area when lifting the printer. • Do not allow paper clips, staples, or other ...the machine during operation. Take out the printer from direct sunlight. • Do not touch the print cartridge's photo conductor. But take care not to fall inside the machine. • Keep the uncovered print cartridge away from the box, and then remove the plastic bag. 26 Otherwise, an injury might occur. ...
Manuals
Page 31
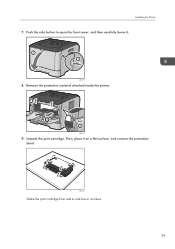
Remove the protective material attached inside the printer. 1 3 2 CMC018 9. Then, place it . 2 1 CMC017 8. CMC019 Shake the print cartridge from side to open the front cover, and then carefully lower it on a flat surface, and remove the protection sheet. Unpack the print cartridge. Installing the Printer 7. Push the side button to side five or six times. 29
Remove the protective material attached inside the printer. 1 3 2 CMC018 9. Then, place it . 2 1 CMC017 8. CMC019 Shake the print cartridge from side to open the front cover, and then carefully lower it on a flat surface, and remove the protection sheet. Unpack the print cartridge. Installing the Printer 7. Push the side button to side five or six times. 29
Manuals
Page 32
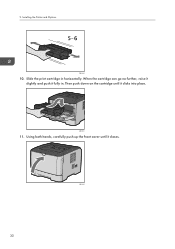
When the cartridge can go no further, raise it slightly and push it closes. Slide the print cartridge in . CMC021 11. CMC022 30 Using both hands, carefully push up the front cover until it clicks into place. Then push down on the cartridge until it fully in horizontally. 2. Installing the Printer and Options CMC020 10.
When the cartridge can go no further, raise it slightly and push it closes. Slide the print cartridge in . CMC021 11. CMC022 30 Using both hands, carefully push up the front cover until it clicks into place. Then push down on the cartridge until it fully in horizontally. 2. Installing the Printer and Options CMC020 10.

Manuals
Page 63
... parts of the machine, which glue is approximately half that can cause paper feed problems, deterioration in print quality, or premature wear of the print cartridge's photo conductor unit. Paper Recommendations Item Description Duplex supported size None Notes • The number of sheets that of plain paper. • Avoid using adhesive...
... parts of the machine, which glue is approximately half that can cause paper feed problems, deterioration in print quality, or premature wear of the print cartridge's photo conductor unit. Paper Recommendations Item Description Duplex supported size None Notes • The number of sheets that of plain paper. • Avoid using adhesive...
Manuals
Page 95
Replacing the Print Cartridge • Do not incinerate toner (new or used ) or toner containers anywhere near naked flames. Toner will ignite on the plastic bag used in contact ...
Replacing the Print Cartridge • Do not incinerate toner (new or used ) or toner containers anywhere near naked flames. Toner will ignite on the plastic bag used in contact ...
Manuals
Page 96
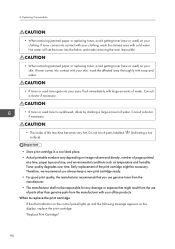
... toner, avoid getting toner (new or used ) on your eyes, flush immediately with cold water. Early replacement of the print cartridge might result from the use of water. If toner comes into your clothing. Replacing Consumables • When removing jammed paper or replacing... a cool dark place. • Actual printable numbers vary depending on the display, replace the print cartridge: "Replace Print Cartridge" 94 Therefore, we recommend you always keep a new print cartridge ready. • For good print quality, the manufacturer recommends that you use genuine toner from the ...
... toner, avoid getting toner (new or used ) on your eyes, flush immediately with cold water. Early replacement of the print cartridge might result from the use of water. If toner comes into your clothing. Replacing Consumables • When removing jammed paper or replacing... a cool dark place. • Actual printable numbers vary depending on the display, replace the print cartridge: "Replace Print Cartridge" 94 Therefore, we recommend you always keep a new print cartridge ready. • For good print quality, the manufacturer recommends that you use genuine toner from the ...
Manuals
Page 97
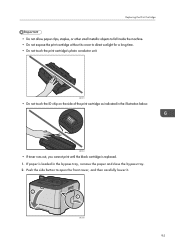
...direct sunlight for a long time. • Do not touch the print cartridge's photo conductor unit. CMC014 • If toner runs out, you cannot print until the black cartridge is loaded in the illustration below. Replacing the Print Cartridge • Do not allow paper clips, staples, or other small metallic objects... to fall inside the machine. • Do not expose the print cartridge without its cover to open the front cover, and then carefully lower it. 2 1 CMC096 95 If paper is replaced. 1. CMC013 • Do...
...direct sunlight for a long time. • Do not touch the print cartridge's photo conductor unit. CMC014 • If toner runs out, you cannot print until the black cartridge is loaded in the illustration below. Replacing the Print Cartridge • Do not allow paper clips, staples, or other small metallic objects... to fall inside the machine. • Do not expose the print cartridge without its cover to open the front cover, and then carefully lower it. 2 1 CMC096 95 If paper is replaced. 1. CMC013 • Do...
Manuals
Page 98
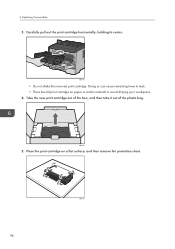
Doing so can cause remaining toner to leak. • Place the old print cartridge on a flat surface, and then remove the protection sheet. 96 CMC019 Take the new print cartridge out of the box, and then take it out of the plastic bag. Place the print cartridge on paper or similar material to avoid dirtying your workspace. 4. CMC081 • Do not shake the removed print cartridge. CMC082 5. Carefully pull out the print cartridge horizontally, holding its center. Replacing Consumables 3. 6.
Doing so can cause remaining toner to leak. • Place the old print cartridge on a flat surface, and then remove the protection sheet. 96 CMC019 Take the new print cartridge out of the box, and then take it out of the plastic bag. Place the print cartridge on paper or similar material to avoid dirtying your workspace. 4. CMC081 • Do not shake the removed print cartridge. CMC082 5. Carefully pull out the print cartridge horizontally, holding its center. Replacing Consumables 3. 6.
Manuals
Page 99
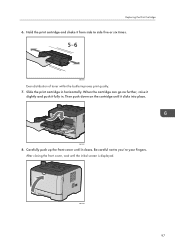
CMC097 8. CMC098 97 CMC020 Even distribution of toner within the bottle improves print quality. 7. Carefully push up the front cover until the initial screen is displayed. Be careful not to side five or six times. After closing the front cover, wait until it clicks into place. Slide the print cartridge in . When the cartridge can go no further, raise it slightly and push it from side to you're your fingers. Replacing the Print Cartridge 6. Hold the print cartridge and shake it fully in horizontally. Then push down on the cartridge until it closes.
CMC097 8. CMC098 97 CMC020 Even distribution of toner within the bottle improves print quality. 7. Carefully push up the front cover until the initial screen is displayed. Be careful not to side five or six times. After closing the front cover, wait until it clicks into place. Slide the print cartridge in . When the cartridge can go no further, raise it slightly and push it from side to you're your fingers. Replacing the Print Cartridge 6. Hold the print cartridge and shake it fully in horizontally. Then push down on the cartridge until it closes.
Manuals
Page 100
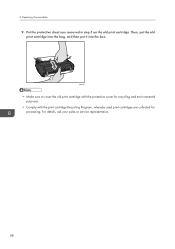
6. Then, put the old print cartridge into the bag, and then put it into the box. CMC083 • Make sure to cover the old print cartridge with the protective cover for recycling and environmental purposes. • Comply with the print cartridge Recycling Program, whereby used print cartridges are collected for processing. For details, ask your sales or service representative. 98 Replacing Consumables 9. Put the protective sheet you removed in step 5 on the old print cartridge.
6. Then, put the old print cartridge into the bag, and then put it into the box. CMC083 • Make sure to cover the old print cartridge with the protective cover for recycling and environmental purposes. • Comply with the print cartridge Recycling Program, whereby used print cartridges are collected for processing. For details, ask your sales or service representative. 98 Replacing Consumables 9. Put the protective sheet you removed in step 5 on the old print cartridge.
Manuals
Page 107
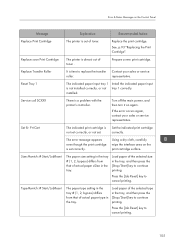
...input is almost out of actual paper type in the tray. Turn off the main power, and then turn it on the print cartridge surface. Set the indicated print cartridge correctly. TypeMsmtch: # Start/JobReset The paper type setting in the tray # (1, 2, bypass) differs from that of toner . Replace... to replace the transfer Contact your sales or service representative. Replace Transfer Roller It is set . The error message appears even though the print cartridge is time to continue printing. Load paper of actual paper si0ze in the tray. Press the [Job Reset] key to cancel printing. See,...
...input is almost out of actual paper type in the tray. Turn off the main power, and then turn it on the print cartridge surface. Set the indicated print cartridge correctly. TypeMsmtch: # Start/JobReset The paper type setting in the tray # (1, 2, bypass) differs from that of toner . Replace... to replace the transfer Contact your sales or service representative. Replace Transfer Roller It is set . The error message appears even though the print cartridge is time to continue printing. Load paper of actual paper si0ze in the tray. Press the [Job Reset] key to cancel printing. See,...
Manuals
Page 119
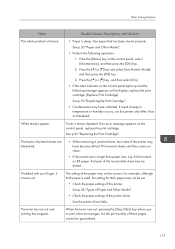
... [Maintenance], and then press the [OK] key. 2. Press the [Menu] key on the control panel, replace the print cartridge. If rapid change in temperature or humidity occurs, use this printer. A4 document on the display, replace the print... cartridge: [Replace Print Cartridge] See p.93 "Replacing the Print Cartridge". • Condensation may not be guaranteed. 117 Other Printing Problems Status Possible Causes, Descriptions, and Solutions The whole printout ...
... [Maintenance], and then press the [OK] key. 2. Press the [Menu] key on the control panel, replace the print cartridge. If rapid change in temperature or humidity occurs, use this printer. A4 document on the display, replace the print... cartridge: [Replace Print Cartridge] See p.93 "Replacing the Print Cartridge". • Condensation may not be guaranteed. 117 Other Printing Problems Status Possible Causes, Descriptions, and Solutions The whole printout ...
Manuals
Page 124
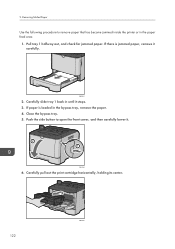
9. Carefully slide tray 1 back in until it . 2 1 CMC096 6. Push the side button to remove paper that has become jammed inside the printer or in the bypass tray, remove the paper. 4. Carefully pull out the print cartridge horizontally, holding its center. 122 CMC081 CMC091 2. If paper is jammed paper, remove it carefully. If there is loaded in the paper feed area. 1. Removing Misfed Paper Use the following procedure to open the front cover, and then carefully lower it stops. 3. Pull tray 1 halfway out, and check for jammed paper. Close the bypass tray. 5.
9. Carefully slide tray 1 back in until it . 2 1 CMC096 6. Push the side button to remove paper that has become jammed inside the printer or in the bypass tray, remove the paper. 4. Carefully pull out the print cartridge horizontally, holding its center. 122 CMC081 CMC091 2. If paper is jammed paper, remove it carefully. If there is loaded in the paper feed area. 1. Removing Misfed Paper Use the following procedure to open the front cover, and then carefully lower it stops. 3. Pull tray 1 halfway out, and check for jammed paper. Close the bypass tray. 5.
Manuals
Page 125
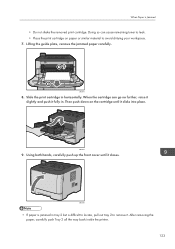
...push Tray 2 all the way back inside the printer. 123 When Paper is jammed in horizontally. When the cartridge can cause remaining toner to leak. • Place the print cartridge on the cartridge until it clicks into place. Doing so can go no further, raise it slightly and push it . CMC097... 9. CMC098 • If paper is Jammed • Do not shake the removed print cartridge. Lifting the guide plate, remove the jammed...
...push Tray 2 all the way back inside the printer. 123 When Paper is jammed in horizontally. When the cartridge can cause remaining toner to leak. • Place the print cartridge on the cartridge until it clicks into place. Doing so can go no further, raise it slightly and push it . CMC097... 9. CMC098 • If paper is Jammed • Do not shake the removed print cartridge. Lifting the guide plate, remove the jammed...
Manuals
Page 127
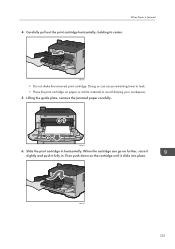
Lifting the guide plate, remove the jammed paper carefully. 1 2 CMC088 6. When the cartridge can cause remaining toner to avoid dirtying your workspace. 5. Then push down on paper or similar material to leak. • Place the print cartridge on the cartridge until it fully in horizontally. Doing so can go no further, raise it slightly and push it clicks into place. Slide the print cartridge in . CMC081 • Do not shake the removed print cartridge. When Paper is Jammed 4. CMC097 125 Carefully pull out the print cartridge horizontally, holding its center.
Lifting the guide plate, remove the jammed paper carefully. 1 2 CMC088 6. When the cartridge can cause remaining toner to avoid dirtying your workspace. 5. Then push down on paper or similar material to leak. • Place the print cartridge on the cartridge until it fully in horizontally. Doing so can go no further, raise it slightly and push it clicks into place. Slide the print cartridge in . CMC081 • Do not shake the removed print cartridge. When Paper is Jammed 4. CMC097 125 Carefully pull out the print cartridge horizontally, holding its center.
Manuals
Page 131
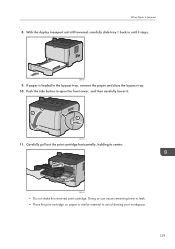
... button to avoid dirtying your workspace. 129 If paper is Jammed 8. CMC081 • Do not shake the removed print cartridge. Doing so can cause remaining toner to leak. • Place the print cartridge on paper or similar material to open the front cover, and then carefully lower it stops. With the duplex... unit still lowered, carefully slide tray 1 back in the bypass tray, remove the paper and close the bypass tray. 10. Carefully pull out the print cartridge horizontally, holding its center. When Paper is loaded in until it . 2 1 CMC096 11.
... button to avoid dirtying your workspace. 129 If paper is Jammed 8. CMC081 • Do not shake the removed print cartridge. Doing so can cause remaining toner to leak. • Place the print cartridge on paper or similar material to open the front cover, and then carefully lower it stops. With the duplex... unit still lowered, carefully slide tray 1 back in the bypass tray, remove the paper and close the bypass tray. 10. Carefully pull out the print cartridge horizontally, holding its center. When Paper is loaded in until it . 2 1 CMC096 11.


