
User Guide
Page 40
... foam and secured with local regulations. • Do not store toner, used toner containers in accordance with tape. Consult a doctor if necessary. • If toner or used toner or toner containers. Getting Started Unpacking To protect it from direct sunlight. ❒ Do not touch the print cartridge's photo conductor unit. 30 BSP024S R WARNING: 2 • Do not...
... foam and secured with local regulations. • Do not store toner, used toner containers in accordance with tape. Consult a doctor if necessary. • If toner or used toner or toner containers. Getting Started Unpacking To protect it from direct sunlight. ❒ Do not touch the print cartridge's photo conductor unit. 30 BSP024S R WARNING: 2 • Do not...
User Guide
Page 210
... ({User Tools} key setting) Quick Dial Entry Speed Dial Entry ❖ Machine Settings ({User Tools} key setting) Speaker Volume Paper Settings I/O Timeout Auto Continue Toner Saver Mode Cartridge&Parts 7 Scanner Carriage Low Humidity Mode Scan Warm-up Time User Registration ❖ Network Settings ({User Tools} key setting) Ethernet IP Configuration ❖ Reports...
... ({User Tools} key setting) Quick Dial Entry Speed Dial Entry ❖ Machine Settings ({User Tools} key setting) Speaker Volume Paper Settings I/O Timeout Auto Continue Toner Saver Mode Cartridge&Parts 7 Scanner Carriage Low Humidity Mode Scan Warm-up Time User Registration ❖ Network Settings ({User Tools} key setting) Ethernet IP Configuration ❖ Reports...
User Guide
Page 232
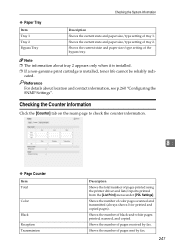
Default: [Off] • On 7 • Off ❖ Cartridge&Parts Displays information about consumables. • Print Cartridge Displays the remaining amount of toner. • Black Life (New), , , , , placing) • Fuser Unit • Fuser Unit Life Displays the remaining life of the fusing ...and continue printing. Note that authentication automatically expires immediately after ten seconds. Default: [Off] • On • Off ❖ Toner Saver Mode Sets the machine to 60 seconds, in increments of the paper feed roller unit. (New), , , , , 222 ...
Default: [Off] • On 7 • Off ❖ Cartridge&Parts Displays information about consumables. • Print Cartridge Displays the remaining amount of toner. • Black Life (New), , , , , placing) • Fuser Unit • Fuser Unit Life Displays the remaining life of the fusing ...and continue printing. Note that authentication automatically expires immediately after ten seconds. Default: [Off] • On • Off ❖ Toner Saver Mode Sets the machine to 60 seconds, in increments of the paper feed roller unit. (New), , , , , 222 ...
User Guide
Page 239
...; Bypass Tray Shows paper size and type settings. • Tray 1 Shows paper size and type settings. • Tray 2 Shows paper size and type settings. ❖ Cartridge & Parts Information Shows the information about supply levels. • Black Toner • Fuser Unit • Transfer Roller • Paper Feed Roller 7 229
...; Bypass Tray Shows paper size and type settings. • Tray 1 Shows paper size and type settings. • Tray 2 Shows paper size and type settings. ❖ Cartridge & Parts Information Shows the information about supply levels. • Black Toner • Fuser Unit • Transfer Roller • Paper Feed Roller 7 229
User Guide
Page 256
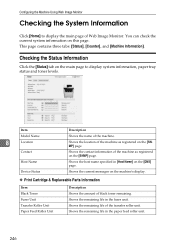
...the paper feed roller unit. 246 Shows the remaining life in [Host Name] on the machine's display. ❖ Print Cartridge & Replaceable Parts Information Item Black Toner Fuser Unit Transfer Roller Unit Paper Feed Roller Unit Description Shows the amount of the transfer roller unit. You can check the...page to display the main page of the machine. Shows the current messages on the [DNS] page. Shows the remaining life of black toner remaining. Item Model Name 8 Location Contact Host Name Device Status Description Shows the name of Web Image Monitor. Shows the remaining life in...
...the paper feed roller unit. 246 Shows the remaining life in [Host Name] on the machine's display. ❖ Print Cartridge & Replaceable Parts Information Item Black Toner Fuser Unit Transfer Roller Unit Paper Feed Roller Unit Description Shows the amount of the transfer roller unit. You can check the...page to display the main page of the machine. Shows the current messages on the [DNS] page. Shows the remaining life of black toner remaining. Item Model Name 8 Location Contact Host Name Device Status Description Shows the name of Web Image Monitor. Shows the remaining life in...
User Guide
Page 257
... size/type setting of pages sent by fax. Reference For details about tray 2 appears only when it is installed. ❒ If a non-genuine print cartridge is installed, toner life cannot be reliably indi- Shows the number of tray 1. Shows the current state and paper size/type setting of pages printed using the...
... size/type setting of pages sent by fax. Reference For details about tray 2 appears only when it is installed. ❒ If a non-genuine print cartridge is installed, toner life cannot be reliably indi- Shows the number of tray 1. Shows the current state and paper size/type setting of pages printed using the...
User Guide
Page 269
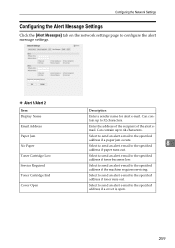
Select to send an alert e-mail to the specified address if toner becomes low. Select to send an alert e-mail to the specified 8 address if ...the specified address if a cover is open. 259 Select to send an alert e-mail to the specified address if toner runs out. Select to send an alert e-mail to the specified address if the machine requires servicing. Configuring the ... settings. ❖ Alert 1/Alert 2 Item Display Name Email Address Paper Jam No Paper Toner Cartridge Low Service Required Toner Cartridge End Cover Open Description Enter a sender name for alert e-mail.
Select to send an alert e-mail to the specified address if toner becomes low. Select to send an alert e-mail to the specified 8 address if ...the specified address if a cover is open. 259 Select to send an alert e-mail to the specified address if toner runs out. Select to send an alert e-mail to the specified address if the machine requires servicing. Configuring the ... settings. ❖ Alert 1/Alert 2 Item Display Name Email Address Paper Jam No Paper Toner Cartridge Low Service Required Toner Cartridge End Cover Open Description Enter a sender name for alert e-mail.
User Guide
Page 284
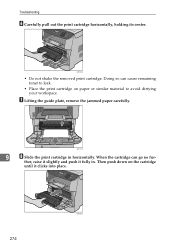
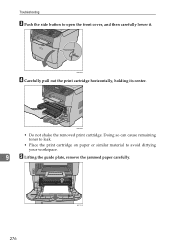
G Lifting the guide plate, remove the jammed paper carefully. ther, raise it slightly and push it clicks into place. 274 BSP039S Doing so can go no fur- BSP036S • Do not shake the removed print cartridge. Then push down on paper or similar material to avoid dirtying your workspace. Troubleshooting F Carefully pull out the print cartridge horizontally, holding its center. BSP121S 9 H Slide the print cartridge in . When the cartridge can cause remaining toner to leak. • Place the print cartridge on the cartridge until it fully in horizontally.
G Lifting the guide plate, remove the jammed paper carefully. ther, raise it slightly and push it clicks into place. 274 BSP039S Doing so can go no fur- BSP036S • Do not shake the removed print cartridge. Then push down on paper or similar material to avoid dirtying your workspace. Troubleshooting F Carefully pull out the print cartridge horizontally, holding its center. BSP121S 9 H Slide the print cartridge in . When the cartridge can cause remaining toner to leak. • Place the print cartridge on the cartridge until it fully in horizontally.
User Guide
Page 286
Doing so can cause remaining toner to leak. • Place the print cartridge on paper or similar material to open the front cover, and then carefully lower it. BSP036S • Do not shake the removed print cartridge. Troubleshooting C Push the side button to avoid dirtying your workspace. 9 E Lifting the guide plate, remove the jammed paper carefully. 276 BSP121S BSP032S D Carefully pull out the print cartridge horizontally, holding its center.
Doing so can cause remaining toner to leak. • Place the print cartridge on paper or similar material to open the front cover, and then carefully lower it. BSP036S • Do not shake the removed print cartridge. Troubleshooting C Push the side button to avoid dirtying your workspace. 9 E Lifting the guide plate, remove the jammed paper carefully. 276 BSP121S BSP032S D Carefully pull out the print cartridge horizontally, holding its center.
User Guide
Page 291
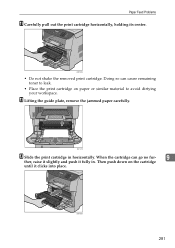
Then push down on paper or similar material to leak. • Place the print cartridge on the cartridge until it fully in horizontally. BSP039S 281 Paper Feed Problems K Carefully pull out the print cartridge horizontally, holding its center. Doing so can go no fur- 9 ther, raise it slightly and push it clicks into place. BSP121S M Slide the print cartridge in . BSP036S • Do not shake the removed print cartridge. When the cartridge can cause remaining toner to avoid dirtying your workspace. L Lifting the guide plate, remove the jammed paper carefully.
Then push down on paper or similar material to leak. • Place the print cartridge on the cartridge until it fully in horizontally. BSP039S 281 Paper Feed Problems K Carefully pull out the print cartridge horizontally, holding its center. Doing so can go no fur- 9 ther, raise it slightly and push it clicks into place. BSP121S M Slide the print cartridge in . BSP036S • Do not shake the removed print cartridge. When the cartridge can cause remaining toner to avoid dirtying your workspace. L Lifting the guide plate, remove the jammed paper carefully.
User Guide
Page 299
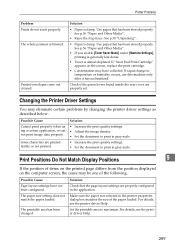
..." . • Paper is almost depleted. See p.56 "Paper and Other Media". • If you enable [Toner Saver Mode] under [Machine Settings], printing is generally less dense. • Toner is damp. Changing the Printer Driver Settings You may have not been configured. ing a certain application, or can- ... dialog box matches the size of items on the printed page differs from the position displayed on the screen, replace the print cartridge. • Condensation may eliminate certain problems by changing the printer driver settings as described below. Print Positions Do Not Match Display...
..." . • Paper is almost depleted. See p.56 "Paper and Other Media". • If you enable [Toner Saver Mode] under [Machine Settings], printing is generally less dense. • Toner is damp. Changing the Printer Driver Settings You may have not been configured. ing a certain application, or can- ... dialog box matches the size of items on the printed page differs from the position displayed on the screen, replace the print cartridge. • Condensation may eliminate certain problems by changing the printer driver settings as described below. Print Positions Do Not Match Display...
User Guide
Page 312
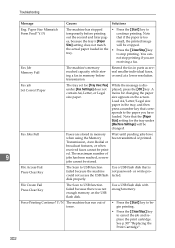
... cannot be stored. or write-protected. Paper Size Mismatch Form Feed? Note out the second and later pag- You can- The maximum number of toner. • Press the {Start} key to begin printing. • Press the {Clear/Stop} key to USB function failed because the machine could... not access the USB flash disk properly. See p.307 "Replacing the Print Cartridge". 302 that is displayed, press the {OK} key. to temporarily before transmission. not stop printing. File Access Fail Press Clear Key The Scan...
... cannot be stored. or write-protected. Paper Size Mismatch Form Feed? Note out the second and later pag- You can- The maximum number of toner. • Press the {Start} key to begin printing. • Press the {Clear/Stop} key to USB function failed because the machine could... not access the USB flash disk properly. See p.307 "Replacing the Print Cartridge". 302 that is displayed, press the {OK} key. to temporarily before transmission. not stop printing. File Access Fail Press Clear Key The Scan...
User Guide
Page 313
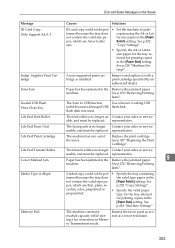
...be replaced. Paper has been jammed in parts as sev- eral at a lower resolution. See p.202 size. See p.307 "Replacing the Print Cartridge". Media Type is no longer Contact your sales or service usable, and must be replaced. See p.218 "Machine Settings". flash disk was used....Memory Full The machine's memory Resend the fax in the Remove the jammed paper. 9 machine. Life End Print Cartridge The machine has run out of the toner. ry Transmission mode. 303 Error and Status Messages on the Screen Message Causes Solutions ID Card Copy Only Support A4...
...be replaced. Paper has been jammed in parts as sev- eral at a lower resolution. See p.202 size. See p.307 "Replacing the Print Cartridge". Media Type is no longer Contact your sales or service usable, and must be replaced. See p.218 "Machine Settings". flash disk was used....Memory Full The machine's memory Resend the fax in the Remove the jammed paper. 9 machine. Life End Print Cartridge The machine has run out of the toner. ry Transmission mode. 303 Error and Status Messages on the Screen Message Causes Solutions ID Card Copy Only Support A4...
User Guide
Page 317
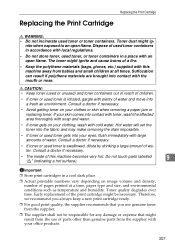
... if necessary. • The inside of the print cartridge might ig- Toner quality degrades over time. Replacing the Print Cartridge Replacing the Print Cartridge R WARNING: • Do not incinerate used toner gets into contact with toner, wash the affected area thoroughly with large amounts of ...and humidity. Important ❒ Store print cartridges in a place with your clothes or skin when removing a paper jam or replacing toner. Dispose of used toner containers in accordance with local regulations. • Do not store toner, used toner is swallowed, dilute by drinking a ...
... if necessary. • The inside of the print cartridge might ig- Toner quality degrades over time. Replacing the Print Cartridge Replacing the Print Cartridge R WARNING: • Do not incinerate used toner gets into contact with toner, wash the affected area thoroughly with large amounts of ...and humidity. Important ❒ Store print cartridges in a place with your clothes or skin when removing a paper jam or replacing toner. Dispose of used toner containers in accordance with local regulations. • Do not store toner, used toner is swallowed, dilute by drinking a ...
User Guide
Page 318
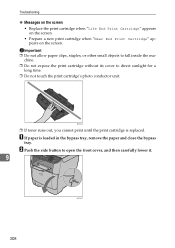
... its cover to open the front cover, and then carefully lower it. 9 BSP032S 308 BSP024S ❒ If toner runs out, you cannot print until the print cartridge is loaded in the bypass tray, remove the paper and close the bypass tray. A If paper is replaced. Troubleshooting ...❖ Messages on the screen • Replace the print cartridge when "Life End Print Cartridge" appears on the screen. • Prepare a new print cartridge when "Near End Print Cartridge" appears on the screen. B Push the side button to direct sunlight for a long time. ...
... its cover to open the front cover, and then carefully lower it. 9 BSP032S 308 BSP024S ❒ If toner runs out, you cannot print until the print cartridge is loaded in the bypass tray, remove the paper and close the bypass tray. A If paper is replaced. Troubleshooting ...❖ Messages on the screen • Replace the print cartridge when "Life End Print Cartridge" appears on the screen. • Prepare a new print cartridge when "Near End Print Cartridge" appears on the screen. B Push the side button to direct sunlight for a long time. ...
User Guide
Page 319
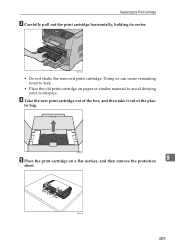
D Take the new print cartridge out of the box, and then take it out of the plas- BSP037S 309 BSP036S • Do not shake the removed print cartridge. Replacing the Print Cartridge C Carefully pull out the print cartridge horizontally, holding its center. BSP195S E Place the print cartridge on paper or similar material to avoid dirtying your workspace. tic bag. Doing so can cause remaining toner to leak. • Place the old print cartridge on a flat surface, and then remove the protection 9 sheet.
D Take the new print cartridge out of the box, and then take it out of the plas- BSP037S 309 BSP036S • Do not shake the removed print cartridge. Replacing the Print Cartridge C Carefully pull out the print cartridge horizontally, holding its center. BSP195S E Place the print cartridge on paper or similar material to avoid dirtying your workspace. tic bag. Doing so can cause remaining toner to leak. • Place the old print cartridge on a flat surface, and then remove the protection 9 sheet.
User Guide
Page 320
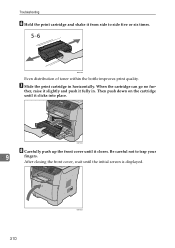
ther, raise it slightly and push it clicks into place. Then push down on the cartridge until it fully in horizontally. BSP039S H Carefully push up the front cover until the initial screen is displayed. 310 BSP253S G Slide the print cartridge in . After closing the front cover, wait until it from side to trap your 9 fingers. Troubleshooting F Hold the print cartridge and shake it closes. Be careful not to side five or six times. When the cartridge can go no fur- BSP038S Even distribution of toner within the bottle improves print quality.
ther, raise it slightly and push it clicks into place. Then push down on the cartridge until it fully in horizontally. BSP039S H Carefully push up the front cover until the initial screen is displayed. 310 BSP253S G Slide the print cartridge in . After closing the front cover, wait until it from side to trap your 9 fingers. Troubleshooting F Hold the print cartridge and shake it closes. Be careful not to side five or six times. When the cartridge can go no fur- BSP038S Even distribution of toner within the bottle improves print quality.
User Guide
Page 327
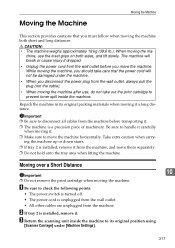
... machine horizontally. Repack the machine in its original position using [Scanner Carriage] under the machine. • When you should take out the print cartridge to check the following points: • The power switch is turned off. • The power cord is installed, remove it. ing the ...grips on both short and long distances. R CAUTION: • The machine weighs approximately 18 kg (39.6 lb.). A Be sure to prevent toner spill inside the machine. Moving the Machine Moving the Machine This section provides cautions that the power cord will break or cause injury if dropped...
... machine horizontally. Repack the machine in its original position using [Scanner Carriage] under the machine. • When you should take out the print cartridge to check the following points: • The power switch is turned off. • The power cord is installed, remove it. ing the ...grips on both short and long distances. R CAUTION: • The machine weighs approximately 18 kg (39.6 lb.). A Be sure to prevent toner spill inside the machine. Moving the Machine Moving the Machine This section provides cautions that the power cord will break or cause injury if dropped...
User Guide
Page 328
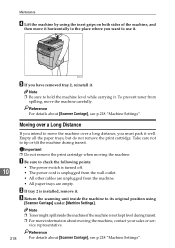
... Carriage], see p.218 "Machine Settings". Empty all the paper trays, but do not remove the print cartridge. Important ❒ Do not remove the print cartridge when moving the machine, contact your sales or service representative. Reference 318 For details about [Scanner Carriage],... see p.218 "Machine Settings". To prevent toner from the machine. • All paper trays are unplugged from spilling, move...
... Carriage], see p.218 "Machine Settings". Empty all the paper trays, but do not remove the print cartridge. Important ❒ Do not remove the print cartridge when moving the machine, contact your sales or service representative. Reference 318 For details about [Scanner Carriage],... see p.218 "Machine Settings". To prevent toner from the machine. • All paper trays are unplugged from spilling, move...
User Guide
Page 331
... used, and environmental conditions such as the factory default. Note ❒ If print cartridges are good for Standardization. Print Cartridges Print cartridge Average printable number of pages per cartridge *1 Black 2,500 pages, 5,000 pages *1 The printable number of quality and functionality...pages. 10 ❒ This machine routinely performs cleaning and uses toner during this machine, use . ❒ Print cartridges (consumables) are compliant with the machine. ❒ The supplied print cartridges are not changed sooner than indicated above due to maintain quality....
... used, and environmental conditions such as the factory default. Note ❒ If print cartridges are good for Standardization. Print Cartridges Print cartridge Average printable number of pages per cartridge *1 Black 2,500 pages, 5,000 pages *1 The printable number of quality and functionality...pages. 10 ❒ This machine routinely performs cleaning and uses toner during this machine, use . ❒ Print cartridges (consumables) are compliant with the machine. ❒ The supplied print cartridges are not changed sooner than indicated above due to maintain quality....


