User Guide
Page 1
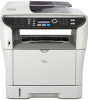
For safe and correct use this machine and keep it handy for future reference. User Guide 1 Guide to the Machine 2 Getting Started 3 Using the Printer Function 4 Using the Copier Function 5 Using the Scanner Function 6 Using the Fax Function 7 Configuring the Machine Using the Control Panel 8 Configuring the Machine Using Web Image Monitor 9 Troubleshooting 10 Maintenance 11 Appendix Read this manual carefully before you use , be sure to read "Safety Information" before using the machine.
For safe and correct use this machine and keep it handy for future reference. User Guide 1 Guide to the Machine 2 Getting Started 3 Using the Printer Function 4 Using the Copier Function 5 Using the Scanner Function 6 Using the Fax Function 7 Configuring the Machine Using the Control Panel 8 Configuring the Machine Using Web Image Monitor 9 Troubleshooting 10 Maintenance 11 Appendix Read this manual carefully before you use , be sure to read "Safety Information" before using the machine.
User Guide
Page 8
... Mode Settings 268 9. Administrator Settings 233 Changing Administrator Settings 233 Administrator Setting Parameters 234 PDL Settings...238 Changing PDL Settings 238 PDL Setting Parameters 239 8. Troubleshooting Overview ...269 Common Problems 270 Paper Feed Problems 271 Removing Printing Jams 272 Removing inner/lower/upper jam 273 Removing bypass tray jam 275 Removing...
... Mode Settings 268 9. Administrator Settings 233 Changing Administrator Settings 233 Administrator Setting Parameters 234 PDL Settings...238 Changing PDL Settings 238 PDL Setting Parameters 239 8. Troubleshooting Overview ...269 Common Problems 270 Paper Feed Problems 271 Removing Printing Jams 272 Removing inner/lower/upper jam 273 Removing bypass tray jam 275 Removing...
User Guide
Page 13
This manual is stored in the manual CD-ROM supplied with the machine. ❖ Quick Guide Provides information about troubleshooting and basic operations for making photocopies, scanning, and sending faxes. Manuals for This Machine Manuals for This Machine Several manuals are ... the machine from its box and connecting it to use the printer, copier, scanner, and fax functions • Configuring the machine • Troubleshooting problems and fixing paper jams • Replacing consumables • Checking the status of this machine. Select the manual that are not included in ...
This manual is stored in the manual CD-ROM supplied with the machine. ❖ Quick Guide Provides information about troubleshooting and basic operations for making photocopies, scanning, and sending faxes. Manuals for This Machine Manuals for This Machine Several manuals are ... the machine from its box and connecting it to use the printer, copier, scanner, and fax functions • Configuring the machine • Troubleshooting problems and fixing paper jams • Replacing consumables • Checking the status of this machine. Select the manual that are not included in ...
User Guide
Page 279
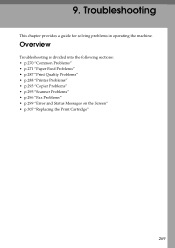
9. Troubleshooting This chapter provides a guide for solving problems in operating the machine. Overview Troubleshooting is divided into the following sections: • p.270 "Common Problems" • p.271 "Paper Feed Problems" • p.287 "Print Quality Problems" • p.288 "Printer Problems" • p.293 "Copier Problems" • p.295 "Scanner Problems" • p.296 "Fax Problems" • p.299 "Error and Status Messages on the Screen" • p.307 "Replacing the Print Cartridge" 269
9. Troubleshooting This chapter provides a guide for solving problems in operating the machine. Overview Troubleshooting is divided into the following sections: • p.270 "Common Problems" • p.271 "Paper Feed Problems" • p.287 "Print Quality Problems" • p.288 "Printer Problems" • p.293 "Copier Problems" • p.295 "Scanner Problems" • p.296 "Fax Problems" • p.299 "Error and Status Messages on the Screen" • p.307 "Replacing the Print Cartridge" 269
User Guide
Page 280
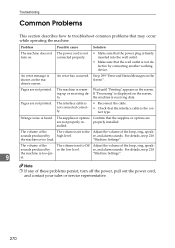
... are not printed. If "Processing" is displayed on the machine's screen. Pages are not printed. er, and alarm sounds . "Machine Settings". Troubleshooting Common Problems This section describes how to troubleshoot common problems that the supplies or options are are not properly in- An error message is the correct type. Strange noise is...
... are not printed. If "Processing" is displayed on the machine's screen. Pages are not printed. er, and alarm sounds . "Machine Settings". Troubleshooting Common Problems This section describes how to troubleshoot common problems that the supplies or options are are not properly in- An error message is the correct type. Strange noise is...

User Guide
Page 282
... be covered in the paper tray. • If the paper curl is severe, take prints from the output tray more frequently. • Paper is damp. Troubleshooting Problem Solution The printed paper is curled. • Load the paper upside down in toner. Torn pieces remaining inside the machine will cause further jams...
... be covered in the paper tray. • If the paper curl is severe, take prints from the output tray more frequently. • Paper is damp. Troubleshooting Problem Solution The printed paper is curled. • Load the paper upside down in toner. Torn pieces remaining inside the machine will cause further jams...
User Guide
Page 284
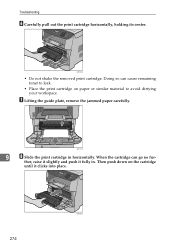
G Lifting the guide plate, remove the jammed paper carefully. ther, raise it slightly and push it clicks into place. 274 BSP039S Troubleshooting F Carefully pull out the print cartridge horizontally, holding its center. Doing so can go no fur- When the cartridge can cause remaining toner to avoid dirtying your workspace. BSP036S • Do not shake the removed print cartridge. BSP121S 9 H Slide the print cartridge in . Then push down on paper or similar material to leak. • Place the print cartridge on the cartridge until it fully in horizontally.
G Lifting the guide plate, remove the jammed paper carefully. ther, raise it slightly and push it clicks into place. 274 BSP039S Troubleshooting F Carefully pull out the print cartridge horizontally, holding its center. Doing so can go no fur- When the cartridge can cause remaining toner to avoid dirtying your workspace. BSP036S • Do not shake the removed print cartridge. BSP121S 9 H Slide the print cartridge in . Then push down on paper or similar material to leak. • Place the print cartridge on the cartridge until it fully in horizontally.
User Guide
Page 286
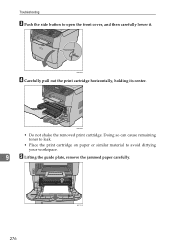
Doing so can cause remaining toner to leak. • Place the print cartridge on paper or similar material to open the front cover, and then carefully lower it. Troubleshooting C Push the side button to avoid dirtying your workspace. 9 E Lifting the guide plate, remove the jammed paper carefully. 276 BSP121S BSP032S D Carefully pull out the print cartridge horizontally, holding its center. BSP036S • Do not shake the removed print cartridge.
Doing so can cause remaining toner to leak. • Place the print cartridge on paper or similar material to open the front cover, and then carefully lower it. Troubleshooting C Push the side button to avoid dirtying your workspace. 9 E Lifting the guide plate, remove the jammed paper carefully. 276 BSP121S BSP032S D Carefully pull out the print cartridge horizontally, holding its center. BSP036S • Do not shake the removed print cartridge.
User Guide
Page 288
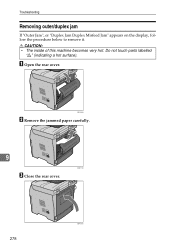
Do not touch parts labelled "v" (indicating a hot surface). BSP238S B Remove the jammed paper carefully. 9 BSP119S C Close the rear cover. 278 BSP251S R CAUTION: • The inside of this machine becomes very hot. A Open the rear cover. Troubleshooting Removing outer/duplex jam If "Outer Jam", or "Duplex Jam Duplex Misfeed Jam" appears on the display, follow the procedure below to remove it.
Do not touch parts labelled "v" (indicating a hot surface). BSP238S B Remove the jammed paper carefully. 9 BSP119S C Close the rear cover. 278 BSP251S R CAUTION: • The inside of this machine becomes very hot. A Open the rear cover. Troubleshooting Removing outer/duplex jam If "Outer Jam", or "Duplex Jam Duplex Misfeed Jam" appears on the display, follow the procedure below to remove it.
User Guide
Page 290
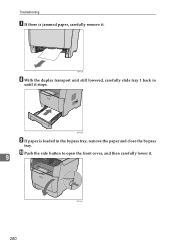
Troubleshooting G If there is loaded in until it . BSP120S H With the duplex transport unit still lowered, carefully slide tray 1 back in the bypass tray, remove the paper and close the bypass tray. J Push the side button to open the front cover, and then carefully lower it. 9 280 BSP032S BSP068S I If paper is jammed paper, carefully remove it stops.
Troubleshooting G If there is loaded in until it . BSP120S H With the duplex transport unit still lowered, carefully slide tray 1 back in the bypass tray, remove the paper and close the bypass tray. J Push the side button to open the front cover, and then carefully lower it. 9 280 BSP032S BSP068S I If paper is jammed paper, carefully remove it stops.
User Guide
Page 292
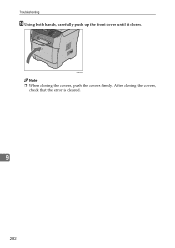
Troubleshooting N Using both hands, carefully push up the front cover until it closes. After closing the covers, push the covers firmly. BSP253S Note ❒ When closing the covers, check that the error is cleared. 9 282
Troubleshooting N Using both hands, carefully push up the front cover until it closes. After closing the covers, push the covers firmly. BSP253S Note ❒ When closing the covers, check that the error is cleared. 9 282
User Guide
Page 294
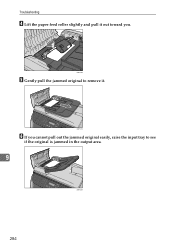
BSP127S F If you cannot pull out the jammed original easily, raise the input tray to remove it out toward you. Troubleshooting D Lift the paper feed roller slightly and pull it . BSP126S E Gently pull the jammed original to see if the original is jammed in the output area. 9 BSP128S 284
BSP127S F If you cannot pull out the jammed original easily, raise the input tray to remove it out toward you. Troubleshooting D Lift the paper feed roller slightly and pull it . BSP126S E Gently pull the jammed original to see if the original is jammed in the output area. 9 BSP128S 284
User Guide
Page 296
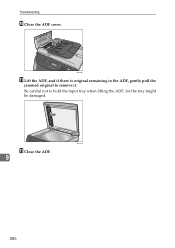
BSP140S L Close the ADF. 9 286 BSP240S K Lift the ADF, and if there is original remaining in the ADF, gently pull the jammed original to hold the input tray when lifting the ADF, for the tray might be damaged. Be careful not to remove it. Troubleshooting J Close the ADF cover.
BSP140S L Close the ADF. 9 286 BSP240S K Lift the ADF, and if there is original remaining in the ADF, gently pull the jammed original to hold the input tray when lifting the ADF, for the tray might be damaged. Be careful not to remove it. Troubleshooting J Close the ADF cover.
User Guide
Page 298
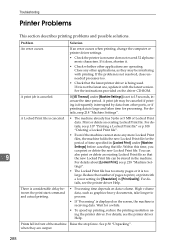
... or printer driver settings. • Check the printer icon name does not exceed 32 alphanumeric characters. A print job may be interfering with the latest version. Troubleshooting Printer Problems This section describes printing problems and possible solutions. A Locked Print file is large and takes time for a while. • To speed up printing...
... or printer driver settings. • Check the printer icon name does not exceed 32 alphanumeric characters. A print job may be interfering with the latest version. Troubleshooting Printer Problems This section describes printing problems and possible solutions. A Locked Print file is large and takes time for a while. • To speed up printing...
User Guide
Page 300
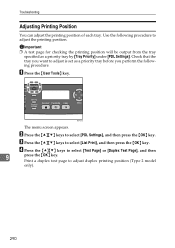
... {OK} key. Use the following procedure. A Press the {User Tools} key. Print a duplex test page to select [List Print], and then press the {OK} key. Troubleshooting Adjusting Printing Position You can adjust the printing position of each tray. C Press the {U}{T} keys to adjust duplex printing position (Type 2 model only). 290 BSP051S...
... {OK} key. Use the following procedure. A Press the {User Tools} key. Print a duplex test page to select [List Print], and then press the {OK} key. Troubleshooting Adjusting Printing Position You can adjust the printing position of each tray. C Press the {U}{T} keys to adjust duplex printing position (Type 2 model only). 290 BSP051S...
User Guide
Page 302
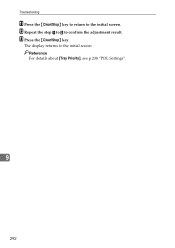
M Press the {Clear/Stop} key. Reference For details about [Tray Priority], see p.238 "PDL Settings". 9 292 The display returns to confirm the adjustment result. L Repeat the step A to E to the initial screen. Troubleshooting K Press the {Clear/Stop} key to return to the initial screen.
M Press the {Clear/Stop} key. Reference For details about [Tray Priority], see p.238 "PDL Settings". 9 292 The display returns to confirm the adjustment result. L Repeat the step A to E to the initial screen. Troubleshooting K Press the {Clear/Stop} key to return to the initial screen.
User Guide
Page 304
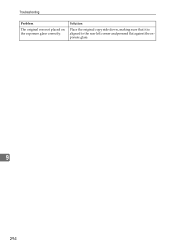
Troubleshooting Problem The original was not placed on the exposure glass correctly. Solution Place the original copy side down, making sure that it is aligned to the rear left corner and pressed flat against the exposure glass. 9 294
Troubleshooting Problem The original was not placed on the exposure glass correctly. Solution Place the original copy side down, making sure that it is aligned to the rear left corner and pressed flat against the exposure glass. 9 294
User Guide
Page 306
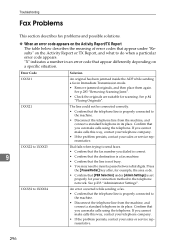
Troubleshooting Fax Problems This section describes fax problems and possible solutions. ❖ When an error code appears on the Activity Report/TX Report The table below ...
Troubleshooting Fax Problems This section describes fax problems and possible solutions. ❖ When an error code appears on the Activity Report/TX Report The table below ...
User Guide
Page 308
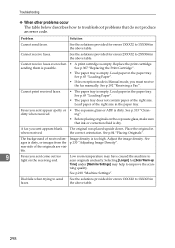
... of the originals are visible. 9 Faxes you must receive the fax manually. Faxes you sent appears blank when received. Troubleshooting ❖ When other problems occur The table below describes how to troubleshoot problems that ink or correction fluid is dry. Problem Cannot send faxes. See the solutions provided for errors 1XXX22 to...
... of the originals are visible. 9 Faxes you must receive the fax manually. Faxes you sent appears blank when received. Troubleshooting ❖ When other problems occur The table below describes how to troubleshoot problems that ink or correction fluid is dry. Problem Cannot send faxes. See the solutions provided for errors 1XXX22 to...
User Guide
Page 310
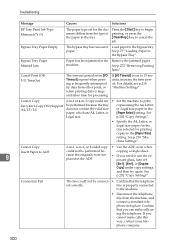
... size paper for the tray selected for printing copies in the Bypass Tray". If you can make calls this way, contact your telephone company. 300 Troubleshooting Message Causes Solutions BP Tray Print Job Type Mismatch?Y/N The paper type set to 15 seconds, increase the time period. See Legal size. See p.202...
... size paper for the tray selected for printing copies in the Bypass Tray". If you can make calls this way, contact your telephone company. 300 Troubleshooting Message Causes Solutions BP Tray Print Job Type Mismatch?Y/N The paper type set to 15 seconds, increase the time period. See Legal size. See p.202...


