Network Guide
Page 50
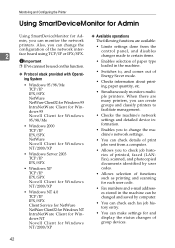
... for Windows NT Novell Client for Windows • Allows selection of functions such as printing and scanning for each fax job history entry. • You can check details of print jobs sent from the control panel, and disables changes made to , and comes out of paper type ❒ IPv6 cannnot be changed and saved by user • Windows XP codes. loaded in the machine can monitor the network printers. Monitoring and Configuring the Printer Using SmartDeviceMonitor for Admin Using SmartDeviceMonitor...
... for Windows NT Novell Client for Windows • Allows selection of functions such as printing and scanning for each fax job history entry. • You can check details of print jobs sent from the control panel, and disables changes made to , and comes out of paper type ❒ IPv6 cannnot be changed and saved by user • Windows XP codes. loaded in the machine can monitor the network printers. Monitoring and Configuring the Printer Using SmartDeviceMonitor for Admin Using SmartDeviceMonitor...
Network Guide
Page 54
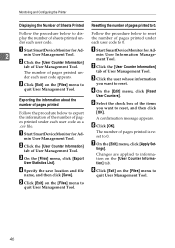
.... A confirmation message appears. B Click the [User Counter Information] tab of User Management Tool. G On the [Edit] menu, click [Apply Set- H Click [Exit] on the [User Counter Information] tab. Follow the procedure below to display the number of sheets printed under each user code as a .csv file. D On the [Edit] menu, click [Reset User Counters]. Changes are applied to quit User Management Tool. 46 A A Start SmartDeviceMonitor for Ad- 2 min User Management Tool. C On the [Files] menu, click...
.... A confirmation message appears. B Click the [User Counter Information] tab of User Management Tool. G On the [Edit] menu, click [Apply Set- H Click [Exit] on the [User Counter Information] tab. Follow the procedure below to display the number of sheets printed under each user code as a .csv file. D On the [Edit] menu, click [Reset User Counters]. Changes are applied to quit User Management Tool. 46 A A Start SmartDeviceMonitor for Ad- 2 min User Management Tool. C On the [Files] menu, click...
PostScript Supplement
Page 36
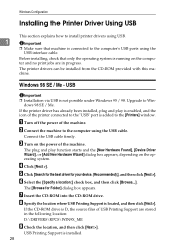
... to install printer drivers using USB. 1 Important ❒ Make sure that only the operating system is running on the computer and no print jobs are stored in progress. Windows 98 SE / Me - A Turn off the power of USB Printing Support are in the following location: D:\DRIVERS\RPCS\WIN9X_ME I Check the location, and then click [Next >]. The [Browse for your device. {Recommended}.], and then click [Next >]. Upgrade to the computer's USB ports using the USB cable. B Connect the machine...
... to install printer drivers using USB. 1 Important ❒ Make sure that only the operating system is running on the computer and no print jobs are stored in progress. Windows 98 SE / Me - A Turn off the power of USB Printing Support are in the following location: D:\DRIVERS\RPCS\WIN9X_ME I Check the location, and then click [Next >]. The [Browse for your device. {Recommended}.], and then click [Next >]. Upgrade to the computer's USB ports using the USB cable. B Connect the machine...
PostScript Supplement
Page 46
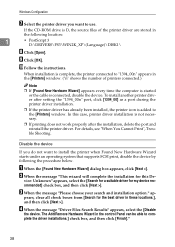
...]." 38 vice: Unknown" appears, select the [Search for a suitable driver for the best driver in the control Panel can be able to install the printer when Found New Hardware Wizard starts under an operating system that supports SCSI print, disable the device by following location: 1 • PostScript 3 D:\DRIVERS\PS3\WIN2K_XP\(Language)\DISK1\ H Click [Open]. I Click [OK]. J Follow the instructions. To install another printer driver after the installation, delete the port and reinstall the printer driver.
...]." 38 vice: Unknown" appears, select the [Search for a suitable driver for the best driver in the control Panel can be able to install the printer when Found New Hardware Wizard starts under an operating system that supports SCSI print, disable the device by following location: 1 • PostScript 3 D:\DRIVERS\PS3\WIN2K_XP\(Language)\DISK1\ H Click [Open]. I Click [OK]. J Follow the instructions. To install another printer driver after the installation, delete the port and reinstall the printer driver.
PostScript Supplement
Page 48
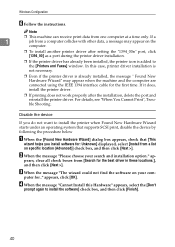
... are connected using the IEEE 1394 interface cable for : Unknown] displayed, select [Install from a list on the computer. ❒ To install another printer driver after the installation, delete the port and reinstall the printer driver. puter for the best driver in these locations.], and then click [Next >]. Disable the device If you do not want to install the printer when Found New Hardware Wizard starts under an operating system that supports SCSI print, disable the device by...
... are connected using the IEEE 1394 interface cable for : Unknown] displayed, select [Install from a list on the computer. ❒ To install another printer driver after the installation, delete the port and reinstall the printer driver. puter for the best driver in these locations.], and then click [Next >]. Disable the device If you do not want to install the printer when Found New Hardware Wizard starts under an operating system that supports SCSI print, disable the device by...

PostScript Supplement
Page 79
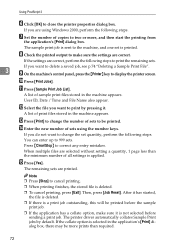
... option is deleted. ❒ To cancel printing, press [Exit]. The remaining sets are using the number keys. User ID, Date / Time and File Name also appear. The printer driver automatically collates Sample Print jobs by pressing it is applied. Printing a Document M Press [Sample Print Job List]. N Select the file you do not want to correct any entry mistakes. If you want to change the number of the print files stored in the machine appears. Press {Clear/Stop} to print by default...
... option is deleted. ❒ To cancel printing, press [Exit]. The remaining sets are using the number keys. User ID, Date / Time and File Name also appear. The printer driver automatically collates Sample Print jobs by pressing it is applied. Printing a Document M Press [Sample Print Job List]. N Select the file you do not want to correct any entry mistakes. If you want to change the number of the print files stored in the machine appears. Press {Clear/Stop} to print by default...
PostScript Supplement
Page 80
... want to change the set is deleted. ❒ To cancel printing, press [Exit]. A list of print files stored in the machine appears. Then, press [Job Reset]. The printer driver automatically collates Sample Print jobs by pressing it is a print job outstanding, this will be printed before sending a print job. If the settings are using the number keys. K Press [Sample Print Job List]. M Press [Print] to print by default. If you want to change the number of sets using Windows 2000, perform the following steps. Using PostScript 3 F Click...
... want to change the set is deleted. ❒ To cancel printing, press [Exit]. A list of print files stored in the machine appears. Then, press [Job Reset]. The printer driver automatically collates Sample Print jobs by pressing it is a print job outstanding, this will be printed before sending a print job. If the settings are using the number keys. K Press [Sample Print Job List]. M Press [Print] to print by default. If you want to change the number of sets using Windows 2000, perform the following steps. Using PostScript 3 F Click...

General Settings Guide
Page 308
... Copies, 186 Copy Count Display, 48 Copy on Designating Page in Combine, 101 Copy Order in Combine, 100 Copy Orientation in Duplex Mode, 91 Counter, 273 Courier Font, 191 Cover Sheet Tray, 54 Customize: Copier Function Key, 92 Customize: Document Server Storage key, 93 D Data Format, 192 Data Security for Copying, 82 Date Stamp, 109 DDNS Configuration, 59 DDNS Configuration (IEEE 1394), 63 Default Printer Language, 188 Default User Name/Password (Send), 72 Delete All Files in Document Server, 81 Delete All Logs, 82 Delete All Stored Print Jobs, 184 Delete...
... Copies, 186 Copy Count Display, 48 Copy on Designating Page in Combine, 101 Copy Order in Combine, 100 Copy Orientation in Duplex Mode, 91 Counter, 273 Courier Font, 191 Cover Sheet Tray, 54 Customize: Copier Function Key, 92 Customize: Document Server Storage key, 93 D Data Format, 192 Data Security for Copying, 82 Date Stamp, 109 DDNS Configuration, 59 DDNS Configuration (IEEE 1394), 63 Default Printer Language, 188 Default User Name/Password (Send), 72 Delete All Files in Document Server, 81 Delete All Logs, 82 Delete All Stored Print Jobs, 184 Delete...
General Settings Guide
Page 311
... / Delete Scan Size, 122, 139 Program/Change/ Delete Standard Message, 124 Program / Change / Delete User Text, 47 Program Closed Network Code, 132 Program/Delete Stamp (User Stamp), 108 Program Fax Information, 134 Program Memory Lock ID, 133 Programming an End Receiver, 146 Programming/Changing Information Boxes, 172 Programming/changing Personal Boxes, 168 Programming/Changing Special Senders, 159 Programming/Changing Transfer Boxes, 176 Programming Initial Set Up of a Special Sender, 164 Programming the LDAP server, 84 Program Special Sender, 126 PS Config./Font Page, 181 PS Menu / Printer...
... / Delete Scan Size, 122, 139 Program/Change/ Delete Standard Message, 124 Program / Change / Delete User Text, 47 Program Closed Network Code, 132 Program/Delete Stamp (User Stamp), 108 Program Fax Information, 134 Program Memory Lock ID, 133 Programming an End Receiver, 146 Programming/Changing Information Boxes, 172 Programming/changing Personal Boxes, 168 Programming/Changing Special Senders, 159 Programming/Changing Transfer Boxes, 176 Programming Initial Set Up of a Special Sender, 164 Programming the LDAP server, 84 Program Special Sender, 126 PS Config./Font Page, 181 PS Menu / Printer...

General Settings Guide
Page 312
... (Date Stamp), 110 Superimpose (Page Numbering), 112 Switch Reception Mode, 126 Switch Title of Quick Dial Table, 120, 195 Switch to Batch, 114 Symbol Set, 191 System Auto Reset Timer, 56 System / Printer Features, 185 System Settings / Administrator Tools, 75 System Settings / File Transfer, 68 System Settings / General Features, 47 System Settings / Timer Settings, 56 System Settings / Tray Paper Settings, 51 System Status/Job List Display Time, 50 T Test Print / Printer Features, 181 Timer Settings / System Settings, 56 To enter an identification name, 84 To enter a port number...
... (Date Stamp), 110 Superimpose (Page Numbering), 112 Switch Reception Mode, 126 Switch Title of Quick Dial Table, 120, 195 Switch to Batch, 114 Symbol Set, 191 System Auto Reset Timer, 56 System / Printer Features, 185 System Settings / Administrator Tools, 75 System Settings / File Transfer, 68 System Settings / General Features, 47 System Settings / Timer Settings, 56 System Settings / Tray Paper Settings, 51 System Status/Job List Display Time, 50 T Test Print / Printer Features, 181 Timer Settings / System Settings, 56 To enter an identification name, 84 To enter a port number...
Printer Reference
Page 37
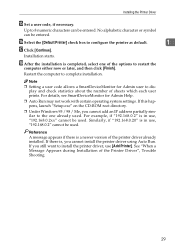
... be used . Restart the computer to configure the printer as default. 1 Q Click [Continue]. Up to display and check statistics about the number of the printer driver already installed. Note ❒ Setting a user code allows a SmartDeviceMonitor for Admin Help. ❒ Auto Run may not work with certain operating system settings. If this happens, launch "Setup.exe" on the CD-ROM root directory. ❒ Under Windows 95 / 98 / Me, you cannot add an IP address...
... be used . Restart the computer to configure the printer as default. 1 Q Click [Continue]. Up to display and check statistics about the number of the printer driver already installed. Note ❒ Setting a user code allows a SmartDeviceMonitor for Admin Help. ❒ Auto Run may not work with certain operating system settings. If this happens, launch "Setup.exe" on the CD-ROM root directory. ❒ Under Windows 95 / 98 / Me, you cannot add an IP address...
Printer Reference
Page 39
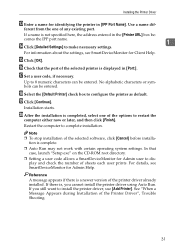
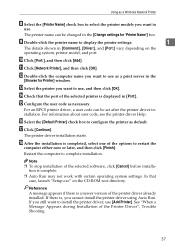
.... Installation starts. Note ❒ To stop installation of the selected software, click [Cancel] before installation is a newer version of the selected printer is not specified here, the address entered in [Port:]. If a name is displayed in the [Printer URL] box be- Q Set a user code, if necessary. R Select the [Default Printer] check box to complete installation. Restart the computer to configure the printer as default. Installing the Printer Driver M Enter a name for Client Help. Use a name dif- N Click [Detailed Settings] to make...
.... Installation starts. Note ❒ To stop installation of the selected software, click [Cancel] before installation is a newer version of the selected printer is not specified here, the address entered in [Port:]. If a name is displayed in the [Printer URL] box be- Q Set a user code, if necessary. R Select the [Default Printer] check box to complete installation. Restart the computer to configure the printer as default. Installing the Printer Driver M Enter a name for Client Help. Use a name dif- N Click [Detailed Settings] to make...
Printer Reference
Page 41
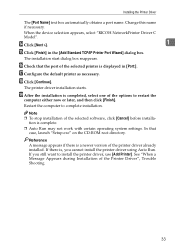
... selected printer is displayed in the [Add Standard TCP/IP Printer Port Wizard] dialog box. The printer driver installation starts. Change this name if necessary. See "When a Message Appears during Installation of the selected software, click [Cancel] before installa- Q Configure the default printer as necessary. Restart the computer to restart the computer either now or later, and then click [Finish]. When the device selection appears, select "RICOH NetworkPrinter Driver C Model". R Click...
... selected printer is displayed in the [Add Standard TCP/IP Printer Port Wizard] dialog box. The printer driver installation starts. Change this name if necessary. See "When a Message Appears during Installation of the selected software, click [Cancel] before installa- Q Configure the default printer as necessary. Restart the computer to restart the computer either now or later, and then click [Finish]. When the device selection appears, select "RICOH NetworkPrinter Driver C Model". R Click...
Printer Reference
Page 43
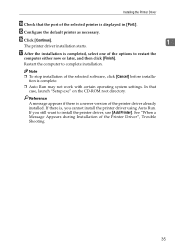
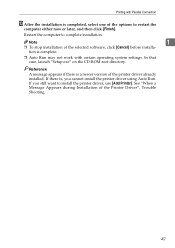
...]. Q After the installation is complete. ❒ Auto Run may not work with certain operating system settings. See "When a Message Appears during Installation of the selected software, click [Cancel] before installa- P Click [Continue]. 1 The printer driver installation starts. O Configure the default printer as necessary. Note ❒ To stop installation of the Printer Driver", Trouble Shooting. 35 Installing the Printer Driver N Check that case, launch "Setup.exe" on the CD-ROM root directory. If you cannot install the printer driver using Auto Run.
...]. Q After the installation is complete. ❒ Auto Run may not work with certain operating system settings. See "When a Message Appears during Installation of the selected software, click [Cancel] before installa- P Click [Continue]. 1 The printer driver installation starts. O Configure the default printer as necessary. Note ❒ To stop installation of the Printer Driver", Trouble Shooting. 35 Installing the Printer Driver N Check that case, launch "Setup.exe" on the CD-ROM root directory. If you cannot install the printer driver using Auto Run.
Printer Reference
Page 45
... printer driver installation starts. O Configure the user code as default. M Select the printer you want to use [Add Printer]. N Check that case, launch "Setup.exe" on the operating system, printer model, and port. If you still want to install the printer driver, use as a print server in the [Change settings for Printer] window. Reference A message appears if there is displayed in [Comment:], [Driver:], and [Port:] vary depending on the CD-ROM root directory. Note ❒ To stop installation of the Printer Driver", Trouble Shooting. 37 I Double...
... printer driver installation starts. O Configure the user code as default. M Select the printer you want to use [Add Printer]. N Check that case, launch "Setup.exe" on the operating system, printer model, and port. If you still want to install the printer driver, use as a print server in the [Change settings for Printer] window. Reference A message appears if there is displayed in [Comment:], [Driver:], and [Port:] vary depending on the CD-ROM root directory. Note ❒ To stop installation of the Printer Driver", Trouble Shooting. 37 I Double...
Printer Reference
Page 46
... the Windows computer used as an Administrators or Power Users group member. ❒ In an IPv6 environment, Netware servers cannot be changed in the [Change settings for 'Printer Name'] box. 38 Install all necessary client applications before following this printer driver under Windows 2000 / XP Professional, Win- D The software license agreement appears in the [License Agreement] dialog box. G Select the [Printer Name] check box to select the printer model...
... the Windows computer used as an Administrators or Power Users group member. ❒ In an IPv6 environment, Netware servers cannot be changed in the [Change settings for 'Printer Name'] box. 38 Install all necessary client applications before following this printer driver under Windows 2000 / XP Professional, Win- D The software license agreement appears in the [License Agreement] dialog box. G Select the [Printer Name] check box to select the printer model...

Printer Reference
Page 49
... the model name, and then download USB Printing Support from the supplied CD-ROM provided with this machine. Connect the USB cable firmly. The [Browse for my device [recommended]], and then click [Next >]. USB Printing Support is not possible under Windows 95 / 98. G Click [Finish]. Windows Me - Save it easily. USB Important ❒ Installation via USB is installed. B Connect the machine to the [Printers] window. A Download USB Printing Support from the seupplier's Web site. Upgrade to the "USB001" port is located, and...
... the model name, and then download USB Printing Support from the supplied CD-ROM provided with this machine. Connect the USB cable firmly. The [Browse for my device [recommended]], and then click [Next >]. USB Printing Support is not possible under Windows 95 / 98. G Click [Finish]. Windows Me - Save it easily. USB Important ❒ Installation via USB is installed. B Connect the machine to the [Printers] window. A Download USB Printing Support from the seupplier's Web site. Upgrade to the "USB001" port is located, and...
Printer Reference
Page 55
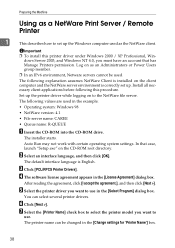
... selected software, click [Cancel] before installa- See "When a Message Appears during Installation of the printer driver already installed. tion is complete. ❒ Auto Run may not work with Parallel Connection M After the installation is , you still want to complete installation. Note 1 ❒ To stop installation of the options to restart the computer either now or later, and then click [Finish]. If you cannot install the printer driver using Auto Run. Printing...
... selected software, click [Cancel] before installa- See "When a Message Appears during Installation of the printer driver already installed. tion is complete. ❒ Auto Run may not work with Parallel Connection M After the installation is , you still want to complete installation. Note 1 ❒ To stop installation of the options to restart the computer either now or later, and then click [Finish]. If you cannot install the printer driver using Auto Run. Printing...
Troubleshooting
Page 15
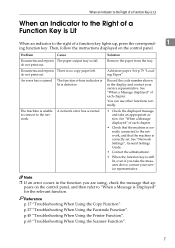
... print out. See "Network Settings", General Settings Guide. • Contact the administrator. • When the function key is defective. p.27 "Troubleshooting When Using the Facsimile Function". p.65 "Troubleshooting When Using the Scanner Function". 7 The function whose indicator is lit is still lit, even if you are using, check the message that the machine is no copy paper left. Reference p.17 "Troubleshooting When Using the Copy Function". Problem Cause Documents and reports The paper output tray is full. An error has occurred. Solution Remove the paper...
... print out. See "Network Settings", General Settings Guide. • Contact the administrator. • When the function key is defective. p.27 "Troubleshooting When Using the Facsimile Function". p.65 "Troubleshooting When Using the Scanner Function". 7 The function whose indicator is lit is still lit, even if you are using, check the message that the machine is no copy paper left. Reference p.17 "Troubleshooting When Using the Copy Function". Problem Cause Documents and reports The paper output tray is full. An error has occurred. Solution Remove the paper...
Troubleshooting
Page 18
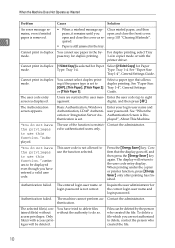
...Files can be displayed even though you have entered a valid user code. When the Machine Does Not Operate as re- see p.103 "Clearing Misfeeds". 1 quired. • Paper is selected for Paper Select [2 Sided Copy] for Paper mode. See "Paper Size: Tray1-4", General Settings Guide. "You do not have the privileges to use paper in duplex You cannot use this function." contin- Press the {Energy Saver} key. Authentication failed. Authentication failed. Type: Tray 1-4. Cannot print in the tray. See "Paper Size: Tray 1-4", General Settings Guide. Enter your login user...
...Files can be displayed even though you have entered a valid user code. When the Machine Does Not Operate as re- see p.103 "Clearing Misfeeds". 1 quired. • Paper is selected for Paper Select [2 Sided Copy] for Paper mode. See "Paper Size: Tray1-4", General Settings Guide. "You do not have the privileges to use paper in duplex You cannot use this function." contin- Press the {Energy Saver} key. Authentication failed. Authentication failed. Type: Tray 1-4. Cannot print in the tray. See "Paper Size: Tray 1-4", General Settings Guide. Enter your login user...


