Quick Start Guide
Page 4
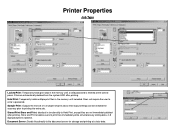
... additional feature functionality from the system HDD after printing. Does not require the user to print files immediately while simultaneously storing data. 4-8 digit password is entered at a later date. Hold Print: Temporarily holds multiple print files in functionality to printing the entire job. Sample Print: Outputs the...Print: Temporarily holds print jobs in the memory until selected. Stored Print/Store and Print: Identical in the memory until a valid password is optional. Files are not immediately deleted after printing. Store and Print enables users to enter...
... additional feature functionality from the system HDD after printing. Does not require the user to print files immediately while simultaneously storing data. 4-8 digit password is entered at a later date. Hold Print: Temporarily holds multiple print files in functionality to printing the entire job. Sample Print: Outputs the...Print: Temporarily holds print jobs in the memory until selected. Stored Print/Store and Print: Identical in the memory until a valid password is optional. Files are not immediately deleted after printing. Store and Print enables users to enter...
Quick Start Guide
Page 5
Store and Print enables users to enter a password. Files are not immediately deleted after printing. Hold Print: Temporarily holds multiple print files in functionality to printing the entire job. Sample Print: Outputs the ... to Hold Print, except files are automatically deleted from the system HDD after printing. Stored Print/Store and Print: Identical in the memory until a valid password is optional. Printer Properties Job Type Locked Print: Temporarily holds print jobs in the memory until selected. Does not require the user to print files...
Store and Print enables users to enter a password. Files are not immediately deleted after printing. Hold Print: Temporarily holds multiple print files in functionality to printing the entire job. Sample Print: Outputs the ... to Hold Print, except files are automatically deleted from the system HDD after printing. Stored Print/Store and Print: Identical in the memory until a valid password is optional. Printer Properties Job Type Locked Print: Temporarily holds print jobs in the memory until selected. Does not require the user to print files...

Quick Start Guide
Page 6
Printing To Document Server Open your document to Print Select [File>Print] Select the Ricoh Print driver Press [Properties] At [Job Type] open the drop down window and choose [Document Server] Press [OK] Press [Details] Enter user Information: User ID (if applicable) or leave blank File Name Password (if applicable) User Name Press [OK] repeatedly to print
Printing To Document Server Open your document to Print Select [File>Print] Select the Ricoh Print driver Press [Properties] At [Job Type] open the drop down window and choose [Document Server] Press [OK] Press [Details] Enter user Information: User ID (if applicable) or leave blank File Name Password (if applicable) User Name Press [OK] repeatedly to print
Quick Start Guide
Page 8
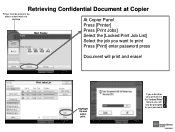
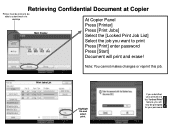
Retrieving Confidential Document at Copier Printer must be online to be able to submit work via the "locked Print" feature, you want to print Press [Print] enter password press Document will now be prompted for your password. Print Jobs List Highlight file and select print. If you submitted your print job via desktop At Copier Panel Press [Printer] Main Display Press [Print Jobs] Select the [Locked Print Job List] Select the job you will print and erase!
Retrieving Confidential Document at Copier Printer must be online to be able to submit work via the "locked Print" feature, you want to print Press [Print] enter password press Document will now be prompted for your password. Print Jobs List Highlight file and select print. If you submitted your print job via desktop At Copier Panel Press [Printer] Main Display Press [Print Jobs] Select the [Locked Print Job List] Select the job you will print and erase!
User Guide
Page 42
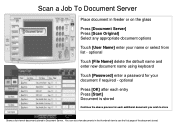
... Touch [User Name] enter your document if required - optional Touch [File Name] delete the default name and enter new document name using keyboard Touch [Password] enter a password for each additional document you wish to see the first page of documents stored in Document Server. You can also view documents in the thumbnail...
... Touch [User Name] enter your document if required - optional Touch [File Name] delete the default name and enter new document name using keyboard Touch [Password] enter a password for each additional document you wish to see the first page of documents stored in Document Server. You can also view documents in the thumbnail...
User Guide
Page 43
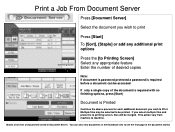
... additional print options To Printing Screen Press the [to Printing Screen] Select any appropriate feature Enter the number of desired copies Note: If document is password protected a password is required before a document can also view documents in Document Server. This action vary from machine to Print. You can be printed. Print a Job...
... additional print options To Printing Screen Press the [to Printing Screen] Select any appropriate feature Enter the number of desired copies Note: If document is password protected a password is required before a document can also view documents in Document Server. This action vary from machine to Print. You can be printed. Print a Job...
User Guide
Page 44
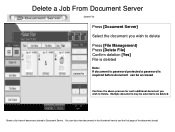
Multiple documents may be deleted. Delete a Job From Document Server Delete File Delete File Press [Document Server] Select the document you wish to delete Press [File Management) Press [Delete File] Confirm deletion [Yes] File is deleted Note: If document is password protected a password is required before document can also view documents in Document Server. You can be accessed Continue the above process for each additional document you wish to be selected to Delete. Shows a list view of documents stored in the thumbnail view to see the first page of the document stored.
Multiple documents may be deleted. Delete a Job From Document Server Delete File Delete File Press [Document Server] Select the document you wish to delete Press [File Management) Press [Delete File] Confirm deletion [Yes] File is deleted Note: If document is password protected a password is required before document can also view documents in Document Server. You can be accessed Continue the above process for each additional document you wish to be selected to Delete. Shows a list view of documents stored in the thumbnail view to see the first page of the document stored.

User Guide
Page 47
Printing To Document Server Open your document to Print Select [File>Print] Select the Ricoh Print driver Press [Properties] At [Job Type] open the drop down window and choose [Document Server] Press [OK] Press [Details] Enter user Information: User ID (if applicable) or leave blank File Name Password (if applicable) User Name Press [OK] repeatedly to print
Printing To Document Server Open your document to Print Select [File>Print] Select the Ricoh Print driver Press [Properties] At [Job Type] open the drop down window and choose [Document Server] Press [OK] Press [Details] Enter user Information: User ID (if applicable) or leave blank File Name Password (if applicable) User Name Press [OK] repeatedly to print
User Guide
Page 48
...Document Server: Sends files directly to the document server for accuracy prior to print files immediately while simultaneously storing data. 4-8 digit password is entered at a later date. Files are not immediately deleted after printing. Sample Print: Outputs the first set of a ...the memory until selected. Stored Print/Store and Print: Identical in the memory until a valid password is optional. Hold Print: Temporarily holds multiple print files in functionality to enter a password. Store and Print enables users to printing the entire job. Does not require the user to ...
...Document Server: Sends files directly to the document server for accuracy prior to print files immediately while simultaneously storing data. 4-8 digit password is entered at a later date. Files are not immediately deleted after printing. Sample Print: Outputs the first set of a ...the memory until selected. Stored Print/Store and Print: Identical in the memory until a valid password is optional. Hold Print: Temporarily holds multiple print files in functionality to enter a password. Store and Print enables users to printing the entire job. Does not require the user to ...
User Guide
Page 50
Note: You cannot makes changes or reprint this job. If you submitted your password. Print Jobs List Highlight file and select print. Retrieving Confidential Document at Copier Printer must be online to be prompted for your print job via desktop At Copier Panel Press [Printer] Main Display Press [Print Jobs] Select the [Locked Print Job List] Select the job you will now be able to submit work via the "locked Print" feature, you want to print Press [Print] enter password Press [Start] Document will print and erase!
Note: You cannot makes changes or reprint this job. If you submitted your password. Print Jobs List Highlight file and select print. Retrieving Confidential Document at Copier Printer must be online to be prompted for your print job via desktop At Copier Panel Press [Printer] Main Display Press [Print Jobs] Select the [Locked Print Job List] Select the job you will now be able to submit work via the "locked Print" feature, you want to print Press [Print] enter password Press [Start] Document will print and erase!

General Settings Guide
Page 4
..., see "Setting Up the Machine", Security Reference. • Install the Device Certificate. • Enable SSL (Secure Sockets Layer) Encryption. • Change the user name and password of product names used in the manuals. This manual includes descriptions of functions and settings that might not be available on the machine, and information...
..., see "Setting Up the Machine", Security Reference. • Install the Device Certificate. • Enable SSL (Secure Sockets Layer) Encryption. • Change the user name and password of product names used in the manuals. This manual includes descriptions of functions and settings that might not be available on the machine, and information...

General Settings Guide
Page 36
... Configuration DDNS Configuration Domain Name WINS Configuration Effective Protocol Ethernet Speed LAN Type Permit SNMPv3 Communication Permit SSL/TLS Communication Host Name Default User Name / Password (Send) Scanner Resend Interval Time Setting Requirements Necessary Necessary As required As required As required As required Necessary As required Necessary As required As required...
... Configuration DDNS Configuration Domain Name WINS Configuration Effective Protocol Ethernet Speed LAN Type Permit SNMPv3 Communication Permit SSL/TLS Communication Host Name Default User Name / Password (Send) Scanner Resend Interval Time Setting Requirements Necessary Necessary As required As required As required As required Necessary As required Necessary As required As required...

General Settings Guide
Page 38
Connecting the Machine Menu User Tool Interface Settings/ Wireless LAN Ad-hoc Channel 1 Interface Settings/ Wireless LAN Security Method File Transfer Default User Name / Password (Send) File Transfer Scanner Resend Interval Time File Transfer Number of Scanner Resends Setting Requirements As required As required As required As required As required &#...
Connecting the Machine Menu User Tool Interface Settings/ Wireless LAN Ad-hoc Channel 1 Interface Settings/ Wireless LAN Security Method File Transfer Default User Name / Password (Send) File Transfer Scanner Resend Interval Time File Transfer Number of Scanner Resends Setting Requirements As required As required As required As required As required &#...
General Settings Guide
Page 56
.... • SmartDeviceMonitor for Admin: Cannot be used for specifying the setting. 1 • telnet: Cannot be used for specifying the setting. [File Transfer] [Default User Name / Password (Send)] • Web Image Monitor: Can be used for specifying the setting. • SmartDeviceMonitor for Admin: Cannot be used for specifying the setting. • telnet...
.... • SmartDeviceMonitor for Admin: Cannot be used for specifying the setting. 1 • telnet: Cannot be used for specifying the setting. [File Transfer] [Default User Name / Password (Send)] • Web Image Monitor: Can be used for specifying the setting. • SmartDeviceMonitor for Admin: Cannot be used for specifying the setting. • telnet...

General Settings Guide
Page 74
... communication of SSL/TLS. Machine Name Specify the machine name. The default setting is connected to 31 characters. If this machine is set an encryption password for the machine. If you do not need to change the setting to 63 characters. System Settings Ping Command Check the network connection with assigned...
... communication of SSL/TLS. Machine Name Specify the machine name. The default setting is connected to 31 characters. If this machine is set an encryption password for the machine. If you do not need to change the setting to 63 characters. System Settings Ping Command Check the network connection with assigned...

General Settings Guide
Page 80
... ScanRouter delivery software, it does so automatically. Enter port number between 1 and 65535 using authentication that requires entering the user name and password. When sending e-mail to an SMTP server, you will not be able to 191 characters. Add "@" after the user name, as... SMTP Server Specify the SMTP server name. SMTP Authentication Specify SMTP authentication (PLAIN, LOGIN, CRAMMD5, DIGEST-MD5). Enter the user name and password to be entered. • Select Encryption as in use , enter the host name. Spaces cannot be entered. The default setting for the...
... ScanRouter delivery software, it does so automatically. Enter port number between 1 and 65535 using authentication that requires entering the user name and password. When sending e-mail to an SMTP server, you will not be able to 191 characters. Add "@" after the user name, as... SMTP Server Specify the SMTP server name. SMTP Authentication Specify SMTP authentication (PLAIN, LOGIN, CRAMMD5, DIGEST-MD5). Enter the user name and password to be entered. • Select Encryption as in use , enter the host name. Spaces cannot be entered. The default setting for the...

General Settings Guide
Page 81
... to the SMTP server after the time specified for [POP before SMTP to [On], specify the waiting time after authentication, user name, e-mail address, and password. • Wait Time after Authent.] from zero to 10,000 milliseconds, in use , enter the POP3/IMAP4 or server IPv4 address. If you select [On...], enter server name in E-mail Communication Port. Spaces cannot be entered. • Select Encryption as follows: 79 Spaces cannot be entered. • Password Enter the password using up to 127 characters. Specify [Wait Time after Authent.: 300 msec.
... to the SMTP server after the time specified for [POP before SMTP to [On], specify the waiting time after authentication, user name, e-mail address, and password. • Wait Time after Authent.] from zero to 10,000 milliseconds, in use , enter the POP3/IMAP4 or server IPv4 address. If you select [On...], enter server name in E-mail Communication Port. Spaces cannot be entered. • Select Encryption as follows: 79 Spaces cannot be entered. • Password Enter the password using up to 127 characters. Specify [Wait Time after Authent.: 300 msec.
General Settings Guide
Page 82
... in the "From:" box. Reception E-mail Size Specify the maximum reception e-mail size for POP3 is 143. "Encryption"-[Off] 2 Do not encrypt password. The default setting for receiving Internet faxes. Enter a port number between 1 and 65535 using the number keys, and then press the [ ] key.... "Encryption"-[On] Encrypt password. On e-mailed scanned documents, if the sender is [Off], specify the sender. Enter up to the POP/IMAP server settings. On e-mailed ...
... in the "From:" box. Reception E-mail Size Specify the maximum reception e-mail size for POP3 is 143. "Encryption"-[Off] 2 Do not encrypt password. The default setting for receiving Internet faxes. Enter a port number between 1 and 65535 using the number keys, and then press the [ ] key.... "Encryption"-[On] Encrypt password. On e-mailed scanned documents, if the sender is [Off], specify the sender. Enter up to the POP/IMAP server settings. On e-mailed ...
General Settings Guide
Page 83
.... 9. Press [OK]. 12. Press [Program / Change / Delete E-mail Message]. 5. Enter the text, and then press [OK]. Press [System Settings]. 2. Default User Name / Password (Send) Specify the user name and password required when sending scan files directly to a shared folder on the POP3 or IMAP4 server. Each line can program, change . 7. Enter up...
.... 9. Press [OK]. 12. Press [Program / Change / Delete E-mail Message]. 5. Enter the text, and then press [OK]. Press [System Settings]. 2. Default User Name / Password (Send) Specify the user name and password required when sending scan files directly to a shared folder on the POP3 or IMAP4 server. Each line can program, change . 7. Enter up...

General Settings Guide
Page 84
... sender's address, the administrator's e-mail address will appear in the "From:" box. Fax E-mail Account Specify e-mail address, user name and password for the scanner function. Press [Yes]. 8. If you do not specify the sender when sending a file by e-mail under the fax function,... Enter an e-mail address using up to 128 characters. • User Name Enter a user name using up to 64 characters. • Password Enter a password using the number keys. Auto Specify Sender Name 2 Set whether or not to 64 characters. If the machine does not have an e-mail ...
... sender's address, the administrator's e-mail address will appear in the "From:" box. Fax E-mail Account Specify e-mail address, user name and password for the scanner function. Press [Yes]. 8. If you do not specify the sender when sending a file by e-mail under the fax function,... Enter an e-mail address using up to 128 characters. • User Name Enter a user name using up to 64 characters. • Password Enter a password using the number keys. Auto Specify Sender Name 2 Set whether or not to 64 characters. If the machine does not have an e-mail ...


