Quick Use Guide
Page 8
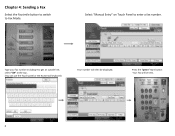
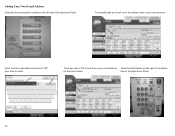
Type your fax number including 9 to get an outside line, select "OK" at the top . (You can use the Touch panel or the Numerical keyboard) Your number will be displayed. Select "Manual Entry" on Touch Panel to Fax Mode. Press the "green" Start button Your Fax will then be Sent. 8 Chapter 4: Sending a Fax Select the Facsimile button to switch to enter a fax number.
Type your fax number including 9 to get an outside line, select "OK" at the top . (You can use the Touch panel or the Numerical keyboard) Your number will be displayed. Select "Manual Entry" on Touch Panel to Fax Mode. Press the "green" Start button Your Fax will then be Sent. 8 Chapter 4: Sending a Fax Select the Facsimile button to switch to enter a fax number.
Quick Use Guide
Page 14
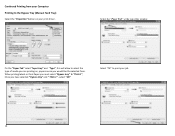
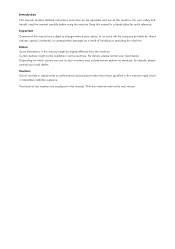
When printing labels or thick Paper you must select "Bypass tray" & "Thick 1", Once you would like the selected from your Computer Printing to the Bypass Tray (Manual Feed Tray) Select the "Properties" button on your job 14 Select the "Paper Tab" at the top of the window On the "Paper Tab" select "Input tray" and "Type", this will allow to select the type of media you are printing on, paper source you have selected " Bypass tray" and " Thick 1" , select "OK" Select "OK" to print your print driver. Continued Printing from .
When printing labels or thick Paper you must select "Bypass tray" & "Thick 1", Once you would like the selected from your Computer Printing to the Bypass Tray (Manual Feed Tray) Select the "Properties" button on your job 14 Select the "Paper Tab" at the top of the window On the "Paper Tab" select "Input tray" and "Type", this will allow to select the type of media you are printing on, paper source you have selected " Bypass tray" and " Thick 1" , select "OK" Select "OK" to print your print driver. Continued Printing from .
Quick Use Guide
Page 15
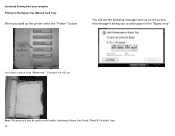
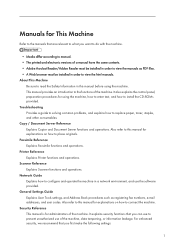
Continued Printing from your computer Printing to the Bypass Tray (Manual Feed Tray) When you walk up on the screen, this message is asking you to place paper in the "Bypass tray" Your print job will see the following message come up the printer select the "Printer" button You will start. Note: This process is placed in the "Bypass tray" Once paper is also be used to print Lables, letterhead, Heavy Card Stock (Think) & Printable Tabs 15
Continued Printing from your computer Printing to the Bypass Tray (Manual Feed Tray) When you walk up on the screen, this message is asking you to place paper in the "Bypass tray" Your print job will see the following message come up the printer select the "Printer" button You will start. Note: This process is placed in the "Bypass tray" Once paper is also be used to print Lables, letterhead, Heavy Card Stock (Think) & Printable Tabs 15
Quick Use Guide
Page 19
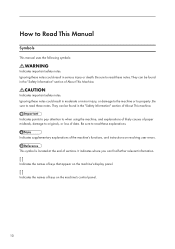
side of the Operations Panel 19 Adding Your Own E-mail Address Select the Scanner button located on the main screen. Once you select "OK' you will see your scan to email. To manually add an e‐mail not in the address book, select manual entry Enter the full e‐mail address and press "OK" your e‐mail address Press the Start Button on the right To complete on the left sideof the Operation Panel.
side of the Operations Panel 19 Adding Your Own E-mail Address Select the Scanner button located on the main screen. Once you select "OK' you will see your scan to email. To manually add an e‐mail not in the address book, select manual entry Enter the full e‐mail address and press "OK" your e‐mail address Press the Start Button on the right To complete on the left sideof the Operation Panel.

General Settings Guide
Page 1
For safe and correct use, be sure to read the Safety Information in "About This Machine" before you use this machine and keep it handy for future reference. Operating Instructions General Settings Guide 1 Connecting the Machine 2 System Settings 3 Copier/Document Server Features 4 Facsimile Features 5 Printer Features 6 Scanner Features 7 Registering Addresses and Users for Facsimile/Scanner Functions 8 Other User Tools 9 Appendix Read this manual carefully before using the machine.
For safe and correct use, be sure to read the Safety Information in "About This Machine" before you use this machine and keep it handy for future reference. Operating Instructions General Settings Guide 1 Connecting the Machine 2 System Settings 3 Copier/Document Server Features 4 Facsimile Features 5 Printer Features 6 Scanner Features 7 Registering Addresses and Users for Facsimile/Scanner Functions 8 Other User Tools 9 Appendix Read this manual carefully before using the machine.
General Settings Guide
Page 2
...for quick reference. For details, please contact your local dealer. Introduction This manual contains detailed instructions and notes on which country you are in, your safety and benefit, read this manual in a handy place for direct, indirect, special, incidental, or consequential ... version. Important Contents of this manual. Certain options might not be slightly different from the machine. With this manual are employed in hazardous radiation exposure. Notes: Some illustrations in this manual might be available in this manual might result in this machine. ...
...for quick reference. For details, please contact your local dealer. Introduction This manual contains detailed instructions and notes on which country you are in, your safety and benefit, read this manual in a handy place for direct, indirect, special, incidental, or consequential ... version. Important Contents of this manual. Certain options might not be slightly different from the machine. With this manual are employed in hazardous radiation exposure. Notes: Some illustrations in this manual might be available in this manual might result in this machine. ...
General Settings Guide
Page 3
...Explains User Tools settings, and Address Book procedures such as PDF files. • A Web browser must be installed in order to view the manuals as registering fax numbers, e-mail addresses, and user codes. For enhanced security, we recommend that you can use to prevent unauthorized use the ...to enter text, and how to install the CD-ROMs provided. Also refer to this manual for using the machine. Scanner Reference Explains Scanner functions and operations. Manuals for This Machine Refer to the manuals that are relevant to what you want to do with the machine. • Media ...
...Explains User Tools settings, and Address Book procedures such as PDF files. • A Web browser must be installed in order to view the manuals as registering fax numbers, e-mail addresses, and user codes. For enhanced security, we recommend that you can use to prevent unauthorized use the ...to enter text, and how to install the CD-ROMs provided. Also refer to this manual for using the machine. Scanner Reference Explains Scanner functions and operations. Manuals for This Machine Refer to the manuals that are relevant to what you want to do with the machine. • Media ...

General Settings Guide
Page 4
... 3 Supplement Explains how to read this machine. Information Contains general notes on this manual when setting the enhanced security functions, or user and administrator authentication. Other manuals • Manuals for DeskTopBinder Lite • DeskTopBinder Lite Setup Guide • DeskTopBinder Introduction Guide &#... SSL (Secure Sockets Layer) Encryption. • Change the user name and password of product names used in the manuals. This manual includes descriptions of functions and settings that might not be available on the machine, and information about the trademarks of ...
... 3 Supplement Explains how to read this machine. Information Contains general notes on this manual when setting the enhanced security functions, or user and administrator authentication. Other manuals • Manuals for DeskTopBinder Lite • DeskTopBinder Lite Setup Guide • DeskTopBinder Introduction Guide &#... SSL (Secure Sockets Layer) Encryption. • Change the user name and password of product names used in the manuals. This manual includes descriptions of functions and settings that might not be available on the machine, and information about the trademarks of ...

General Settings Guide
Page 5
......34 Wireless LAN...35 Network Settings Required to Use the Network Delivery Scanner 37 Ethernet...37 Wireless LAN...38 Network Settings Required to Read This Manual...10 Symbols...10 Display Panel...11 Accessing User Tools...12 Changing Default Settings...12 Quitting User Tools...13 Menu Protect...14 1. TABLE OF CONTENTS...
......34 Wireless LAN...35 Network Settings Required to Use the Network Delivery Scanner 37 Ethernet...37 Wireless LAN...38 Network Settings Required to Read This Manual...10 Symbols...10 Display Panel...11 Accessing User Tools...12 Changing Default Settings...12 Quitting User Tools...13 Menu Protect...14 1. TABLE OF CONTENTS...
General Settings Guide
Page 12
... notes could result in moderate or minor injury, or damage to the machine or to originals, or loss of sections. Be sure to Read This Manual Symbols This manual uses the following symbols: Indicates important safety notes. Indicates supplementary explanations of About This machine.
... notes could result in moderate or minor injury, or damage to the machine or to originals, or loss of sections. Be sure to Read This Manual Symbols This manual uses the following symbols: Indicates important safety notes. Indicates supplementary explanations of About This machine.
General Settings Guide
Page 49
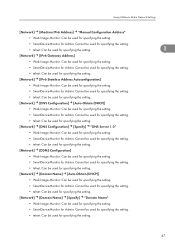
Using Utilities to Make Network Settings [Network] [Machine IPv6 Address] "Manual Configuration Address" • Web Image Monitor: Can be used for specifying the setting. • SmartDeviceMonitor for Admin: Cannot be used for specifying the setting. • ...
Using Utilities to Make Network Settings [Network] [Machine IPv6 Address] "Manual Configuration Address" • Web Image Monitor: Can be used for specifying the setting. • SmartDeviceMonitor for Admin: Cannot be used for specifying the setting. • ...
General Settings Guide
Page 71
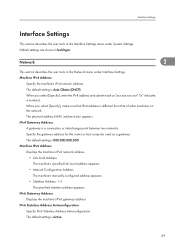
... Address Autoconfiguration. Machine IPv6 Address Displays the machine's IPv6 network address. • Link-local Address The machine's specified link-local address appears. • Manual Configuration Address The machine's manually configured address appears. • Stateless Address: 1-5 The specified stateless address appears. Machine IPv4 Address Specify the machine's IPv4 network address. When you select...
... Address Autoconfiguration. Machine IPv6 Address Displays the machine's IPv6 network address. • Link-local Address The machine's specified link-local address appears. • Manual Configuration Address The machine's manually configured address appears. • Stateless Address: 1-5 The specified stateless address appears. Machine IPv4 Address Specify the machine's IPv4 network address. When you select...
General Settings Guide
Page 127
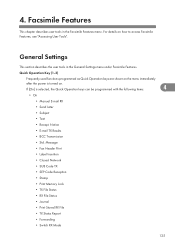
... are shown on the menu immediately after the power is selected, the Quick Operation keys can be programmed with the following items: 4 • On • Manual E-mail RX • Send Later • Subject • Text • Recept. Facsimile Features This chapter describes user tools in the General Settings menu under Facsimile...
... are shown on the menu immediately after the power is selected, the Quick Operation keys can be programmed with the following items: 4 • On • Manual E-mail RX • Send Later • Subject • Text • Recept. Facsimile Features This chapter describes user tools in the General Settings menu under Facsimile...

General Settings Guide
Page 201
... to access Printer Features, see "Accessing User Tools". For details on how to one of the following types of Auto Job Cancel and jobs canceled manually from the control panel can be printed.
... to access Printer Features, see "Accessing User Tools". For details on how to one of the following types of Auto Job Cancel and jobs canceled manually from the control panel can be printed.
General Settings Guide
Page 248
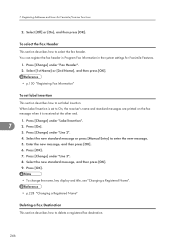
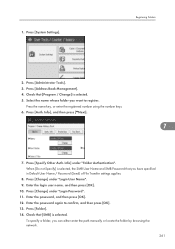
... new message. 5. Select the new standard message, and then press [OK]. 9. Press [Change] under "Fax Header". 2. Press [OK]. 7. Select the new standard message or press [Manual Entry] to On, the receiver's name and standard messages are printed on the fax message when it is set label insertion. Registering Addresses and Users...
... new message. 5. Select the new standard message, and then press [OK]. 9. Press [Change] under "Fax Header". 2. Press [OK]. 7. Select the new standard message or press [Manual Entry] to On, the receiver's name and standard messages are printed on the fax message when it is set label insertion. Registering Addresses and Users...

General Settings Guide
Page 254
... [Change] under "Label Insertion". 2. To select the Fax Header 7 This section describes how to enter the new message. 5. Select the new standard message or press [Manual Entry] to select the fax header. 1. Enter a password using the number keys, and then press [OK]. 4. Press [OK]. Select [1st Name] or [2nd Name], and...
... [Change] under "Label Insertion". 2. To select the Fax Header 7 This section describes how to enter the new message. 5. Select the new standard message or press [Manual Entry] to select the fax header. 1. Enter a password using the number keys, and then press [OK]. 4. Press [OK]. Select [1st Name] or [2nd Name], and...
General Settings Guide
Page 263
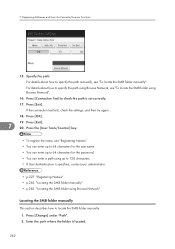
... key, or enter the registered number using the number keys. 6. When [Do not Specify] is selected. 5. To specify a folder, you can either enter the path manually or locate the folder by browsing the network. 261 Enter the password, and then press [OK]. 12.
... key, or enter the registered number using the number keys. 6. When [Do not Specify] is selected. 5. To specify a folder, you can either enter the path manually or locate the folder by browsing the network. 261 Enter the password, and then press [OK]. 12.
General Settings Guide
Page 264
... Authentication is specified, contact your administrator. • p.227 "Registering Names" • p.262 "Locating the SMB folder manually" • p.263 "Locating the SMB folder using Browse Network" Locating the SMB folder manually This section describes how to specify the path using Browse Network". 16. Press [Exit]. 7 20. Enter the path where...Exit]. If the connection test fails, check the settings, and then try again. 18. Specify the path. Press [Connection Test] to specify the path manually, see "To locate the SMB folder using Browse Network, see "To locate the SMB folder...
... Authentication is specified, contact your administrator. • p.227 "Registering Names" • p.262 "Locating the SMB folder manually" • p.263 "Locating the SMB folder using Browse Network" Locating the SMB folder manually This section describes how to specify the path using Browse Network". 16. Press [Exit]. 7 20. Enter the path where...Exit]. If the connection test fails, check the settings, and then try again. 18. Specify the path. Press [Connection Test] to specify the path manually, see "To locate the SMB folder using Browse Network, see "To locate the SMB folder...
General Settings Guide
Page 266
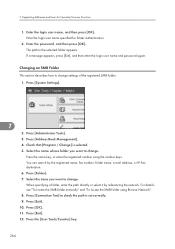
... or select it by the registered name, fax number, folder name, e-mail address, or IP-Fax destination. 6. For details, see "To locate the SMB folder manually" and "To locate the SMB folder using the number keys. Press [Exit]. 10. Check that [Program / Change] is set correctly. 9. Press [OK]. 11. Changing an...
... or select it by the registered name, fax number, folder name, e-mail address, or IP-Fax destination. 6. For details, see "To locate the SMB folder manually" and "To locate the SMB folder using the number keys. Press [Exit]. 10. Check that [Program / Change] is set correctly. 9. Press [OK]. 11. Changing an...

General Settings Guide
Page 267
... Folders • To change the name, key display and title, see "Changing a Registered Name". • p.228 "Changing a Registered Name" • p.262 "Locating the SMB folder manually" • p.263 "Locating the SMB folder using Browse Network" To change the protocol This section describes how to delete the registered SMB folder. 265 Changing...
... Folders • To change the name, key display and title, see "Changing a Registered Name". • p.228 "Changing a Registered Name" • p.262 "Locating the SMB folder manually" • p.263 "Locating the SMB folder using Browse Network" To change the protocol This section describes how to delete the registered SMB folder. 265 Changing...


