User Guide
Page 14
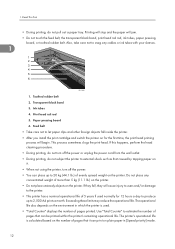
... is used normally for the first time, the print head priming process will jam. • Do not touch the feed belt, the transparent black band, print head rail rod, ink tubes, paper pressing board, or toothed rubber belt. This process sometimes clogs the print head. Printing will... stop and the paper will begin. Toothed rubber belt 2. Transparent black band 3. Do not place any cables or ink tubes with your sleeves. 1 1 12 23 34 45 56 BYJ164S 1. Read This First •...
... is used normally for the first time, the print head priming process will jam. • Do not touch the feed belt, the transparent black band, print head rail rod, ink tubes, paper pressing board, or toothed rubber belt. This process sometimes clogs the print head. Printing will... stop and the paper will begin. Toothed rubber belt 2. Transparent black band 3. Do not place any cables or ink tubes with your sleeves. 1 1 12 23 34 45 56 BYJ164S 1. Read This First •...
User Guide
Page 15
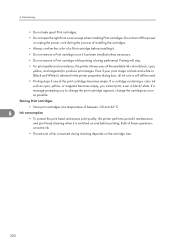
...This printer is designed to have an operational life of disuse. • Color ink may be used even if you print all-black text or if you specify black and white printing. Maintenance is also performed when printing begins after a long period of copies in a single day might cause the... up sooner than normal. Allow any condensation to what you cannot print, even in the printer properties dialog box, all the available ink colors (black, cyan, yellow, and magenta) to do. 13 An "Ink Collector almost full" message appears shortly before their expiry date, ideally within six ...
...This printer is designed to have an operational life of disuse. • Color ink may be used even if you print all-black text or if you specify black and white printing. Maintenance is also performed when printing begins after a long period of copies in a single day might cause the... up sooner than normal. Allow any condensation to what you cannot print, even in the printer properties dialog box, all the available ink colors (black, cyan, yellow, and magenta) to do. 13 An "Ink Collector almost full" message appears shortly before their expiry date, ideally within six ...
User Guide
Page 23
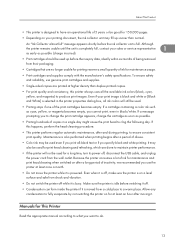
Right Front Cover During normal usage, keep this cover when you need to the rear position . ; Open this cover closed . GX e2600 1 4 7 5 BYJ260S 21 Envelope Selector For envelopes, set the lever to Components 5. Print Cartridge (yellow) 10. Paper Feed Wheel... to install or replace an ink cartridge or the ink collector unit. 12. Open this cover closed . Guide to the forward position 6. Print Cartridge (black) 1 7. Print Cartridge (magenta) 9. Ink Collector Unit 11. for everything else, set the lever to turn the paper feed wheel. Print Cartridge (...
Right Front Cover During normal usage, keep this cover when you need to the rear position . ; Open this cover closed . GX e2600 1 4 7 5 BYJ260S 21 Envelope Selector For envelopes, set the lever to Components 5. Print Cartridge (yellow) 10. Paper Feed Wheel... to install or replace an ink cartridge or the ink collector unit. 12. Open this cover closed . Guide to the forward position 6. Print Cartridge (black) 1 7. Print Cartridge (magenta) 9. Ink Collector Unit 11. for everything else, set the lever to turn the paper feed wheel. Print Cartridge (...

User Guide
Page 26
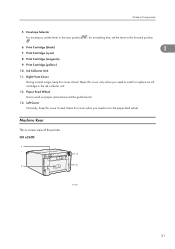
...when making settings. Display Displays current printer status and error messages. 2. You can use this key to clean the cyan, magenta, yellow, and black print heads ( only). 24 If a message prompting you to cancel an ongoing print job. 7. A red light indicates an error has occurred... print all data left , the colors show the status of 10. Cartridge replacement indicator Each color corresponds to print data received in units of the black (K), cyan (C), magenta (M), and yellow (Y) cartridges. 3. [Menu] key Press this to force the printer to a print cartridge. Press this to...
...when making settings. Display Displays current printer status and error messages. 2. You can use this key to clean the cyan, magenta, yellow, and black print heads ( only). 24 If a message prompting you to cancel an ongoing print job. 7. A red light indicates an error has occurred... print all data left , the colors show the status of 10. Cartridge replacement indicator Each color corresponds to print data received in units of the black (K), cyan (C), magenta (M), and yellow (Y) cartridges. 3. [Menu] key Press this to force the printer to a print cartridge. Press this to...
User Guide
Page 32
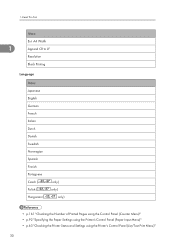
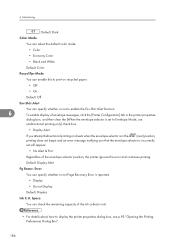
1. A4 Width 1 Append CR to LF Resolution Black Printing Language Menu Japanese English German French Italian Dutch Danish Swedish Norwegian Spanish Finnish Portuguese Czech ( Polish ( Hungarian ( only) only) only) • p.161 "Checking the Number of Printed Pages using the Control Panel (Counter Menu)" • p.92 "Specifying the Paper Settings using the Printer's Control Panel (Paper Input Menu)" • p.63 "Checking the Printer Status and Settings using the Printer's Control Panel (List/Test Print Menu)" 30 Read This First Menu Ext.
1. A4 Width 1 Append CR to LF Resolution Black Printing Language Menu Japanese English German French Italian Dutch Danish Swedish Norwegian Spanish Finnish Portuguese Czech ( Polish ( Hungarian ( only) only) only) • p.161 "Checking the Number of Printed Pages using the Control Panel (Counter Menu)" • p.92 "Specifying the Paper Settings using the Printer's Control Panel (Paper Input Menu)" • p.63 "Checking the Printer Status and Settings using the Printer's Control Panel (List/Test Print Menu)" 30 Read This First Menu Ext.

User Guide
Page 42
... when lifting can result in breakage and/or injury. 2 • Do not turn the machine on this. 1. Yellow • Starter cartridge - Magenta • Starter cartridge - Black • Quick Installation Guide • Safety information • CD-ROM; User Guide is included on until you want to do so. Remove the plastic bag...
... when lifting can result in breakage and/or injury. 2 • Do not turn the machine on this. 1. Yellow • Starter cartridge - Magenta • Starter cartridge - Black • Quick Installation Guide • Safety information • CD-ROM; User Guide is included on until you want to do so. Remove the plastic bag...

User Guide
Page 45
Repeat steps 3 to 4 for all four cartridges. 6. Push in the following order from the left: black, cyan, magenta, and yellow. 4. Setting Up the Hardware 2. Close the right front cover. BPR114S Install in each cartridge, and then install them gently. BPR115S 43 Check the orientation of the right front cover, open the cover ( ). 2 BPR113S 3. While pressing the recessed area ( ) of each cartridge. 5.
Repeat steps 3 to 4 for all four cartridges. 6. Push in the following order from the left: black, cyan, magenta, and yellow. 4. Setting Up the Hardware 2. Close the right front cover. BPR114S Install in each cartridge, and then install them gently. BPR115S 43 Check the orientation of the right front cover, open the cover ( ). 2 BPR113S 3. While pressing the recessed area ( ) of each cartridge. 5.

User Guide
Page 101
..., content other than text is printed at lower density. • If ink smears appear and characters are not properly formed when printing white text on a black background, select [High speed] or [Speed priority] in the [Print Quality] area, and then print the job again. • Printing on envelopes • Before loading...
..., content other than text is printed at lower density. • If ink smears appear and characters are not properly formed when printing white text on a black background, select [High speed] or [Speed priority] in the [Print Quality] area, and then print the job again. • Printing on envelopes • Before loading...
User Guide
Page 144
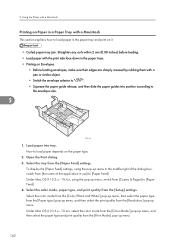
... paper guides into tray. Select the color mode, paper type, and print quality from the [Paper Feed] settings. Select the color mode from the [Color/Black and White:] pop-up menu, then select the paper type from the [Paper type:] pop-up menu, and then select the print quality from the...
... paper guides into tray. Select the color mode, paper type, and print quality from the [Paper Feed] settings. Select the color mode from the [Color/Black and White:] pop-up menu, then select the paper type from the [Paper type:] pop-up menu, and then select the print quality from the...

User Guide
Page 149
... setting will change automatically to [Auto Tray Select]. • Tray 1 Thick • If you are using Mac OS X v10.5 or later and specify [Black and White] for [Color/Black and White], [Color Ink Saving] will be unavailable. • If you specify a custom size outside the range of printing modes for a paper tray...
... setting will change automatically to [Auto Tray Select]. • Tray 1 Thick • If you are using Mac OS X v10.5 or later and specify [Black and White] for [Color/Black and White], [Color Ink Saving] will be unavailable. • If you specify a custom size outside the range of printing modes for a paper tray...
User Guide
Page 163
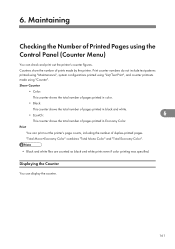
... number of duplex-printed pages. Show Counter • Color: This counter shows the total number of pages printed in color. • Black: This counter shows the total number of pages printed in Economy Color. Displaying the Counter You can check and print out the printer's ...printouts made by the printer. "Total Mono+Economy Color" combines "Total Mono Color" and "Total Economy Color". • Black and white files are counted as black and white prints even if color printing was specified. Counters show the number of Printed Pages using "Counter". Maintaining Checking the...
... number of duplex-printed pages. Show Counter • Color: This counter shows the total number of pages printed in color. • Black: This counter shows the total number of pages printed in Economy Color. Displaying the Counter You can check and print out the printer's ...printouts made by the printer. "Total Mono+Economy Color" combines "Total Mono Color" and "Total Economy Color". • Black and white files are counted as black and white prints even if color printing was specified. Counters show the number of Printed Pages using "Counter". Maintaining Checking the...

User Guide
Page 164
Press the [Menu] key. Press the [Online] key. BYJ127S 2. Press [ ] or [ ], and then check the [Color], [Black], and [EconClr] on the display. Menu: Counter 3. Press [ ] or [ ] to display [Show Counter], and then press the [#Enter] key. 6 Menu: Show Counter 4. Color: 12345678 Black: 12345678 EconClr: 12345678 5. The operating screen appears. 162 Maintaining 1. Press [ ] or [ ] to display [Counter], and then press the [#Enter] key. 6.
Press the [Menu] key. Press the [Online] key. BYJ127S 2. Press [ ] or [ ], and then check the [Color], [Black], and [EconClr] on the display. Menu: Counter 3. Press [ ] or [ ] to display [Show Counter], and then press the [#Enter] key. 6 Menu: Show Counter 4. Color: 12345678 Black: 12345678 EconClr: 12345678 5. The operating screen appears. 162 Maintaining 1. Press [ ] or [ ] to display [Counter], and then press the [#Enter] key. 6.

User Guide
Page 169
Performing Maintenance using the Control Panel (Maintenance Menu) 3. Maintenance in process... 7. Head-cleaning: All Heads 1 1 2 2 BYJ160S 1. Head 2 (Black/Cyan) 6 6. Press the [Online] key. Menu: Maintenance 4. Head 1 (Yellow/Magenta) 2. Press the [#Enter] key. Press the [ ] or [ ] key ... Head cleaning starts. The initial screen appears. No-Fuss Head Cleaning When the machine is online, you can clean the cyan, magenta, yellow, and black print heads with just a couple of keystrokes. 167 Press # to display [Head-cleaning], and then press the [#Enter] key. Press the [ ...
Performing Maintenance using the Control Panel (Maintenance Menu) 3. Maintenance in process... 7. Head-cleaning: All Heads 1 1 2 2 BYJ160S 1. Head 2 (Black/Cyan) 6 6. Press the [Online] key. Menu: Maintenance 4. Head 1 (Yellow/Magenta) 2. Press the [#Enter] key. Press the [ ] or [ ] key ... Head cleaning starts. The initial screen appears. No-Fuss Head Cleaning When the machine is online, you can clean the cyan, magenta, yellow, and black print heads with just a couple of keystrokes. 167 Press # to display [Head-cleaning], and then press the [#Enter] key. Press the [ ...
User Guide
Page 172
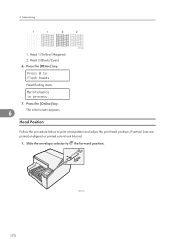
Press the [#Enter] key. Maintenance in process... 7. Head Position Follow the procedure below to flush heads Head flushing starts. Maintaining 1 1 2 2 BYJ160S 1. Press the [Online] key. 6 The initial screen appears. Head 2 (Black/Cyan) 6. Press # to print a test pattern and adjust the print head positions if vertical lines are printed unaligned or printed colors look blurred. 1. Slide the envelope selector to the forward position. 170 BPR137S Head 1 (Yellow/Magenta) 2. 6.
Press the [#Enter] key. Maintenance in process... 7. Head Position Follow the procedure below to flush heads Head flushing starts. Maintaining 1 1 2 2 BYJ160S 1. Press the [Online] key. 6 The initial screen appears. Head 2 (Black/Cyan) 6. Press # to print a test pattern and adjust the print head positions if vertical lines are printed unaligned or printed colors look blurred. 1. Slide the envelope selector to the forward position. 170 BPR137S Head 1 (Yellow/Magenta) 2. 6.

User Guide
Page 174
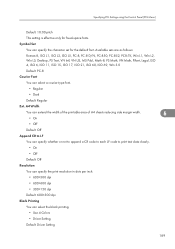
... [Adjustment], and then press the [#Enter] key. 9. The initial screen appears. Adj.Paper Feed If horizontal lines are printed unaligned, print images are patchy, or a black or white line is printed at regular intervals, print a test pattern, and then adjust the paper feed setting. 172 Enter the optimal adjustment values from...
... [Adjustment], and then press the [#Enter] key. 9. The initial screen appears. Adj.Paper Feed If horizontal lines are printed unaligned, print images are patchy, or a black or white line is printed at regular intervals, print a test pattern, and then adjust the paper feed setting. 172 Enter the optimal adjustment values from...
User Guide
Page 188
... "Opening the Printing Preferences Dialog Box". 186 Maintaining : Default: Dark Color Mode You can select the default color mode. • Color • Economy Color • Black and White Default: Color Recycl.Ppr.Mode You can enable this to print on recycled paper. • Off • On Default: Off Env.Slctr.Alert...
... "Opening the Printing Preferences Dialog Box". 186 Maintaining : Default: Dark Color Mode You can select the default color mode. • Color • Economy Color • Black and White Default: Color Recycl.Ppr.Mode You can enable this to print on recycled paper. • Off • On Default: Off Env.Slctr.Alert...
User Guide
Page 191
... dots per inch. • 600×300 dpi • 600×600 dpi • 300×150 dpi Default: 600×300 dpi Black Printing You can select the black printing. • Use 4 Colors • Driver Setting Default: Driver Setting 189 Specifying PCL Settings using the Control Panel (PCL Menu) Default: 10...
... dots per inch. • 600×300 dpi • 600×600 dpi • 300×150 dpi Default: 600×300 dpi Black Printing You can select the black printing. • Use 4 Colors • Driver Setting Default: Driver Setting 189 Specifying PCL Settings using the Control Panel (PCL Menu) Default: 10...

User Guide
Page 198
.... Maintaining 4. The illustration above indicates the cyan ink has completely run out. From left to right, the cartridge replacement indicators display the status of the black (K), cyan (C), magenta (M), and yellow (Y) Print cartridges. • The cartridge status can be used for determination of cartridge 6 needs to replace a print cartridge can be also...
.... Maintaining 4. The illustration above indicates the cyan ink has completely run out. From left to right, the cartridge replacement indicators display the status of the black (K), cyan (C), magenta (M), and yellow (Y) Print cartridges. • The cartridge status can be used for determination of cartridge 6 needs to replace a print cartridge can be also...

User Guide
Page 200
Push in the following order from the left: black, cyan, magenta, and yellow. 5. While pressing the recessed area ( ) of the right front cover, open the cover ( ). Install in the cartridge. 198 BPR141S 6. When doing this, be sure to hold the printer firmly so that it does not move. 6 BPR140S 4. Check the cartridges' orientation, and then install them gently. Maintaining 2. Take out the empty cartridges. BPR113S 3.
Push in the following order from the left: black, cyan, magenta, and yellow. 5. While pressing the recessed area ( ) of the right front cover, open the cover ( ). Install in the cartridge. 198 BPR141S 6. When doing this, be sure to hold the printer firmly so that it does not move. 6 BPR140S 4. Check the cartridges' orientation, and then install them gently. Maintaining 2. Take out the empty cartridges. BPR113S 3.
User Guide
Page 202
Even if your print image is black and white or [Black and White] is switched on the cartridge size. 200 6. Both of these operations consume ink. ... before installing it. • Do not remove a Print cartridge once it is selected in black/white. If a message prompting you cannot print, even in the printer properties dialog box, all the available ink colors... (black, cyan, yellow, and magenta) to change the print cartridge appears, change the cartridge as soon as cyan,...
Even if your print image is black and white or [Black and White] is switched on the cartridge size. 200 6. Both of these operations consume ink. ... before installing it. • Do not remove a Print cartridge once it is selected in black/white. If a message prompting you cannot print, even in the printer properties dialog box, all the available ink colors... (black, cyan, yellow, and magenta) to change the print cartridge appears, change the cartridge as soon as cyan,...


