
User Guide
Page 4
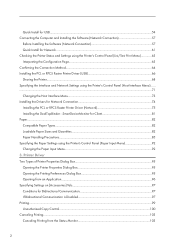
... 57 Before Installing the Software (Network Connection 57 Quick Install for Network...61 Checking the Printer Status and Settings using the Printer's Control Panel (List/Test Print Menu 63 Interpreting the Configuration Page...63 Confirming the Connection Method...64 Installing the PCL or RPCS Raster Printer Driver (USB 66 Sharing the...
... 57 Before Installing the Software (Network Connection 57 Quick Install for Network...61 Checking the Printer Status and Settings using the Printer's Control Panel (List/Test Print Menu 63 Interpreting the Configuration Page...63 Confirming the Connection Method...64 Installing the PCL or RPCS Raster Printer Driver (USB 66 Sharing the...
User Guide
Page 7
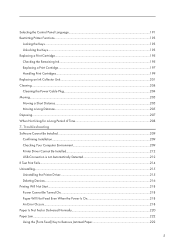
... Be Installed...209 Confirming Installation...209 Checking Your Computer Environment...209 Printer Driver Cannot Be Installed...212 USB Connection is not Automatically Detected 212 If Test Print Fails...214 Uninstalling...215 Uninstalling the Printer Driver...215 Deleting Devices...216 Printing Will Not Start...218 Power Cannot Be Turned On...218 Paper...
... Be Installed...209 Confirming Installation...209 Checking Your Computer Environment...209 Printer Driver Cannot Be Installed...212 USB Connection is not Automatically Detected 212 If Test Print Fails...214 Uninstalling...215 Uninstalling the Printer Driver...215 Deleting Devices...216 Printing Will Not Start...218 Power Cannot Be Turned On...218 Paper...
User Guide
Page 29
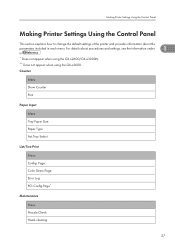
... Counter Print Paper Input Menu Tray Paper Size Paper Type Aut.Tray Select List/Test Print Menu Config. For details about the parameters included in . * Does not appear when using the GX e2600/GX e3300N. ** Does not appear when using the GX e2600. Making Printer Settings Using the Control Panel Making Printer Settings Using the...
... Counter Print Paper Input Menu Tray Paper Size Paper Type Aut.Tray Select List/Test Print Menu Config. For details about the parameters included in . * Does not appear when using the GX e2600/GX e3300N. ** Does not appear when using the GX e2600. Making Printer Settings Using the Control Panel Making Printer Settings Using the...

User Guide
Page 30
1. Err Report* Auto Continue Sub Paper Size Energy Saver Notify by Email** Memory Usage* Unit of Measure Page Size* Paper Type* Preprinted Ppr* Copies* Duplex* 28 Read This First Menu Head-flushing 1 Head Position Adj.Paper Feed Registration Date/Time Key Repeat Dry-delay (Exit) Dry-delay (Dup)** Paper Feed Test De-condensation System Menu Prt.
1. Err Report* Auto Continue Sub Paper Size Energy Saver Notify by Email** Memory Usage* Unit of Measure Page Size* Paper Type* Preprinted Ppr* Copies* Duplex* 28 Read This First Menu Head-flushing 1 Head Position Adj.Paper Feed Registration Date/Time Key Repeat Dry-delay (Exit) Dry-delay (Dup)** Paper Feed Test De-condensation System Menu Prt.
User Guide
Page 32
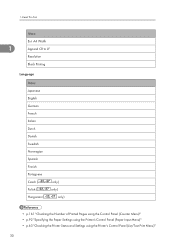
A4 Width 1 Append CR to LF Resolution Black Printing Language Menu Japanese English German French Italian Dutch Danish Swedish Norwegian Spanish Finnish Portuguese Czech ( Polish ( Hungarian ( only) only) only) • p.161 "Checking the Number of Printed Pages using the Control Panel (Counter Menu)" • p.92 "Specifying the Paper Settings using the Printer's Control Panel (Paper Input Menu)" • p.63 "Checking the Printer Status and Settings using the Printer's Control Panel (List/Test Print Menu)" 30 Read This First Menu Ext. 1.
A4 Width 1 Append CR to LF Resolution Black Printing Language Menu Japanese English German French Italian Dutch Danish Swedish Norwegian Spanish Finnish Portuguese Czech ( Polish ( Hungarian ( only) only) only) • p.161 "Checking the Number of Printed Pages using the Control Panel (Counter Menu)" • p.92 "Specifying the Paper Settings using the Printer's Control Panel (Paper Input Menu)" • p.63 "Checking the Printer Status and Settings using the Printer's Control Panel (List/Test Print Menu)" 30 Read This First Menu Ext. 1.

User Guide
Page 53
... is printed on facing up the hardware and before connecting the printer to the paper size. Setting Up the Hardware 2. Printing the configuration page as a test print primes the print heads and allows you to check the printer's configuration and system settings. • The configuration page is functional. Load paper in... same paper tray. 51 BPR176S Printing a Configuration Page After setting up . 2 BPR126S Before loading narrow paper, position the side paper guides according to a computer, make a test print by printing the configuration page.
... is printed on facing up the hardware and before connecting the printer to the paper size. Setting Up the Hardware 2. Printing the configuration page as a test print primes the print heads and allows you to check the printer's configuration and system settings. • The configuration page is functional. Load paper in... same paper tray. 51 BPR176S Printing a Configuration Page After setting up . 2 BPR126S Before loading narrow paper, position the side paper guides according to a computer, make a test print by printing the configuration page.

User Guide
Page 54
...Enter] key. Page The configuration page is printed. If you are clogged up or not by printing a nozzle check test pattern. 4. List/Test Print: Config. The List/Test Print menu screen returns on the configuration page, see p.63 "Checking the Printer Status and Settings using the Printer's ...proceed to p.53 "Connecting the Computer and Installing the Software (USB Connection)". Hold the [Power] key down until the printer shuts down. Menu: List/Test Print 3. Page], and then press the [#Enter] key. 2. If you are connecting the printer to a computer via USB, proceed to p.57 ...
...Enter] key. Page The configuration page is printed. If you are clogged up or not by printing a nozzle check test pattern. 4. List/Test Print: Config. The List/Test Print menu screen returns on the configuration page, see p.63 "Checking the Printer Status and Settings using the Printer's ...proceed to p.53 "Connecting the Computer and Installing the Software (USB Connection)". Hold the [Power] key down until the printer shuts down. Menu: List/Test Print 3. Page], and then press the [#Enter] key. 2. If you are connecting the printer to a computer via USB, proceed to p.57 ...
User Guide
Page 55
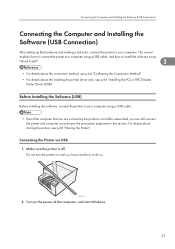
Connecting the Computer and Installing the Software (USB Connection) Connecting the Computer and Installing the Software (USB Connection) After setting up the hardware and making a test print, connect the printer to via USB 1. Before Installing the Software (USB) Before installing the software, connect the printer to your computer. Do not turn ...
Connecting the Computer and Installing the Software (USB Connection) Connecting the Computer and Installing the Software (USB Connection) After setting up the hardware and making a test print, connect the printer to via USB 1. Before Installing the Software (USB) Before installing the software, connect the printer to your computer. Do not turn ...
User Guide
Page 58
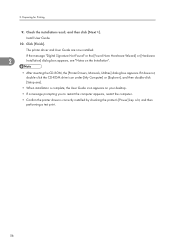
... the computer appears, restart the computer. • Confirm the printer driver is correctly installed by checking the printer's [Power] key is lit, and then performing a test print. 56 Preparing for Printing 9. Check the installation result, and then click [Next >]. Click [Finish]. If it does not, double-click the CD-ROM drive...
... the computer appears, restart the computer. • Confirm the printer driver is correctly installed by checking the printer's [Power] key is lit, and then performing a test print. 56 Preparing for Printing 9. Check the installation result, and then click [Next >]. Click [Finish]. If it does not, double-click the CD-ROM drive...
User Guide
Page 59
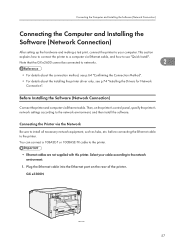
... the Computer and Installing the Software (Network Connection) After setting up the hardware and making a test print, connect the printer to your cable according to the network environment. 1. GX e3300N BPR129S 57 This section explains how to connect the printer to a computer via Ethernet cable, and...• For details about the installing the printer driver only, see p.74 "Installing the Drivers for Network Connection". Note that the GX e2600 cannot be connected to the printer. Plug the Ethernet cable into the Ethernet port on the printer's control panel, specify the ...
... the Computer and Installing the Software (Network Connection) After setting up the hardware and making a test print, connect the printer to your cable according to the network environment. 1. GX e3300N BPR129S 57 This section explains how to connect the printer to a computer via Ethernet cable, and...• For details about the installing the printer driver only, see p.74 "Installing the Drivers for Network Connection". Note that the GX e2600 cannot be connected to the printer. Plug the Ethernet cable into the Ethernet port on the printer's control panel, specify the ...
User Guide
Page 64
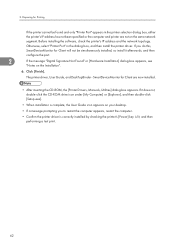
...-click the CD-ROM drive icon under [My Computer] or [Explorer], and then double-click [Setup.exe]. • When installation is lit, and then performing a test print. 62 2. SmartDeviceMonitor for Client are not on the Installation". 6. The printer driver, User Guide, and DeskTopBinder -
...-click the CD-ROM drive icon under [My Computer] or [Explorer], and then double-click [Setup.exe]. • When installation is lit, and then performing a test print. 62 2. SmartDeviceMonitor for Client are not on the Installation". 6. The printer driver, User Guide, and DeskTopBinder -
User Guide
Page 65
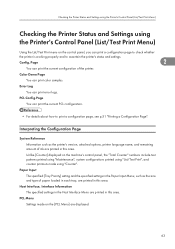
... loaded in each tray, are printed in this area. PCL Menu Settings made using the Printer's Control Panel (List/Test Print Menu) Using the List/Test Print menu on the [PCL Menu] are printed in this area. Checking the Printer Status and Settings using the Printer...Settings using "Counter". Unlike [Counter] displayed on the machine's control panel, the "Total Counter" numbers include test patterns printed using "Maintenance", system configurations printed using "List/Test Print", and counter printouts made on the control panel, you can print the current configuration of ink are ...
... loaded in each tray, are printed in this area. PCL Menu Settings made using the Printer's Control Panel (List/Test Print Menu) Using the List/Test Print menu on the [PCL Menu] are printed in this area. Checking the Printer Status and Settings using the Printer...Settings using "Counter". Unlike [Counter] displayed on the machine's control panel, the "Total Counter" numbers include test patterns printed using "Maintenance", system configurations printed using "List/Test Print", and counter printouts made on the control panel, you can print the current configuration of ink are ...
User Guide
Page 69
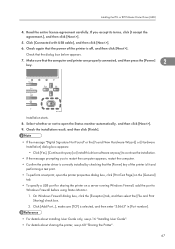
Click [Connected with USB cable], and then click [Next >]. 6. Select whether or not to open the printer properties dialog box, click [Print Test Page] on the [General] tab. • To specify a USB port for sharing the printer on a server running Windows Firewall, add the...the dialog box below appears. 7. Read the entire license agreement carefully. Click [Add Port...], make sure [TCP] is lit and performing a test print. • To perform a test print, open the Status monitor automatically, and then click [Next >]. 9. On Windows Firewall dialog box, click the [Exception] tab, and then...
Click [Connected with USB cable], and then click [Next >]. 6. Select whether or not to open the printer properties dialog box, click [Print Test Page] on the [General] tab. • To specify a USB port for sharing the printer on a server running Windows Firewall, add the...the dialog box below appears. 7. Read the entire license agreement carefully. Click [Add Port...], make sure [TCP] is lit and performing a test print. • To perform a test print, open the Status monitor automatically, and then click [Next >]. 9. On Windows Firewall dialog box, click the [Exception] tab, and then...

User Guide
Page 70
... the printer driver. 8. On the [Start] menu, click [Control Panel]. 2. Select the [Client for Printing • p.249 "If a Message Appears during Installation" • p.214 "If Test Print Fails" Sharing the Printer 2 This section explains how to set up a print server so that the printer can be shared by connecting it , and...
... the printer driver. 8. On the [Start] menu, click [Control Panel]. 2. Select the [Client for Printing • p.249 "If a Message Appears during Installation" • p.214 "If Test Print Fails" Sharing the Printer 2 This section explains how to set up a print server so that the printer can be shared by connecting it , and...

User Guide
Page 134
...: Checking the printer status and settings using the printer's control panel See p.63 "Checking the Printer Status and Settings using the Printer's Control Panel (List/Test Print Menu)" Specifying the interface and network settings using the printer's control panel See p.71 "Specifying the Interface and Network Settings using the Printer's Control...
...: Checking the printer status and settings using the printer's control panel See p.63 "Checking the Printer Status and Settings using the Printer's Control Panel (List/Test Print Menu)" Specifying the interface and network settings using the printer's control panel See p.71 "Specifying the Interface and Network Settings using the Printer's Control...
User Guide
Page 163
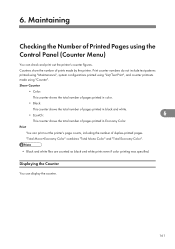
... the Control Panel (Counter Menu) You can check and print out the printer's counter figures. Print counter numbers do not include test patterns printed using "Maintenance", system configurations printed using "List/Test Print", and counter printouts made by the printer. "Total Mono+Economy Color" combines "Total Mono Color" and "Total Economy Color...
... the Control Panel (Counter Menu) You can check and print out the printer's counter figures. Print counter numbers do not include test patterns printed using "Maintenance", system configurations printed using "List/Test Print", and counter printouts made by the printer. "Total Mono+Economy Color" combines "Total Mono Color" and "Total Economy Color...
User Guide
Page 165
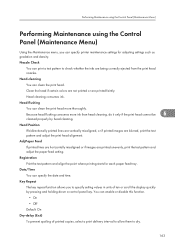
...cleaning. Because head flushing consumes more thoroughly. Clean the head if certain colors are not printed or are printed unevenly, print the test pattern and adjust the paper feed setting. Head-flushing You can clean the print head. Adj.Paper Feed If printed lines are ...holding down a control panel key. Key Repeat The key repeat function allows you can specify the date and time. Registration Print the test pattern and align the point where printing starts for adjusting settings such as gradation and density. Head Position If bidirectionally printed lines are...
...cleaning. Because head flushing consumes more thoroughly. Clean the head if certain colors are not printed or are printed unevenly, print the test pattern and adjust the paper feed setting. Head-flushing You can clean the print head. Adj.Paper Feed If printed lines are ...holding down a control panel key. Key Repeat The key repeat function allows you can specify the date and time. Registration Print the test pattern and align the point where printing starts for adjusting settings such as gradation and density. Head Position If bidirectionally printed lines are...

User Guide
Page 166
... to allow a duplex-printed sheet to allow them . Nozzle Check Follow the procedure below to dry. The interval must be long enough to dry. The GX e2600 has no duplex printing capability and therefore does not feature this function. • Off 6 • 1 sec • 2 sec • 5 sec •...; 10 sec • 15 sec • 20 sec Default: Off Paper Feed Test You can eject three sheets of paper without printing anything on them to check whether the print head nozzles are clogged up or not by...
... to allow a duplex-printed sheet to allow them . Nozzle Check Follow the procedure below to dry. The interval must be long enough to dry. The GX e2600 has no duplex printing capability and therefore does not feature this function. • Off 6 • 1 sec • 2 sec • 5 sec •...; 10 sec • 15 sec • 20 sec Default: Off Paper Feed Test You can eject three sheets of paper without printing anything on them to check whether the print head nozzles are clogged up or not by...

User Guide
Page 167
Press the [#Enter] key. Press the [Online] key. The initial screen appears. 6. Performing Maintenance using the Control Panel (Maintenance Menu) BYJ127S 2. Press the [ ] or [ ] key to display [Nozzle Check], and then press the [#Enter] key. Press the [ ] or [ ] key to display [Maintenance], and then press the [#Enter] key. Press the [Menu] key. Menu: Maintenance 3. Check the printed test pattern. Maintenance: Nozzle Check 6 4. 1. Normal BPR211S When print heads are clogged 165 Press # to print pattern A test pattern is printed. 5.
Press the [#Enter] key. Press the [Online] key. The initial screen appears. 6. Performing Maintenance using the Control Panel (Maintenance Menu) BYJ127S 2. Press the [ ] or [ ] key to display [Nozzle Check], and then press the [#Enter] key. Press the [ ] or [ ] key to display [Maintenance], and then press the [#Enter] key. Press the [Menu] key. Menu: Maintenance 3. Check the printed test pattern. Maintenance: Nozzle Check 6 4. 1. Normal BPR211S When print heads are clogged 165 Press # to print pattern A test pattern is printed. 5.
User Guide
Page 172
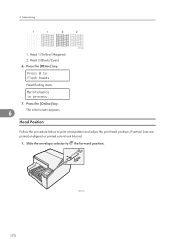
Press the [#Enter] key. Press the [Online] key. 6 The initial screen appears. Slide the envelope selector to flush heads Head flushing starts. 6. Press # to the forward position. 170 BPR137S Head 2 (Black/Cyan) 6. Maintaining 1 1 2 2 BYJ160S 1. Maintenance in process... 7. Head Position Follow the procedure below to print a test pattern and adjust the print head positions if vertical lines are printed unaligned or printed colors look blurred. 1. Head 1 (Yellow/Magenta) 2.
Press the [#Enter] key. Press the [Online] key. 6 The initial screen appears. Slide the envelope selector to flush heads Head flushing starts. 6. Press # to the forward position. 170 BPR137S Head 2 (Black/Cyan) 6. Maintaining 1 1 2 2 BYJ160S 1. Maintenance in process... 7. Head Position Follow the procedure below to print a test pattern and adjust the print head positions if vertical lines are printed unaligned or printed colors look blurred. 1. Head 1 (Yellow/Magenta) 2.