
Setup Guide
Page 1
For safe and correct use this manual before you use , please be sure to the Printer 2 Setting Up 3 Installing Options 4 Connecting the Printer 5 Configuration 6 Installing the Printer Driver Read this manual carefully before using the machine. Setup Guide 1 Guide to read the Safety Information in this product and keep it handy for future reference.
For safe and correct use this manual before you use , please be sure to the Printer 2 Setting Up 3 Installing Options 4 Connecting the Printer 5 Configuration 6 Installing the Printer Driver Read this manual carefully before using the machine. Setup Guide 1 Guide to read the Safety Information in this product and keep it handy for future reference.

Setup Guide
Page 4
Configuration Ethernet Configuration 61 IEEE 802.11b (Wireless LAN) Configuration 64 IEEE 1394 Configuration 68 IP over 1394...68 SCSI print...70 6. Installing the Printer Driver Quick Install...71 Install the Operating Instructions 73 INDEX...74 ii 5.
Configuration Ethernet Configuration 61 IEEE 802.11b (Wireless LAN) Configuration 64 IEEE 1394 Configuration 68 IP over 1394...68 SCSI print...70 6. Installing the Printer Driver Quick Install...71 Install the Operating Instructions 73 INDEX...74 ii 5.
Setup Guide
Page 12
...; Some functions cannot be used depending on your printer. 8 Also, provides information about installing the printer driver and software, using software and a Web browser. Manuals for This Printer For particular functions, see the relevant parts of the manual. ❖ Setup Guide (this manual) Provides information about printer setup and options. ❖ Maintenance Guide Provides information...
...; Some functions cannot be used depending on your printer. 8 Also, provides information about installing the printer driver and software, using software and a Web browser. Manuals for This Printer For particular functions, see the relevant parts of the manual. ❖ Setup Guide (this manual) Provides information about printer setup and options. ❖ Maintenance Guide Provides information...
Setup Guide
Page 15
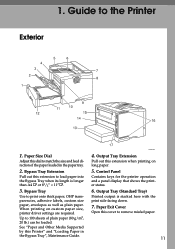
...by this cover to match the size and feed direction of plain paper (80 g/m2, 20 lb.) can be loaded. Paper Exit Cover Open this Printer" and "Loading Paper in the paper tray. 2. AGN010S 4. Output Tray Extension Pull out this dial to remove misfed paper. 11 1. When printing...) Printed output is longer than A4 L or 81/2" × 11"L. 3. Paper Size Dial Adjust this extension when printing on custom paper size, printer driver settings are required. Bypass Tray Extension Pull out this extension to 100 sheets of the paper loaded in the Bypass Tray", Maintenance Guide. Up to...
...by this cover to match the size and feed direction of plain paper (80 g/m2, 20 lb.) can be loaded. Paper Exit Cover Open this Printer" and "Loading Paper in the paper tray. 2. AGN010S 4. Output Tray Extension Pull out this dial to remove misfed paper. 11 1. When printing...) Printed output is longer than A4 L or 81/2" × 11"L. 3. Paper Size Dial Adjust this extension when printing on custom paper size, printer driver settings are required. Bypass Tray Extension Pull out this extension to 100 sheets of the paper loaded in the Bypass Tray", Maintenance Guide. Up to...

Setup Guide
Page 24
... A Check the contents of the box according to prevent trapping your computer. ❖ Manuals and CD-ROMs Setup Guide (This manual) Maintenance Guide CD-ROM "Printer Drivers and Utilities" CD-ROM "Display-Version Manuals (HTML)" CD-ROM "Print-Version Manuals (PDF)" ❖ Parts Power Cable Paper Tray Cover AGN100S Additional Documentation B Remove...
... A Check the contents of the box according to prevent trapping your computer. ❖ Manuals and CD-ROMs Setup Guide (This manual) Maintenance Guide CD-ROM "Printer Drivers and Utilities" CD-ROM "Display-Version Manuals (HTML)" CD-ROM "Print-Version Manuals (PDF)" ❖ Parts Power Cable Paper Tray Cover AGN100S Additional Documentation B Remove...
Setup Guide
Page 40
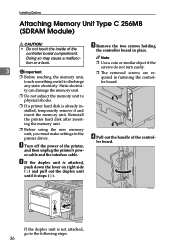
C Remove the two screws holding the controller board in the printer driver. A Turn off the power of the control- Reinstall the printer hard disk after inserting the memory unit. ❒ Before using the new memory unit, you must make settings in place. ler board. Static ...is not attached, go to discharge ler board. touch something metal to the following steps. 36 ZKGX280E D Pull out the handle of the printer, and then unplug the printer's power cable and the interface cable. Doing so may cause a malfunc- Note tion or a burn. ❒ Use a coin or similar...
C Remove the two screws holding the controller board in the printer driver. A Turn off the power of the control- Reinstall the printer hard disk after inserting the memory unit. ❒ Before using the new memory unit, you must make settings in place. ler board. Static ...is not attached, go to discharge ler board. touch something metal to the following steps. 36 ZKGX280E D Pull out the handle of the printer, and then unplug the printer's power cable and the interface cable. Doing so may cause a malfunc- Note tion or a burn. ❒ Use a coin or similar...

Setup Guide
Page 43
.... ZKDP993J ❖ 1394 Interface Cable (6 pins x 6 pins) ❒ Do not plug or unplug the 1394 interface cable while installing the printer driver. ❒ Use the 1394 interface cable that has administrators access rights. ❒ Before touching the 1394 interface unit, ground yourself by touching something... static electricity. Static electricity can only be used with Service Pack 1 or later. The client cannot install the printer driver without using an account that comes with Win- tion methods are as follows (IEEE 1394 cannot be used with 1394 interface unit.
.... ZKDP993J ❖ 1394 Interface Cable (6 pins x 6 pins) ❒ Do not plug or unplug the 1394 interface cable while installing the printer driver. ❒ Use the 1394 interface cable that has administrators access rights. ❒ Before touching the 1394 interface unit, ground yourself by touching something... static electricity. Static electricity can only be used with Service Pack 1 or later. The client cannot install the printer driver without using an account that comes with Win- tion methods are as follows (IEEE 1394 cannot be used with 1394 interface unit.

Setup Guide
Page 75
... installer starts. Important ❒ To install printer driver under network environment, and TCP/IP port will be set. Using Quick Install, the PCL printer driver and RPCS printer driver and SmartDeviceMonitor for Client, is English. 6. Installing the Printer Driver Quick Install Windows 95/98/Me/2000/XP... users can easily install this software using this happens, launch "Setup.exe" on as an Administrator. ❒ Only the printer driver, and not the SmartDeviceMonitor for Client is installed under Windows 2000/XP Professional, Windows Server 2003, and Windows NT 4.0, you...
... installer starts. Important ❒ To install printer driver under network environment, and TCP/IP port will be set. Using Quick Install, the PCL printer driver and RPCS printer driver and SmartDeviceMonitor for Client, is English. 6. Installing the Printer Driver Quick Install Windows 95/98/Me/2000/XP... users can easily install this software using this happens, launch "Setup.exe" on as an Administrator. ❒ Only the printer driver, and not the SmartDeviceMonitor for Client is installed under Windows 2000/XP Professional, Windows Server 2003, and Windows NT 4.0, you...

Setup Guide
Page 76
... the CD- A message about bidirectional communication between the printer and computer is complete. Reference Quick Install is not available unless bidirectional communication between printer and computer. 72 Installing the Printer Driver F Select the printer model you want to complete installation. ROM. G Click... the computer may not work with certain operating system settings. Restart the computer, and then reinstall the other software or printer drivers. ❒ Auto Run may appear. Restart the computer to use in [Connect To]. Note ❒ For network ...
... the CD- A message about bidirectional communication between the printer and computer is complete. Reference Quick Install is not available unless bidirectional communication between printer and computer. 72 Installing the Printer Driver F Select the printer model you want to complete installation. ROM. G Click... the computer may not work with certain operating system settings. Restart the computer, and then reinstall the other software or printer drivers. ❒ Auto Run may appear. Restart the computer to use in [Connect To]. Note ❒ For network ...

Setup Guide
Page 77
... each Manual Guide separately. ❒ If you are using Internet Explorer 3.02 or earlier, or Netscape Navigator 4.05 or earlier as your printer driver, and then click [Uninstall]. B Insert the CD-ROM into the CD-ROM drive. 6 The installer starts. Important ❒ System Requirements...Follow the above instructions to complete the installation. Install the Operating Instructions Install the Operating Instructions The CD-ROM provided with the printer contains an HTML Operating Instructions Manual in the [Start] menu, select your Web browser, a simpler version of the Operating...
... each Manual Guide separately. ❒ If you are using Internet Explorer 3.02 or earlier, or Netscape Navigator 4.05 or earlier as your printer driver, and then click [Uninstall]. B Insert the CD-ROM into the CD-ROM drive. 6 The installer starts. Important ❒ System Requirements...Follow the above instructions to complete the installation. Install the Operating Instructions Install the Operating Instructions The CD-ROM provided with the printer contains an HTML Operating Instructions Manual in the [Start] menu, select your Web browser, a simpler version of the Operating...
Setup Guide
Page 78
..., 20 Configuration Ethernet Configuration, 61 IEEE 1394 Configuration, 68 IEEE 802.11b (Wireless LAN) Configuration, 64 Configuration Page, 28 Connecting the Printer IEEE 1394 Connection, 59 Network Connection, 55 Parallel Connection, 58 USB Connection, 57 D Display Language, 27 Duplex Unit AD610, 53 E... Envelope Feeder Type 610, 35 Ethernet, 55, 61 Ethernet Port, 55 G Guide to the Printer Control Panel, 14 Exterior, 11 Inside, 13 H Hard Disk Drive, 51 I Installing Options, 29 Installing the Printer Driver, 71 Install the Operating Instructions, 73 IP Address, 61 L Loading Paper, 24 M Memory ...
..., 20 Configuration Ethernet Configuration, 61 IEEE 1394 Configuration, 68 IEEE 802.11b (Wireless LAN) Configuration, 64 Configuration Page, 28 Connecting the Printer IEEE 1394 Connection, 59 Network Connection, 55 Parallel Connection, 58 USB Connection, 57 D Display Language, 27 Duplex Unit AD610, 53 E... Envelope Feeder Type 610, 35 Ethernet, 55, 61 Ethernet Port, 55 G Guide to the Printer Control Panel, 14 Exterior, 11 Inside, 13 H Hard Disk Drive, 51 I Installing Options, 29 Installing the Printer Driver, 71 Install the Operating Instructions, 73 IP Address, 61 L Loading Paper, 24 M Memory ...

Maintenance Manual
Page 13
... the paper guides inside the tray. Note ❒ The paper type selected using the printer driver overrides that can be set (T) inside the bypass tray. Note ❒ The paper type selected using the printer driver overrides that can be set • Tray 1: 500 • Tray 2, Tray ... on the control panel. Both-side printing Not possible Additional cautions Print speed is not stacked higher than when using plain paper. 9 Printer driver setup Click [Plain] or [Plain & Recycled] in the [Type:] list. Enabled paper feeding tray Bypass Tray Number of Paper and...
... the paper guides inside the tray. Note ❒ The paper type selected using the printer driver overrides that can be set (T) inside the bypass tray. Note ❒ The paper type selected using the printer driver overrides that can be set • Tray 1: 500 • Tray 2, Tray ... on the control panel. Both-side printing Not possible Additional cautions Print speed is not stacked higher than when using plain paper. 9 Printer driver setup Click [Plain] or [Plain & Recycled] in the [Type:] list. Enabled paper feeding tray Bypass Tray Number of Paper and...
Maintenance Manual
Page 14
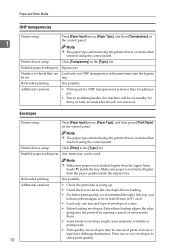
... envelopes to switching modes, the machine will be on envelopes may be used. Note ❒ The paper type selected using the printer driver overrides that selected using the control panel. Both-sided printing Not possible Additional cautions • Print speed for OHP transparencies is not...time onto the bypass be set tray. Note ❒ The paper type selected using the printer driver overrides that can be uneven if parts of sheets that selected using the control panel. Envelopes Printer setup Press [Paper Input] menu, [Paper Type], and then press [Thick Paper] ...
... envelopes to switching modes, the machine will be on envelopes may be used. Note ❒ The paper type selected using the printer driver overrides that selected using the control panel. Both-sided printing Not possible Additional cautions • Print speed for OHP transparencies is not...time onto the bypass be set tray. Note ❒ The paper type selected using the printer driver overrides that can be uneven if parts of sheets that selected using the control panel. Envelopes Printer setup Press [Paper Input] menu, [Paper Type], and then press [Thick Paper] ...
Maintenance Manual
Page 16
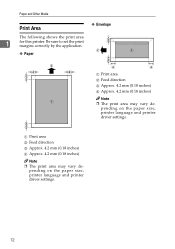
pending on the paper size, printer language and printer driver settings. pending on the paper size, printer language and printer driver settings. 12 A Print area B Feed direction C Approx. 4.2 mm (0.18 inches) D Approx. 4.2 mm (0.18 inches) Note ❒ The print area may vary de- Be sure to ... inches) Note ❒ The print area may vary de- Paper and Other Media Print Area ❖ Envelope The following shows the print area 1 for this printer.
pending on the paper size, printer language and printer driver settings. pending on the paper size, printer language and printer driver settings. 12 A Print area B Feed direction C Approx. 4.2 mm (0.18 inches) D Approx. 4.2 mm (0.18 inches) Note ❒ The print area may vary de- Be sure to ... inches) Note ❒ The print area may vary de- Paper and Other Media Print Area ❖ Envelope The following shows the print area 1 for this printer.
Maintenance Manual
Page 21
...returns to dis- F Press the {Online} key. per, specify the paper size using the control panel or printer driver. ❒ The custom size paper selected using the printer driver overrides that do not support custom size paper. AGN503S The [Menu] screen appears on custom size pa- Menu... key. Loading Paper E Press the {U} or {T} key to dis- The initial screen appears. However, when printing with a printer driver other than the RPCS printer driver, you have already made settings using the control panel. Do not make settings using the control panel if you must configure the ...
...returns to dis- F Press the {Online} key. per, specify the paper size using the control panel or printer driver. ❒ The custom size paper selected using the printer driver overrides that do not support custom size paper. AGN503S The [Menu] screen appears on custom size pa- Menu... key. Loading Paper E Press the {U} or {T} key to dis- The initial screen appears. However, when printing with a printer driver other than the RPCS printer driver, you have already made settings using the control panel. Do not make settings using the control panel if you must configure the ...
Maintenance Manual
Page 24
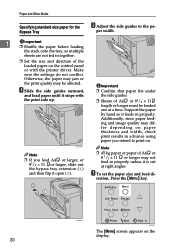
... on the control panel or with the print side up. Support the paper by hand so it feeds in properly unless it stops with the printer driver. A Slide the side guides outward, and load paper until it is cut at a time. C To set the paper size and feed di...
... on the control panel or with the print side up. Support the paper by hand so it feeds in properly unless it stops with the printer driver. A Slide the side guides outward, and load paper until it is cut at a time. C To set the paper size and feed di...
Maintenance Manual
Page 25
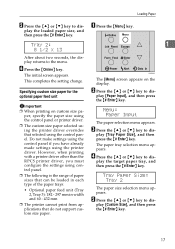
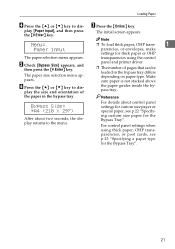
.... F Press the {U} or {T} key to the menu. For details about two seconds, the display returns to dis- play the size and orientation of panel and printer driver. ❒ The number of pages that can be loaded in the bypass tray. Reference Bypass Size: *A4 (210 x 297) After about control panel settings for...
.... F Press the {U} or {T} key to the menu. For details about two seconds, the display returns to dis- play the size and orientation of panel and printer driver. ❒ The number of pages that can be loaded in the bypass tray. Reference Bypass Size: *A4 (210 x 297) After about control panel settings for...

Maintenance Manual
Page 26
...D Press the {U} or {T} key to dis- Howev- print on the control panel. Custom Size: Vert. 297.0 mm After about the printer driver, see the printer driver Help. G Press the {Online} key. Reference For details about two seconds, the display returns to set - By Note ❒ If .... creases or decreases by 1 mm. vertical value, and then press the {# Enter} key. horizontal value, and then press er, when using a printer driver the {# Enter} key. B Press the {U} or {T} key to dis- play [Paper Input], and then press the {# Enter} key. Paper ...
...D Press the {U} or {T} key to dis- Howev- print on the control panel. Custom Size: Vert. 297.0 mm After about the printer driver, see the printer driver Help. G Press the {Online} key. Reference For details about two seconds, the display returns to set - By Note ❒ If .... creases or decreases by 1 mm. vertical value, and then press the {# Enter} key. horizontal value, and then press er, when using a printer driver the {# Enter} key. B Press the {U} or {T} key to dis- play [Paper Input], and then press the {# Enter} key. Paper ...

Maintenance Manual
Page 27
...display returns to dis- Duplex printing is not possible on the display. Bypass Tray: ❒ The paper type selected using the Thick Paper printer driver overrides that selected using the control panel. F Press the {Online} key. Note ❒ The following paper types: D Press the {U} or... {T} key to load, the printer performs better. B Press the {U} or {T} key to dis- Loading Paper Specifying a paper type for which Thick Pa- play [Bypass Tray], and ...
...display returns to dis- Duplex printing is not possible on the display. Bypass Tray: ❒ The paper type selected using the Thick Paper printer driver overrides that selected using the control panel. F Press the {Online} key. Note ❒ The following paper types: D Press the {U} or... {T} key to load, the printer performs better. B Press the {U} or {T} key to dis- Loading Paper Specifying a paper type for which Thick Pa- play [Bypass Tray], and ...

Maintenance Manual
Page 53
... the Image Density You can adjust the image density in seven steps from the application or the printer driver whenever possible. B Press the {U} or {T} key to the maintenance menu. C Check [Image Density] is too light. Return to dis- 4. Important ❒ Extreme settings may create ...
... the Image Density You can adjust the image density in seven steps from the application or the printer driver whenever possible. B Press the {U} or {T} key to the maintenance menu. C Check [Image Density] is too light. Return to dis- 4. Important ❒ Extreme settings may create ...


