
Operating Instructions
Page 3
... Making Network Settings for the Specified Model...9 1. Configuration Ethernet Configuration...39 Using DHCP - Guide to Put the Printer...19 Space Required for Installation...19 Installing the Toner bottle...22 Loading Paper...26 Loading Paper into Tray 1 (Tandem Tray 26 Loading Paper into Tray 2 and ...3...27 Turning the Power On...29 Selecting the Display Language...31 Test Printing...33 3. Connecting the Printer Network Connection...35 Reading ...
... Making Network Settings for the Specified Model...9 1. Configuration Ethernet Configuration...39 Using DHCP - Guide to Put the Printer...19 Space Required for Installation...19 Installing the Toner bottle...22 Loading Paper...26 Loading Paper into Tray 1 (Tandem Tray 26 Loading Paper into Tray 2 and ...3...27 Turning the Power On...29 Selecting the Display Language...31 Test Printing...33 3. Connecting the Printer Network Connection...35 Reading ...

Operating Instructions
Page 4
...Replacing the Toner bottle...77 Adding Staples...81 Finisher SR841...81 Finisher SR4000...83 Finisher SR4000 (Saddle Stitch)...86 8. Installing the Printer Driver Quick Install...53 Install the Operating Instructions...55 6. Paper and Other Media Paper and Other Media Supported by This Printer 57 Paper...Troubleshooting Error & Status Messages on the Display Panel 95 When Call-light Is Lit or Blinking...104 2 Cleaning and Adjusting the Printer Cautions to Take When Cleaning...91 Adjusting Tray Registration...92 9. Setting the Ethernet Speed...44 IEEE 802.11b (Wireless LAN) Configuration ...
...Replacing the Toner bottle...77 Adding Staples...81 Finisher SR841...81 Finisher SR4000...83 Finisher SR4000 (Saddle Stitch)...86 8. Installing the Printer Driver Quick Install...53 Install the Operating Instructions...55 6. Paper and Other Media Paper and Other Media Supported by This Printer 57 Paper...Troubleshooting Error & Status Messages on the Display Panel 95 When Call-light Is Lit or Blinking...104 2 Cleaning and Adjusting the Printer Cautions to Take When Cleaning...91 Adjusting Tray Registration...92 9. Setting the Ethernet Speed...44 IEEE 802.11b (Wireless LAN) Configuration ...
Operating Instructions
Page 5
... Misfed Paper...127 Remove Misfeed A, U: Internal...127 Remove Misfeed B-F: Internal...130 Remove Misfeed Q: Interposer...135 Remove Misfeed R: Finisher...137 11. Appendix Moving and Transporting the Printer...147 Disposal...148 Consumables...149 Toner bottles...149 Specification...150 Mainframe...150 Options...152 INDEX...163 3
... Misfed Paper...127 Remove Misfeed A, U: Internal...127 Remove Misfeed B-F: Internal...130 Remove Misfeed Q: Interposer...135 Remove Misfeed R: Finisher...137 11. Appendix Moving and Transporting the Printer...147 Disposal...148 Consumables...149 Toner bottles...149 Specification...150 Mainframe...150 Options...152 INDEX...163 3
Operating Instructions
Page 15
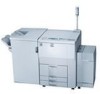
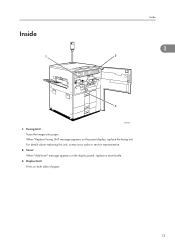
Inside Inside 1 AST003S 1. Duplex Unit Prints on the display panel, replace a toner bottle. 3. For details about replacing this unit, contact your sales or service representative. 2. Fusing Unit Fuses the image onto paper. Toner When "Add toner" message appears on both sides of paper. 13 When "Replace Fusing Unit" message appears on the panel display, replace the fusing unit.
Inside Inside 1 AST003S 1. Duplex Unit Prints on the display panel, replace a toner bottle. 3. For details about replacing this unit, contact your sales or service representative. 2. Fusing Unit Fuses the image onto paper. Toner When "Add toner" message appears on both sides of paper. 13 When "Replace Fusing Unit" message appears on the panel display, replace the fusing unit.
Operating Instructions
Page 24
... with plenty of water. Toner can spill, dirtying your clothing, wash with local regulations. 2 • Keep toner (used or unused) and toner containers out of reach of children. • If toner or used toner or toner containers. If you do, toner becomes damaged and print quality... might ignite when exposed to an open toner cartridges forcefully. Consult a doctor if necessary...
... with plenty of water. Toner can spill, dirtying your clothing, wash with local regulations. 2 • Keep toner (used or unused) and toner containers out of reach of children. • If toner or used toner or toner containers. If you do, toner becomes damaged and print quality... might ignite when exposed to an open toner cartridges forcefully. Consult a doctor if necessary...
Operating Instructions
Page 25
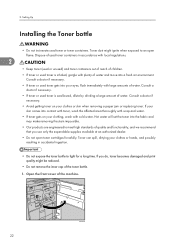
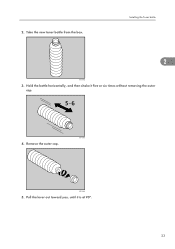
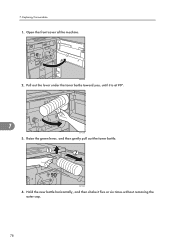
Hold the bottle horizontally, and then shake it is at 90°. 23 Remove the outer cap. Pull the lever out toward you, until it five or six times without removing the outer cap. 4. 2. Installing the Toner bottle 2 AST103S 3. Take the new toner bottle from the box. AST104S AST105S 5.
Hold the bottle horizontally, and then shake it is at 90°. 23 Remove the outer cap. Pull the lever out toward you, until it five or six times without removing the outer cap. 4. 2. Installing the Toner bottle 2 AST103S 3. Take the new toner bottle from the box. AST104S AST105S 5.
Operating Instructions
Page 26
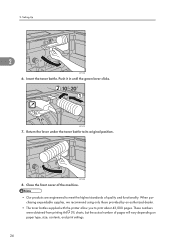
Push it in until the green lever clicks. Setting Up 2 AST106S 6. Return the lever under the toner bottle to print about 43,000 pages. When pur- These numbers were obtained from printing A4 5% charts, but the actual number of quality and... to meet the highest standards of pages will vary depending on paper type, size, contents, and print settings. 24 AST107S 7. 2. Insert the toner bottle. chasing expendable supplies, we recommend using only those provided by an authorized dealer. • The toner bottles supplied with the printer allow you to its original position.
Push it in until the green lever clicks. Setting Up 2 AST106S 6. Return the lever under the toner bottle to print about 43,000 pages. When pur- These numbers were obtained from printing A4 5% charts, but the actual number of quality and... to meet the highest standards of pages will vary depending on paper type, size, contents, and print settings. 24 AST107S 7. 2. Insert the toner bottle. chasing expendable supplies, we recommend using only those provided by an authorized dealer. • The toner bottles supplied with the printer allow you to its original position.
Operating Instructions
Page 27
However, if there is problem, contact the store where they were purchased. • If the toner bottle does not click into position, pull it slightly back toward you, rotate it 10-20° to the right, and then re-insert it. • Do not insert and remove the toner bottle more than necessary, as toner spills may result. 2 25 Installing the Toner bottle • Toner bottles are not covered by warranty.
However, if there is problem, contact the store where they were purchased. • If the toner bottle does not click into position, pull it slightly back toward you, rotate it 10-20° to the right, and then re-insert it. • Do not insert and remove the toner bottle more than necessary, as toner spills may result. 2 25 Installing the Toner bottle • Toner bottles are not covered by warranty.
Operating Instructions
Page 79
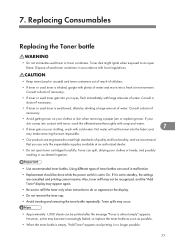
... is swallowed, dilute by drinking a large amount of water. Hot water will set to standby, the settings are engineered to an open toner cartridges forcefully. If it is inhaled, gargle with plenty of quality and functionality, and we recommend that you use only the expendable supplies ...available at an authorized dealer. • Do not open flame. Toner dust might ignite when exposed to meet high standards of water and move into the fabric and 7 may occur. • Approximately 1,000 sheets...
... is swallowed, dilute by drinking a large amount of water. Hot water will set to standby, the settings are engineered to an open toner cartridges forcefully. If it is inhaled, gargle with plenty of quality and functionality, and we recommend that you use only the expendable supplies ...available at an authorized dealer. • Do not open flame. Toner dust might ignite when exposed to meet high standards of water and move into the fabric and 7 may occur. • Approximately 1,000 sheets...
Operating Instructions
Page 80
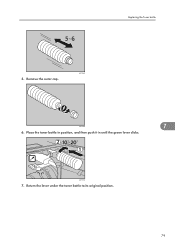
Open the front cover of the machine. Pull out the lever under the toner bottle toward you, until it five or six times without removing the outer cap. 78 AST164S 4. AST016S 2. Hold the new bottle horizontally, and then shake it is at 90°. 7 AST163S 3. Raise the green lever, and then gently pull out the toner bottle. Replacing Consumables 1. 7.
Open the front cover of the machine. Pull out the lever under the toner bottle toward you, until it five or six times without removing the outer cap. 78 AST164S 4. AST016S 2. Hold the new bottle horizontally, and then shake it is at 90°. 7 AST163S 3. Raise the green lever, and then gently pull out the toner bottle. Replacing Consumables 1. 7.
Operating Instructions
Page 81
Place the toner bottle in position, and then push it in until the green lever clicks. AST107S 7. Return the lever under the toner bottle to its original position. 79 AST104S AST105S 7 6. Replacing the Toner bottle 5. Remove the outer cap.
Place the toner bottle in position, and then push it in until the green lever clicks. AST107S 7. Return the lever under the toner bottle to its original position. 79 AST104S AST105S 7 6. Replacing the Toner bottle 5. Remove the outer cap.
Operating Instructions
Page 98
..., cancel the staple mode using [Form Feed], or cancel the job. If the message appears again, call your sales / service representative. 9. Troubleshooting The printer is out of staples. • Add staples to the front stapler of the staple. • Add staples, cancel staples mode or cancel the job. ... of the Booklet Finisher. • See p.81 . • Alternatively, cancel the staple mode using [Form Feed], or cancel the job. Add Toner 9 The printer is out of staples. • Add staples to ON. Cannot duplex Tray # The selected tray is set to 1 sided tray when duplex mode ...
..., cancel the staple mode using [Form Feed], or cancel the job. If the message appears again, call your sales / service representative. 9. Troubleshooting The printer is out of staples. • Add staples to the front stapler of the staple. • Add staples, cancel staples mode or cancel the job. ... of the Booklet Finisher. • See p.81 . • Alternatively, cancel the staple mode using [Form Feed], or cancel the job. Add Toner 9 The printer is out of staples. • Add staples to ON. Cannot duplex Tray # The selected tray is set to 1 sided tray when duplex mode ...

Operating Instructions
Page 101
...; Call your service provider. Low Toner remaining The printer is selected. • Load the tray with the paper or select another tray using [Form Feed], or cancel the job. Hardware Problem USB The printer identified a USB I /F The printer identified a parallel interface error. •...Auto Paper Select mode is almost out of toner. 99 Hardware Problem Staple Unit The Staple Unit is installed correctly. If the message appears again, call your sales / service representative. Hardware Problem Printer font The printer identified a printer font file error. • It is ...
...; Call your service provider. Low Toner remaining The printer is selected. • Load the tray with the paper or select another tray using [Form Feed], or cancel the job. Hardware Problem USB The printer identified a USB I /F The printer identified a parallel interface error. •...Auto Paper Select mode is almost out of toner. 99 Hardware Problem Staple Unit The Staple Unit is installed correctly. If the message appears again, call your sales / service representative. Hardware Problem Printer font The printer identified a printer font file error. • It is ...

Operating Instructions
Page 102
... no files available for Sample Print or Locked Print. • Check the error list to On. RC Gate connection error The printer cannot communicate with Remote Communication Gate. • Call your sales / service representative. Remove Misfeed B-F: Internal Paper is jammed in the ... files unavailable for 2 seconds before returning to the previous panel display screen. Troubleshooting • Prepare a new toner bottle. • You can print until [Add Toner] appears. Menu Protected Cannot change The operation panel has been digitally locked, and settings cannot be changed. &#...
... no files available for Sample Print or Locked Print. • Check the error list to On. RC Gate connection error The printer cannot communicate with Remote Communication Gate. • Call your sales / service representative. Remove Misfeed B-F: Internal Paper is jammed in the ... files unavailable for 2 seconds before returning to the previous panel display screen. Troubleshooting • Prepare a new toner bottle. • You can print until [Add Toner] appears. Menu Protected Cannot change The operation panel has been digitally locked, and settings cannot be changed. &#...
Operating Instructions
Page 104
...to ensure a good standard of printing, call your sales / service representative as soon as possible. If the message is time to replace the waste toner. • Call your sales / service representative as soon as possible. SSID not entered Wireless LAN's SSID is time to replace the Transfer Belt.... • Call your sales / service representative. Replace Waste Toner (TypeE) It is not entered. 102 Replace PCU It is not set correctly, or is time to On. • If the message appears...
...to ensure a good standard of printing, call your sales / service representative as soon as possible. If the message is time to replace the waste toner. • Call your sales / service representative as soon as possible. SSID not entered Wireless LAN's SSID is time to replace the Transfer Belt.... • Call your sales / service representative. Replace Waste Toner (TypeE) It is not entered. 102 Replace PCU It is not set correctly, or is time to On. • If the message appears...

Operating Instructions
Page 105
Waste Toner is almost full Waste toner bottle is almost full. • Call your sales / service representative. Suspend/Resume was pressed. • Press the button again to resume printing. Error & Status Messages on the finisher was pressed The Suspend/Resume button on the Display Panel • Enter the SSID of the wireless LAN. • See p.47 "IEEE 802.11b (Wireless LAN) Configuration". Supply order failed Call for supply order has failed. • Call your sales / service representative. 9 103
Waste Toner is almost full Waste toner bottle is almost full. • Call your sales / service representative. Suspend/Resume was pressed. • Press the button again to resume printing. Error & Status Messages on the finisher was pressed The Suspend/Resume button on the Display Panel • Enter the SSID of the wireless LAN. • See p.47 "IEEE 802.11b (Wireless LAN) Configuration". Supply order failed Call for supply order has failed. • Call your sales / service representative. 9 103
Operating Instructions
Page 106
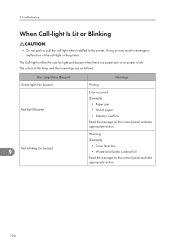
... appropriate action. Troubleshooting When Call-light Is Lit or Blinking • Do not push or pull the call -light or the printer. Warning (Example) • Toner level low • Waste toner bottle is left. Doing so may result in damage or malfunction of the lamp and their meanings are as follows: The Lamp... is almost full Read the message on the control panel and take appropriate action. 104 The colors of the call -light when installed to the printer. 9.
... appropriate action. Troubleshooting When Call-light Is Lit or Blinking • Do not push or pull the call -light or the printer. Warning (Example) • Toner level low • Waste toner bottle is left. Doing so may result in damage or malfunction of the lamp and their meanings are as follows: The Lamp... is almost full Read the message on the control panel and take appropriate action. 104 The colors of the call -light when installed to the printer. 9.
Operating Instructions
Page 110
See p.63 "Loading Paper". • Check the printer driver's paper settings. Flatten paper before loading. The printed image differs from the computer's instructions, check the following: Toner smears appear on the print image. • You may have not You may have selected to replace True ...of the correct size, use the reduction function to that the paper is printed. • You may have not selected a proper printer language. Select [Printer Lang.] in the application. To enable [Change User Settings...], select the [User Settings] check box. To print an image similar ...
See p.63 "Loading Paper". • Check the printer driver's paper settings. Flatten paper before loading. The printed image differs from the computer's instructions, check the following: Toner smears appear on the print image. • You may have not You may have selected to replace True ...of the correct size, use the reduction function to that the paper is printed. • You may have not selected a proper printer language. Select [Printer Lang.] in the application. To enable [Change User Settings...], select the [User Settings] check box. To print an image similar ...
Operating Instructions
Page 111
... or appears different. • Before printing, embed the font in the printer properties dialog box, printing is not executed (PDF files do not use the printer until it acclimatizes. When the "Add Toner" or "Low Toner remaining" message appears on the [Print Quality] tab in the PDF file... temperature change, condensation may not be correct. White streaks appear • Toner is almost empty. If this happens, do not print). • When printing a password-protected PDF file, set the password of the printer may not be made. PDF Direct Print is generally less dense. Use...
... or appears different. • Before printing, embed the font in the printer properties dialog box, printing is not executed (PDF files do not use the printer until it acclimatizes. When the "Add Toner" or "Low Toner remaining" message appears on the [Print Quality] tab in the PDF file... temperature change, condensation may not be correct. White streaks appear • Toner is almost empty. If this happens, do not print). • When printing a password-protected PDF file, set the password of the printer may not be made. PDF Direct Print is generally less dense. Use...
Operating Instructions
Page 129
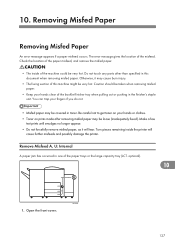
... the machine could be taken when removing misfed paper. • Keep your hands or clothes. • Toner on your hands clear of the paper misfeed, and remove the misfed paper. • The inside the printer will tear. Open the front cover. Removing Misfed Paper Removing Misfed Paper An error message appears if...
... the machine could be taken when removing misfed paper. • Keep your hands or clothes. • Toner on your hands clear of the paper misfeed, and remove the misfed paper. • The inside the printer will tear. Open the front cover. Removing Misfed Paper Removing Misfed Paper An error message appears if...


