
Hardware Guide
Page 3
AQV254S High temperature parts. The surface of RWARNING and RCAUTION labels This machine has labels for RWARNING and RCAUTION at the positions shown below. Turn off the main power and be careful when replacing fusing unit/removing misfed paper. Do not touch parts labelled "R" (indicating a hot surface). ii Positions of the fusing unit becomes very hot. For safety, please follow the instructions and handle the machine as indicated. Touching these parts will result in burns.
AQV254S High temperature parts. The surface of RWARNING and RCAUTION labels This machine has labels for RWARNING and RCAUTION at the positions shown below. Turn off the main power and be careful when replacing fusing unit/removing misfed paper. Do not touch parts labelled "R" (indicating a hot surface). ii Positions of the fusing unit becomes very hot. For safety, please follow the instructions and handle the machine as indicated. Touching these parts will result in burns.
Hardware Guide
Page 4
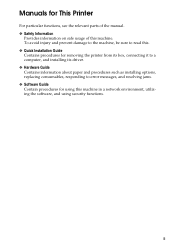
... injury and prevent damage to the machine, be sure to read this. ❖ Quick Installation Guide Contains procedures for removing the printer from its box, connecting it to a computer, and installing its driver. ❖ Hardware Guide Contains information about paper and procedures... options, replacing consumables, responding to error messages, and resolving jams. ❖ Software Guide Contain procedures for This Printer For particular functions, see the relevant parts of the manual. ❖ Safety Information Provides information on safe usage of this machine in a network environment, ...
... injury and prevent damage to the machine, be sure to read this. ❖ Quick Installation Guide Contains procedures for removing the printer from its box, connecting it to a computer, and installing its driver. ❖ Hardware Guide Contains information about paper and procedures... options, replacing consumables, responding to error messages, and resolving jams. ❖ Software Guide Contain procedures for This Printer For particular functions, see the relevant parts of the manual. ❖ Safety Information Provides information on safe usage of this machine in a network environment, ...
Hardware Guide
Page 12
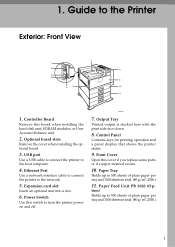
Controller Board Remove this cover if you replace some parts or if a paper misfeed occurs. 10. Ethernet Port Use a network interface cable to connect the printer to the host computer. 4. Expansion card slot Insert an optional unit into a slot. 6. tion) Holds up to 550 sheets of plain ..., SDRAM modules, or User Account Enhance unit. 2. AQV002S 7. Control Panel Contains keys for printing operation and a panel display that shows the printer status. 9. Paper Feed Unit PB 3020 (Op- Optional board slots Remove the cover when installing the optional board. 3. 1. Guide to turn the...
Controller Board Remove this cover if you replace some parts or if a paper misfeed occurs. 10. Ethernet Port Use a network interface cable to connect the printer to the host computer. 4. Expansion card slot Insert an optional unit into a slot. 6. tion) Holds up to 550 sheets of plain ..., SDRAM modules, or User Account Enhance unit. 2. AQV002S 7. Control Panel Contains keys for printing operation and a panel display that shows the printer status. 9. Paper Feed Unit PB 3020 (Op- Optional board slots Remove the cover when installing the optional board. 3. 1. Guide to turn the...

Hardware Guide
Page 28
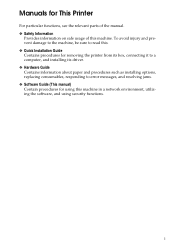
AQV501S F Place the controller board on a flat surface. Attaching User Account Enhance Unit Type E D Remove the screws as shown by turning them counterclockwise using the provided screwdriver. 2 AQV500S E Hold the part (1) of the controller board, and then slide it out completely. AQV516S 17
AQV501S F Place the controller board on a flat surface. Attaching User Account Enhance Unit Type E D Remove the screws as shown by turning them counterclockwise using the provided screwdriver. 2 AQV500S E Hold the part (1) of the controller board, and then slide it out completely. AQV516S 17

Hardware Guide
Page 33
Installing Options D Remove the screws as shown by turning them counterclockwise using the provided screwdriver. 2 AQV500S E Hold the part (1) of the controller board, and then slide it out completely. AQV516S 22 AQV501S F Place the controller board on a flat surface.
Installing Options D Remove the screws as shown by turning them counterclockwise using the provided screwdriver. 2 AQV500S E Hold the part (1) of the controller board, and then slide it out completely. AQV516S 22 AQV501S F Place the controller board on a flat surface.

Hardware Guide
Page 35
AQV730S L Connect the power cable to secure the hard disk drive. Installing Options J Carefully insert the hard disk drive into the center of the front end of the controller board. 2 AQV517S K Fasten the screws clockwise as shown. There is a lip cut into the controller board as shown by using the provided screwdriver, to the socket on the controller board, and then align (2) and (3) with the screw holes in the rear edge of the hard disk drive's casing. Hook this part over the flange (curled part) in the slot (1) on the controller board. 24 AQV520S
AQV730S L Connect the power cable to secure the hard disk drive. Installing Options J Carefully insert the hard disk drive into the center of the front end of the controller board. 2 AQV517S K Fasten the screws clockwise as shown. There is a lip cut into the controller board as shown by using the provided screwdriver, to the socket on the controller board, and then align (2) and (3) with the screw holes in the rear edge of the hard disk drive's casing. Hook this part over the flange (curled part) in the slot (1) on the controller board. 24 AQV520S

Hardware Guide
Page 39
AQV501S E Place the controller board on a flat surface. AQV516S 28 Installing Options C Remove the screws as shown by turning them counterclockwise using the provided screwdriver. 2 AQV500S D Hold the part (1) of the controller board, and then slide it out completely.
AQV501S E Place the controller board on a flat surface. AQV516S 28 Installing Options C Remove the screws as shown by turning them counterclockwise using the provided screwdriver. 2 AQV500S D Hold the part (1) of the controller board, and then slide it out completely.

Hardware Guide
Page 128
...your hands or clothes. ❒ Toner on your sales or service representative. ❒ Do not leave any torn paper scraps within the printer. 117 Removing Misfed Paper Removing Misfed Paper An error message appears if a paper misfeed occurs. Be careful not to misfeed, check the ...following charts shown in toner. R CAUTION: • The inside the printer will tear. Do not touch the parts with a "v" label (means hot surface) could result in the paper tray. • Confirm that the setting of the paper ...
...your hands or clothes. ❒ Toner on your sales or service representative. ❒ Do not leave any torn paper scraps within the printer. 117 Removing Misfed Paper Removing Misfed Paper An error message appears if a paper misfeed occurs. Be careful not to misfeed, check the ...following charts shown in toner. R CAUTION: • The inside the printer will tear. Do not touch the parts with a "v" label (means hot surface) could result in the paper tray. • Confirm that the setting of the paper ...
Software Guide
Page 3
... injury and prevent damage to the machine, be sure to read this. ❖ Quick Installation Guide Contains procedures for removing the printer from its box, connecting it to a computer, and installing its driver. ❖ Hardware Guide Contains information about paper and procedures...consumables, responding to error messages, and resolving jams. ❖ Software Guide (This manual) Contain procedures for This Printer For particular functions, see the relevant parts of the manual. ❖ Safety Information Provides information on safe usage of this machine in a network environment, ...
... injury and prevent damage to the machine, be sure to read this. ❖ Quick Installation Guide Contains procedures for removing the printer from its box, connecting it to a computer, and installing its driver. ❖ Hardware Guide Contains information about paper and procedures...consumables, responding to error messages, and resolving jams. ❖ Software Guide (This manual) Contain procedures for This Printer For particular functions, see the relevant parts of the manual. ❖ Safety Information Provides information on safe usage of this machine in a network environment, ...

Software Guide
Page 329
... is also registered. CNAMEs that can be updated manually, if the printer's IP address is changed. ❒ To update the record using message authentication (TSIG, SIG(0)) is not supported. 317 When a DNS server is part of the network environment to which dynamically updates (registers and deletes) ...8226; Ethernet and IEEE 802.11b RNPXXXXXX (XXXXXX represents the last 3 hexadecimal bytes of the MAC address) Important ❒ Dynamic update using the printer, the DNS server has to have one of the following : • No security settings made. • If security settings are made, ...
... is also registered. CNAMEs that can be updated manually, if the printer's IP address is changed. ❒ To update the record using message authentication (TSIG, SIG(0)) is not supported. 317 When a DNS server is part of the network environment to which dynamically updates (registers and deletes) ...8226; Ethernet and IEEE 802.11b RNPXXXXXX (XXXXXX represents the last 3 hexadecimal bytes of the MAC address) Important ❒ Dynamic update using the printer, the DNS server has to have one of the following : • No security settings made. • If security settings are made, ...

Software Guide
Page 336
... installed on this product, including the controller (hereinafter "software") and the expat Version 1.95.2 application software (hereinafter "expat 1.95.2"), is subject to be included in part on the work of the Independent JPEG Group. 324
... installed on this product, including the controller (hereinafter "software") and the expat Version 1.95.2 application software (hereinafter "expat 1.95.2"), is subject to be included in part on the work of the Independent JPEG Group. 324

Software Guide
Page 337
... endorse or promote products derived from this software must reproduce the above copyright notice, this product: This product contains NetBSD operating system: For the most part, the software constituting the NetBSD operating system is not in the public domain; For exact copyright notice applicable for many of the NetBSD source code...
... endorse or promote products derived from this software must reproduce the above copyright notice, this product: This product contains NetBSD operating system: For the most part, the software constituting the NetBSD operating system is not in the public domain; For exact copyright notice applicable for many of the NetBSD source code...


