Operating Instructions
Page 2
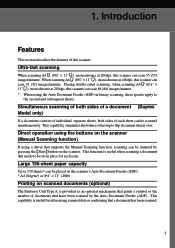
... Information before turning on the power cord. 6. Do not place heavy ob- Introduction This manual contains detailed instructions on the operation and maintenance of this manual are subject to change without prior notice. To get maximum versatility from a cold location to the power cord. Important Parts of this machine. When the machine is near the machine. Wait 1 hour or more . 2. Power Supply 1. Insert the power plug securely...
... Information before turning on the power cord. 6. Do not place heavy ob- Introduction This manual contains detailed instructions on the operation and maintenance of this manual are subject to change without prior notice. To get maximum versatility from a cold location to the power cord. Important Parts of this machine. When the machine is near the machine. Wait 1 hour or more . 2. Power Supply 1. Insert the power plug securely...
Operating Instructions
Page 4
... used for the main switch: • a means Push ON Push OFF RICOH IMAGE SCANNER IS450S/IS450D/IS450SE/IS450DE Copyright © 1998 Warning Changes or modifications not expressly approved by one more of FCC Rules. In accordance with part 15 of the following symbols for connections to host computer (and/or peripheral) in a particular installation. Declaration of Conformity Product Name: Scanner Model Number: RICOH IMAGE SCANNER...
... used for the main switch: • a means Push ON Push OFF RICOH IMAGE SCANNER IS450S/IS450D/IS450SE/IS450DE Copyright © 1998 Warning Changes or modifications not expressly approved by one more of FCC Rules. In accordance with part 15 of the following symbols for connections to host computer (and/or peripheral) in a particular installation. Declaration of Conformity Product Name: Scanner Model Number: RICOH IMAGE SCANNER...

Operating Instructions
Page 8
..., these instructions and keep them for ventilation; Slots and openings in installation unless proper ventilation is provided. 7. This machine should never be blocked or covered. This machine is a safety feature. If you are marked "Do Not Remove" may touch dangerous voltage points or short out parts that the total of power available, contact your outlet. to replace your...
..., these instructions and keep them for ventilation; Slots and openings in installation unless proper ventilation is provided. 7. This machine should never be blocked or covered. This machine is a safety feature. If you are marked "Do Not Remove" may touch dangerous voltage points or short out parts that the total of power available, contact your outlet. to replace your...
Operating Instructions
Page 11
... SCSI Cable (No Connection to Other Port 11 Connecting the SCSI Cable (Connection to Other Port 12 Connecting the Power Cable 13 Turning On/Off the Scanner Power 15 Turning On the Scanner Power 15 Turning Off the Scanner Power 15 Initializing the Scanner 16 vii Table of Contents Table of Contents Safety Information i Safety During Operation i Examples of a document Duplex Model only 1 Direct operation using the buttons on the scanner Manual Scanning function 1 Large 150-sheet paper capacity 1 Printing on scanned documents (optional 1 Space-saving design 2 Supports...
... SCSI Cable (No Connection to Other Port 11 Connecting the SCSI Cable (Connection to Other Port 12 Connecting the Power Cable 13 Turning On/Off the Scanner Power 15 Turning On the Scanner Power 15 Turning Off the Scanner Power 15 Initializing the Scanner 16 vii Table of Contents Table of Contents Safety Information i Safety During Operation i Examples of a document Duplex Model only 1 Direct operation using the buttons on the scanner Manual Scanning function 1 Large 150-sheet paper capacity 1 Printing on scanned documents (optional 1 Space-saving design 2 Supports...
Operating Instructions
Page 12
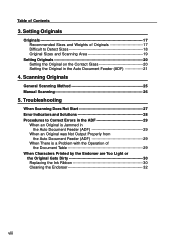
... 3. Troubleshooting When Scanning Does Not Start 27 Error Indicators and Solutions 28 Procedures to Detect Sizes 18 Original Sizes and Scanning Area 19 Setting Originals 20 Setting the Original on the Contact Glass 20 Setting the Original in the Auto Document Feeder (ADF 29 When an Original was Not Output Properly from the Auto Document Feeder (ADF 29 When There is a Problem with the Operation of the Document Table 29 When Characters Printed...
... 3. Troubleshooting When Scanning Does Not Start 27 Error Indicators and Solutions 28 Procedures to Detect Sizes 18 Original Sizes and Scanning Area 19 Setting Originals 20 Setting the Original on the Contact Glass 20 Setting the Original in the Auto Document Feeder (ADF 29 When an Original was Not Output Properly from the Auto Document Feeder (ADF 29 When There is a Problem with the Operation of the Document Table 29 When Characters Printed...
Operating Instructions
Page 13
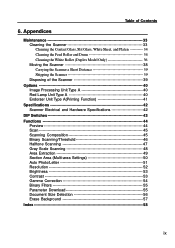
Appendices Maintenance 33 Cleaning the Scanner 33 Cleaning the Contact Glass, Slit Glass, White Sheet, and Platen ---------- 34 Cleaning the Feed Roller and Drum 34 Cleaning the White Roller (Duplex Model Only 36 Moving the Scanner 38 Carrying the Scanner a Short Distance 39 Shipping the Scanner 39 Disposing of Contents 6. Table of the Scanner 39 Options 40 Image Processing Unit Type A 40 Red Lamp Unit Type A 40 Endorser Unit Type A(Printing Function 41 Specifications 42 Scanner Electrical and...
Appendices Maintenance 33 Cleaning the Scanner 33 Cleaning the Contact Glass, Slit Glass, White Sheet, and Platen ---------- 34 Cleaning the Feed Roller and Drum 34 Cleaning the White Roller (Duplex Model Only 36 Moving the Scanner 38 Carrying the Scanner a Short Distance 39 Shipping the Scanner 39 Disposing of Contents 6. Table of the Scanner 39 Options 40 Image Processing Unit Type A 40 Red Lamp Unit Type A 40 Endorser Unit Type A(Printing Function 41 Specifications 42 Scanner Electrical and...
Operating Instructions
Page 15
...) images/minute. * When using a driver that supports the Manual Scanning function, scanning can be set in place for referencing scanned data or confirming that needs to the second and subsequent sheets. This capability eliminates the bother of documents that have been scanned by pressing the {Start} button on the scanner. This function is useful for each sheet can be scanned simultaneously. Direct operation using the buttons on the scanner (Manual Scanning function) If using the Auto Document Feeder (ADF) in the scanner's Auto Document Feeder (ADF). * A4...
...) images/minute. * When using a driver that supports the Manual Scanning function, scanning can be set in place for referencing scanned data or confirming that needs to the second and subsequent sheets. This capability eliminates the bother of documents that have been scanned by pressing the {Start} button on the scanner. This function is useful for each sheet can be scanned simultaneously. Direct operation using the buttons on the scanner (Manual Scanning function) If using the Auto Document Feeder (ADF) in the scanner's Auto Document Feeder (ADF). * A4...
Operating Instructions
Page 17
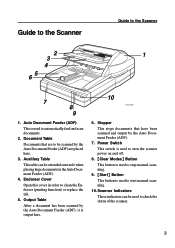
... be used to the Scanner 2 3 1 4 65 7 8 9 1. Power Switch This switch is used to turn the scanner power on and off. 8. {Clear Modes} Button This button is used to stop manual scanning. 9. {Start} Button This button is used to check the status of the scanner. 3 Stopper This stops documents that are placed here. 3. Auxiliary Table This table can be extended outwards when placing large documents in order to be scanned by the Auto Document Feeder (ADF) are to clean the Endorser (printing function) or replace...
... be used to the Scanner 2 3 1 4 65 7 8 9 1. Power Switch This switch is used to turn the scanner power on and off. 8. {Clear Modes} Button This button is used to stop manual scanning. 9. {Start} Button This button is used to check the status of the scanner. 3 Stopper This stops documents that are placed here. 3. Auxiliary Table This table can be extended outwards when placing large documents in order to be scanned by the Auto Document Feeder (ADF) are to clean the Endorser (printing function) or replace...
Operating Instructions
Page 18
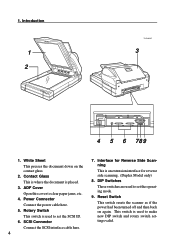
.... 6. SCSI Connector Connect the SCSI interface cable here. 4 7. Reset Switch This switch resets the scanner as if the power had been turned off and then back on the contact glass. 2. ADF Cover Open this cover to make new DIP switch and rotary switch settings valid. Interface for Reverse Side Scanning This is placed. 3. 1. Introduction 1 2 TH2H020E 3 4 5 6 789 1. Contact Glass This is where the document is an extension interface for reverse side scanning. (Duplex Model only) 8. DIP Switches These switches are used to clear paper jams...
.... 6. SCSI Connector Connect the SCSI interface cable here. 4 7. Reset Switch This switch resets the scanner as if the power had been turned off and then back on the contact glass. 2. ADF Cover Open this cover to make new DIP switch and rotary switch settings valid. Interface for Reverse Side Scanning This is placed. 3. 1. Introduction 1 2 TH2H020E 3 4 5 6 789 1. Contact Glass This is where the document is an extension interface for reverse side scanning. (Duplex Model only) 8. DIP Switches These switches are used to clear paper jams...

Operating Instructions
Page 21
... Installation Checking the Scanner Location Set up the scanner in a location that satisfies the following conditions: y Setup location Warning: • Make sure the wall outlet is near the machine and easily accessible so that are necessary in event of an emergency it could cause injury. A fire or an electric shock might occur. • Do not place the machine on all sides. 7 Set...
... Installation Checking the Scanner Location Set up the scanner in a location that satisfies the following conditions: y Setup location Warning: • Make sure the wall outlet is near the machine and easily accessible so that are necessary in event of an emergency it could cause injury. A fire or an electric shock might occur. • Do not place the machine on all sides. 7 Set...

Operating Instructions
Page 23
Preparing for Installation Set up the scanner in a location where the temperature and humidity will fall within the ranges shown below. %RH 80 60 10°C 80% 15°C 70% 40 15°C 30% ...°F 30% 20 50°F 15% 50 60 70 Usable range 77°F 30% 89.6°F 15% 80 90 °F Recommended range TH2H070E Important Ì Save the box and cushioning material in which the scanner was packed so that they can be used if it is necessary to transport the...
Preparing for Installation Set up the scanner in a location where the temperature and humidity will fall within the ranges shown below. %RH 80 60 10°C 80% 15°C 70% 40 15°C 30% ...°F 30% 20 50°F 15% 50 60 70 Usable range 77°F 30% 89.6°F 15% 80 90 °F Recommended range TH2H070E Important Ì Save the box and cushioning material in which the scanner was packed so that they can be used if it is necessary to transport the...
Operating Instructions
Page 31
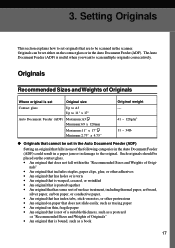
... Auto Document Feeder (ADF) could result in a paper jam or in the Auto Document Feeder (ADF). Originals Recommended Sizes and Weights of Originals Where original is not of a suitable thickness, such as tracing paper • An original on the contact glass or in damage to scan multiple originals consecutively. Originals can be set either on thin, fragile paper • An original that are to be set Original size Contact glass...
... Auto Document Feeder (ADF) could result in a paper jam or in the Auto Document Feeder (ADF). Originals Recommended Sizes and Weights of Originals Where original is not of a suitable thickness, such as tracing paper • An original on the contact glass or in damage to scan multiple originals consecutively. Originals can be set either on thin, fragile paper • An original that are to be set Original size Contact glass...
Operating Instructions
Page 32
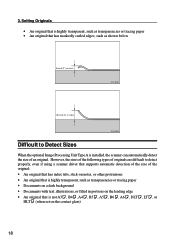
... more Difficult to detect properly, even if using a scanner driver that supports automatic detection of the size of the original: • An original that has index tabs, stick-on notes, or other protrusions • An original that is highly transparent, such as transparencies or tracing paper • Documents on a dark background • Documents with text, illustrations, or filled in...
... more Difficult to detect properly, even if using a scanner driver that supports automatic detection of the size of the original: • An original that has index tabs, stick-on notes, or other protrusions • An original that is highly transparent, such as transparencies or tracing paper • Documents on a dark background • Documents with text, illustrations, or filled in...

Operating Instructions
Page 54
... original, and converts the scanned image to the supplement, "Setting up the Image Processing Unit Type A." The Red Lamp Unit Type A can be used , the following image processing features become possible: Dynamic Threshold This function automatically determines a suitable threshold value on installing the Image Processing Unit Type A, refer to binary data. If this function is used to the host computer. Limitation Ì During double-sided scanning, this function is...
... original, and converts the scanned image to the supplement, "Setting up the Image Processing Unit Type A." The Red Lamp Unit Type A can be used , the following image processing features become possible: Dynamic Threshold This function automatically determines a suitable threshold value on installing the Image Processing Unit Type A, refer to binary data. If this function is used to the host computer. Limitation Ì During double-sided scanning, this function is...

Operating Instructions
Page 56
... when operating (options installed) 470mm (W) x 677mm (D) x 278mm (H) 18.5" (W) x 26.7" (D) x 10.9" (H) Simplex Model: Approximately 25kg (55.1lb) Duplex Model: Approximately 26kg (63.9lb) (Add 1kg (4.4lb) when the Endorser Unit Type A is installed.) 42 Sub-direction: 432mm (17") max. Appendices Specifications Scanner Electrical and Hardware Specifications Type Scanning methods Scanning area Resolution Gray scale Scanning time Scanning speed Warm-up time Interface Power consumption Size Weight Desktop flatbed scanner Fixed original scanning...
... when operating (options installed) 470mm (W) x 677mm (D) x 278mm (H) 18.5" (W) x 26.7" (D) x 10.9" (H) Simplex Model: Approximately 25kg (55.1lb) Duplex Model: Approximately 26kg (63.9lb) (Add 1kg (4.4lb) when the Endorser Unit Type A is installed.) 42 Sub-direction: 432mm (17") max. Appendices Specifications Scanner Electrical and Hardware Specifications Type Scanning methods Scanning area Resolution Gray scale Scanning time Scanning speed Warm-up time Interface Power consumption Size Weight Desktop flatbed scanner Fixed original scanning...

Operating Instructions
Page 60
... original) is much clearer. The threshold value should be set automatically. 6. Conversely, setting a low threshold value when scanning an original that are darker than the threshold value are two modes for the front side of 255 values can be either black or white accordingly. y Dynamic threshold mode This function is valid only when the optional Image Processing Unit Type A is installed.
... original) is much clearer. The threshold value should be set automatically. 6. Conversely, setting a low threshold value when scanning an original that are darker than the threshold value are two modes for the front side of 255 values can be either black or white accordingly. y Dynamic threshold mode This function is valid only when the optional Image Processing Unit Type A is installed.
Operating Instructions
Page 69
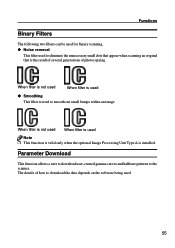
... is valid only when the optional Image Processing Unit Type A is the result of several generations of how to the scanner. Parameter Download This function allows a user to download user-created gamma curves and halftone patterns to download the data depends on the software being used to smooth out small bumps within an image. y Noise removal This filter used . 55 When filter is not...
... is valid only when the optional Image Processing Unit Type A is the result of several generations of how to the scanner. Parameter Download This function allows a user to download user-created gamma curves and halftone patterns to download the data depends on the software being used to smooth out small bumps within an image. y Noise removal This filter used . 55 When filter is not...

Operating Instructions
Page 70
Document Size Detection on the Contact Glass 5mm (0.2") Document Size Detection in the Auto Document Feeder (ADF) 5mm (0.2") Note Ì If there is any coloring on both sides so that the original feeds straight into the ADF. Ì This function is valid only when the optional Image Processing Unit Type A is installed. 56 6. Line up the edges of the sheets of the original, and position the guides on the leading...
Document Size Detection on the Contact Glass 5mm (0.2") Document Size Detection in the Auto Document Feeder (ADF) 5mm (0.2") Note Ì If there is any coloring on both sides so that the original feeds straight into the ADF. Ì This function is valid only when the optional Image Processing Unit Type A is installed. 56 6. Line up the edges of the sheets of the original, and position the guides on the leading...
Operating Instructions
Page 72
... 55 Binary Scanning 45, 46 Brightness 53 C {Clear Modes} Button 3, 26 Contact Glass 4, 17, 19, 20, 34 Contrast 53 D Daisy Chain 10, 43 DIP Switch 4, 10, 27, 43 Document in Place 5 Document Size Detection 40, 56 Document Table 3, 29 Drum 34 Duplex Model 1, 42 Dynamic Threshold 40 E Endorser ------- 1, 28, 30, 31, 32, 41, 42 Endorser Cover 3, 30 Erase Background 57 Error 5 58 F Feed roller 29, 35...
... 55 Binary Scanning 45, 46 Brightness 53 C {Clear Modes} Button 3, 26 Contact Glass 4, 17, 19, 20, 34 Contrast 53 D Daisy Chain 10, 43 DIP Switch 4, 10, 27, 43 Document in Place 5 Document Size Detection 40, 56 Document Table 3, 29 Drum 34 Duplex Model 1, 42 Dynamic Threshold 40 E Endorser ------- 1, 28, 30, 31, 32, 41, 42 Endorser Cover 3, 30 Erase Background 57 Error 5 58 F Feed roller 29, 35...

Operating Instructions
Page 73
Index P Parameter Download 55 Platen 34 Power Cable 13 Power Connector 4, 14 Power On 5 Power Switch 3, 13, 15 Preview 44 R Red Lamp Unit 40 Reset Switch 4, 16 Resolution 52 Rotary Switch 4, 11 S Scale 20 SCAM 10, 43 Scanner Indicators 3 Scanning Composition 45 SCSI 10 SCSI Board 10 SCSI Cables 10, 11, 27, 39 SCSI Connector 4 SCSI ID 10, 11, 27 Section Area (Multi-area Settings) ------- 50 Simplex Model 42 Slit Glass 34 {Start} Button 3, 26 Stopper 3, 21, 22 T Terminator 10, 11, 43 Threshold 46 TWAIN 2, 25 W White Roller 36 White Sheet 4, 34, 36 59
Index P Parameter Download 55 Platen 34 Power Cable 13 Power Connector 4, 14 Power On 5 Power Switch 3, 13, 15 Preview 44 R Red Lamp Unit 40 Reset Switch 4, 16 Resolution 52 Rotary Switch 4, 11 S Scale 20 SCAM 10, 43 Scanner Indicators 3 Scanning Composition 45 SCSI 10 SCSI Board 10 SCSI Cables 10, 11, 27, 39 SCSI Connector 4 SCSI ID 10, 11, 27 Section Area (Multi-area Settings) ------- 50 Simplex Model 42 Slit Glass 34 {Start} Button 3, 26 Stopper 3, 21, 22 T Terminator 10, 11, 43 Threshold 46 TWAIN 2, 25 W White Roller 36 White Sheet 4, 34, 36 59


