
Brochure
Page 1
Ricoh Aficio CL3500N Color Laser Printer Print Power for Budget-conscious Small Offices and Workgroups cefoficlioenrt cefoficlioenrt versatile
Ricoh Aficio CL3500N Color Laser Printer Print Power for Budget-conscious Small Offices and Workgroups cefoficlioenrt cefoficlioenrt versatile

Brochure
Page 2
... shows, you can be affected by network, application or PC performance. PA-0516 The Ricoh Aficio CL3500N is a network-ready full-color/monochrome laser printer designed to multi-user network printing at no additional cost when the time is a registered...Optional Paper Capacity: Maximum Paper Capacity: Acceptable Paper Sizes: Acceptable Paper Weights: Output Capacity: Automatic Duplexing: Duplex Paper Weight: Part # 402434 Desktop Laser beam scanning, color laser electro photographic printing with unique printing requirements. IS200e Image Scanner (MFP Option) (Part # 402334) Table...
... shows, you can be affected by network, application or PC performance. PA-0516 The Ricoh Aficio CL3500N is a network-ready full-color/monochrome laser printer designed to multi-user network printing at no additional cost when the time is a registered...Optional Paper Capacity: Maximum Paper Capacity: Acceptable Paper Sizes: Acceptable Paper Weights: Output Capacity: Automatic Duplexing: Duplex Paper Weight: Part # 402434 Desktop Laser beam scanning, color laser electro photographic printing with unique printing requirements. IS200e Image Scanner (MFP Option) (Part # 402334) Table...

User Manual
Page 1
...: Front View 11 Exterior: Rear View 12 Inside...14 Control Panel...15 Setting Up Where to Put the Printer 17 Checking the Contents of the Box 20 Unpacking...22 Installing the Waste Toner Bottle and Photo Conductor Unit 23 Installing the Toner Cartridge 29 ...
...: Front View 11 Exterior: Rear View 12 Inside...14 Control Panel...15 Setting Up Where to Put the Printer 17 Checking the Contents of the Box 20 Unpacking...22 Installing the Waste Toner Bottle and Photo Conductor Unit 23 Installing the Toner Cartridge 29 ...

User Manual
Page 2
... (Duplex Unit 52 Attaching Memory Unit Type D 128MB, Memory Unit Type E 256MB (SDRAM Module) ...55 Attaching Printer Hard Disk Type 3000 60 Formatting the Printer Hard Disk 64 Attaching User Account Enhance Unit Type E 66 Attaching IEEE 1394 Interface Board Type B 70 Attaching IEEE... Interface Unit Type 3245 77 Attaching IEEE 1284 Interface Board Type A 81 Attaching Network Data Protection Unit Type C 83 Connecting the Printer Network Connection 85 USB Connection 87 Parallel Connection 88 IEEE 1394 Connection 89 Configuration Ethernet Configuration 90 IEEE 802.11b (Wireless LAN) ...
... (Duplex Unit 52 Attaching Memory Unit Type D 128MB, Memory Unit Type E 256MB (SDRAM Module) ...55 Attaching Printer Hard Disk Type 3000 60 Formatting the Printer Hard Disk 64 Attaching User Account Enhance Unit Type E 66 Attaching IEEE 1394 Interface Board Type B 70 Attaching IEEE... Interface Unit Type 3245 77 Attaching IEEE 1284 Interface Board Type A 81 Attaching Network Data Protection Unit Type C 83 Connecting the Printer Network Connection 85 USB Connection 87 Parallel Connection 88 IEEE 1394 Connection 89 Configuration Ethernet Configuration 90 IEEE 802.11b (Wireless LAN) ...

User Manual
Page 3
...; Workstation 4.0 G1398502_1.00 Copyright © 2005 3 Read This First Trademarks Microsoft, Windows and Windows NT are registered trademarks of the Bluetooth SIG, Inc. IPS-PRINT Printer Language Emulation Copyright© 1999-2000 Oak Technology, Inc., All rights reserved. worldwide.
...; Workstation 4.0 G1398502_1.00 Copyright © 2005 3 Read This First Trademarks Microsoft, Windows and Windows NT are registered trademarks of the Bluetooth SIG, Inc. IPS-PRINT Printer Language Emulation Copyright© 1999-2000 Oak Technology, Inc., All rights reserved. worldwide.

User Manual
Page 4
Read This First Safety Information When using your printer, the following important symbols are used: Indicates a potentially hazardous situation which , if instructions are not followed, could result in minor or moderate injury or damage to property. 4 Indicates a potentially hazardous situation which , if instructions are not followed, may result in death or serious injury. In this manual, the following safety precautions should always be followed.
Read This First Safety Information When using your printer, the following important symbols are used: Indicates a potentially hazardous situation which , if instructions are not followed, could result in minor or moderate injury or damage to property. 4 Indicates a potentially hazardous situation which , if instructions are not followed, may result in death or serious injury. In this manual, the following safety precautions should always be followed.

User Manual
Page 6
.... • Keep the machine in fire or electric shock. • Wait at least one hour after power off before replacing parts. Not allowing the printer to cool may cause injury. 6 Consult a doctor if necessary. • If toner or used toner is outside the recommended ranges of water. Read ...surface. Accumulated dust can result in an area that is inhaled, gargle with wet hands. Keep the area around the socket free of this printer becomes very hot. Pulling the cord causes wear and tear that can become an electrical fire hazard. • Place the machine on the right...
.... • Keep the machine in fire or electric shock. • Wait at least one hour after power off before replacing parts. Not allowing the printer to cool may cause injury. 6 Consult a doctor if necessary. • If toner or used toner is outside the recommended ranges of water. Read ...surface. Accumulated dust can result in an area that is inhaled, gargle with wet hands. Keep the area around the socket free of this printer becomes very hot. Pulling the cord causes wear and tear that can become an electrical fire hazard. • Place the machine on the right...

User Manual
Page 7
.... • Lifting the paper feed unit carelessly or dropping it may cause a machine malfunction or a burn. • When moving the printer after use, do not touch the fusing unit because it could be turned off and unplugged for options: Max. When purchasing expendable supplies, ...we recommend using only those specified by an authorized dealer. ❒ Rating voltage of the controller board compartment. The printer will break or cause injury if dropped. • Before installing options, the machine should hold the handles that are engineered to issue ...
.... • Lifting the paper feed unit carelessly or dropping it may cause a machine malfunction or a burn. • When moving the printer after use, do not touch the fusing unit because it could be turned off and unplugged for options: Max. When purchasing expendable supplies, ...we recommend using only those specified by an authorized dealer. ❒ Rating voltage of the controller board compartment. The printer will break or cause injury if dropped. • Before installing options, the machine should hold the handles that are engineered to issue ...

User Manual
Page 8
... paper. Toner dust may cause flashback when exposed to an open flame. 8 Read This First Positions of this printer becomes very hot. Do not incinerate toner or toner containers. The inside of this printer becomes very hot. Touching these parts will result in burns. Touching these parts will result in burns. The...
... paper. Toner dust may cause flashback when exposed to an open flame. 8 Read This First Positions of this printer becomes very hot. Do not incinerate toner or toner containers. The inside of this printer becomes very hot. Touching these parts will result in burns. Touching these parts will result in burns. The...

User Manual
Page 9
...warming. When a product meets the ENERGY STAR Guidelines for energy efficiency. This product was designed to configure Energy Saver mode, see "Making Printer Settings with office equipment by means of energy-saving features, such as Low-power mode. ❖ Low-power Mode (Energy Saver mode) This... printer automatically lowers its power consumption 1 minutes after the last operation has been completed. Read This First ENERGY STAR Program As an ENERGY STAR...
...warming. When a product meets the ENERGY STAR Guidelines for energy efficiency. This product was designed to configure Energy Saver mode, see "Making Printer Settings with office equipment by means of energy-saving features, such as Low-power mode. ❖ Low-power Mode (Energy Saver mode) This... printer automatically lowers its power consumption 1 minutes after the last operation has been completed. Read This First ENERGY STAR Program As an ENERGY STAR...

User Manual
Page 11
...settings must be loaded here. Make sure the ventilator is stacked here print side down. 2. Control Panel Contains keys for printer control and a panel display that displays the printer's status. 5. G1398502_1.00 Copyright © 2005 11 Standard Tray Output is not blocked by objects or in malfunction. ... to 530 sheets of plain paper can be made in order to print onto custom size paper. 7. Upper Left Cover Open this to the Printer Exterior: Front View 1. Guide to replace the fusing unit or transfer roller, install the duplex unit, or remove misfed paper. 6. Front Cover...
...settings must be loaded here. Make sure the ventilator is stacked here print side down. 2. Control Panel Contains keys for printer control and a panel display that displays the printer's status. 5. G1398502_1.00 Copyright © 2005 11 Standard Tray Output is not blocked by objects or in malfunction. ... to 530 sheets of plain paper can be made in order to print onto custom size paper. 7. Upper Left Cover Open this to the Printer Exterior: Front View 1. Guide to replace the fusing unit or transfer roller, install the duplex unit, or remove misfed paper. 6. Front Cover...

User Manual
Page 12
...way obstructed. 2. Make sure the ventilator is longer than A4 or 8 1/2" × 11". 5. Expansion Card Slots Install expansion cards in this to the Printer Exterior: Rear View 1. Right Cover Open this out when printing on and off. 4. Optional Interface Board Slots Insert an optional 1394 interface board, 802.11b... out to one interface board can be inserted at a time. 12 Plug cables such as the memory unit, user account enhance unit, or printer hard disk. Up to install options such as the USB cable and Ethernet cable into their connectors here. 6. Guide to turn the power on...
...way obstructed. 2. Make sure the ventilator is longer than A4 or 8 1/2" × 11". 5. Expansion Card Slots Install expansion cards in this to the Printer Exterior: Rear View 1. Right Cover Open this out when printing on and off. 4. Optional Interface Board Slots Insert an optional 1394 interface board, 802.11b... out to one interface board can be inserted at a time. 12 Plug cables such as the memory unit, user account enhance unit, or printer hard disk. Up to install options such as the USB cable and Ethernet cable into their connectors here. 6. Guide to turn the power on...

User Manual
Page 13
... a host computer. 9. Make sure the ventilator is not blocked by objects or in malfunction. USB Port Use a USB cable to connect the printer to a network. 10. Overheating results in any way obstructed. 11. Guide to the paper feed unit. 12. Ventilator The ventilator helps keep internal components from ... of the cable directly to the wall outlet (do not use an extension). 13 Power Port Connect the power cable to this to connect the printer to the...
... a host computer. 9. Make sure the ventilator is not blocked by objects or in malfunction. USB Port Use a USB cable to connect the printer to a network. 10. Overheating results in any way obstructed. 11. Guide to the paper feed unit. 12. Ventilator The ventilator helps keep internal components from ... of the cable directly to the wall outlet (do not use an extension). 13 Power Port Connect the power cable to this to connect the printer to the...

User Manual
Page 14
... "Replace Transfer Belt" message appears on the display, replace this unit. 7. Fusing Unit Fuses the image onto paper. Duplex Unit (optional for Basic Model Printer) Use to the Printer Inside 1. Toner Cartridges When the "Add Toner (color)" message appears on the display, replace the indicated Photo Conductor Unit. 6. Photo Conductor Unit Color...
... "Replace Transfer Belt" message appears on the display, replace this unit. 7. Fusing Unit Fuses the image onto paper. Duplex Unit (optional for Basic Model Printer) Use to the Printer Inside 1. Toner Cartridges When the "Add Toner (color)" message appears on the display, replace the indicated Photo Conductor Unit. 6. Photo Conductor Unit Color...

User Manual
Page 15
... . A red light indicates the toner cartridge needs to be printed. 15 It is unlit when the power is off or while the printer is on, follow the instructions that makes printing impossible; the yellow light indicates a potential error during printing. For details about error messages,...each color. A yellow light indicates the toner amount is on the display in Energy Saver mode. 7. Keep the key pressed to the Printer Control Panel 1. A red light indicates an error has occurred that appear on the display when making settings. Power indicator This indicator remains lit...
... . A red light indicates the toner cartridge needs to be printed. 15 It is unlit when the power is off or while the printer is on, follow the instructions that makes printing impossible; the yellow light indicates a potential error during printing. For details about error messages,...each color. A yellow light indicates the toner amount is on the display in Energy Saver mode. 7. Keep the key pressed to the Printer Control Panel 1. A red light indicates an error has occurred that appear on the display when making settings. Power indicator This indicator remains lit...
User Manual
Page 16
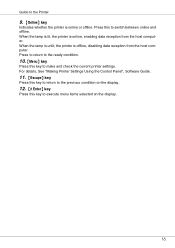
.... Press this key to switch between online and offline. When the lamp is lit, the printer is offline, disabling data reception from the host computer. For details, See "Making Printer Settings Using the Control Panel", Software Guide. 11. {Escape} key Press this key to return to the previous ...condition on the display. 12. {# Enter} key Press this key to the Printer 9. {Online} key Indicates whether the printer is online or offline. When the lamp is unlit, the printer is online, enabling data reception from the host computer. Guide to execute menu items selected on the...
.... Press this key to switch between online and offline. When the lamp is lit, the printer is offline, disabling data reception from the host computer. For details, See "Making Printer Settings Using the Control Panel", Software Guide. 11. {Escape} key Press this key to return to the previous ...condition on the display. 12. {# Enter} key Press this key to the Printer 9. {Online} key Indicates whether the printer is online or offline. When the lamp is unlit, the printer is online, enabling data reception from the host computer. Guide to execute menu items selected on the...
User Manual
Page 17
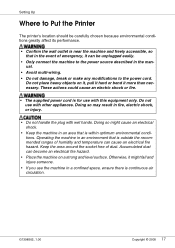
... is for use with this equipment only. Do not use with other appliances. G1398502_1.00 Copyright © 2005 17 Setting Up Where to Put the Printer The printer's location should be carefully chosen because environmental conditions greatly affect its performance. • Confirm the wall outlet is near the machine and freely accessible...
... is for use with this equipment only. Do not use with other appliances. G1398502_1.00 Copyright © 2005 17 Setting Up Where to Put the Printer The printer's location should be carefully chosen because environmental conditions greatly affect its performance. • Confirm the wall outlet is near the machine and freely accessible...

User Manual
Page 18
Setting Up ❖ Space Required for Installation Leave enough space around the printer. This space is necessary to operate the printer. The recommended (or minimum) space requirements are as follows: A: 13 cm (5.2 inches) or more B: 11 cm (4.4 inches) or more C: 35 cm (14.0 inches) or more D: 61 cm (24.4 inches) or more ❖ Optimum Environmental Conditions Permissible and recommended temperature and humidity ranges are as follows: • White area: Permissible Range • Gray area: Recommended Range 18
Setting Up ❖ Space Required for Installation Leave enough space around the printer. This space is necessary to operate the printer. The recommended (or minimum) space requirements are as follows: A: 13 cm (5.2 inches) or more B: 11 cm (4.4 inches) or more C: 35 cm (14.0 inches) or more D: 61 cm (24.4 inches) or more ❖ Optimum Environmental Conditions Permissible and recommended temperature and humidity ranges are as follows: • White area: Permissible Range • Gray area: Recommended Range 18
User Manual
Page 20
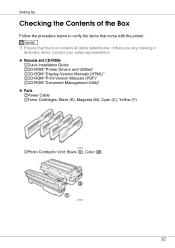
Setting Up Checking the Contents of the Box Follow the procedure below to verify the items that come with the printer. ❒ Ensure that the box contains all items listed below. If there are any missing or defective items, contact your sales representative. ❖ ...Manuals and CD-ROMs Quick Installation Guide CD-ROM "Printer Drivers and Utilities" CD-ROM "Display-Version Manuals (HTML)" CD-ROM "Print-Version Manuals (PDF)" CD-ROM "Document Management Utility" ❖ Parts Power...
Setting Up Checking the Contents of the Box Follow the procedure below to verify the items that come with the printer. ❒ Ensure that the box contains all items listed below. If there are any missing or defective items, contact your sales representative. ❖ ...Manuals and CD-ROMs Quick Installation Guide CD-ROM "Printer Drivers and Utilities" CD-ROM "Display-Version Manuals (HTML)" CD-ROM "Print-Version Manuals (PDF)" CD-ROM "Document Management Utility" ❖ Parts Power...

User Manual
Page 22
...; Lower the machine slowly and carefully to prevent trapping your hands or clothes. B Position the printer where it is dirty. Lifting the printer requires at least two people. Remove these protective materials after bringing the machine to where it will be used. Be careful not to let it ... conductor unit to avoid malfunction. ❒ Removed tape is to be installed. • When lifting the machine, use the inset grips on both sides. The printer could break or cause an injury if dropped. • Place no objects on the right cover. ❒ Be sure to remove all four strips of...
...; Lower the machine slowly and carefully to prevent trapping your hands or clothes. B Position the printer where it is dirty. Lifting the printer requires at least two people. Remove these protective materials after bringing the machine to where it will be used. Be careful not to let it ... conductor unit to avoid malfunction. ❒ Removed tape is to be installed. • When lifting the machine, use the inset grips on both sides. The printer could break or cause an injury if dropped. • Place no objects on the right cover. ❒ Be sure to remove all four strips of...


