
Brochure
Page 2
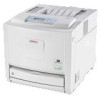
... @ 533MHz Printer Languages: Adobe® PostScript® 3™, PCL 6, PCL 5c, PDF Direct, Ricoh RPCS Fonts: Adobe PostScript 3: 136 Type 1 fonts PCL: 45 Intellifonts, 10 TrueType fonts, 1 Bitmap font Memory (RAM): 128MB Std. / 512MB Max. Use the Multipurpose Tray to feed stocks up Time: Power Source: Power Consumption: Standard Paper Capacity: Optional Paper Capacity: Maximum Paper Capacity: Acceptable Paper Sizes: Acceptable Paper Weights: Output Capacity: Automatic Duplexing: Duplex Paper Weight: Part # 402434 Desktop Laser beam scanning, color laser electro...
... @ 533MHz Printer Languages: Adobe® PostScript® 3™, PCL 6, PCL 5c, PDF Direct, Ricoh RPCS Fonts: Adobe PostScript 3: 136 Type 1 fonts PCL: 45 Intellifonts, 10 TrueType fonts, 1 Bitmap font Memory (RAM): 128MB Std. / 512MB Max. Use the Multipurpose Tray to feed stocks up Time: Power Source: Power Consumption: Standard Paper Capacity: Optional Paper Capacity: Maximum Paper Capacity: Acceptable Paper Sizes: Acceptable Paper Weights: Output Capacity: Automatic Duplexing: Duplex Paper Weight: Part # 402434 Desktop Laser beam scanning, color laser electro...

User Manual
Page 1
... 9 How to Read This Manual 10 Guide to the Printer Exterior: Front View 11 Exterior: Rear View 12 Inside...14 Control Panel...15 Setting Up Where to Put the Printer 17 Checking the Contents of the Box 20 Unpacking...22 Installing the Waste Toner Bottle and Photo Conductor Unit 23 Installing the Toner Cartridge 29 Loading Paper ...33 Turning the Power On 36 Selecting the Display Language 38 Test Printing ...40 G1398502_1.00...
... 9 How to Read This Manual 10 Guide to the Printer Exterior: Front View 11 Exterior: Rear View 12 Inside...14 Control Panel...15 Setting Up Where to Put the Printer 17 Checking the Contents of the Box 20 Unpacking...22 Installing the Waste Toner Bottle and Photo Conductor Unit 23 Installing the Toner Cartridge 29 Loading Paper ...33 Turning the Power On 36 Selecting the Display Language 38 Test Printing ...40 G1398502_1.00...

User Manual
Page 2
... Board Type B 70 Attaching IEEE 802.11b Interface Unit Type H 73 Attaching Bluetooth Interface Unit Type 3245 77 Attaching IEEE 1284 Interface Board Type A 81 Attaching Network Data Protection Unit Type C 83 Connecting the Printer Network Connection 85 USB Connection 87 Parallel Connection 88 IEEE 1394 Connection 89 Configuration Ethernet Configuration 90 IEEE 802.11b (Wireless LAN) Configuration 95 IEEE 1394 Configuration 101 IP over 1394...101 SCSI print...103 Installing the Printer Driver Quick Install...105 Install the Operating Instructions 107...
... Board Type B 70 Attaching IEEE 802.11b Interface Unit Type H 73 Attaching Bluetooth Interface Unit Type 3245 77 Attaching IEEE 1284 Interface Board Type A 81 Attaching Network Data Protection Unit Type C 83 Connecting the Printer Network Connection 85 USB Connection 87 Parallel Connection 88 IEEE 1394 Connection 89 Configuration Ethernet Configuration 90 IEEE 802.11b (Wireless LAN) Configuration 95 IEEE 1394 Configuration 101 IP over 1394...101 SCSI print...103 Installing the Printer Driver Quick Install...105 Install the Operating Instructions 107...

User Manual
Page 6
... make removing the stain impossible. • Keep toner (used toner is outside the recommended ranges of children. • Grip the plug, not the cord, when pulling the plug from the socket. If your skin comes into your clothes or skin when removing a paper jam or replacing toner. Doing so might cause an electrical shock. • Keep the machine in burns. • Lifting the paper feed unit...
... make removing the stain impossible. • Keep toner (used toner is outside the recommended ranges of children. • Grip the plug, not the cord, when pulling the plug from the socket. If your skin comes into your clothes or skin when removing a paper jam or replacing toner. Doing so might cause an electrical shock. • Keep the machine in burns. • Lifting the paper feed unit...
User Manual
Page 9
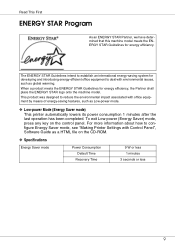
... the ENERGY STAR logo onto the machine model. To exit Low-power (Energy Saver) mode, press any key on the CD-ROM. ❖ Specifications Energy Saver mode Power Consumption Default Time Recovery Time 9 W or less 1 minutes 3 seconds or less 9 For more information about how to configure Energy Saver mode, see "Making Printer Settings with environmental issues, such as a HTML file on the control panel. When a product meets the ENERGY STAR...
... the ENERGY STAR logo onto the machine model. To exit Low-power (Energy Saver) mode, press any key on the CD-ROM. ❖ Specifications Energy Saver mode Power Consumption Default Time Recovery Time 9 W or less 1 minutes 3 seconds or less 9 For more information about how to configure Energy Saver mode, see "Making Printer Settings with environmental issues, such as a HTML file on the control panel. When a product meets the ENERGY STAR...

User Manual
Page 11
... Tray Output is not blocked by objects or in malfunction. Bypass Tray Use this to print onto custom size paper. 7. Special printer driver settings must be loaded here. Tray 1 Up to 530 sheets of plain paper can be made in order to replace the fusing unit or transfer roller, install the duplex unit, or remove misfed paper. 6. Guide to replace toner cartridges. 3. Upper Left Cover Open this to the Printer Exterior: Front View 1. Make sure the ventilator is stacked here print side down. 2. Control Panel...
... Tray Output is not blocked by objects or in malfunction. Bypass Tray Use this to print onto custom size paper. 7. Special printer driver settings must be loaded here. Tray 1 Up to 530 sheets of plain paper can be made in order to replace the fusing unit or transfer roller, install the duplex unit, or remove misfed paper. 6. Guide to replace toner cartridges. 3. Upper Left Cover Open this to the Printer Exterior: Front View 1. Make sure the ventilator is stacked here print side down. 2. Control Panel...

User Manual
Page 12
... turn the power on paper that is not blocked by objects or in this to install options such as the USB cable and Ethernet cable into their connectors here. 6. To install an expansion card, use the under slot. 7. Up to the Printer Exterior: Rear View 1. Plug cables such as the memory unit, user account enhance unit, or printer hard disk. Guide to one interface board can be inserted at a time...
... turn the power on paper that is not blocked by objects or in this to install options such as the USB cable and Ethernet cable into their connectors here. 6. To install an expansion card, use the under slot. 7. Up to the Printer Exterior: Rear View 1. Plug cables such as the memory unit, user account enhance unit, or printer hard disk. Guide to one interface board can be inserted at a time...

User Manual
Page 13
Ventilator The ventilator helps keep internal components from overheating. Overheating results in any way obstructed. 11. Make sure the ventilator is not blocked by objects or in malfunction. Ethernet Port Use a network interface cable to connect the printer to a host computer. 9. Power Port Connect the power cable to this to connect the printer to the paper feed unit. 12. USB Port Use a USB cable to connect the printer to a network. 10. Optional Paper Feed Unit Connector Use this socket and the other...
Ventilator The ventilator helps keep internal components from overheating. Overheating results in any way obstructed. 11. Make sure the ventilator is not blocked by objects or in malfunction. Ethernet Port Use a network interface cable to connect the printer to a host computer. 9. Power Port Connect the power cable to this to connect the printer to the paper feed unit. 12. USB Port Use a USB cable to connect the printer to a network. 10. Optional Paper Feed Unit Connector Use this socket and the other...

User Manual
Page 14
Duplex Unit (optional for Basic Model Printer) Use to the Printer Inside 1. When the "Replace Used Toner Bottle" message appears on the display, replace this bottle. 14 Fusing Unit Fuses the image onto paper. When the "Replace Fusing Unit" message appears on the display, replace this unit. 2. Toner Cartridges When the "Add Toner (color)" message appears on the display, replace this unit. 7. Transfer Roller When the "Replace Fusing Unit" message appears on the display, replace the toner cartridge of paper. 4. Guide to print on both sides of the indicated color. 5. Photo ...
Duplex Unit (optional for Basic Model Printer) Use to the Printer Inside 1. When the "Replace Used Toner Bottle" message appears on the display, replace this bottle. 14 Fusing Unit Fuses the image onto paper. When the "Replace Fusing Unit" message appears on the display, replace this unit. 2. Toner Cartridges When the "Add Toner (color)" message appears on the display, replace this unit. 7. Transfer Roller When the "Replace Fusing Unit" message appears on the display, replace the toner cartridge of paper. 4. Guide to print on both sides of the indicated color. 5. Photo ...

User Manual
Page 15
... the online status when the paper size or type does not match the actually set size or type. 6. Toner End LED The color of 10. 3. Power indicator This indicator remains lit while the power is approaching exhaustion. Data In indicator Blinks when the printer is on the display. 8. You can use this to be replaced. 4. {Job Reset} key When the printer is online, press this key to cancel an ongoing print job. 5. {Form Feed} key...
... the online status when the paper size or type does not match the actually set size or type. 6. Toner End LED The color of 10. 3. Power indicator This indicator remains lit while the power is approaching exhaustion. Data In indicator Blinks when the printer is on the display. 8. You can use this to be replaced. 4. {Job Reset} key When the printer is online, press this key to cancel an ongoing print job. 5. {Form Feed} key...
User Manual
Page 16
... "Making Printer Settings Using the Control Panel", Software Guide. 11. {Escape} key Press this key to return to the previous condition on the display. 12. {# Enter} key Press this to switch between online and offline. When the lamp is unlit, the printer is offline, disabling data reception from the host computer. Press to return to the ready condition. 10. {Menu} key Press this key to make and check the...
... "Making Printer Settings Using the Control Panel", Software Guide. 11. {Escape} key Press this key to return to the previous condition on the display. 12. {# Enter} key Press this to switch between online and offline. When the lamp is unlit, the printer is offline, disabling data reception from the host computer. Press to return to the ready condition. 10. {Menu} key Press this key to make and check the...
User Manual
Page 20
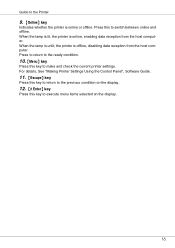
... that come with the printer. ❒ Ensure that the box contains all items listed below. If there are any missing or defective items, contact your sales representative. ❖ Manuals and CD-ROMs Quick Installation Guide CD-ROM "Printer Drivers and Utilities" CD-ROM "Display-Version Manuals (HTML)" CD-ROM "Print-Version Manuals (PDF)" CD-ROM "Document Management Utility" ❖ Parts Power Cable Toner Cartridges: Black (K), Magenta (M), Cyan (C), Yellow (Y) Photo Conductor Unit: Black ( ), Color ( ) 20
... that come with the printer. ❒ Ensure that the box contains all items listed below. If there are any missing or defective items, contact your sales representative. ❖ Manuals and CD-ROMs Quick Installation Guide CD-ROM "Printer Drivers and Utilities" CD-ROM "Display-Version Manuals (HTML)" CD-ROM "Print-Version Manuals (PDF)" CD-ROM "Document Management Utility" ❖ Parts Power Cable Toner Cartridges: Black (K), Magenta (M), Cyan (C), Yellow (Y) Photo Conductor Unit: Black ( ), Color ( ) 20
User Manual
Page 29
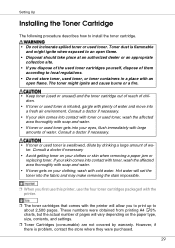
... amount of pages will vary depending on the paper type, size, contents, and settings. ❒ Toner Cartridges (consumable) are not covered by warranty. However, if there is inhaled, gargle with plenty of water and move into the fabric and may make removing the stain impossible. ❒ When you first use this printer, use the four toner cartridges packaged with the printer. ❒ The toner cartridges that comes with...
... amount of pages will vary depending on the paper type, size, contents, and settings. ❒ Toner Cartridges (consumable) are not covered by warranty. However, if there is inhaled, gargle with plenty of water and move into the fabric and may make removing the stain impossible. ❒ When you first use this printer, use the four toner cartridges packaged with the printer. ❒ The toner cartridges that comes with...

User Manual
Page 55
... the controller board. 55 er. Installing Options Attaching Memory Unit Type D 128MB, Memory Unit Type E 256MB (SDRAM Module) • Do not touch the inside of the printer. ❒ These screws will be used again in the printer driv- Static electricity can damage the memory unit. ❒ Do not subject the memory unit to physical shocks. ❒ Available memory varies depending on model type. ❒ Before using the new memory unit, you must make settings in...
... the controller board. 55 er. Installing Options Attaching Memory Unit Type D 128MB, Memory Unit Type E 256MB (SDRAM Module) • Do not touch the inside of the printer. ❒ These screws will be used again in the printer driv- Static electricity can damage the memory unit. ❒ Do not subject the memory unit to physical shocks. ❒ Available memory varies depending on model type. ❒ Before using the new memory unit, you must make settings in...

User Manual
Page 70
... print" ❒ Under Windows 2000, the 1394 interface board can damage the 1394 interface board. ❒ Do not plug or unplug the 1394 interface cable while installing the printer driver. ❒ Use the 1394 interface cable that has administrators access rights. ❒ Before touching the 1394 interface board, ground yourself by touching something metal to discharge any static electricity. Operating system-compatible connection methods...
... print" ❒ Under Windows 2000, the 1394 interface board can damage the 1394 interface board. ❒ Do not plug or unplug the 1394 interface cable while installing the printer driver. ❒ Use the 1394 interface cable that has administrators access rights. ❒ Before touching the 1394 interface board, ground yourself by touching something metal to discharge any static electricity. Operating system-compatible connection methods...

User Manual
Page 95
... about setting items under [Network Setup]. The following table shows the control panel settings and their default values. These items appear in 802.11 Ad hoc mode or Ad hoc mode, "ASSID" appears. Setting Name Comm. The [Menu] screen appears. 95 A Press the {Menu} key. Configuration IEEE 802.11b (Wireless LAN) Configuration Configure the printer to use IEEE 802.11b (Wireless LAN), select [IEEE 802.11b] for [LAN Type] in [Network Setup...
... about setting items under [Network Setup]. The following table shows the control panel settings and their default values. These items appear in 802.11 Ad hoc mode or Ad hoc mode, "ASSID" appears. Setting Name Comm. The [Menu] screen appears. 95 A Press the {Menu} key. Configuration IEEE 802.11b (Wireless LAN) Configuration Configure the printer to use IEEE 802.11b (Wireless LAN), select [IEEE 802.11b] for [LAN Type] in [Network Setup...

User Manual
Page 103
The IEEE 1394 setting menu appears. D Set [SCSI print] and [Bidi-SCSI print] if necessary. ❒ The default setting is "Active". For details about printing the configuration page, see p.40 "Test Printing". The [Menu] screen appears. C Press the {U} or {T} key to display [SCSI print], and the press the {# Enter} key. 103 E Press the {U} or {T} key to display [IEEE 1394 Setup], and then press the {# Enter} key. B Press the...
The IEEE 1394 setting menu appears. D Set [SCSI print] and [Bidi-SCSI print] if necessary. ❒ The default setting is "Active". For details about printing the configuration page, see p.40 "Test Printing". The [Menu] screen appears. C Press the {U} or {T} key to display [SCSI print], and the press the {# Enter} key. 103 E Press the {U} or {T} key to display [IEEE 1394 Setup], and then press the {# Enter} key. B Press the...

User Manual
Page 105
.../IP port will be set. ❒ To install printer driver under USB connection. If you must have an account that has Manage Printers permission. C Select an interface language, and then click [OK]. D Click [Quick Install]. Installing the Printer Driver Quick Install Windows 95/98/Me, Windows 2000/XP, Windows Server 2003, and Windows NT 4.0 users can easily install this happens, launch "Setup.exe" on as an Administrator. ❒ The Quick Install is not available when using this printer under Windows...
.../IP port will be set. ❒ To install printer driver under USB connection. If you must have an account that has Manage Printers permission. C Select an interface language, and then click [OK]. D Click [Quick Install]. Installing the Printer Driver Quick Install Windows 95/98/Me, Windows 2000/XP, Windows Server 2003, and Windows NT 4.0 users can easily install this happens, launch "Setup.exe" on as an Administrator. ❒ The Quick Install is not available when using this printer under Windows...
User Manual
Page 106
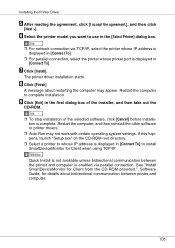
... network connection via parallel connection. See "Install SmartDeviceMonitor for Client from the CD-ROM provided.", Software Guide, for Client when using TCP/IP. F Select the printer model you want to install SmartDeviceMonitor for details about restarting the computer may not work with certain operating system settings. G Click [Install]. Restart the computer to complete installation. Restart the computer, and then reinstall the other software or printer drivers. ❒ Auto Run...
... network connection via parallel connection. See "Install SmartDeviceMonitor for Client from the CD-ROM provided.", Software Guide, for Client when using TCP/IP. F Select the printer model you want to install SmartDeviceMonitor for details about restarting the computer may not work with certain operating system settings. G Click [Install]. Restart the computer to complete installation. Restart the computer, and then reinstall the other software or printer drivers. ❒ Auto Run...
User Manual
Page 107
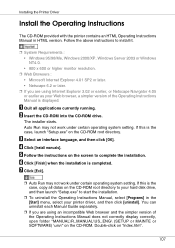
... the Operating Instructions Manual does not correctly display correctly, open folder "MANUAL\R_MANUAL\US_ENG\ (SETUP or MAINTE or SOFTWARE) \unv\" on the CD-ROM root directory to your printer driver, and then click [uninstall]. Double-click on the screen to complete the installation. F Click [Finish] when the installation is the case, copy all applications currently running. If this is displayed. D Click [Install manuals]. C Select an interface language, and...
... the Operating Instructions Manual does not correctly display correctly, open folder "MANUAL\R_MANUAL\US_ENG\ (SETUP or MAINTE or SOFTWARE) \unv\" on the CD-ROM root directory to your printer driver, and then click [uninstall]. Double-click on the screen to complete the installation. F Click [Finish] when the installation is the case, copy all applications currently running. If this is displayed. D Click [Install manuals]. C Select an interface language, and...


