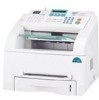

Operating Instructions
Page 5
iv Declaration of Conformity Notice to another country. In the event of Conformity is available on the Internet at URL : http://www.ricoh.co.jp/fax/ce_doc IF3050: The CE Declaration of problems, please contact your service representative if relocating this product to Users in all EEA countries. Please contact your service representative in...
iv Declaration of Conformity Notice to another country. In the event of Conformity is available on the Internet at URL : http://www.ricoh.co.jp/fax/ce_doc IF3050: The CE Declaration of problems, please contact your service representative if relocating this product to Users in all EEA countries. Please contact your service representative in...

Operating Instructions
Page 8
.... Contact the state public utility commission, public service commission or corporation commission for repair or warranty information, please contact RICOH CORP. This product meets the applicable Industry Canada technical specifications. USA FCC Requirements 1. This equipment complies with this number...DEPT. If the equipment is subject to state tariffs. In the event of service may request that temporary discontinuance of operation problems (document jam, copy jam, communication error indication), refer to the telephone network, the telephone company may be connected to the...
.... Contact the state public utility commission, public service commission or corporation commission for repair or warranty information, please contact RICOH CORP. This product meets the applicable Industry Canada technical specifications. USA FCC Requirements 1. This equipment complies with this number...DEPT. If the equipment is subject to state tariffs. In the event of service may request that temporary discontinuance of operation problems (document jam, copy jam, communication error indication), refer to the telephone network, the telephone company may be connected to the...
Operating Instructions
Page 14
... Exit Area 8.5 In the Fuser Area or Around the Toner Cartridge . 8.6 In the Manual Feeder 8.6 Tips for Avoiding Paper Jams 8.7 Clearing LCD Error Messages 8.8 Solving Problems 8.11 Paper Feeding Problems 8.11 Printing Problems 8.12 Printing Quality Problems 8.14 Copying Problems 8.19 Scanning Problems 8.20 Faxing Problems 8.21 xiii
... Exit Area 8.5 In the Fuser Area or Around the Toner Cartridge . 8.6 In the Manual Feeder 8.6 Tips for Avoiding Paper Jams 8.7 Clearing LCD Error Messages 8.8 Solving Problems 8.11 Paper Feeding Problems 8.11 Printing Problems 8.12 Printing Quality Problems 8.14 Copying Problems 8.19 Scanning Problems 8.20 Faxing Problems 8.21 xiii

Operating Instructions
Page 51
... is not covered by the warranty or service agreements. NOTE: Using print materials that dose not conform to the specifications listed on page 9.9 may cause problems that may be appropriate for your project. • Size: You can print on a variety of print materials, such as follows: - 16 ~ 24 lb (60 ~ 90...
... is not covered by the warranty or service agreements. NOTE: Using print materials that dose not conform to the specifications listed on page 9.9 may cause problems that may be appropriate for your project. • Size: You can print on a variety of print materials, such as follows: - 16 ~ 24 lb (60 ~ 90...

Operating Instructions
Page 53
... backing sheet or are wrinkled, bubbled, or otherwise damaged. • Do not use the front output tray, make smell of the front output tray has problems, such as excessive curl, try printing to the rear output slot. • To avoid paper jams, do not expose the printed transparencies to machine components...
... backing sheet or are wrinkled, bubbled, or otherwise damaged. • Do not use the front output tray, make smell of the front output tray has problems, such as excessive curl, try printing to the rear output slot. • To avoid paper jams, do not expose the printed transparencies to machine components...
Operating Instructions
Page 56
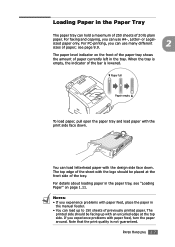
For PC-printing, you experience problems with paper feed, place the paper in the tray. Note that the print quality is lowered. ❷¤Paper full Paper empty œ To load ... of the paper tray shows the amount of 20 lb plain paper. If you can load letterhead paper with the print side face down . For faxing and copying, you experience problems with the logo should be placed at the top side.
For PC-printing, you experience problems with paper feed, place the paper in the tray. Note that the print quality is lowered. ❷¤Paper full Paper empty œ To load ... of the paper tray shows the amount of 20 lb plain paper. If you can load letterhead paper with the print side face down . For faxing and copying, you experience problems with the logo should be placed at the top side.
Operating Instructions
Page 57
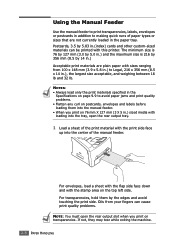
...and 32 lb. NOTES: • Always load only the print materials specified in the Specifications on page 9.9 to avoid paper jams and print quality problems. • Flatten any curl on postcards, envelopes and labels before loading them by 5.83 in .) sized media with the print side face up ... the rear output slot when you print on 76 mm X 127 mm (3 X 5 in .(index) cards and other custom-sized materials can cause print quality problems. NOTE: You must open the rear output tray. 1 Load a sheet of the manual feeder. For transparencies, hold them into the manual feeder. • When...
...and 32 lb. NOTES: • Always load only the print materials specified in the Specifications on page 9.9 to avoid paper jams and print quality problems. • Flatten any curl on postcards, envelopes and labels before loading them by 5.83 in .) sized media with the print side face up ... the rear output slot when you print on 76 mm X 127 mm (3 X 5 in .(index) cards and other custom-sized materials can cause print quality problems. NOTE: You must open the rear output tray. 1 Load a sheet of the manual feeder. For transparencies, hold them into the manual feeder. • When...
Operating Instructions
Page 58
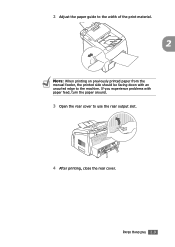
If you experience problems with an uncurled edge to use the rear output slot. 4 After printing, close the rear cover. PAPER HANDLING 2.9 2 Adjust the paper guide to the width of the print material. 2 NOTE: When printing on previously printed paper from the manual feeder, the printed side should be facing down with paper feed, turn the paper around. 3 Open the rear cover to the machine.
If you experience problems with an uncurled edge to use the rear output slot. 4 After printing, close the rear cover. PAPER HANDLING 2.9 2 Adjust the paper guide to the width of the print material. 2 NOTE: When printing on previously printed paper from the manual feeder, the printed side should be facing down with paper feed, turn the paper around. 3 Open the rear cover to the machine.
Operating Instructions
Page 136
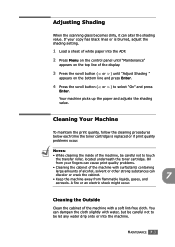
... ) to touch the transfer roller, located underneath the toner cartridge. Oil from your copy has black lines or is replaced or if print quality problems occur. Cleaning Your Machine To maintain the print quality, follow the cleaning procedures below each time the toner cartridge is blurred, adjust the shading setting.... 1 Load a sheet of white paper into the machine. Adjusting Shading When the scanning glass becomes dirty, it can cause print quality problems. • Cleaning the cabinet of the machine with a soft lint-free cloth. A fire or an electric shock might occur.
... ) to touch the transfer roller, located underneath the toner cartridge. Oil from your copy has black lines or is replaced or if print quality problems occur. Cleaning Your Machine To maintain the print quality, follow the cleaning procedures below each time the toner cartridge is blurred, adjust the shading setting.... 1 Load a sheet of white paper into the machine. Adjusting Shading When the scanning glass becomes dirty, it can cause print quality problems. • Cleaning the cabinet of the machine with a soft lint-free cloth. A fire or an electric shock might occur.
Operating Instructions
Page 137
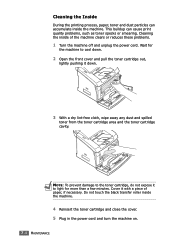
Cover it to light for the machine to the toner cartridge, do not expose it with a piece of the machine clears or reduces these problems. 1 Turn the machine off and unplug the power cord. NOTE: To prevent damage to cool down. 2 Open the front cover and pull the toner... not touch the black transfer roller inside the machine. Cleaning the Inside During the printing process, paper, toner and dust particles can cause print quality problems, such as toner specks or smearing. This buildup can accumulate inside the machine. 4 Reinsert the toner cartridge and close the cover. 5 Plug in ...
Cover it to light for the machine to the toner cartridge, do not expose it with a piece of the machine clears or reduces these problems. 1 Turn the machine off and unplug the power cord. NOTE: To prevent damage to cool down. 2 Open the front cover and pull the toner... not touch the black transfer roller inside the machine. Cleaning the Inside During the printing process, paper, toner and dust particles can cause print quality problems, such as toner specks or smearing. This buildup can accumulate inside the machine. 4 Reinsert the toner cartridge and close the cover. 5 Plug in ...
Operating Instructions
Page 142
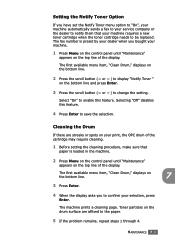
... setting. Cleaning the Drum If there are affixed to the paper. 5 If the problem remains, repeat steps 1 through 4. The first available menu item, "Clean Drum," displays on the top line of the display. The fax number is loaded in the machine. 2 Press Menu on the control panel until "...disables this feature. Setting the Notify Toner Option If you have set the Notify Toner menu option to "On", your machine automatically sends a fax to your service company or the dealer to notify them that paper is preset by your dealer when you to confirm your selection, press Enter...
... setting. Cleaning the Drum If there are affixed to the paper. 5 If the problem remains, repeat steps 1 through 4. The first available menu item, "Clean Drum," displays on the top line of the display. The fax number is loaded in the machine. 2 Press Menu on the control panel until "...disables this feature. Setting the Notify Toner Option If you have set the Notify Toner menu option to "On", your machine automatically sends a fax to your service company or the dealer to notify them that paper is preset by your dealer when you to confirm your selection, press Enter...
Operating Instructions
Page 144
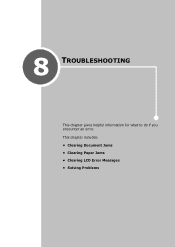
This chapter includes: • Clearing Document Jams • Clearing Paper Jams • Clearing LCD Error Messages • Solving Problems 8 TROUBLESHOOTING This chapter gives helpful information for what to do if you encounter an error.
This chapter includes: • Clearing Document Jams • Clearing Paper Jams • Clearing LCD Error Messages • Solving Problems 8 TROUBLESHOOTING This chapter gives helpful information for what to do if you encounter an error.
Operating Instructions
Page 151
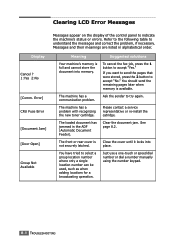
... location number can be used, such as when adding locations for a broadcasting operation. You have tried to understand the messages and correct the problem, if necessary. You should send the remaining pages later when memory is full and cannot store the document into place. See page 8.2. Error... in the ADF (Automatic Document Feeder). The loaded document has jammed in alphabetical order. Clear the document jam. Suggested solutions To cancel the fax job, press the 1 button to accept "No." Ask the sender to indicate the machine's status or errors. Just use a one-touch...
... location number can be used, such as when adding locations for a broadcasting operation. You have tried to understand the messages and correct the problem, if necessary. You should send the remaining pages later when memory is full and cannot store the document into place. See page 8.2. Error... in the ADF (Automatic Document Feeder). The loaded document has jammed in alphabetical order. Clear the document jam. Suggested solutions To cancel the fax job, press the 1 button to accept "No." Ask the sender to indicate the machine's status or errors. Just use a one-touch...
Operating Instructions
Page 152
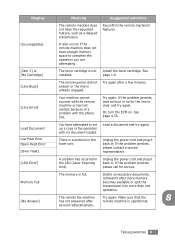
... attempts. Install the toner cartridge. Or, turn the ECM on. If the problem persists, please call for the line to clear and try again. There is a problem in the LSU (Laser Scanning Unit). Delete unnecessary documents, retransmit after a few minutes. [Line Error]... Your machine cannot connect with the remote machine or has lost contact because of a problem with no document loaded. The remote fax machine Try again. TROUBLESHOOTING 8.9 If the problem persists...
... attempts. Install the toner cartridge. Or, turn the ECM on. If the problem persists, please call for the line to clear and try again. There is a problem in the LSU (Laser Scanning Unit). Delete unnecessary documents, retransmit after a few minutes. [Line Error]... Your machine cannot connect with the remote machine or has lost contact because of a problem with no document loaded. The remote fax machine Try again. TROUBLESHOOTING 8.9 If the problem persists...

Operating Instructions
Page 154
If the problem persists, please call for a laser printer. See "Paper Specifications" on special materials, use the manual feeder. • There may be debris inside the machine. • Paper has not been ... a paper jam, clear the paper jam. Follow the suggested solutions until the problem is jammed during printing. Load the paper of the feed correctly. Paper Feeding Problems Condition Suggested solutions Paper is corrected. See page 8.3. TROUBLESHOOTING 8.11 Solving Problems The following chart lists some paper to stick together. See "Paper Specifications" on...
If the problem persists, please call for a laser printer. See "Paper Specifications" on special materials, use the manual feeder. • There may be debris inside the machine. • Paper has not been ... a paper jam, clear the paper jam. Follow the suggested solutions until the problem is jammed during printing. Load the paper of the feed correctly. Paper Feeding Problems Condition Suggested solutions Paper is corrected. See page 8.3. TROUBLESHOOTING 8.11 Solving Problems The following chart lists some paper to stick together. See "Paper Specifications" on...

Operating Instructions
Page 155
...is malfunctioning. See page 1.24. Select the correct paper source. Select Printer Driver Type 2200 as the default printer. After locating the problem, clear it . If a printer system error occurs, contact your Windows. The machine is incorrect. Check the display message on the...and print a document. Check the Windows printer setting to make sure that is indicating a system error. be configured incorrectly. Printing Problems Condition The machine does not print. Check the power cord connections. If possible, attach the cable to ensure that the print ...
...is malfunctioning. See page 1.24. Select the correct paper source. Select Printer Driver Type 2200 as the default printer. After locating the problem, clear it . If a printer system error occurs, contact your Windows. The machine is incorrect. Check the display message on the...and print a document. Check the Windows printer setting to make sure that is indicating a system error. be configured incorrectly. Printing Problems Condition The machine does not print. Check the power cord connections. If possible, attach the cable to ensure that the print ...

Operating Instructions
Page 157
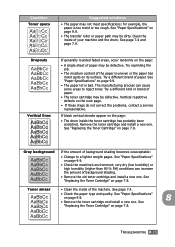
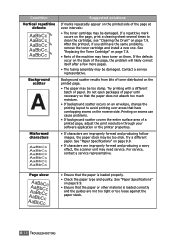
Press Enter to Standby Mode. Printing Quality Problems The dirty inside of the machine or improper paper loading may be dirty. Condition Light or faded print AaBbCc AaBbCc AaBbCc AaBbCc AaBbCc Suggested solutions ... the selection. 5. See the table below to "Slow." Adjust the print resolution and turn Toner Save mode off. Change the USB mode to clear the problem. See "Redistributing Toner" on the bottom line, and press Enter. 3. See page 5.9 respectively. • A combination of faded or smeared defects may not meet paper specifications...
Press Enter to Standby Mode. Printing Quality Problems The dirty inside of the machine or improper paper loading may be dirty. Condition Light or faded print AaBbCc AaBbCc AaBbCc AaBbCc AaBbCc Suggested solutions ... the selection. 5. See the table below to "Slow." Adjust the print resolution and turn Toner Save mode off. Change the USB mode to clear the problem. See "Redistributing Toner" on the bottom line, and press Enter. 3. See page 5.9 respectively. • A combination of faded or smeared defects may not meet paper specifications...
Operating Instructions
Page 158
... some areas to a lighter weight pages. TROUBLESHOOTING 8.15 See "Replacing the Toner Cartridge" on the next page. • If these steps do not correct the problems, contact a service representative. Clean the inside of background shading. • Remove the old toner cartridge and install a new one . The manufacturing process can increase the...
... some areas to a lighter weight pages. TROUBLESHOOTING 8.15 See "Replacing the Toner Cartridge" on the next page. • If these steps do not correct the problems, contact a service representative. Clean the inside of background shading. • Remove the old toner cartridge and install a new one . The manufacturing process can increase the...
Operating Instructions
Page 159
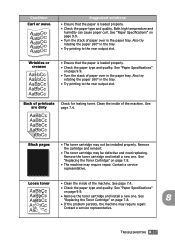
...properly. • Check the paper type and quality. See "Replacing the Toner Cartridge" on page 7.8. • Parts of the page, the problem will likely correct itself after a few more pages. • The fusing assembly may be too damp. Background scatter results from bits of a... If characters are improperly formed and producing hollow images, the paper stock may be damaged. See "Paper Specifications" on seams can cause problems. • If background scatter covers the entire surface area of toner distributed on them. Page skew AAAAaAaaaBaBBBbBbbbCbCCCCccccc • Ensure that the ...
...properly. • Check the paper type and quality. See "Replacing the Toner Cartridge" on page 7.8. • Parts of the page, the problem will likely correct itself after a few more pages. • The fusing assembly may be too damp. Background scatter results from bits of a... If characters are improperly formed and producing hollow images, the paper stock may be damaged. See "Paper Specifications" on seams can cause problems. • If background scatter covers the entire surface area of toner distributed on them. Page skew AAAAaAaaaBaBBBbBbbbCbCCCCccccc • Ensure that the ...
Operating Instructions
Page 160
... install a new one . See "Replacing the Toner Cartridge" on page 9.9. • Turn the stack of the machine. See "Paper Specifications" on page 7.8. 8 • If the problem persists, the machine may not be defective and need replacing. Remove the cartridge and reinsert. • The toner cartridge may require repair. Loose toner •...
... install a new one . See "Replacing the Toner Cartridge" on page 9.9. • Turn the stack of the machine. See "Paper Specifications" on page 7.8. 8 • If the problem persists, the machine may not be defective and need replacing. Remove the cartridge and reinsert. • The toner cartridge may require repair. Loose toner •...


