Operating Instructions
Page 4
... socket-outlet shall be in hazardous radiation exposure. Do not use this Operating Instructions might occur. This equipment contains a 5 milliwatt, 760-800 nanometer wavelength, AlGaAs laser diode. For Fax or Telephone Do not use a telephone in a wet basement or near the product and shall be easily accessible...
... socket-outlet shall be in hazardous radiation exposure. Do not use this Operating Instructions might occur. This equipment contains a 5 milliwatt, 760-800 nanometer wavelength, AlGaAs laser diode. For Fax or Telephone Do not use a telephone in a wet basement or near the product and shall be easily accessible...

Operating Instructions
Page 5
...://jboard.danka.de/jboard/produkte/index.htmlo and selecting the product applicable. Local PSTN compatibility is dependent on the Internet at URL : http://www.ricoh.co.jp/fax/ce_doc IF3050: The CE Declaration of Conformity is available on software switch settings. Please contact your service representative in the first instance. In the...
...://jboard.danka.de/jboard/produkte/index.htmlo and selecting the product applicable. Local PSTN compatibility is dependent on the Internet at URL : http://www.ricoh.co.jp/fax/ce_doc IF3050: The CE Declaration of Conformity is available on software switch settings. Please contact your service representative in the first instance. In the...

Operating Instructions
Page 7
...United States of America Notice: This equipment has been tested and found to comply with your machine. vi If this information into your FAX machine, you should complete the following measures: • Reorient or relocate the receiving antenna. • Increase the separation between the ...equipment and receiver. • Connect the equipment into your document by one more of the following steps: Follow the FAX HEADER programming procedure in the Programming chapter of the operating instructions to enter the business identification and telephone number of the terminal or...
...United States of America Notice: This equipment has been tested and found to comply with your machine. vi If this information into your FAX machine, you should complete the following measures: • Reorient or relocate the receiving antenna. • Increase the separation between the ...equipment and receiver. • Connect the equipment into your document by one more of the following steps: Follow the FAX HEADER programming procedure in the Programming chapter of the operating instructions to enter the business identification and telephone number of the terminal or...
Operating Instructions
Page 11
... Out Option 3.8 Collation Copying 3.8 Chapter 4: FAXING Sending a Fax Changing the Fax Setup options 4.2 Available Fax Setup Options 4.3 Loading a Document 4.5 Adjusting the Document Resolution 4.6 Sending a Fax Automatically 4.7 Sending a Fax Manually 4.8 Redialing the Last Number 4.8 Confirming Transmission 4.9 Automatic Redialing 4.9 Receiving a Fax About Receiving Modes 4.10 Loading Paper for Receiving Faxes 4.11 Receiving Automatically in Fax Mode 4.11 Receiving Automatically in Ans...
... Out Option 3.8 Collation Copying 3.8 Chapter 4: FAXING Sending a Fax Changing the Fax Setup options 4.2 Available Fax Setup Options 4.3 Loading a Document 4.5 Adjusting the Document Resolution 4.6 Sending a Fax Automatically 4.7 Sending a Fax Manually 4.8 Redialing the Last Number 4.8 Confirming Transmission 4.9 Automatic Redialing 4.9 Receiving a Fax About Receiving Modes 4.10 Loading Paper for Receiving Faxes 4.11 Receiving Automatically in Fax Mode 4.11 Receiving Automatically in Ans...

Operating Instructions
Page 12
...touch Dialing 4.15 Storing a Number for One-touch Dialing 4.15 Sending a Fax using a One-touch Number ......... 4.16 Speed Dialing 4.16 Storing a Number for Speed Dialing 4.16 Sending a Fax using a Speed Number 4.17 Group Dialing 4.18 Setting a Group Dial Number ... Letter 4.21 Printing a Phone Book List 4.21 Advanced Fax Functions Sending Broadcasting Faxes 4.22 Sending a Delayed Fax 4.23 Sending a Priority Fax 4.25 Polling a Remote Machine 4.26 Adding Documents to a Scheduled Fax 4.27 Canceling a Scheduled Fax 4.28 Additional Features Using Secure Receiving Mode 4.29 Printing ...
...touch Dialing 4.15 Storing a Number for One-touch Dialing 4.15 Sending a Fax using a One-touch Number ......... 4.16 Speed Dialing 4.16 Storing a Number for Speed Dialing 4.16 Sending a Fax using a Speed Number 4.17 Group Dialing 4.18 Setting a Group Dial Number ... Letter 4.21 Printing a Phone Book List 4.21 Advanced Fax Functions Sending Broadcasting Faxes 4.22 Sending a Delayed Fax 4.23 Sending a Priority Fax 4.25 Polling a Remote Machine 4.26 Adding Documents to a Scheduled Fax 4.27 Canceling a Scheduled Fax 4.28 Additional Features Using Secure Receiving Mode 4.29 Printing ...
Operating Instructions
Page 14
... Jams 8.7 Clearing LCD Error Messages 8.8 Solving Problems 8.11 Paper Feeding Problems 8.11 Printing Problems 8.12 Printing Quality Problems 8.14 Copying Problems 8.19 Scanning Problems 8.20 Faxing Problems 8.21 xiii
... Jams 8.7 Clearing LCD Error Messages 8.8 Solving Problems 8.11 Paper Feeding Problems 8.11 Printing Problems 8.12 Printing Quality Problems 8.14 Copying Problems 8.19 Scanning Problems 8.20 Faxing Problems 8.21 xiii

Operating Instructions
Page 16
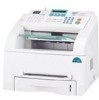
This chapter includes: • Setting Up Your Machine • Installing Software • Setting Up the Machine System This chapter gives you with printing, copying, scanning, and faxing functions! Your machine provides you step-by-step instructions for purchasing this multifunctional product. 1 GETTING STARTED Thank you for setting up your machine.
This chapter includes: • Setting Up Your Machine • Installing Software • Setting Up the Machine System This chapter gives you with printing, copying, scanning, and faxing functions! Your machine provides you step-by-step instructions for purchasing this multifunctional product. 1 GETTING STARTED Thank you for setting up your machine.

Operating Instructions
Page 21
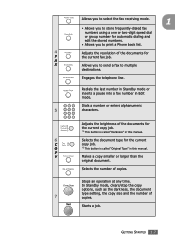
Scrolls through the menus available. Confirms the selection on the display. 2 Enters Menu mode and scrolls through the options available for the selected menu item. Control Panel Functions Use to store frequently-dialed fax number and dial them with a touch of the buttons. 1 Allows you to the numbers 21 through 40. Returns you to shift the one-touch buttons to the upper menu level. 3 Displays the current status and prompts during an operation. 1.6 GETTING STARTED
Scrolls through the menus available. Confirms the selection on the display. 2 Enters Menu mode and scrolls through the options available for the selected menu item. Control Panel Functions Use to store frequently-dialed fax number and dial them with a touch of the buttons. 1 Allows you to the numbers 21 through 40. Returns you to shift the one-touch buttons to the upper menu level. 3 Displays the current status and prompts during an operation. 1.6 GETTING STARTED
Operating Instructions
Page 22
... using a one or two-digit speed dial or group number for automatic dialing and edit the stored numbers. • Allows you to send a fax to print a Phone book list. 4 Adjusts the resolution of 7 copies. Dials a number or enters alphanumeric 5 characters. O *2 This button is ... Adjusts the brightness of copies. Redials the last number in Standby mode or inserts a pause into a fax number in this manual. Selects the number of the documents for F the current fax job. Stops an operation at any time. A X Allows you to multiple destinations. Starts a job....
... using a one or two-digit speed dial or group number for automatic dialing and edit the stored numbers. • Allows you to send a fax to print a Phone book list. 4 Adjusts the resolution of 7 copies. Dials a number or enters alphanumeric 5 characters. O *2 This button is ... Adjusts the brightness of copies. Redials the last number in Standby mode or inserts a pause into a fax number in this manual. Selects the number of the documents for F the current fax job. Stops an operation at any time. A X Allows you to multiple destinations. Starts a job....
Operating Instructions
Page 27
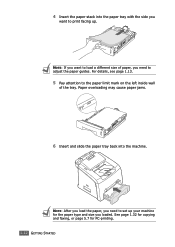
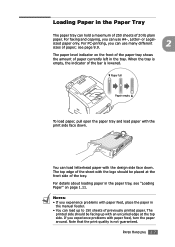
NOTE: After you load the paper, you need to set up . See page 1.32 for copying and faxing, or page 5.7 for the paper type and size you need to print facing up your machine for PC-printing. 1.12 GETTING STARTED Paper overloading may cause paper jams. 6 Insert and slide the paper tray back into the paper tray with the side you want to adjust the paper guides. NOTE: If you want to the paper limit mark on the left inside wall of paper, you loaded. For details, see page 1.13. 5 Pay attention to load a different size of the tray. 4 Insert the paper stack into the machine.
NOTE: After you load the paper, you need to set up . See page 1.32 for copying and faxing, or page 5.7 for the paper type and size you need to print facing up your machine for PC-printing. 1.12 GETTING STARTED Paper overloading may cause paper jams. 6 Insert and slide the paper tray back into the paper tray with the side you want to adjust the paper guides. NOTE: If you want to the paper limit mark on the left inside wall of paper, you loaded. For details, see page 1.13. 5 Pay attention to load a different size of the tray. 4 Insert the paper stack into the machine.

Operating Instructions
Page 30
GETTING STARTED 1.15 Making Connections 1 Plug the telephone line cord into the LINE jack and the other end into the wall jack. ➜ To the walljack If you want to use your machine for receiving both faxes and voice calls, you will need to connect a telephone and/or answering machine to your machine.
GETTING STARTED 1.15 Making Connections 1 Plug the telephone line cord into the LINE jack and the other end into the wall jack. ➜ To the walljack If you want to use your machine for receiving both faxes and voice calls, you will need to connect a telephone and/or answering machine to your machine.

Operating Instructions
Page 43
... the cursor to skip the position. 6 Press Enter when the name on the display is a number already set, the number appears. 3 Enter your fax number on any fax you send. NOTE: If you make a mistake while entering numbers, press the button to delete the last digit. 4 Press Enter when the number on... the name, you to enter alphanumeric characters, see page 1.29. Setting the Machine ID In some countries, you are required by law to indicate your fax number using the number keypad. The display asks you to enter the ID. 5 Enter your telephone number and name or company name, will be printed...
... the cursor to skip the position. 6 Press Enter when the name on the display is a number already set, the number appears. 3 Enter your fax number on any fax you send. NOTE: If you make a mistake while entering numbers, press the button to delete the last digit. 4 Press Enter when the number on... the name, you to enter alphanumeric characters, see page 1.29. Setting the Machine ID In some countries, you are required by law to indicate your fax number using the number keypad. The display asks you to enter the ID. 5 Enter your telephone number and name or company name, will be printed...

Operating Instructions
Page 46
...: The date format may differ from each country. Setting the Date and Time 1 The current date and time are shown on the display when your faxes will have the date and time printed on the display is not under the digit you want to 24-hour format (e.g. 01:00 PM as...
...: The date format may differ from each country. Setting the Date and Time 1 The current date and time are shown on the display when your faxes will have the date and time printed on the display is not under the digit you want to 24-hour format (e.g. 01:00 PM as...

Operating Instructions
Page 47
... set for the machine displays. 3 Press the scroll button ( or ) to select the other mode and then press Enter to save it. 7 To return to Fax and Copy modes. Setting the Paper Type and Size After loading paper in the application program you are using and press Enter to save it...
... set for the machine displays. 3 Press the scroll button ( or ) to select the other mode and then press Enter to save it. 7 To return to Fax and Copy modes. Setting the Paper Type and Size After loading paper in the application program you are using and press Enter to save it...

Operating Instructions
Page 48
For the ringer volume, you can select from the telephone line through the speaker, such as a dial tone or a fax tone. GETTING STARTED 1.33 Setting Sounds 1 You can control the following sounds: • Ringer: You can adjust the ringer volume. • Key Sound: With this ... the option you have selected. With this option set to scroll through 4. 6 To return to "On," an alarm tone sounds when an error occurs or fax communication ends. • Speaker: You can adjust the speaker volume level using the On Hook Dial button. You can turn the alarm sound on or...
For the ringer volume, you can select from the telephone line through the speaker, such as a dial tone or a fax tone. GETTING STARTED 1.33 Setting Sounds 1 You can control the following sounds: • Ringer: You can adjust the ringer volume. • Key Sound: With this ... the option you have selected. With this option set to scroll through 4. 6 To return to "On," an alarm tone sounds when an error occurs or fax communication ends. • Speaker: You can adjust the speaker volume level using the On Hook Dial button. You can turn the alarm sound on or...
Operating Instructions
Page 56
... paper tray shows the amount of paper currently left in the paper tray, see page 9.9. If you can use many different 2 sizes of paper; For faxing and copying, you experience problems with paper feed, turn the paper around. see "Loading Paper" on page 1.11. For details about loading paper in the...
... paper tray shows the amount of paper currently left in the paper tray, see page 9.9. If you can use many different 2 sizes of paper; For faxing and copying, you experience problems with paper feed, turn the paper around. see "Loading Paper" on page 1.11. For details about loading paper in the...
Operating Instructions
Page 61
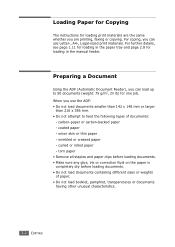
... in the manual feeder. curled or rolled paper - onion skin or thin paper - Loading Paper for Copying The instructions for loading print materials are printing, faxing or copying.
... in the manual feeder. curled or rolled paper - onion skin or thin paper - Loading Paper for Copying The instructions for loading print materials are printing, faxing or copying.

Operating Instructions
Page 68
This chapter includes: • Sending a Fax • Receiving a Fax • Automatic Dialing • Advanced Fax Functions • Additional Features 4 FAXING This chapter gives you information about using your machine as a fax machine.
This chapter includes: • Sending a Fax • Receiving a Fax • Automatic Dialing • Advanced Fax Functions • Additional Features 4 FAXING This chapter gives you information about using your machine as a fax machine.

Operating Instructions
Page 69
The first available menu item, "Ring To Answer," displays on the bottom line. 2 Press the scroll button ( or ) until "Fax Setup" appears on the bottom line and press Enter. 3 Use the scroll button ( or ) to find the status or use the number keypad to enter the value for the option you want on the top line of the display. Sending a Fax Changing the Fax Setup options 1 Press Menu until the menu item you have selected. 4 Press Enter to save the selection. 5 If necessary, repeat steps 2 through 4. 6 To return to Standby mode, press Clear/Stop. 4.2 FAXING
The first available menu item, "Ring To Answer," displays on the bottom line. 2 Press the scroll button ( or ) until "Fax Setup" appears on the bottom line and press Enter. 3 Use the scroll button ( or ) to find the status or use the number keypad to enter the value for the option you want on the top line of the display. Sending a Fax Changing the Fax Setup options 1 Press Menu until the menu item you have selected. 4 Press Enter to save the selection. 5 If necessary, repeat steps 2 through 4. 6 To return to Standby mode, press Clear/Stop. 4.2 FAXING

Operating Instructions
Page 70
... previous 50 communications operations, including time and dates. Darkness Redial Term Redials MSG Confirm Auto Report Auto Reduction You can automatically redial a remote fax machine when the line is not successful. The available options are On or Off. Select On if you enter 0, the machine will not redial...to fit onto one page, the document is divided and printed in the machine. Your machine can select the default darkness mode to fax your machine to 13. Intervals from 1 to 15 minutes can specify the number of times the machine rings, 1 to automatically reduce an...
... previous 50 communications operations, including time and dates. Darkness Redial Term Redials MSG Confirm Auto Report Auto Reduction You can automatically redial a remote fax machine when the line is not successful. The available options are On or Off. Select On if you enter 0, the machine will not redial...to fit onto one page, the document is divided and printed in the machine. Your machine can select the default darkness mode to fax your machine to 13. Intervals from 1 to 15 minutes can specify the number of times the machine rings, 1 to automatically reduce an...


