
Operating Instructions
Page 1
Operating Instructions Laser Facsimile For safe and correct use of this machine, please be sure to read the Safety Information in this manual before you use it.
Operating Instructions Laser Facsimile For safe and correct use of this machine, please be sure to read the Safety Information in this manual before you use it.

Operating Instructions
Page 2
...© 2004. • Centronics is a trademark of Centronics Data Computer Corporation. • IBM and IBM PC are Trademark of International Business Machines Corporation. • Microsoft, Windows, Windows 9x, Window Me, Windows 2000, Windows NT 4.0 and Windows XP are registered trademarks of Microsoft Corporation... damages as a printer, a scanner and a copier and information for maintaining and troubleshooting the machine. It also provides all of the detailed instructions for setting up your machine as a result of Apple Computer, Inc. • All other brand or product names are...
...© 2004. • Centronics is a trademark of Centronics Data Computer Corporation. • IBM and IBM PC are Trademark of International Business Machines Corporation. • Microsoft, Windows, Windows 9x, Window Me, Windows 2000, Windows NT 4.0 and Windows XP are registered trademarks of Microsoft Corporation... damages as a printer, a scanner and a copier and information for maintaining and troubleshooting the machine. It also provides all of the detailed instructions for setting up your machine as a result of Apple Computer, Inc. • All other brand or product names are...

Operating Instructions
Page 3
...pulling the plug, not the cable) if the power cable or plug becomes frayed or otherwise damaged. • To avoid hazardous electric shock or laser radiation exposure, do not remove any covers or screws other than those specified in this manual. • Turn off the power and disconnect the power... electric shock might ignite when exposed to an open flame. • Disposal can take place at our authorized dealer. • Dispose of your machine needs service or repair. •The external housing of the used toner bottle in minor or moderate injury or damage to property. Toner dust might...
...pulling the plug, not the cable) if the power cable or plug becomes frayed or otherwise damaged. • To avoid hazardous electric shock or laser radiation exposure, do not remove any covers or screws other than those specified in this manual. • Turn off the power and disconnect the power... electric shock might ignite when exposed to an open flame. • Disposal can take place at our authorized dealer. • Dispose of your machine needs service or repair. •The external housing of the used toner bottle in minor or moderate injury or damage to property. Toner dust might...
Operating Instructions
Page 4
... tub, in hazardous radiation exposure. Normally, the ozone level is considered a class 1 laser device. This equipment contains a 5 milliwatt, 760-800 nanometer wavelength, AlGaAs laser diode. CAUTION: • Protect the machine from dampness or wet weather, such as rain and snow. • Unplug the power...should take place at household waste collection points. Disposal can take care that the power cord will not be very hot. For Fax or Telephone Do not use a telephone in hazardous radiation exposure. iii Ozone Safety This product generates ozone during an electrical storm....
... tub, in hazardous radiation exposure. Normally, the ozone level is considered a class 1 laser device. This equipment contains a 5 milliwatt, 760-800 nanometer wavelength, AlGaAs laser diode. CAUTION: • Protect the machine from dampness or wet weather, such as rain and snow. • Unplug the power...should take place at household waste collection points. Disposal can take care that the power cord will not be very hot. For Fax or Telephone Do not use a telephone in hazardous radiation exposure. iii Ozone Safety This product generates ozone during an electrical storm....

Operating Instructions
Page 6
v In accordance with IEC 60417, this machine uses the following symbols for WARNING and CAUTION at the positions shown below. means POWER OFF. Positions of Labels and Hallmarks for WARNING and CAUTION Labels This machine has labels for the main power switch: means POWER ON. For safety, please follow the instructions and handle the machine as indicated. * * *This label is stuck to touch these areas. Be careful not to hot surfaces.
v In accordance with IEC 60417, this machine uses the following symbols for WARNING and CAUTION at the positions shown below. means POWER OFF. Positions of Labels and Hallmarks for WARNING and CAUTION Labels This machine has labels for the main power switch: means POWER ON. For safety, please follow the instructions and handle the machine as indicated. * * *This label is stuck to touch these areas. Be careful not to hot surfaces.

Operating Instructions
Page 7
... it is no guarantee that to which charges exceed local or long-distance transmission charges.) In order to program this information into your FAX machine, you should complete the following measures: • Reorient or relocate the receiving antenna. • Increase the separation between the equipment and...into an outlet on the first page of the transmission, the date and time it unlawful for any other electronic device, including FAX machines, to enter the business identification and telephone number of the terminal or business. However, there is sent and an identification of ...
... it is no guarantee that to which charges exceed local or long-distance transmission charges.) In order to program this information into your FAX machine, you should complete the following measures: • Reorient or relocate the receiving antenna. • Increase the separation between the equipment and...into an outlet on the first page of the transmission, the date and time it unlawful for any other electronic device, including FAX machines, to enter the business identification and telephone number of the terminal or business. However, there is sent and an identification of ...

Operating Instructions
Page 9
Differences Between British and American English British English (Re)dialling Colour Emphasise Recognise Organise Authorise Cancelling Customise Socket Labelling American English (Re)dialing Color Emphasize Recognize Organize Authorize Canceling Customize Jack Labeling WARNING • Do not disassemble the machine as it may give you an electric shock. • If you print large amount of copies, the surface of the output tray may become hot. viii Be careful not to touch the surface, especially for children.
Differences Between British and American English British English (Re)dialling Colour Emphasise Recognise Organise Authorise Cancelling Customise Socket Labelling American English (Re)dialing Color Emphasize Recognize Organize Authorize Canceling Customize Jack Labeling WARNING • Do not disassemble the machine as it may give you an electric shock. • If you print large amount of copies, the surface of the output tray may become hot. viii Be careful not to touch the surface, especially for children.

Operating Instructions
Page 10
...Document Output Support 1.8 Installing the Toner Cartridge 1.9 Loading Paper 1.11 Making Connections 1.15 Connecting to your computer 1.17 Turning the Machine On 1.18 Installing Software About Software 1.19 Printer Driver Features 1.20 Installing Software in Windows 1.21 System Requirements 1.21 Installing Software ...In Windows 1.22 Repairing Software 1.24 Removing Software 1.26 Setting Up the Machine System Changing the Display Language 1.27 Setting the Machine ID 1.28 Entering Characters Using the Number Keypad .. 1.29 Setting the Date and Time 1.31...
...Document Output Support 1.8 Installing the Toner Cartridge 1.9 Loading Paper 1.11 Making Connections 1.15 Connecting to your computer 1.17 Turning the Machine On 1.18 Installing Software About Software 1.19 Printer Driver Features 1.20 Installing Software in Windows 1.21 System Requirements 1.21 Installing Software ...In Windows 1.22 Repairing Software 1.24 Removing Software 1.26 Setting Up the Machine System Changing the Display Language 1.27 Setting the Machine ID 1.28 Entering Characters Using the Number Keypad .. 1.29 Setting the Date and Time 1.31...

Operating Instructions
Page 12
... Sequentially through the Memory ...... 4.20 Searching with a Particular First Letter 4.21 Printing a Phone Book List 4.21 Advanced Fax Functions Sending Broadcasting Faxes 4.22 Sending a Delayed Fax 4.23 Sending a Priority Fax 4.25 Polling a Remote Machine 4.26 Adding Documents to a Scheduled Fax 4.27 Canceling a Scheduled Fax 4.28 Additional Features Using Secure Receiving Mode 4.29 Printing Reports 4.31 Using Advanced...
... Sequentially through the Memory ...... 4.20 Searching with a Particular First Letter 4.21 Printing a Phone Book List 4.21 Advanced Fax Functions Sending Broadcasting Faxes 4.22 Sending a Delayed Fax 4.23 Sending a Priority Fax 4.25 Polling a Remote Machine 4.26 Adding Documents to a Scheduled Fax 4.27 Canceling a Scheduled Fax 4.28 Additional Features Using Secure Receiving Mode 4.29 Printing Reports 4.31 Using Advanced...

Operating Instructions
Page 14
Chapter 7: MAINTENANCE Clearing the Memory 7.2 Adjusting Shading 7.3 Cleaning Your Machine 7.3 Cleaning the Outside 7.3 Cleaning the Inside 7.4 Cleaning the Scanning Glass 7.5 Maintaining the Toner Cartridge 7.6 Redistributing Toner 7.7 Replacing the Toner Cartridge 7.8 Setting the Notify Toner Option 7.9 ... Jams 8.7 Clearing LCD Error Messages 8.8 Solving Problems 8.11 Paper Feeding Problems 8.11 Printing Problems 8.12 Printing Quality Problems 8.14 Copying Problems 8.19 Scanning Problems 8.20 Faxing Problems 8.21 xiii
Chapter 7: MAINTENANCE Clearing the Memory 7.2 Adjusting Shading 7.3 Cleaning Your Machine 7.3 Cleaning the Outside 7.3 Cleaning the Inside 7.4 Cleaning the Scanning Glass 7.5 Maintaining the Toner Cartridge 7.6 Redistributing Toner 7.7 Replacing the Toner Cartridge 7.8 Setting the Notify Toner Option 7.9 ... Jams 8.7 Clearing LCD Error Messages 8.8 Solving Problems 8.11 Paper Feeding Problems 8.11 Printing Problems 8.12 Printing Quality Problems 8.14 Copying Problems 8.19 Scanning Problems 8.20 Faxing Problems 8.21 xiii

Operating Instructions
Page 16
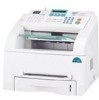
1 GETTING STARTED Thank you step-by-step instructions for purchasing this multifunctional product. This chapter includes: • Setting Up Your Machine • Installing Software • Setting Up the Machine System This chapter gives you for setting up your machine. Your machine provides you with printing, copying, scanning, and faxing functions!
1 GETTING STARTED Thank you step-by-step instructions for purchasing this multifunctional product. This chapter includes: • Setting Up Your Machine • Installing Software • Setting Up the Machine System This chapter gives you for setting up your machine. Your machine provides you with printing, copying, scanning, and faxing functions!
Operating Instructions
Page 17
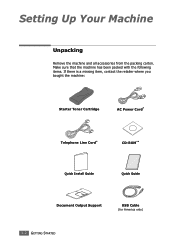
Make sure that the machine has been packed with the following items. If there is a missing item, contact the retailer where you bought the machine: Starter Toner Cartridge AC Power Cord* Telephone Line Cord* CD-ROM** Quick Install Guide Quick Guide Document Output Support USB Cable (for America only) 1.2 GETTING STARTED Setting Up Your Machine Unpacking Remove the machine and all accessories from the packing carton.
Make sure that the machine has been packed with the following items. If there is a missing item, contact the retailer where you bought the machine: Starter Toner Cartridge AC Power Cord* Telephone Line Cord* CD-ROM** Quick Install Guide Quick Guide Document Output Support USB Cable (for America only) 1.2 GETTING STARTED Setting Up Your Machine Unpacking Remove the machine and all accessories from the packing carton.

Operating Instructions
Page 18
... only /May already be plugged into a grounded power socket. • Components may differ from one country to your machine. 1 Brand plaque*** (May already be affixed to the machine in some regions) * The appearance of the machine. NOTES: • You should be AWG #26 or larger telephone line cord. • The power cord must...
... only /May already be plugged into a grounded power socket. • Components may differ from one country to your machine. 1 Brand plaque*** (May already be affixed to the machine in some regions) * The appearance of the machine. NOTES: • You should be AWG #26 or larger telephone line cord. • The power cord must...

Operating Instructions
Page 19
Allow extra space for air circulation. Selecting a Location Select a level, stable place with adequate space for opening covers and trays. Do not set the machine close to the edge of heat, cold and humidity. Clearance Space • Front: 482.6 mm (enough space so that the paper tray can be well-ventilated and away from direct sunlight or sources of your desk or table. The area should be removed) • Back: 250 mm (enough space for ventilation) • Right: 100 mm • Left: 100 mm (enough space for ventilation) 1.4 GETTING STARTED
Allow extra space for air circulation. Selecting a Location Select a level, stable place with adequate space for opening covers and trays. Do not set the machine close to the edge of heat, cold and humidity. Clearance Space • Front: 482.6 mm (enough space so that the paper tray can be well-ventilated and away from direct sunlight or sources of your desk or table. The area should be removed) • Back: 250 mm (enough space for ventilation) • Right: 100 mm • Left: 100 mm (enough space for ventilation) 1.4 GETTING STARTED
Operating Instructions
Page 20
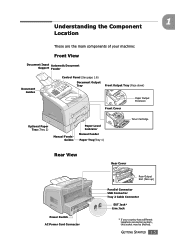
Understanding the Component Location These are the main components of your machine: Front View Document Input Automatic Document Support Feeder Document Guides Control Panel (See page 1.6) Document Output Tray Front Output Tray (Face down) Front Cover Paper ...
Understanding the Component Location These are the main components of your machine: Front View Document Input Automatic Document Support Feeder Document Guides Control Panel (See page 1.6) Document Output Tray Front Output Tray (Face down) Front Cover Paper ...

Operating Instructions
Page 25
3 Slide the toner cartridge into the machine until it locks into place completely. 4 Close the front cover. Make sure that the cover is securely closed. 1.10 GETTING STARTED
3 Slide the toner cartridge into the machine until it locks into place completely. 4 Close the front cover. Make sure that the cover is securely closed. 1.10 GETTING STARTED

Operating Instructions
Page 26
GETTING STARTED 1.11 To load a stack of the paper stack to even it locks into place. 3 Fan the edges of Letter-sized paper: 1 Pull open the paper tray and remove it from the machine. 2 Push down on a flat surface to separate the pages. Loading Paper 1 You can load approximately 250 sheets. Then tap the stack on the pressure plate until it up.
GETTING STARTED 1.11 To load a stack of the paper stack to even it locks into place. 3 Fan the edges of Letter-sized paper: 1 Pull open the paper tray and remove it from the machine. 2 Push down on a flat surface to separate the pages. Loading Paper 1 You can load approximately 250 sheets. Then tap the stack on the pressure plate until it up.
Operating Instructions
Page 27
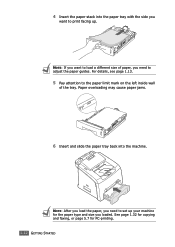
4 Insert the paper stack into the machine. Paper overloading may cause paper jams. 6 Insert and slide the paper tray back into the paper tray with the side you want to load a different size of the tray. For details, see page 1.13. 5 Pay attention to print facing up your machine for PC-printing. 1.12 GETTING STARTED See page 1.32 for copying and faxing, or page 5.7 for the paper type and size you loaded. NOTE: If you need to set up . NOTE: After you load the paper, you want to the paper limit mark on the left inside wall of paper, you need to adjust the paper guides.
4 Insert the paper stack into the machine. Paper overloading may cause paper jams. 6 Insert and slide the paper tray back into the paper tray with the side you want to load a different size of the tray. For details, see page 1.13. 5 Pay attention to print facing up your machine for PC-printing. 1.12 GETTING STARTED See page 1.32 for copying and faxing, or page 5.7 for the paper type and size you loaded. NOTE: If you need to set up . NOTE: After you load the paper, you want to the paper limit mark on the left inside wall of paper, you need to adjust the paper guides.

Operating Instructions
Page 30
Making Connections 1 Plug the telephone line cord into the LINE jack and the other end into the wall jack. ➜ To the walljack If you want to use your machine for receiving both faxes and voice calls, you will need to connect a telephone and/or answering machine to your machine. GETTING STARTED 1.15
Making Connections 1 Plug the telephone line cord into the LINE jack and the other end into the wall jack. ➜ To the walljack If you want to use your machine for receiving both faxes and voice calls, you will need to connect a telephone and/or answering machine to your machine. GETTING STARTED 1.15

Operating Instructions
Page 31
NOTE: In the United Kingdom, if a three-wire type (SHUNT-wire, older equipment) telephone or answering machine is connected to the EXT jack on the machine, the external equipment will fail to ring when receiving an incoming call as the machine is designed to operate with the latest technology. To prevent this incompatibility, use two-wire (newer equipment) telephone or answering machines. 1.16 GETTING STARTED
NOTE: In the United Kingdom, if a three-wire type (SHUNT-wire, older equipment) telephone or answering machine is connected to the EXT jack on the machine, the external equipment will fail to ring when receiving an incoming call as the machine is designed to operate with the latest technology. To prevent this incompatibility, use two-wire (newer equipment) telephone or answering machines. 1.16 GETTING STARTED


