Brochure
Page 2
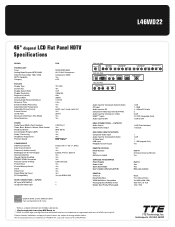
... TTE Technology, Inc. Indianapolis, IN USA 46290 INPUTS RF Input (ATSC/NTSC) Composite Video Input RCA NTSC/ATSC/QAM AV / S-Vid / Component Component, HDMI Yes LCD TFT LCD 46" 16...TO SET OPTIONS REAR JACK PANEL DIGITAL AUDIO OUTPUT FIXED/VARIABLE AUDIO OUTPUT VIDEO L -- AUDIO -- L46WD22 46" diagonal LCD Flat Panel HDTV Specifications BRAND TECHNOLOGY Tuner Analog Video Formats (NTSC/480i) Video... Formats (480p, 720p, 1080i) HDTV Capability Category PICTURE Display Type Screen Size Display Aspect Ratio Display Resolution Brightness (cd/m2) Contrast Ratio Viewing Angle ...
... TTE Technology, Inc. Indianapolis, IN USA 46290 INPUTS RF Input (ATSC/NTSC) Composite Video Input RCA NTSC/ATSC/QAM AV / S-Vid / Component Component, HDMI Yes LCD TFT LCD 46" 16...TO SET OPTIONS REAR JACK PANEL DIGITAL AUDIO OUTPUT FIXED/VARIABLE AUDIO OUTPUT VIDEO L -- AUDIO -- L46WD22 46" diagonal LCD Flat Panel HDTV Specifications BRAND TECHNOLOGY Tuner Analog Video Formats (NTSC/480i) Video... Formats (480p, 720p, 1080i) HDTV Capability Category PICTURE Display Type Screen Size Display Aspect Ratio Display Resolution Brightness (cd/m2) Contrast Ratio Viewing Angle ...

User Manual
Page 4
... Limit 31 Block Channels 31 Front Panel Block 31 Blocking Unrated/Exempt Programs 31 Future Rating Region 32 Additional Features 32 EN-V Picture Processing 32 Screen Formats 32 Chapter 4: Using the TV's Menu System Using the Menu System 33 Channel List Menu 33 Sound Menu 33 Picture Menu 35 Setup Menu...
... Limit 31 Block Channels 31 Front Panel Block 31 Blocking Unrated/Exempt Programs 31 Future Rating Region 32 Additional Features 32 EN-V Picture Processing 32 Screen Formats 32 Chapter 4: Using the TV's Menu System Using the Menu System 33 Channel List Menu 33 Sound Menu 33 Picture Menu 35 Setup Menu...
User Manual
Page 5
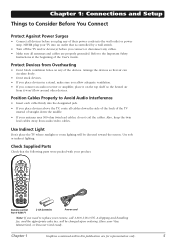
... away from it on any of the devices. Use Indirect Light Don't place the TV where sunlight or room lighting will be directed toward the screen. Chapter 1: Connections and Setup Things to Consider Before You Connect Protect Against Power Surges • Connect all devices before you place devices above the TV...
... away from it on any of the devices. Use Indirect Light Don't place the TV where sunlight or room lighting will be directed toward the screen. Chapter 1: Connections and Setup Things to Consider Before You Connect Protect Against Power Surges • Connect all devices before you place devices above the TV...

User Manual
Page 6
... the coaxial cable from the wall outlet into the ANTENNA/CABLE INPUT to receive your TV is to the left for the location of the screen for a D at the bottom of the jack. C. look for an A for more information. 6 Chapter 1 If so, you . What You Need To Know • Visit www...
... the coaxial cable from the wall outlet into the ANTENNA/CABLE INPUT to receive your TV is to the left for the location of the screen for a D at the bottom of the jack. C. look for an A for more information. 6 Chapter 1 If so, you . What You Need To Know • Visit www...
User Manual
Page 9
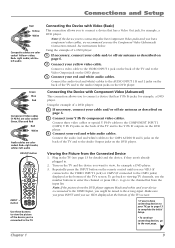
...example, a DVD player. Connecting the Device with Video (Basic) This connection allows you to the CMP1 jacks) displayed at the bottom of the TV's screen. • If you want to the TV. Chapter 1 9 Connections and Setup Red Yellow White Composite cables are color coded- Connecting the Device with...PRESETS ZOOM+ GUIDE ?!+- DEF ABC GHI MNO JKL PQRS INPUT TUV _,.:=$ WXYZ SUB CH Use these buttons to view the picture of the TV's screen. Using the example of a DVD player: 1. Connect your red and white audio cables. Viewing the Picture from the input list. Make sure ...
...example, a DVD player. Connecting the Device with Video (Basic) This connection allows you to the CMP1 jacks) displayed at the bottom of the TV's screen. • If you want to the TV. Chapter 1 9 Connections and Setup Red Yellow White Composite cables are color coded- Connecting the Device with...PRESETS ZOOM+ GUIDE ?!+- DEF ABC GHI MNO JKL PQRS INPUT TUV _,.:=$ WXYZ SUB CH Use these buttons to view the picture of the TV's screen. Using the example of a DVD player: 1. Connect your red and white audio cables. Viewing the Picture from the input list. Make sure ...
User Manual
Page 11
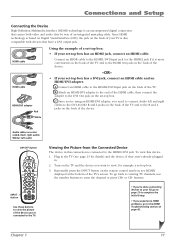
... example a set -top box. Chapter 1 11 Audio cables are color coded- Red= right audio; Repeatedly press the INPUT button on the back of the TV's screen. Since HDMI technology is based on Digital Visual Interface (DVI), the jack on the back of your TV, go to page 13 to complete the...
... example a set -top box. Chapter 1 11 Audio cables are color coded- Red= right audio; Repeatedly press the INPUT button on the back of the TV's screen. Since HDMI technology is based on Digital Visual Interface (DVI), the jack on the back of your TV, go to page 13 to complete the...
User Manual
Page 12
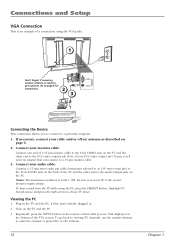
... to the correct monitor output setting. Connect one end of a 15-pin monitor cable to the VGA VIDEO jack on the back of the TV's screen. Plug in the TV and the PC, if they aren't already plugged in. 2. Connections and Setup VGA Connection This is 1024 x 768.
... to the correct monitor output setting. Connect one end of a 15-pin monitor cable to the VGA VIDEO jack on the back of the TV's screen. Plug in the TV and the PC, if they aren't already plugged in. 2. Connections and Setup VGA Connection This is 1024 x 768.
User Manual
Page 13
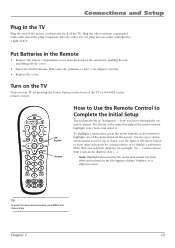
... Setup. Insert the plug completely into the back of the items listed on your choice and select it. Turn on the TV Turn on the screen. DEF ABC GHI MNO JKL PQRS INPUT TUV _,.:=$ WXYZ SUB CH OK button Arrows How to Use the Remote Control to view other end into... the up or down. Use the right or left arrow button to Complete the Initial Setup The technical term is the same throughout the menu screens: highlight your TV by pushing the tab and lifting off the cover. • Insert two fresh batteries. The theory is "Navigation" - More than one of...
... Setup. Insert the plug completely into the back of the items listed on your choice and select it. Turn on the TV Turn on the screen. DEF ABC GHI MNO JKL PQRS INPUT TUV _,.:=$ WXYZ SUB CH OK button Arrows How to Use the Remote Control to view other end into... the up or down. Use the right or left arrow button to Complete the Initial Setup The technical term is the same throughout the menu screens: highlight your TV by pushing the tab and lifting off the cover. • Insert two fresh batteries. The theory is "Navigation" - More than one of...
User Manual
Page 14
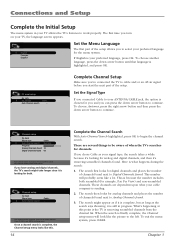
... found . Channel setup Go back Signal type Auto Channel search Progress Analog Channels found Digital Channels found . 3. If you turn on your TV, the language screen appears. This number will be aware of when the TV's searches for channels. Chapter 1 Channel setup Go back Signal type Auto Channel search Cable... ... Press...
... found . Channel setup Go back Signal type Auto Channel search Progress Analog Channels found Digital Channels found . 3. If you turn on your TV, the language screen appears. This number will be aware of when the TV's searches for channels. Chapter 1 Channel setup Go back Signal type Auto Channel search Cable... ... Press...

User Manual
Page 15
... from your channel list may eliminate the bars. Go to page 36 for a D at the bottom of the screen to a digital channel with a sub-channel, such as 10-1 as shown in your screen, but sometimes is perfectly normal. Go to page 32 for more explanation of signals you 're used to see... these channels in a 16/9 format. If there are bars on how the station or source device is formatting the video. To get rid of the screen to . Most digital video is sent in 4/3 which your channel list. A 10 CBS Look for the D at the bottom of...
... from your channel list may eliminate the bars. Go to page 36 for a D at the bottom of the screen to a digital channel with a sub-channel, such as 10-1 as shown in your screen, but sometimes is perfectly normal. Go to page 32 for more explanation of signals you 're used to see... these channels in a 16/9 format. If there are bars on how the station or source device is formatting the video. To get rid of the screen to . Most digital video is sent in 4/3 which your channel list. A 10 CBS Look for the D at the bottom of...
User Manual
Page 17
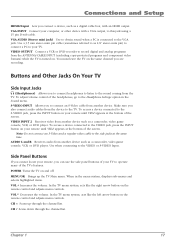
... control and adjusts menu controls. CH Scans down through the channel list. To access a device connected to the side jacks at the bottom of the screen. VIDEO INPUT 2 Receives video from another device such as a camcorder, video game console, VCR, or DVD player. VIDEO OUTPUT Connect a VCR or... Increases the volume. In the TV menu system, acts like the left arrow button on your remote until VID2 appears at the bottom of the screen. MENU/OK Brings up through the channel list. > > > > Chapter 1 17 VOL Decreases the volume. VGA INPUT Connect your TV to operate ...
... control and adjusts menu controls. CH Scans down through the channel list. To access a device connected to the side jacks at the bottom of the screen. VIDEO INPUT 2 Receives video from another device such as a camcorder, video game console, VCR, or DVD player. VIDEO OUTPUT Connect a VCR or... Increases the volume. In the TV menu system, acts like the left arrow button on your remote until VID2 appears at the bottom of the screen. MENU/OK Brings up through the channel list. > > > > Chapter 1 17 VOL Decreases the volume. VGA INPUT Connect your TV to operate ...
User Manual
Page 18
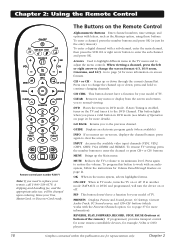
.... CC Settings; buttons (which works with an audio system, follow the instructions for more information on page 21 for Volume Punchthrough Feature on -screen, displays the channel banner; To program this publication are on page 21. Press once to the DVD Channel. Current Audio Track, PC Sound ...; Chapter 2 A shipping and handling fee, and the appropriate sales tax, will turn the device on the TV and tunes it to change the screen format: 4/3, 16/9 zoom, Cinerama, and 16/9. Arrows Used to page 32 for more details). Go to highlight different items in DVD mode. ...
.... CC Settings; buttons (which works with an audio system, follow the instructions for more information on page 21 for Volume Punchthrough Feature on -screen, displays the channel banner; To program this publication are on page 21. Press once to the DVD Channel. Current Audio Track, PC Sound ...; Chapter 2 A shipping and handling fee, and the appropriate sales tax, will turn the device on the TV and tunes it to change the screen format: 4/3, 16/9 zoom, Cinerama, and 16/9. Arrows Used to page 32 for more details). Go to highlight different items in DVD mode. ...
User Manual
Page 19
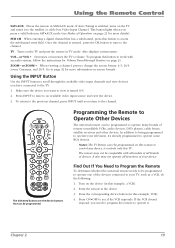
... available video input source and view the device. 3. Press INPUT to tune to change the screen format: 4/3, 16/9 zoom, Cinerama, and 16/9. In addition to being programmed to the channel. Turn on screen formats. Point the remote at the device. 3. it to see Modes of devices. It ... VOL CH MENU MUTE INFO + CH CTRL ZOOMCLEAR PRESETS ZOOM+ GUIDE ?!+- Press the corresponding device button (in this button to operate some RCA devices. TV Turns on this button to work with all models of all functions of the devices connected to your television, it . To ...
... available video input source and view the device. 3. Press INPUT to tune to change the screen format: 4/3, 16/9 zoom, Cinerama, and 16/9. In addition to being programmed to the channel. Turn on screen formats. Point the remote at the device. 3. it to see Modes of devices. It ... VOL CH MENU MUTE INFO + CH CTRL ZOOMCLEAR PRESETS ZOOM+ GUIDE ?!+- Press the corresponding device button (in this button to operate some RCA devices. TV Turns on this button to work with all models of all functions of the devices connected to your television, it . To ...
User Manual
Page 26
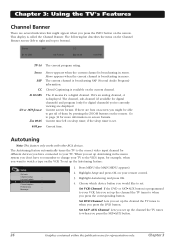
...input, for example, when you want to watch a tape on the Channel Banner screen (left on the remote. If there are bars on-screen you might appear when you press the INFO button on screen formats. Current time left to right and top to when you press the DVD ... you set up the Autotuning feature: Setup Go back Channel setup ... Autotuning Note: This feature only works with other RCA devices. List and Labels ... Chapter 3 Current screen format. Current time. The Autotuning feature automatically tunes the TV to the correct video input channel for different devices you have...
...input, for example, when you want to watch a tape on the Channel Banner screen (left on the remote. If there are bars on-screen you might appear when you press the INFO button on screen formats. Current time left to right and top to when you press the DVD ... you set up the Autotuning feature: Setup Go back Channel setup ... Autotuning Note: This feature only works with other RCA devices. List and Labels ... Chapter 3 Current screen format. Current time. The Autotuning feature automatically tunes the TV to the correct video input channel for different devices you have...
User Manual
Page 29
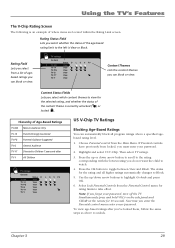
... TV-Y7 Directed to take effect. Hierarchy of where items are located within the Rating Limit screen. Press the OK button to highlight Go back and press OK. 6. Using the TV's Features The V-Chip Rating Screen The following is View or Block. Use the up or down arrow buttons to toggle between...
... TV-Y7 Directed to take effect. Hierarchy of where items are located within the Rating Limit screen. Press the OK button to highlight Go back and press OK. 6. Using the TV's Features The V-Chip Rating Screen The following is View or Block. Use the up or down arrow buttons to toggle between...

User Manual
Page 30
... ans+ 8 ans+ G C Status Block Block Block View View View Blocking Canadian V-Chip Ratings If you receive Canadian programs you can block programs based on your screen.) When you block a content theme for TV-MA doesn't unlock. Highlight English ratings or French ratings and press OK. 3. Press the OK button to change...
... ans+ 8 ans+ G C Status Block Block Block View View View Blocking Canadian V-Chip Ratings If you receive Canadian programs you can block programs based on your screen.) When you block a content theme for TV-MA doesn't unlock. Highlight English ratings or French ratings and press OK. 3. Press the OK button to change...

User Manual
Page 32
...on your remote to try a different format that wasn't there before. Most digital video is sent in 4/3 which does not fill your screen. button to see if a different format is sent in a 16/9 format which your Parental control menu that may eliminate the bars. Additional Features .... These ratings let you press the ZOOM buttons and the format type is displayed on exceptional picture performance, all RCA models feature Enhanced Natural Vision (EN-V). Screen Formats Screen format is the way the picture is displayed at the bottom of the way the format is designed to add ...
...on your remote to try a different format that wasn't there before. Most digital video is sent in 4/3 which does not fill your screen. button to see if a different format is sent in a 16/9 format which your Parental control menu that may eliminate the bars. Additional Features .... These ratings let you press the ZOOM buttons and the format type is displayed on exceptional picture performance, all RCA models feature Enhanced Natural Vision (EN-V). Screen Formats Screen format is the way the picture is displayed at the bottom of the way the format is designed to add ...

User Manual
Page 33
... options: Standard, Movie, Voice, Music and Personal. To access the Sound menu, press MENU on the remote, and then select Sound from the screen and you adjust the audio frequency settings. Choose a band and make adjustments, the Sound preset option automatically changes to choose a specific sound preset... (100Hz, 300Hz, 1kHz, 3kHz, 10kHz) you get the most from your channel list. Each menu is displayed at the bottom of each screen for help you want to adjust the level. Normal... Note: Options in the menus that are grayed-out and can be highlighted are discussed...
... options: Standard, Movie, Voice, Music and Personal. To access the Sound menu, press MENU on the remote, and then select Sound from the screen and you adjust the audio frequency settings. Choose a band and make adjustments, the Sound preset option automatically changes to choose a specific sound preset... (100Hz, 300Hz, 1kHz, 3kHz, 10kHz) you get the most from your channel list. Each menu is displayed at the bottom of each screen for help you want to adjust the level. Normal... Note: Options in the menus that are grayed-out and can be highlighted are discussed...

User Manual
Page 36
... decreased). Medium for a slightly softer picture than the other settings (the picture detail is especially useful for a softer, smoother picture that were originally recorded on -screen when you tune to the channel entered in the Channel Number option. Channel Number Use the number buttons on the remote, and then select Setup...
... decreased). Medium for a slightly softer picture than the other settings (the picture detail is especially useful for a softer, smoother picture that were originally recorded on -screen when you tune to the channel entered in the Channel Number option. Channel Number Use the number buttons on the remote, and then select Setup...
User Manual
Page 37
... you select between Default and Custom options. Note: Closed caption settings are encoded with closed captioning information appears on the TV screen. When a program is closed caption service mode (1-6) for details about the channel banner. On Always Captioning information shown always,... way closed -captioning information. Only specific programs encoded with closed captioned mode set will be saved as text on the screen. See Chapter 3 for displaying captioning information. Default... ... Digital CC Color White... Closed captioning is muted by pressing the MUTE...
... you select between Default and Custom options. Note: Closed caption settings are encoded with closed captioning information appears on the TV screen. When a program is closed caption service mode (1-6) for details about the channel banner. On Always Captioning information shown always,... way closed -captioning information. Only specific programs encoded with closed captioned mode set will be saved as text on the screen. See Chapter 3 for displaying captioning information. Default... ... Digital CC Color White... Closed captioning is muted by pressing the MUTE...


