
User Manual
Page 19
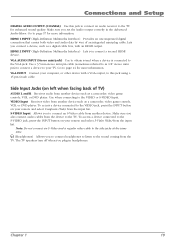
... connected to the TV for more information. Side Input Jacks (on left when facing back of an integrated mini-plug cable. Make sure you connect a second HDMI device. Go to the VIDEO jack, press the INPUT button on your computer, or other device with an HDMI output. The TV speakers... turn off when you set the Audio output correctly in headphones. HDMI 2 INPUT (High-Definition Multimedia Interface) Lets you also connect audio cables from ...
... connected to the TV for more information. Side Input Jacks (on left when facing back of an integrated mini-plug cable. Make sure you connect a second HDMI device. Go to the VIDEO jack, press the INPUT button on your computer, or other device with an HDMI output. The TV speakers... turn off when you set the Audio output correctly in headphones. HDMI 2 INPUT (High-Definition Multimedia Interface) Lets you also connect audio cables from ...
User Manual
Page 23
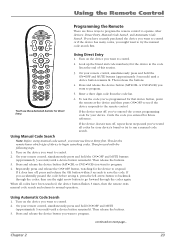
...code number(s) for Direct Entry. 6. If the device doesn't turn off, press and release the OK button within 3 seconds to program. 4. This lets the remote know which type of this section. 3. Then release the buttons. 3. Turn on the device you must use Direct Entry first..... Using Automatic Code Search 1. On your remote control, simultaneously press and hold the ON•OFF and MUTE buttons (approximately 3 seconds) until a device button remains lit. Repeatedly press and release the ON•OFF button, watching for your remote control, simultaneously press...
...code number(s) for Direct Entry. 6. If the device doesn't turn off, press and release the OK button within 3 seconds to program. 4. This lets the remote know which type of this section. 3. Then release the buttons. 3. Turn on the device you must use Direct Entry first..... Using Automatic Code Search 1. On your remote control, simultaneously press and hold the ON•OFF and MUTE buttons (approximately 3 seconds) until a device button remains lit. Repeatedly press and release the ON•OFF button, watching for your remote control, simultaneously press...
User Manual
Page 24
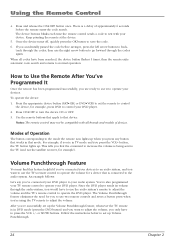
... that the command to increase the volume is being sent to adjust the volume. Use the remote buttons that mode. Follow the instructions below to turn the device ON or OFF. 3. Keep pointing the remote at the device. 5. Press ON•OFF to set up Volume Punchthrough. 24 Chapter 2 Modes... of approximately 6 seconds before saving it to that device. or MUTE buttons. The device buttons blinks each time the remote control sends a code to the mode the remote...
... that the command to increase the volume is being sent to adjust the volume. Use the remote buttons that mode. Follow the instructions below to turn the device ON or OFF. 3. Keep pointing the remote at the device. 5. Press ON•OFF to set up Volume Punchthrough. 24 Chapter 2 Modes... of approximately 6 seconds before saving it to that device. or MUTE buttons. The device buttons blinks each time the remote control sends a code to the mode the remote...
User Manual
Page 25
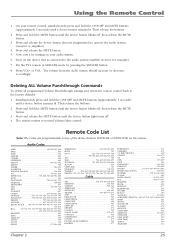
... 488 PHILIPS 471 479 485 490 491 492 PHILIPS-MAGNAVOX 505 534 PIONEER 478 506 493 494 PULSAR 486 RADIO SHACK 505 534 525 RCA 460 471 507 REALISTIC 469 REGAL 482 REGENCY 477 REMBRANDT 463 ROGERS 506 RUNCO 486 SAMSUNG 474 494 SCIENTIFIC ATLANTA . 498 497 506...474 Chapter 2 25 Then release the buttons. 2. Press and hold the ON•OFF and MUTE buttons (approximately 3 seconds) until a device button remains lit. Using the Remote Control 1. Turn on the remote. The volume from the audio system should increase or decrease accordingly. Press and release the device button that...
... 488 PHILIPS 471 479 485 490 491 492 PHILIPS-MAGNAVOX 505 534 PIONEER 478 506 493 494 PULSAR 486 RADIO SHACK 505 534 525 RCA 460 471 507 REALISTIC 469 REGAL 482 REGENCY 477 REMBRANDT 463 ROGERS 506 RUNCO 486 SAMSUNG 474 494 SCIENTIFIC ATLANTA . 498 497 506...474 Chapter 2 25 Then release the buttons. 2. Press and hold the ON•OFF and MUTE buttons (approximately 3 seconds) until a device button remains lit. Using the Remote Control 1. Turn on the remote. The volume from the audio system should increase or decrease accordingly. Press and release the device button that...
User Manual
Page 40
...8226; If using S-Video or Y, PB, PR, remember to also connect the device's left and right audio output jacks to watch something else. Turn the TV on again. Other Information Troubleshooting Most problems you encounter with your TV can be set incorrectly. No picture, no device connected to page...by consulting the following troubleshooting list. Go to make sure the TV/VCR button on the VCR is in again. 40 Chapter 5 Wait 30 seconds and then turn on • Make sure the TV is plugged in. • Check the wall receptacle (or extension cord) to page 37 for more information...
...8226; If using S-Video or Y, PB, PR, remember to also connect the device's left and right audio output jacks to watch something else. Turn the TV on again. Other Information Troubleshooting Most problems you encounter with your TV can be set incorrectly. No picture, no device connected to page...by consulting the following troubleshooting list. Go to make sure the TV/VCR button on the VCR is in again. 40 Chapter 5 Wait 30 seconds and then turn on • Make sure the TV is plugged in. • Check the wall receptacle (or extension cord) to page 37 for more information...


