User Guide
Page 1
... (one blade is wider than the other way. Do not attempt to change the outlet, or use a different one way. In the space below, record the date and place of Purchase Serial No. CAUTION RISK OF ELECTRIC SHOCK DO NOT OPEN CAUTION: TO REDUCE THE RISK OF ELECTRIC SHOCK, DO... NOT REMOVE COVER (OR BACK). Service Information This product should be serviced only by one or more of FCC Rules. For Your Records In the event that interference will not fit, contact a qualified electrician to bypass this equipment may need both the model number and the serial number...
... (one blade is wider than the other way. Do not attempt to change the outlet, or use a different one way. In the space below, record the date and place of Purchase Serial No. CAUTION RISK OF ELECTRIC SHOCK DO NOT OPEN CAUTION: TO REDUCE THE RISK OF ELECTRIC SHOCK, DO... NOT REMOVE COVER (OR BACK). Service Information This product should be serviced only by one or more of FCC Rules. For Your Records In the event that interference will not fit, contact a qualified electrician to bypass this equipment may need both the model number and the serial number...
User Guide
Page 2
... Programs and Disc Titles 13 Recalling Playback Programs and Disc Titles 14 Erasing Disc Titles 14 Troubleshooting 15 More Information 16 Cleaning the Exterior 16 CD Care 16 CD Lens Care 16 Precautions 16 Don't Infringe 16 Discs for Recording 16 Equipment Specifications 16 Index 17 Limited Warranty 18 EN 1
... Programs and Disc Titles 13 Recalling Playback Programs and Disc Titles 14 Erasing Disc Titles 14 Troubleshooting 15 More Information 16 Cleaning the Exterior 16 CD Care 16 CD Lens Care 16 Precautions 16 Don't Infringe 16 Discs for Recording 16 Equipment Specifications 16 Index 17 Limited Warranty 18 EN 1
User Guide
Page 3
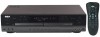
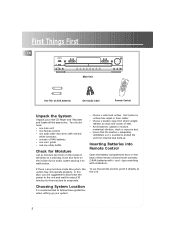
... Unit One Audio Cable POWER REVERSE PLAY PREV STOP PAUSE FORWARD NEXT CD ERASE CD-SYNC CDR OK RECORD SHIFT 1 PROGRAM FINALIZE 2 OPEN/CLOSE 3 4 DISPLAY 5 SHUFFLE 7 LIVE SELECT 6 DJ 8 LIVE INTRO 9 0 REPEAT CD TITLE Remote Control Unpack the System Unpack your audio system causing it ...that the location is any moisture inside of windows on a cold day, it can also form on the inside of your new CD Player and Recorder and locate all the accessories. Choosing System Location It is essential to malfunction. • Choose a solid, level surface. Check for...
... Unit One Audio Cable POWER REVERSE PLAY PREV STOP PAUSE FORWARD NEXT CD ERASE CD-SYNC CDR OK RECORD SHIFT 1 PROGRAM FINALIZE 2 OPEN/CLOSE 3 4 DISPLAY 5 SHUFFLE 7 LIVE SELECT 6 DJ 8 LIVE INTRO 9 0 REPEAT CD TITLE Remote Control Unpack the System Unpack your audio system causing it ...that the location is any moisture inside of windows on a cold day, it can also form on the inside of your new CD Player and Recorder and locate all the accessories. Choosing System Location It is essential to malfunction. • Choose a solid, level surface. Check for...

User Guide
Page 4
...safety, complete all cable connections before you can always make analog recordings when digital recording is not possible. • As minimum setting, CD Analog cables must be connected for power. For recording from an external source with analog output (e.g. amplifier) with digital ...If possible, connect both digital and analog cables so that you plug for CD playback. 3 For recording from an external source with digital coaxial in sound quality and usability (e.g. Tips: • Digital recordings (digital / coaxial) offer the best performance in for playback. Connection to ...
...safety, complete all cable connections before you can always make analog recordings when digital recording is not possible. • As minimum setting, CD Analog cables must be connected for power. For recording from an external source with analog output (e.g. amplifier) with digital ...If possible, connect both digital and analog cables so that you plug for CD playback. 3 For recording from an external source with digital coaxial in sound quality and usability (e.g. Tips: • Digital recordings (digital / coaxial) offer the best performance in for playback. Connection to ...
User Guide
Page 5
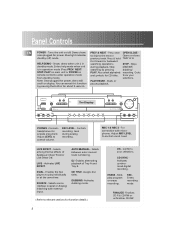
...Connects headphones for power. AUTO/MANUAL - Selects source (Optical, Coaxial or Analog) matching with microphones. CD SYNC Activates synchronized digital recording. Demo shows PREV & NEXT - Stop playback/ is in operation mode (Press PREV/ NEXT/ searching by pressing... the button for CD titles. Also select alphabets recording. Adjust MIC LEVEL to relevant sections for function details ) 4 OK - LIVE - CD TITLE -Assigns disc titles. selections. Controls recording level during playback. Selects between auto/ manual track...
...Connects headphones for power. AUTO/MANUAL - Selects source (Optical, Coaxial or Analog) matching with microphones. CD SYNC Activates synchronized digital recording. Demo shows PREV & NEXT - Stop playback/ is in operation mode (Press PREV/ NEXT/ searching by pressing... the button for CD titles. Also select alphabets recording. Adjust MIC LEVEL to relevant sections for function details ) 4 OK - LIVE - CD TITLE -Assigns disc titles. selections. Controls recording level during playback. Selects between auto/ manual track...
User Guide
Page 6
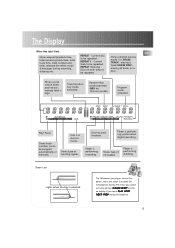
Player is selected. Green Led Lights when the tray is performing synchronized digital recording. REPEAT 1 - Shows selected erasing mode ( i.e. Random Play mode activated. (MIX for power, there are to be repeated. Play/ Pause Shows track numbers ...a track/ ERASE DISC erasing all tracks on display if you cannot activate any key. Shows type of CD loaded. Player is performing recording. During this time, you touch PLAY, STOP, NEXT/ PREV during recording, dubbing etc. Current track to be repeated. Disc has been finalized. Tip: Whenever you plug or...
Player is selected. Green Led Lights when the tray is performing synchronized digital recording. REPEAT 1 - Shows selected erasing mode ( i.e. Random Play mode activated. (MIX for power, there are to be repeated. Play/ Pause Shows track numbers ...a track/ ERASE DISC erasing all tracks on display if you cannot activate any key. Shows type of CD loaded. Player is performing recording. During this time, you touch PLAY, STOP, NEXT/ PREV during recording, dubbing etc. Current track to be repeated. Disc has been finalized. Tip: Whenever you plug or...
User Guide
Page 7
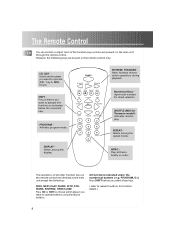
... tracks briefly on the main unit through the remote control. POWER REVERSE PLAY FORWARD PREV STOP PAUSE NEXT CD CD-SYNC CDR ERASE OK RECORD SHIFT FINALIZE OPEN/CLOSE 1 PROGRAM 4 DISPLAY 7 DJ 2 5 LIVE SELECT 8 INTRO 0 CD TITLE 3 SHUFFLE 6 LIVE 9 REPEAT REVERSE, FORWARD Starts forward/ reverse search operations during playback. All functions indicated under the...
... tracks briefly on the main unit through the remote control. POWER REVERSE PLAY FORWARD PREV STOP PAUSE NEXT CD CD-SYNC CDR ERASE OK RECORD SHIFT FINALIZE OPEN/CLOSE 1 PROGRAM 4 DISPLAY 7 DJ 2 5 LIVE SELECT 8 INTRO 0 CD TITLE 3 SHUFFLE 6 LIVE 9 REPEAT REVERSE, FORWARD Starts forward/ reverse search operations during playback. All functions indicated under the...
User Guide
Page 11
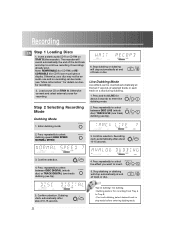
...the last 7 seconds of track or disc. Confirm selection. Insert a blank audio CD-R or CD-RW on TRAY A. OK 4. Press repeatedly to Tray B. Press repeatedly to continue recording if recordings already exist. Stop dubbing or dubbing will stop automatically at end of the last... Otherwise, your disc may not be an audio one and no recording can be made. (see tip). 6 SHIFT LIVE 1. Load source CD on TRAY B (the recorder). Step 2 Selecting Recording Mode Dubbing Mode 6. Press and hold LIVE for recording) 2. Confirm selection. SHIFT 5 LIVE SELECT STOP Tips on a ...
...the last 7 seconds of track or disc. Confirm selection. Insert a blank audio CD-R or CD-RW on TRAY A. OK 4. Press repeatedly to Tray B. Press repeatedly to continue recording if recordings already exist. Stop dubbing or dubbing will stop automatically at end of the last... Otherwise, your disc may not be an audio one and no recording can be made. (see tip). 6 SHIFT LIVE 1. Load source CD on TRAY B (the recorder). Step 2 Selecting Recording Mode Dubbing Mode 6. Press and hold LIVE for recording) 2. Confirm selection. SHIFT 5 LIVE SELECT STOP Tips on a ...

User Guide
Page 12
... be stopped automatically at end of track or disc. 4. Stop recording. Enter CD-SYNC mode. CD-SYNC 2. Select Dual mode ON. 2. Refer to make your own digital recording. With the recording of track numbers is on tray B. 3. Confirm selection. Start recording. Synchronized Digital Recording Mode (from the digital source material. However, manual assignment of your favourite music...
... be stopped automatically at end of track or disc. 4. Stop recording. Enter CD-SYNC mode. CD-SYNC 2. Select Dual mode ON. 2. Refer to make your own digital recording. With the recording of track numbers is on tray B. 3. Confirm selection. Start recording. Synchronized Digital Recording Mode (from the digital source material. However, manual assignment of your favourite music...
User Guide
Page 13
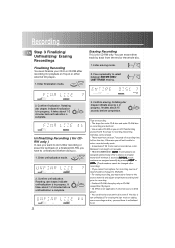
...have it before completion. Rotating star shapes indicate unfinalization is in progress. Confirm erasing. Recording mistakes can be recorded on CD-RW compatible CD players. • CD SYNC is not applicable if external source is DVD player. • You can ...seconds before doing so. 1. Enter finalization mode. Minimum track length is in recording. Recording EN Step 3 Finalizing/ Unfinalizing/ Erasing Recordings Finalizing Recording You must finalize your CD-R or CD-RW after recording for CD-RW only. Otherwise you will not be able to select ERASE between ENTIRE...
...have it before completion. Rotating star shapes indicate unfinalization is in progress. Confirm erasing. Recording mistakes can be recorded on CD-RW compatible CD players. • CD SYNC is not applicable if external source is DVD player. • You can ...seconds before doing so. 1. Enter finalization mode. Minimum track length is in recording. Recording EN Step 3 Finalizing/ Unfinalizing/ Erasing Recordings Finalizing Recording You must finalize your CD-R or CD-RW after recording for CD-RW only. Otherwise you will not be able to select ERASE between ENTIRE...
User Guide
Page 16
... level. • Re-connect the wires properly. • Choose the correct mode at the receiver. • Load a CD. • Turn the disc over again. • If total disc recordable time (eg. 74'30") shows on yet. • Batteries are dead. • The remote control sensor cannot sense .... • Move closer towards the system. • Remove the obstacles. • Unfinalized CD-RW • Use CD-R or CD-RW • Use an appropriate disc. • Select the correct input source. • Re-do recording at the receiver. • There is no power at that particular power outlet. •...
... level. • Re-connect the wires properly. • Choose the correct mode at the receiver. • Load a CD. • Turn the disc over again. • If total disc recordable time (eg. 74'30") shows on yet. • Batteries are dead. • The remote control sensor cannot sense .... • Move closer towards the system. • Remove the obstacles. • Unfinalized CD-RW • Use CD-R or CD-RW • Use an appropriate disc. • Select the correct input source. • Re-do recording at the receiver. • There is no power at that particular power outlet. •...
User Guide
Page 17
... CDR): You can use a soft clean cloth to wipe the CD from the AC power outlet. To clean the lens you will need to be made only by a trained technician. Recordable ReWritable Equipment Specifications Power Supply: CDRW121- 120V~60Hz, DAR2060 - 230V~50Hz Unit Dimensions: (HxWxD in clean water, wring it . • Never use...
... CDR): You can use a soft clean cloth to wipe the CD from the AC power outlet. To clean the lens you will need to be made only by a trained technician. Recordable ReWritable Equipment Specifications Power Supply: CDRW121- 120V~60Hz, DAR2060 - 230V~50Hz Unit Dimensions: (HxWxD in clean water, wring it . • Never use...
User Guide
Page 18
Index A Accessories 2 ANALOG 3, 4, 5 Assigning disc title 13 AUTO/ MANUAL track numbering 4, 8 B Batteries, inserting 2 C CD-R & CD-RW 16 CD Care 16 CD, CDR 6 CD Lens Care 16 CD SYNC button 4, 5 CD TITLE button 4 Clearing program 9 CLOSE 4 Coaxial 3, 4, 5 Connections ( cables, power ) 3 Copyright 16 D DJ 4, 8 Digital recording 11 Display 5, 6, 8 Display messages 14 Dual 4, 5, 6, 7 Dubbing 4, 5, 10 E Editing disc title 13 Erase 6 Erasing disc...
Index A Accessories 2 ANALOG 3, 4, 5 Assigning disc title 13 AUTO/ MANUAL track numbering 4, 8 B Batteries, inserting 2 C CD-R & CD-RW 16 CD Care 16 CD, CDR 6 CD Lens Care 16 CD SYNC button 4, 5 CD TITLE button 4 Clearing program 9 CLOSE 4 Coaxial 3, 4, 5 Connections ( cables, power ) 3 Copyright 16 D DJ 4, 8 Digital recording 11 Display 5, 6, 8 Display messages 14 Dual 4, 5, 6, 7 Dubbing 4, 5, 10 E Editing disc title 13 Erase 6 Erasing disc...


