User Guide
Page 5
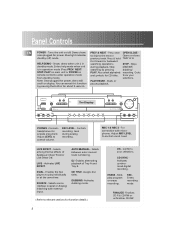
.... You can cancel this function pauses playback. Adjust MIC LEVEL to the next or Opens or closes standby (off . CD TITLE -Assigns disc titles. CD SYNC Activates synchronized digital recording. from your selections. LIVE - AUTO/MANUAL - DJ -Enables alternating playback of Applause/ Cheer/ Encore/ Live Effect Off. Demo shows PREV & NEXT - previous track. Enters...
.... You can cancel this function pauses playback. Adjust MIC LEVEL to the next or Opens or closes standby (off . CD TITLE -Assigns disc titles. CD SYNC Activates synchronized digital recording. from your selections. LIVE - AUTO/MANUAL - DJ -Enables alternating playback of Applause/ Cheer/ Encore/ Live Effect Off. Demo shows PREV & NEXT - previous track. Enters...
User Guide
Page 6
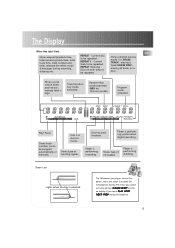
... both trays to be repeated. During this time, you touch PLAY, STOP, NEXT/ PREV during recording, dubbing etc. Current track to be assigned automatically or manually. ERASE TRACK - Player is performing recording. Player is performing synchronized digital recording. The Display When they light/ flash: EN Shows elapsed playback time, total remaining track time, total... 3 seconds for Thomson model) Program mode activated. PLEASE WAIT scrolls on display if you cannot activate any key. Shows selected erasing mode ( i.e. Shows type of CD loaded.
... both trays to be repeated. During this time, you touch PLAY, STOP, NEXT/ PREV during recording, dubbing etc. Current track to be assigned automatically or manually. ERASE TRACK - Player is performing recording. Player is performing synchronized digital recording. The Display When they light/ flash: EN Shows elapsed playback time, total remaining track time, total... 3 seconds for Thomson model) Program mode activated. PLEASE WAIT scrolls on display if you cannot activate any key. Shows selected erasing mode ( i.e. Shows type of CD loaded.

User Guide
Page 12
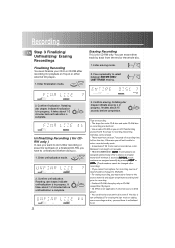
... next page! 11 Synchronized Digital Recording Mode (from the digital source material. Recording External Recording Mode 1. OK 5. CD-SYNC 2. Refer to "Program" (steps 1-7, p. 9) to match with external input (e.g. Select source (analog/ optical/ coaxial) to create program on tray B. 3. Synchronized recording is not possible. 1. Stop recording or recording STOP will start automatically. 5. However, manual assignment of external source and...
... next page! 11 Synchronized Digital Recording Mode (from the digital source material. Recording External Recording Mode 1. OK 5. CD-SYNC 2. Refer to "Program" (steps 1-7, p. 9) to match with external input (e.g. Select source (analog/ optical/ coaxial) to create program on tray B. 3. Synchronized recording is not possible. 1. Stop recording or recording STOP will start automatically. 5. However, manual assignment of external source and...
User Guide
Page 13
...the steps in progress. MANUAL: track numbers are assigned manually by track from the end or the whole disc. Enter erasing mode. 2. It takes about 1-2 OK minutes before completion. It takes about 1-2 minutes before doing so. 1. Minimum track length is in recording. For erasing the ... erase either track by pressing NEXT or SKIP+. (Track numbers cannot be changed after recording) • If you connect microphone for recording, source of recording time left on CD-RW compatible CD players. • CD SYNC is not applicable if external source is DVD player. • You can directly...
...the steps in progress. MANUAL: track numbers are assigned manually by track from the end or the whole disc. Enter erasing mode. 2. It takes about 1-2 OK minutes before completion. It takes about 1-2 minutes before doing so. 1. Minimum track length is in recording. For erasing the ... erase either track by pressing NEXT or SKIP+. (Track numbers cannot be changed after recording) • If you connect microphone for recording, source of recording time left on CD-RW compatible CD players. • CD SYNC is not applicable if external source is DVD player. • You can directly...
User Guide
Page 18
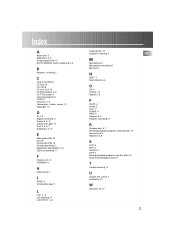
Index A Accessories 2 ANALOG 3, 4, 5 Assigning disc title 13 AUTO/ MANUAL track numbering 4, 8 B Batteries, inserting 2 C CD-R & CD-RW 16 CD Care 16 CD, CDR 6 CD Lens Care 16 CD SYNC button 4, 5 CD TITLE button 4 Clearing program 9 CLOSE 4 Coaxial 3, 4, 5 Connections ( cables, power ) 3 Copyright 16 D DJ 4, 8 Digital recording 11 Display 5, 6, 8 Display messages 14 Dual 4, 5, 6, 7 Dubbing 4, 5, 10 E Editing disc title 13 Erase 6 Erasing disc title...
Index A Accessories 2 ANALOG 3, 4, 5 Assigning disc title 13 AUTO/ MANUAL track numbering 4, 8 B Batteries, inserting 2 C CD-R & CD-RW 16 CD Care 16 CD, CDR 6 CD Lens Care 16 CD SYNC button 4, 5 CD TITLE button 4 Clearing program 9 CLOSE 4 Coaxial 3, 4, 5 Connections ( cables, power ) 3 Copyright 16 D DJ 4, 8 Digital recording 11 Display 5, 6, 8 Display messages 14 Dual 4, 5, 6, 7 Dubbing 4, 5, 10 E Editing disc title 13 Erase 6 Erasing disc title...
User Guide
Page 19
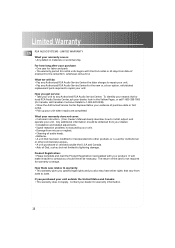
... 1-800-522-0338). • Show the Authorized Service Center Representative your evidence of God, such as but not limited to any Authorized RCA Audio Service Center. How State Law relates to install, adjust, and operate your dealer for warranty coverage. Contact your unit. If you ... or other products or is not required for warranty information. 18 What your warranty does not cover: • Customer instruction. (Your Owner's Manual clearly describes how to warranty: • This warranty gives you specific legal rights and you get service: • Take your unit. How ...
... 1-800-522-0338). • Show the Authorized Service Center Representative your evidence of God, such as but not limited to any Authorized RCA Audio Service Center. How State Law relates to install, adjust, and operate your dealer for warranty coverage. Contact your unit. If you ... or other products or is not required for warranty information. 18 What your warranty does not cover: • Customer instruction. (Your Owner's Manual clearly describes how to warranty: • This warranty gives you specific legal rights and you get service: • Take your unit. How ...


