User Guide
Page 2
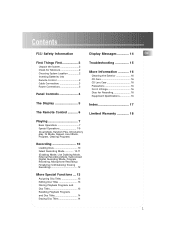
... Programs and Disc Titles 13 Recalling Playback Programs and Disc Titles 14 Erasing Disc Titles 14 Troubleshooting 15 More Information 16 Cleaning the Exterior 16 CD Care 16 CD Lens Care 16 Precautions 16 Don't Infringe 16 Discs for Recording 16 Equipment Specifications 16 Index 17 Limited Warranty 18 EN 1
... Programs and Disc Titles 13 Recalling Playback Programs and Disc Titles 14 Erasing Disc Titles 14 Troubleshooting 15 More Information 16 Cleaning the Exterior 16 CD Care 16 CD Lens Care 16 Precautions 16 Don't Infringe 16 Discs for Recording 16 Equipment Specifications 16 Index 17 Limited Warranty 18 EN 1
User Guide
Page 3
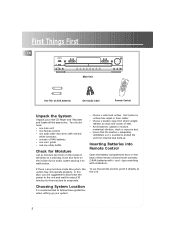
... place on surfaces like carpet or foam rubber. • Choose a location away from internal heat build-up your new CD Player and Recorder and locate all the accessories. Inserting Batteries into Remote Control Open the battery compartment door on the inside of windows on ...Main Unit One Audio Cable POWER REVERSE PLAY PREV STOP PAUSE FORWARD NEXT CD ERASE CD-SYNC CDR OK RECORD SHIFT 1 PROGRAM FINALIZE 2 OPEN/CLOSE 3 4 DISPLAY 5 SHUFFLE 7 LIVE SELECT 6 DJ 8 LIVE INTRO 9 0 REPEAT CD TITLE Remote Control Unpack the System Unpack your system: 2 You should ...
... place on surfaces like carpet or foam rubber. • Choose a location away from internal heat build-up your new CD Player and Recorder and locate all the accessories. Inserting Batteries into Remote Control Open the battery compartment door on the inside of windows on ...Main Unit One Audio Cable POWER REVERSE PLAY PREV STOP PAUSE FORWARD NEXT CD ERASE CD-SYNC CDR OK RECORD SHIFT 1 PROGRAM FINALIZE 2 OPEN/CLOSE 3 4 DISPLAY 5 SHUFFLE 7 LIVE SELECT 6 DJ 8 LIVE INTRO 9 0 REPEAT CD TITLE Remote Control Unpack the System Unpack your system: 2 You should ...

User Guide
Page 4
...external receiver (e.g amplifier) through analog audio cable. First Things First Connections EN Cable Connections 1. Connection to external receiver (e.g. For recording from an external source with digital coaxial in sound quality and usability (e.g. Power Connections Plug the power supply cord into an AC ...and analog cables so that you plug for CD playback. 3 Note: For the sake of safety, complete all cable connections before you can always make analog recordings when digital recording is not possible. • As minimum setting, CD Analog cables must be connected for power.
...external receiver (e.g amplifier) through analog audio cable. First Things First Connections EN Cable Connections 1. Connection to external receiver (e.g. For recording from an external source with digital coaxial in sound quality and usability (e.g. Power Connections Plug the power supply cord into an AC ...and analog cables so that you plug for CD playback. 3 Note: For the sake of safety, complete all cable connections before you can always make analog recordings when digital recording is not possible. • As minimum setting, CD Analog cables must be connected for power.
User Guide
Page 5
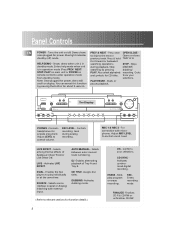
... to enter operation mode and symbols for CD titles. DUBBING -Activates dubbing mode. ( Refer to control volume. Edits play individually or at the same time. Stops standby mode. Enters help mode when unit during analog recording. from standby mode). Starts or scroll on... /off ) mode. Adjust LEVEL to relevant sections for about 3 seconds. MIC 1 & MIC 2 - AUTO/MANUAL - DUAL - Activates LIVE EFFECT. ERASE - FINALIZE -Finalizes CD-R & CD-RW or unfinalizes CD-RW. Turns the unit on...
... to enter operation mode and symbols for CD titles. DUBBING -Activates dubbing mode. ( Refer to control volume. Edits play individually or at the same time. Stops standby mode. Enters help mode when unit during analog recording. from standby mode). Starts or scroll on... /off ) mode. Adjust LEVEL to relevant sections for about 3 seconds. MIC 1 & MIC 2 - AUTO/MANUAL - DUAL - Activates LIVE EFFECT. ERASE - FINALIZE -Finalizes CD-R & CD-RW or unfinalizes CD-RW. Turns the unit on...
User Guide
Page 6
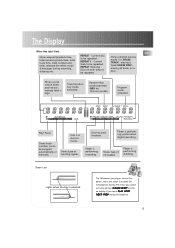
ERASE TRACK - Unit is high. Shows type of CD loaded. Disc has been finalized. Player is performing recording. REPEAT 1 - Current track to be repeated. Current disc to be repeated. Random Play mode activated. (MIX for initialization. Player... assigned automatically or manually. Shows selected erasing mode ( i.e. Player is selected. During this time, you touch PLAY, STOP, NEXT/ PREV during recording, dubbing etc. Shows type of inputing signals. erasing a track/ ERASE DISC erasing all tracks on mode. Play/ Pause Shows track numbers are about...
ERASE TRACK - Unit is high. Shows type of CD loaded. Disc has been finalized. Player is performing recording. REPEAT 1 - Current track to be repeated. Current disc to be repeated. Random Play mode activated. (MIX for initialization. Player... assigned automatically or manually. Shows selected erasing mode ( i.e. Player is selected. During this time, you touch PLAY, STOP, NEXT/ PREV during recording, dubbing etc. Shows type of inputing signals. erasing a track/ ERASE DISC erasing all tracks on mode. Play/ Pause Shows track numbers are about...
User Guide
Page 7
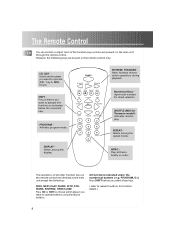
..., NEXT, PLAY, PAUSE, STOP, FORWARD, REVERSE, OPEN/CLOSE Press CD or CDR to choose which player you want to operate. (CD - POWER REVERSE PLAY FORWARD PREV STOP PAUSE NEXT CD CD-SYNC CDR ERASE OK RECORD SHIFT FINALIZE OPEN/CLOSE 1 PROGRAM 4 DISPLAY 7 DJ 2 5 LIVE SELECT 8 INTRO 0 CD TITLE 3 SHUFFLE 6 LIVE 9 REPEAT REVERSE, FORWARD Starts forward/ reverse...
..., NEXT, PLAY, PAUSE, STOP, FORWARD, REVERSE, OPEN/CLOSE Press CD or CDR to choose which player you want to operate. (CD - POWER REVERSE PLAY FORWARD PREV STOP PAUSE NEXT CD CD-SYNC CDR ERASE OK RECORD SHIFT FINALIZE OPEN/CLOSE 1 PROGRAM 4 DISPLAY 7 DJ 2 5 LIVE SELECT 8 INTRO 0 CD TITLE 3 SHUFFLE 6 LIVE 9 REPEAT REVERSE, FORWARD Starts forward/ reverse...
User Guide
Page 11
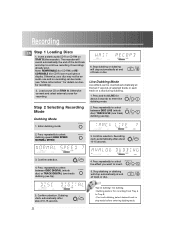
...the last track and stop to continue recording if recordings already exist. Dubbing to select dubbing speed (HIGH SPEED/ NORMAL SPEED) 3. Note: REWRITABLE (for CD-RW) or RECORDABLE (for recording. Load source CD on TRAY B (the recorder). OK 4. starts automatically after about... 10-15 seconds. Enter dubbing mode 2. Confirm selection. Recording EN Step 1 Loading Discs 1. Otherwise, your disc may ...
...the last track and stop to continue recording if recordings already exist. Dubbing to select dubbing speed (HIGH SPEED/ NORMAL SPEED) 3. Note: REWRITABLE (for CD-RW) or RECORDABLE (for recording. Load source CD on TRAY B (the recorder). OK 4. starts automatically after about... 10-15 seconds. Enter dubbing mode 2. Confirm selection. Recording EN Step 1 Loading Discs 1. Otherwise, your disc may ...

User Guide
Page 12
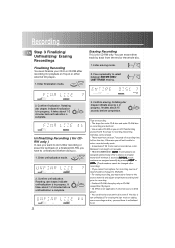
... along to create program on tray B. 3. Refer to "Dubbing Mode" (p.10) for program recording (Note: DISC DIGITAL must be selected for step 1). MD) 2. Stop recording. CD-SYNC 2. Program Recording 1. Load source disc on tray A and destination disc on source disc (Tray A). 4. With... the recording of track numbers is on the next page! 11 Stop recording or recording STOP will be selected for recording (Note: ANALOG must be...
... along to create program on tray B. 3. Refer to "Dubbing Mode" (p.10) for program recording (Note: DISC DIGITAL must be selected for step 1). MD) 2. Stop recording. CD-SYNC 2. Program Recording 1. Load source disc on tray A and destination disc on source disc (Tray A). 4. With... the recording of track numbers is on the next page! 11 Stop recording or recording STOP will be selected for recording (Note: ANALOG must be...
User Guide
Page 13
.... For erasing the last track or adding more recordings on disc, you must have to recording. • Finalized CD-RW discs play only on CD-RW compatible CD players. • CD SYNC is not applicable if external source is for audio CD-R disc and audio CD-RW disc on recording are still familiarizing yourself with the steps in progress...
.... For erasing the last track or adding more recordings on disc, you must have to recording. • Finalized CD-RW discs play only on CD-RW compatible CD players. • CD SYNC is not applicable if external source is for audio CD-R disc and audio CD-RW disc on recording are still familiarizing yourself with the steps in progress...
User Guide
Page 16
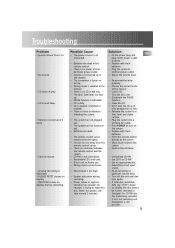
... wires properly. • Choose the correct mode at the receiver. • Load a CD. • Turn the disc over again. • If total disc recordable time (eg. 74'30") shows on display during recording. • Power failure or vigorous vibration has occured. CD recorder is still possible. 15 Troubleshooting Problem • System doesn't turn on •...
... wires properly. • Choose the correct mode at the receiver. • Load a CD. • Turn the disc over again. • If total disc recordable time (eg. 74'30") shows on display during recording. • Power failure or vigorous vibration has occured. CD recorder is still possible. 15 Troubleshooting Problem • System doesn't turn on •...
User Guide
Page 17
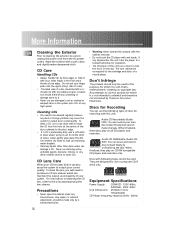
...-dampened cloth. • Warning: Never operate this unit: Audio CD Recordable (Audio CDR): You can damage a CD. Do not put your CD lens gets dirty it is not intended is ; Any attempts to clean CDs. Use another dry cloth to soak up remaining water droplets. •... this product for recording with your own disc content freely but cannot Recordable make changes. Precautions • Never open the cabinet under any liquid enters the unit, take the player to output poor sound quality. Recordable ReWritable Equipment Specifications Power Supply: CDRW121- 120V~60Hz, DAR2060...
...-dampened cloth. • Warning: Never operate this unit: Audio CD Recordable (Audio CDR): You can damage a CD. Do not put your CD lens gets dirty it is not intended is ; Any attempts to clean CDs. Use another dry cloth to soak up remaining water droplets. •... this product for recording with your own disc content freely but cannot Recordable make changes. Precautions • Never open the cabinet under any liquid enters the unit, take the player to output poor sound quality. Recordable ReWritable Equipment Specifications Power Supply: CDRW121- 120V~60Hz, DAR2060...
User Guide
Page 18
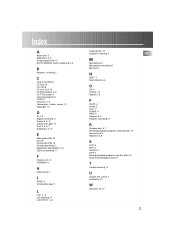
Index A Accessories 2 ANALOG 3, 4, 5 Assigning disc title 13 AUTO/ MANUAL track numbering 4, 8 B Batteries, inserting 2 C CD-R & CD-RW 16 CD Care 16 CD, CDR 6 CD Lens Care 16 CD SYNC button 4, 5 CD TITLE button 4 Clearing program 9 CLOSE 4 Coaxial 3, 4, 5 Connections ( cables, power ) 3 Copyright 16 D DJ 4, 8 Digital recording 11 Display 5, 6, 8 Display messages 14 Dual 4, 5, 6, 7 Dubbing 4, 5, 10 E Editing disc title 13 Erase 6 Erasing disc...
Index A Accessories 2 ANALOG 3, 4, 5 Assigning disc title 13 AUTO/ MANUAL track numbering 4, 8 B Batteries, inserting 2 C CD-R & CD-RW 16 CD Care 16 CD, CDR 6 CD Lens Care 16 CD SYNC button 4, 5 CD TITLE button 4 Clearing program 9 CLOSE 4 Coaxial 3, 4, 5 Connections ( cables, power ) 3 Copyright 16 D DJ 4, 8 Digital recording 11 Display 5, 6, 8 Display messages 14 Dual 4, 5, 6, 7 Dubbing 4, 5, 10 E Editing disc title 13 Erase 6 Erasing disc...


