
User Guide
Page 2
...To reduce risk of injury, charge only rechargeable batteries recommended by the manufacturer for proof of plug to use this camcorder. Model No: SerialNo:_,, Purchase Date-_ _ Purchased From: CC6151 or CC6251 or CC6271 -, •_ : ;._. ,!. ': : Keep your sales receipt for this product. ...important instructions accompanying the product. NO USER-SERVICEABLE PARTS ARE INSIDE. FCC Regulations state that presents a risk of the camcorder. Product Registration Please fill out the product registration card and retum it immediately. Record the serial number and model numbers...
...To reduce risk of injury, charge only rechargeable batteries recommended by the manufacturer for proof of plug to use this camcorder. Model No: SerialNo:_,, Purchase Date-_ _ Purchased From: CC6151 or CC6251 or CC6271 -, •_ : ;._. ,!. ': : Keep your sales receipt for this product. ...important instructions accompanying the product. NO USER-SERVICEABLE PARTS ARE INSIDE. FCC Regulations state that presents a risk of the camcorder. Product Registration Please fill out the product registration card and retum it immediately. Record the serial number and model numbers...
User Guide
Page 3
...800-336-1900 (page 83) Accessories 800-338-0376 (pages 70-75) Safety Information i First Time Operation • Assistance 3 • Unpack the Camcorder and Accessories 3 • Attach the Adapter/Charger 4 • Adjust the Handstrap to Fit Your Hand 4 • Slide LENS COVER Control to ...Switch to OFF to Turn Off the Camcorder ........ 9 • Close the Lens Cover 9 • Review Camcorder's Operating Controls 10-11 Power Your Camcorder • Use the Adapter/Charger to Power Your Camcorder 12 • Use the Battery to Power Your Camcorder 13-15 • Use the Optional...
...800-336-1900 (page 83) Accessories 800-338-0376 (pages 70-75) Safety Information i First Time Operation • Assistance 3 • Unpack the Camcorder and Accessories 3 • Attach the Adapter/Charger 4 • Adjust the Handstrap to Fit Your Hand 4 • Slide LENS COVER Control to ...Switch to OFF to Turn Off the Camcorder ........ 9 • Close the Lens Cover 9 • Review Camcorder's Operating Controls 10-11 Power Your Camcorder • Use the Adapter/Charger to Power Your Camcorder 12 • Use the Battery to Power Your Camcorder 13-15 • Use the Optional...
User Guide
Page 4
...-69 Optional Accessories 70-75 • Accessory Order Form 73-75 Trouble Checks 76-79 Care and Maintenance • Clean the Camcorder 80 • Clean the Camcorder's Lens ......... 80 • Clean the Camcorder's Viewfinder 80 • Proper Care and Storage 81 • Things to Avoid 81 Specifications 82 Information to User 82 Customer...
...-69 Optional Accessories 70-75 • Accessory Order Form 73-75 Trouble Checks 76-79 Care and Maintenance • Clean the Camcorder 80 • Clean the Camcorder's Lens ......... 80 • Clean the Camcorder's Viewfinder 80 • Proper Care and Storage 81 • Things to Avoid 81 Specifications 82 Information to User 82 Customer...
User Guide
Page 5
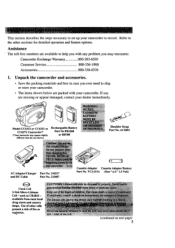
... No FB1260 or BB700 Shoulder Strap Part No. Adapter Battery Part No. 241017 Part No. Camcorder Exchange Warranty 800-283-6503 Customer Service 800-336-1900 Accessories 800-338-0376 1. Model CC6151 or CC6251 or CC6271 Camcorder* (*Your camcorder may encounter. VCAll5A (Size "AA" 1.5 Volt) Part No. 233087 Q Clock Cell 3-Volt Micro Lithium Cell...
... No FB1260 or BB700 Shoulder Strap Part No. Adapter Battery Part No. 241017 Part No. Camcorder Exchange Warranty 800-283-6503 Customer Service 800-336-1900 Accessories 800-338-0376 1. Model CC6151 or CC6251 or CC6271 Camcorder* (*Your camcorder may encounter. VCAll5A (Size "AA" 1.5 Volt) Part No. 233087 Q Clock Cell 3-Volt Micro Lithium Cell...
User Guide
Page 6
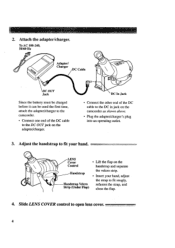
... your hand, adjust the strap to the DC in jack on the Control handstrap and separate the velcro strip. Slide LENS COVER control to the camcorder. Connect one end of the DC cable to the DC OUT jack on the adapter/charger. _DC In Jack • Connect the other end of..., refasten the strap, and close the flap. 4. Handstrap strap Velcro trip (Under Flap) Insert your hand. ___ _d LENS Cover Lift the flap on the camcorder as shown above. • Plug the adapter/charger's plug into an operating outlet. 3. o Attach the adapter/charger.
... your hand, adjust the strap to the DC in jack on the Control handstrap and separate the velcro strip. Slide LENS COVER control to the camcorder. Connect one end of the DC cable to the DC OUT jack on the adapter/charger. _DC In Jack • Connect the other end of..., refasten the strap, and close the flap. 4. Handstrap strap Velcro trip (Under Flap) Insert your hand. ___ _d LENS Cover Lift the flap on the camcorder as shown above. • Plug the adapter/charger's plug into an operating outlet. 3. o Attach the adapter/charger.
User Guide
Page 7
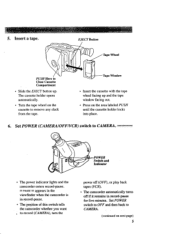
... in record-pause. • The position of this switch tells the camcorder whether you want , to remove any slack from the tape. 5. The cassette holder opens automatically. • Turn the tape wheel on the area labeled PUSH ... on next page) 5 Set POWER switch to OFF and then back to CAMERA. _ _ ___ • Switch and Indicator • The power indicator lights and the camcorder enters record-pause. =- The camcorder automatically turns off (OFF), or play back tapes (VCR). Insert a tape.
... in record-pause. • The position of this switch tells the camcorder whether you want , to remove any slack from the tape. 5. The cassette holder opens automatically. • Turn the tape wheel on the area labeled PUSH ... on next page) 5 Set POWER switch to OFF and then back to CAMERA. _ _ ___ • Switch and Indicator • The power indicator lights and the camcorder enters record-pause. =- The camcorder automatically turns off (OFF), or play back tapes (VCR). Insert a tape.
User Guide
Page 9
... in MAN, and press the MENU dial to display the MENU in to remove the menus from the viewfinder. • Details are using so the camcorder can correctly calculate the recording time remaining on pages 24-25. 7 Select a tape length.
... in MAN, and press the MENU dial to display the MENU in to remove the menus from the viewfinder. • Details are using so the camcorder can correctly calculate the recording time remaining on pages 24-25. 7 Select a tape length.

User Guide
Page 10
...- Press and release the thumb trigger again to start recording. _, appears in the viewf'mder, and the tally light lights while the camcorder is now in the viewfinder. (continued on page 32. In the AUTO mode, the focus, exposure, and white balance are automatically controlled by... the camcorder. 11. The camcorder is recording. 8 • Many of the special effects do not operate in the AUTO mode. Thumb Trigger Power Indicator POWER (VCR/ ...
...- Press and release the thumb trigger again to start recording. _, appears in the viewf'mder, and the tally light lights while the camcorder is now in the viewfinder. (continued on page 32. In the AUTO mode, the focus, exposure, and white balance are automatically controlled by... the camcorder. 11. The camcorder is recording. 8 • Many of the special effects do not operate in the AUTO mode. Thumb Trigger Power Indicator POWER (VCR/ ...
User Guide
Page 11
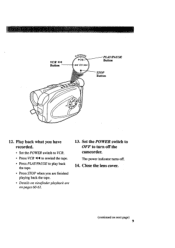
Close the lens cover. (continued on pages 60-61. 13. Set the POWER switch to OFF to play back the tape. • Press STOP when you have recorded. • Set the POWER switch to VCR. • Press VCR • • to rewind the tape. • Press PLAY/PAUSE to turn off . 14. VCR • • Button Button STOP Button 12. The power indicator turns off the camcorder. Play back what you are finished playing back the tape. • Details on viewfinder playback are on next page) 9
Close the lens cover. (continued on pages 60-61. 13. Set the POWER switch to OFF to play back the tape. • Press STOP when you have recorded. • Set the POWER switch to VCR. • Press VCR • • to rewind the tape. • Press PLAY/PAUSE to turn off . 14. VCR • • Button Button STOP Button 12. The power indicator turns off the camcorder. Play back what you are finished playing back the tape. • Details on viewfinder playback are on next page) 9
User Guide
Page 13
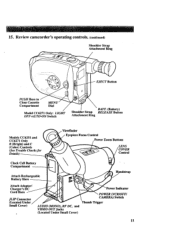
Review camcorder's operating controls. (continued) Shoulder Strap Attachment Ring EJECT Button PUSH Here to Close Cassette Compartment MENU Dial Model CC6271 Only: LIGHT OFF.A UTO.ON Switch ...
Review camcorder's operating controls. (continued) Shoulder Strap Attachment Ring EJECT Button PUSH Here to Close Cassette Compartment MENU Dial Model CC6271 Only: LIGHT OFF.A UTO.ON Switch ...
User Guide
Page 14
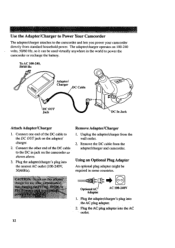
... AC plug adapter into the nearest AC outlet (100-240V, 50/60Hz). Remove Adapter/Charger 1. Unplug the adapter/charger from the adapter/charger and camcorder. Connect the other end of the DC cable to the DC in jack on the adapter/ charger. 2. Plug the adapter/charger's plug into the... countries. Plug the adapter/charger's plug into the AC plug adapter. • 2. Use the Adapter/Charger to Power Your Camcorder The adapter/charger attaches to power the camcorder or recharge the battery. The adapter/charger operates on 100-240 volts, 50/60 Hz, so it can be required in ...
... AC plug adapter into the nearest AC outlet (100-240V, 50/60Hz). Remove Adapter/Charger 1. Unplug the adapter/charger from the adapter/charger and camcorder. Connect the other end of the DC cable to the DC in jack on the adapter/ charger. 2. Plug the adapter/charger's plug into the... countries. Plug the adapter/charger's plug into the AC plug adapter. • 2. Use the Adapter/Charger to Power Your Camcorder The adapter/charger attaches to power the camcorder or recharge the battery. The adapter/charger operates on 100-240 volts, 50/60 Hz, so it can be required in ...
User Guide
Page 15
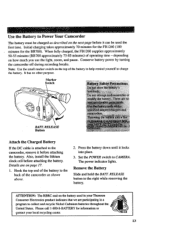
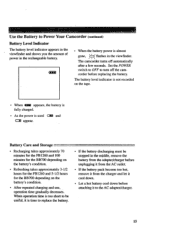
... of the battery to help remind yourself to collect and recycle Nickel Cadmium batteries throughout the, United States. depending on the top of the camcorder as described on the battery used the first time. Hook the top end of operating time - Remove the Battery Slide and hold the BATT... center. 13 RELEASE Button Attach the Charged Battery If the DC cable is attached to CAMERA. Set the POWER switch to the camcorder, remove it before attaching the battery. Use the Battery to Power Your Camcorder The battery must be used in a program to charge the battery.
... of the battery to help remind yourself to collect and recycle Nickel Cadmium batteries throughout the, United States. depending on the top of the camcorder as described on the battery used the first time. Hook the top end of operating time - Remove the Battery Slide and hold the BATT... center. 13 RELEASE Button Attach the Charged Battery If the DC cable is attached to CAMERA. Set the POWER switch to the camcorder, remove it before attaching the battery. Use the Battery to Power Your Camcorder The battery must be used in a program to charge the battery.
User Guide
Page 16
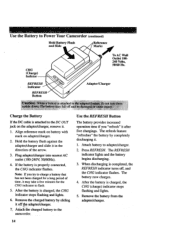
.... Remove the charged battery by completely discharging it in the direction of time, it after five chargings. After the battery is attached to Power Your Camcorder Hold Battery Flush and Slide (continued) Marks I CHG (Charge) Im REFRESH • Indicator Adapter/Charger To AC Wall Outlet 100- 240 Volts, 50/60 Hz...
.... Remove the charged battery by completely discharging it in the direction of time, it after five chargings. After the battery is attached to Power Your Camcorder Hold Battery Flush and Slide (continued) Marks I CHG (Charge) Im REFRESH • Indicator Adapter/Charger To AC Wall Outlet 100- 240 Volts, 50/60 Hz...
User Guide
Page 17
Refreshing takes approximately 3-1/2 hours for the FB 1260 and 5-1/2 hours for the BB700 depending on the battery's condition. The camcorder turns off the cam- When Operation time is too short to be useful, it is time to replace the battery. --_- • If the ..._ appears, the battery is fully charged. • As the power is almost gone, ,_,\:_" flashes in the rechargeable battery. Use the Battery to Power Your Camcorder (continued) Battery Level Indicator The battery level indicator appears in the viewf'mder and shows you the amount of power in the viewfinder. mmml •...
Refreshing takes approximately 3-1/2 hours for the FB 1260 and 5-1/2 hours for the BB700 depending on the battery's condition. The camcorder turns off the cam- When Operation time is too short to be useful, it is time to replace the battery. --_- • If the ..._ appears, the battery is fully charged. • As the power is almost gone, ,_,\:_" flashes in the rechargeable battery. Use the Battery to Power Your Camcorder (continued) Battery Level Indicator The battery level indicator appears in the viewf'mder and shows you the amount of power in the viewfinder. mmml •...
User Guide
Page 18
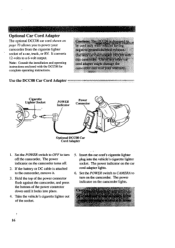
...cigarette lighter socket. Cigarette Lighter Socket POWER Indicator Power Connector Optional DCC08 Car Cord Adapter 1. Hold the top of the power connector flush against the camcorder, and press •the bottom of the power connector down until it . 3. Insert the car cord's cigarette lighter plug into place. 4.... Optional Car Cord Adapter The optional DCC08 car cord shown on page 70 allows you to power your camcorder from the cigarette lighter socket of the socket. 5. If the battery or DC cable is attached to a 6-volt output. Note: Consult ...
...cigarette lighter socket. Cigarette Lighter Socket POWER Indicator Power Connector Optional DCC08 Car Cord Adapter 1. Hold the top of the power connector flush against the camcorder, and press •the bottom of the power connector down until it . 3. Insert the car cord's cigarette lighter plug into place. 4.... Optional Car Cord Adapter The optional DCC08 car cord shown on page 70 allows you to power your camcorder from the cigarette lighter socket of the socket. 5. If the battery or DC cable is attached to a 6-volt output. Note: Consult ...

User Guide
Page 19
... or needs replacing. Insert the clock cell with the "+" terminal facing out, and press it in the viewfinder when you turn on the camcorder if the cell is turned off, and remove any power supply attached to Remove Cell Clock Cell (+ Side Facing Out) Clock Cell Compartmen!... . It clicks into place. Press release tab of clock cell compartment cover and open the compartment. 3. Insert Object Here to the camcorder. 2. Close the compartment cover. To Remove Lithium Cell To remove battery, insert a pointed nonmetallic object between battery and compartment and lift. :, _ -t ...
... or needs replacing. Insert the clock cell with the "+" terminal facing out, and press it in the viewfinder when you turn on the camcorder if the cell is turned off, and remove any power supply attached to Remove Cell Clock Cell (+ Side Facing Out) Clock Cell Compartmen!... . It clicks into place. Press release tab of clock cell compartment cover and open the compartment. 3. Insert Object Here to the camcorder. 2. Close the compartment cover. To Remove Lithium Cell To remove battery, insert a pointed nonmetallic object between battery and compartment and lift. :, _ -t ...
User Guide
Page 23
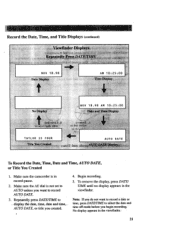
... Time, AUTO DATE, or Title You Created 1. Repeatedly press DATE/TIME to select the date and time off mode before you created. . Make sure the camcorder is not set to AUTO unless you want to record ad:_te or time, press DATE/TIME to ._ display th_ date, time, date and time,_.
... Time, AUTO DATE, or Title You Created 1. Repeatedly press DATE/TIME to select the date and time off mode before you created. . Make sure the camcorder is not set to AUTO unless you want to record ad:_te or time, press DATE/TIME to ._ display th_ date, time, date and time,_.

User Guide
Page 24
... whenever you select good quality tapes for your videocassettes over and over tape. The automatic head-cleaning system minimizes the need for popular VHS-C cassettes. To erase a previous recording, just record over the type of poor quality tapes or tapes that have been damaged or ...speed by a Service Center. SLP - Make sure you insert or remove a cassette. Safety Tab A. Recording and Playback Speeds and Times The camcorder records and plays back in a snowy picture or no control over it. The selected speed is not covered under warranty. Cassette TC-20 TC-...
... whenever you select good quality tapes for your videocassettes over and over tape. The automatic head-cleaning system minimizes the need for popular VHS-C cassettes. To erase a previous recording, just record over the type of poor quality tapes or tapes that have been damaged or ...speed by a Service Center. SLP - Make sure you insert or remove a cassette. Safety Tab A. Recording and Playback Speeds and Times The camcorder records and plays back in a snowy picture or no control over it. The selected speed is not covered under warranty. Cassette TC-20 TC-...
User Guide
Page 25
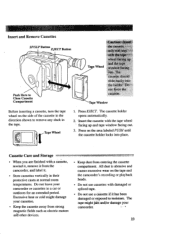
... it . • Store cassettes vertically in their protective cases at normal room temperatures. "Tape Window 1. Press on the tape and the camcorder's recording or playback heads. Keep dust from strong magnetic fields such as electric motors anU other devices. Do not leave your cassettes. •...; Keep the cassette away from entering the cassette compartment. Excessive heat or cold might j_'and/or damage your camcorder. 3-_" 23 Press EJECT. Do not use cassettes with damaged or spliced tape. Cassette Care and Storage • When you are finished ...
... it . • Store cassettes vertically in their protective cases at normal room temperatures. "Tape Window 1. Press on the tape and the camcorder's recording or playback heads. Keep dust from strong magnetic fields such as electric motors anU other devices. Do not leave your cassettes. •...; Keep the cassette away from entering the cassette compartment. Excessive heat or cold might j_'and/or damage your camcorder. 3-_" 23 Press EJECT. Do not use cassettes with damaged or spliced tape. Cassette Care and Storage • When you are finished ...
User Guide
Page 26
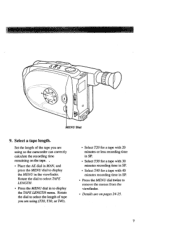
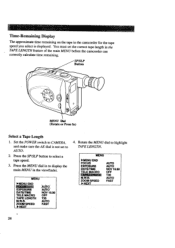
... to highlight TAPE LENGTH. Press the MENU dial in to display the main MENU in the TAPE LENGTH feature of the main MENU before the camcorder can correctly calculate time remaining. / SPISLP Button .,S / MENU Dial (Rotate or Press In) Select a Tape Length 1. You must set to CAMERA, and ... T30 AUTO FAST 4. MENU )*MENU END FOCUS EXPOSURE DATEfTIME TELE MACRO M.W.B. Time-Remaining Display The approximate time remaining on the tape in the camcorder for the tape speed you select is not set the correct tape length in the viewfinder. ZOOM SPEED _NEXT AUTO • AUTO NOV 18....
... to highlight TAPE LENGTH. Press the MENU dial in to display the main MENU in the TAPE LENGTH feature of the main MENU before the camcorder can correctly calculate time remaining. / SPISLP Button .,S / MENU Dial (Rotate or Press In) Select a Tape Length 1. You must set to CAMERA, and ... T30 AUTO FAST 4. MENU )*MENU END FOCUS EXPOSURE DATEfTIME TELE MACRO M.W.B. Time-Remaining Display The approximate time remaining on the tape in the camcorder for the tape speed you select is not set the correct tape length in the viewfinder. ZOOM SPEED _NEXT AUTO • AUTO NOV 18....


