User Guide
Page 6
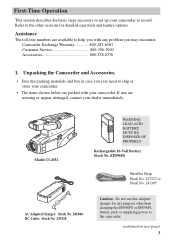
... the packing materials and box in case you ever need to the camcorder. (continued on next page) 3 Model CC4352 WARNING: LEAD-ACID BATTERY. EP096FS Shoulder Strap Stock No. 227327 or Stock No. 241305 POWER CHARGE AC Adapter/Charger: Stock No. 241044 DC Cable: Stock No. 233328 Caution: Do not use this adapter/ charger for...
... the packing materials and box in case you ever need to the camcorder. (continued on next page) 3 Model CC4352 WARNING: LEAD-ACID BATTERY. EP096FS Shoulder Strap Stock No. 227327 or Stock No. 241305 POWER CHARGE AC Adapter/Charger: Stock No. 241044 DC Cable: Stock No. 233328 Caution: Do not use this adapter/ charger for...
User Guide
Page 7
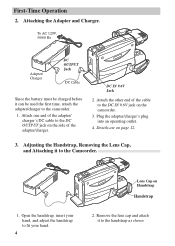
...charger's plug into an operating outlet. 4. Open the handstrap, insert your hand. 4 Lens Cap on the camcorder. 3. To AC 120V, 50/60 Hz POWER CHARGE Adapter/ Charger DC OUTPUT Jack DC Cable Since the battery must be used the first time, attach the adapter/charger to fit your hand, and ...adjust the handstrap to the camcorder. 1. Attach one end of the adapter/charger. Adjusting the Handstrap, Removing ...
...charger's plug into an operating outlet. 4. Open the handstrap, insert your hand. 4 Lens Cap on the camcorder. 3. To AC 120V, 50/60 Hz POWER CHARGE Adapter/ Charger DC OUTPUT Jack DC Cable Since the battery must be used the first time, attach the adapter/charger to fit your hand, and ...adjust the handstrap to the camcorder. 1. Attach one end of the adapter/charger. Adjusting the Handstrap, Removing ...
User Guide
Page 15
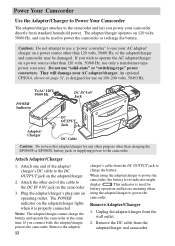
...60 Hz, or the adapter/charger and camcorder may be used for use only a transformer-type power converter. An optional CPS014, shown on the camcorder. 3. Plug the adapter/charger's plug into an operating outlet. Remove the DC cable from the wall outlet. 2. Attach Adapter/...Charger Adap1t.erA/Ctthacahrgoenre end of the adapter/ charger's DC cable to the DC AttachinOgUTPUT jack on a power source other end of the cable to power the camcorder, the battery level indicator might display ...
...60 Hz, or the adapter/charger and camcorder may be used for use only a transformer-type power converter. An optional CPS014, shown on the camcorder. 3. Plug the adapter/charger's plug into an operating outlet. Remove the DC cable from the wall outlet. 2. Attach Adapter/...Charger Adap1t.erA/Ctthacahrgoenre end of the adapter/ charger's DC cable to the DC AttachinOgUTPUT jack on a power source other end of the cable to power the camcorder, the battery level indicator might display ...
User Guide
Page 16
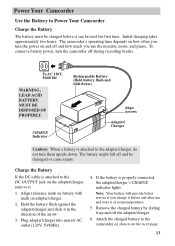
... them upside down .) Align Arrows Adapter/ Charger Caution: When a battery is attached to Power Your Camcorder Charge the Battery Using the Battery The battery must be damaged or cause injury. Charge the Battery If the DC cable is properly connected, the adapter/charger's CHARGE indicator lights. Plug adapter/charger into nearest AC outlet...
... them upside down .) Align Arrows Adapter/ Charger Caution: When a battery is attached to Power Your Camcorder Charge the Battery Using the Battery The battery must be damaged or cause injury. Charge the Battery If the DC cable is properly connected, the adapter/charger's CHARGE indicator lights. Plug adapter/charger into nearest AC outlet...
User Guide
Page 17
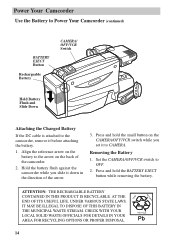
... the arrow. Power Your Camcorder Use the Battery to Power Your Camcorder (continued) BATTERY EJECT Button Rechargeable Battery CAMERA/ OFF/VCR Switch Hold Battery Flush and Slide Down Attaching Attaching the Charged Battery Removing If the DC cable is attached to the camcorder, remove it down in... the direction of the camcorder. 2. Align the reference arrow on the CAMERA/OFF/VCR switch while you slide it before ...
... the arrow. Power Your Camcorder Use the Battery to Power Your Camcorder (continued) BATTERY EJECT Button Rechargeable Battery CAMERA/ OFF/VCR Switch Hold Battery Flush and Slide Down Attaching Attaching the Charged Battery Removing If the DC cable is attached to the camcorder, remove it down in... the direction of the camcorder. 2. Align the reference arrow on the CAMERA/OFF/VCR switch while you slide it before ...
User Guide
Page 20
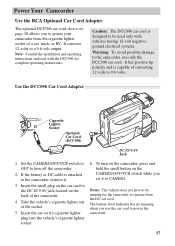
...DC cable is capable of a car, truck, or RV. Insert the small plug on the car cord to the DC IN 9.6V jack located on the back of the socket. 5. Insert the car cord's cigarette lighter plug into the vehicle's cigarette lighter socket. 6. It converts 12-volts to power the camcorder...complete operating instructions. Use the DCC096 Car Cord Adapter Cigarette Lighter Socket Optional Car Cord (DCC096) DC IN 9.6V Jack 1. To turn off the camcorder. 2. Power Your Camcorder Use the RCA Optional Car Cord AdapterCar Cord Adapter The optional DCC096 car cord shown on page 50 allows you ...
...DC cable is capable of a car, truck, or RV. Insert the small plug on the car cord to the DC IN 9.6V jack located on the back of the socket. 5. Insert the car cord's cigarette lighter plug into the vehicle's cigarette lighter socket. 6. It converts 12-volts to power the camcorder...complete operating instructions. Use the DCC096 Car Cord Adapter Cigarette Lighter Socket Optional Car Cord (DCC096) DC IN 9.6V Jack 1. To turn off the camcorder. 2. Power Your Camcorder Use the RCA Optional Car Cord AdapterCar Cord Adapter The optional DCC096 car cord shown on page 50 allows you ...
User Guide
Page 51
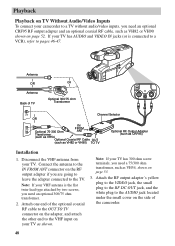
...), refer to pages 46-47. Playback on a TV/VCR Without A/V Jacks Antenna OR Antenna Back of the camcorder. 48 Note: If your TV has 300 ohm screw terminals, you need a 75/300 ohm transformer, such as... Attach the RF output adapter's yellow plug to the VIDEO jack, the small plug to the RF DC OUT jack, and the white plug to the AUDIO jack located under the small cover on the side... on TV Without Audio/Video Inputs To connect your camcorder to a TV without audio/video inputs, you need an optional CRF95 RF output adapter and an optional coaxial RF cable, such as VH54, shown on page 53. 3....
...), refer to pages 46-47. Playback on a TV/VCR Without A/V Jacks Antenna OR Antenna Back of the camcorder. 48 Note: If your TV has 300 ohm screw terminals, you need a 75/300 ohm transformer, such as... Attach the RF output adapter's yellow plug to the VIDEO jack, the small plug to the RF DC OUT jack, and the white plug to the AUDIO jack located under the small cover on the side... on TV Without Audio/Video Inputs To connect your camcorder to a TV without audio/video inputs, you need an optional CRF95 RF output adapter and an optional coaxial RF cable, such as VH54, shown on page 53. 3....
User Guide
Page 58
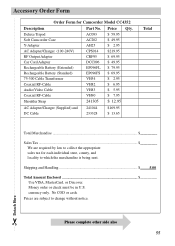
...required by law to collect the appropriate sales tax for Camcorder Model CC4352 Description Part No. Shipping and Handling 5.00 Total Amount ..., county, and locality to which the merchandise is being sent. Price Qty. Deluxe Tripod Soft Camcorder Case Y-Adapter AC Adapter/Charger (100-240V) RF Output Adapter Car Cord Adapter Rechargeable Battery (Extended... $ 69.95 75-300 Cable Transformer VH54 $ 2.95 Coaxial RF-Cable Audio/Video Cable Coaxial RF-Cable Shoulder Strap VH82 VH83 VH90 241305 $ 6.95 $ 5.95 $ 7.95 $ 12.95 AC Adapter/Charger (Supplied) and DC Cable 241044 233328 $169.95 $...
...required by law to collect the appropriate sales tax for Camcorder Model CC4352 Description Part No. Shipping and Handling 5.00 Total Amount ..., county, and locality to which the merchandise is being sent. Price Qty. Deluxe Tripod Soft Camcorder Case Y-Adapter AC Adapter/Charger (100-240V) RF Output Adapter Car Cord Adapter Rechargeable Battery (Extended... $ 69.95 75-300 Cable Transformer VH54 $ 2.95 Coaxial RF-Cable Audio/Video Cable Coaxial RF-Cable Shoulder Strap VH82 VH83 VH90 241305 $ 6.95 $ 5.95 $ 7.95 $ 12.95 AC Adapter/Charger (Supplied) and DC Cable 241044 233328 $169.95 $...
User Guide
Page 71
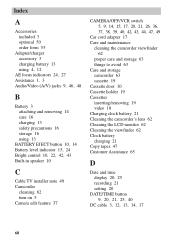
... 16 using 13 BATTERY EJECT button 10, 14 Battery level indicator 15, 24 Bright control 10, 22, 42, 43 Built-in speaker 10 C Cable TV installer note 49 Camcorder cleaning 62 turn on 5 Camera edit feature 37 CAMERA/OFF/VCR switch 5, 9, 14, 15, 17, 20, 21, 26, 36, 37, 38, 39, 40... Charging clock battery 21 Cleaning the camcorder's lens 62 Cleaning the LCD monitor 62 Cleaning the viewfinder 62 Clock battery charging 21 Copy tapes 47 Customer Assistance 65 D Date and time display 20, 25 recording 21 setting 20 DATE/TIME button 9, 20, 21, 25, 40 DC cable 3, 12, 13, 14, 17 Index 68
... 16 using 13 BATTERY EJECT button 10, 14 Battery level indicator 15, 24 Bright control 10, 22, 42, 43 Built-in speaker 10 C Cable TV installer note 49 Camcorder cleaning 62 turn on 5 Camera edit feature 37 CAMERA/OFF/VCR switch 5, 9, 14, 15, 17, 20, 21, 26, 36, 37, 38, 39, 40... Charging clock battery 21 Cleaning the camcorder's lens 62 Cleaning the LCD monitor 62 Cleaning the viewfinder 62 Clock battery charging 21 Copy tapes 47 Customer Assistance 65 D Date and time display 20, 25 recording 21 setting 20 DATE/TIME button 9, 20, 21, 25, 40 DC cable 3, 12, 13, 14, 17 Index 68


