
User Guide
Page 3
... Contents IMPORTANT INFORMATION 2 EQUIPMENT APPROVAL INFORMATION 2 INTERFERENCE INFORMATION 2 INTRODUCTION 5 CONNECTIONS AND SETUP 6 BASE LAYOUT 6 PARTS CHECKLIST 7 TELEPHONE JACK REQUIREMENTS 7 INSTALLATION 7 IMPORTANT INSTALLATION INFORMATION 7 INSTALLING THE PHONE 8 DATA PORT 10 PROGRAMMING THE TELEPHONE 11 DISPLAY LANGUAGE 11 MANUALLY SETTING THE DATE AND TIME 11 FLASH TIME 12 HOUR FORMAT 12 CALL ALERT...
... Contents IMPORTANT INFORMATION 2 EQUIPMENT APPROVAL INFORMATION 2 INTERFERENCE INFORMATION 2 INTRODUCTION 5 CONNECTIONS AND SETUP 6 BASE LAYOUT 6 PARTS CHECKLIST 7 TELEPHONE JACK REQUIREMENTS 7 INSTALLATION 7 IMPORTANT INSTALLATION INFORMATION 7 INSTALLING THE PHONE 8 DATA PORT 10 PROGRAMMING THE TELEPHONE 11 DISPLAY LANGUAGE 11 MANUALLY SETTING THE DATE AND TIME 11 FLASH TIME 12 HOUR FORMAT 12 CALL ALERT...

User Guide
Page 4
... CALLER ID 22 CALLER ID (CID 22 SUMMARY SCREEN 22 RECEIVING AND STORING CID RECORDS 22 REVIEWING CID RECORDS 23 SAVING CID RECORDS TO MEMORY/PHONE DIRECTORY MEMORY 23 DELETING A CID RECORD 23 DELETING ALL CID RECORDS 23 DIALING BACK 23 IF YOU PROGRAMMED YOUR LOCAL AREA CODE IN THE SETUP...
... CALLER ID 22 CALLER ID (CID 22 SUMMARY SCREEN 22 RECEIVING AND STORING CID RECORDS 22 REVIEWING CID RECORDS 23 SAVING CID RECORDS TO MEMORY/PHONE DIRECTORY MEMORY 23 DELETING A CID RECORD 23 DELETING ALL CID RECORDS 23 DIALING BACK 23 IF YOU PROGRAMMED YOUR LOCAL AREA CODE IN THE SETUP...
User Guide
Page 5
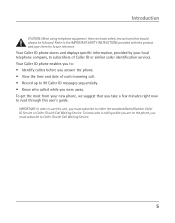
...to use this product and save them for future reference. To know who called while you were away. Your Caller ID phone stores and displays specific information, provided by your new phone, we suggest that should always be followed. To get the most from your local telephone company, to subscribers of each... provided with this unit, you must subscribe to Caller ID with Call Waiting Service. Introduction CAUTION: When using telephone equipment, there are on the phone, you must subscribe to either the standard Name/Number Caller ID Service or Caller ID with Call Waiting Service. 5
...to use this product and save them for future reference. To know who called while you were away. Your Caller ID phone stores and displays specific information, provided by your new phone, we suggest that should always be followed. To get the most from your local telephone company, to subscribers of each... provided with this unit, you must subscribe to Caller ID with Call Waiting Service. Introduction CAUTION: When using telephone equipment, there are on the phone, you must subscribe to either the standard Name/Number Caller ID Service or Caller ID with Call Waiting Service. 5

User Guide
Page 7
.../office. MEM. INT. MEM. INT. INT. MEM. MEM. INT. Base Handset Handset cord Line cords AC power converter Wall plate Telephone Jack Requirements Modular telephone line jack To use this phone, you will need one RJ14C or two RJ11C type modular phone jacks, which might look like the one pictured here, installed in wet...
.../office. MEM. INT. MEM. INT. INT. MEM. MEM. INT. Base Handset Handset cord Line cords AC power converter Wall plate Telephone Jack Requirements Modular telephone line jack To use this phone, you will need one RJ14C or two RJ11C type modular phone jacks, which might look like the one pictured here, installed in wet...

User Guide
Page 8
... is important that you do not want to write down any stored information you replace them as soon as possible to the back of the phone. • Insert the batteries as a table top or desk. 2. Choose an area near an electrical outlet and telephone wall jack. IMPORTANT: If you ...surface, such as shown on the diagram inside the battery compartment. • Snap the battery compartment door back into place and tighten the screw. Your phone should be placed on the bottom of the base. Install 3 AA-size alkaline batteries (not included) for more than 30 days, remove the batteries ...
... is important that you do not want to write down any stored information you replace them as soon as possible to the back of the phone. • Insert the batteries as a table top or desk. 2. Choose an area near an electrical outlet and telephone wall jack. IMPORTANT: If you ...surface, such as shown on the diagram inside the battery compartment. • Snap the battery compartment door back into place and tighten the screw. Your phone should be placed on the bottom of the base. Install 3 AA-size alkaline batteries (not included) for more than 30 days, remove the batteries ...

User Guide
Page 9
...plug one telephone line, this phone will still operate, but only as a single line telephone. 5. Plug the other end into separate wall jacks. Check for a dial tone. If you have two telephone lines with unique telephone numbers. Connect the handset cord: Plug one telephone line cord into the jack marked LINE... 1+2 and another cord into the jack marked LINE 1+2 on the back of each line cord into the 2-line wall jack. Lift the handset and listen for a dial tone. If you hear a dial tone, the phone is properly installed. 9 Plug the ...
...plug one telephone line, this phone will still operate, but only as a single line telephone. 5. Plug the other end into separate wall jacks. Check for a dial tone. If you have two telephone lines with unique telephone numbers. Connect the handset cord: Plug one telephone line cord into the jack marked LINE... 1+2 and another cord into the jack marked LINE 1+2 on the back of each line cord into the 2-line wall jack. Lift the handset and listen for a dial tone. If you hear a dial tone, the phone is properly installed. 9 Plug the ...

User Guide
Page 10
... to reach your fax machine, for example, and then set the DATA PORT switch to 2 in order to receive faxes on the back of the phone controls the DATA PORT jack so you are talking to hook up your fax machine if they dial the normal fax line. 10 Connections and... Setup Data Port This phone has a DATA PORT jack to the normal line when you can now receive calls on line 2 and want them to fax something to you, change...
... to reach your fax machine, for example, and then set the DATA PORT switch to 2 in order to receive faxes on the back of the phone controls the DATA PORT jack so you are talking to hook up your fax machine if they dial the normal fax line. 10 Connections and... Setup Data Port This phone has a DATA PORT jack to the normal line when you can now receive calls on line 2 and want them to fax something to you, change...
User Guide
Page 12
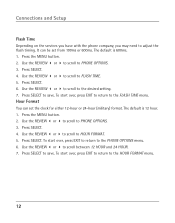
... start over , press EXIT to return to the HOUR FORMAT menu. 12 Connections and Setup Flash Time Depending on the services you have with the phone company, you may need to HOUR FORMAT. 5. The default is 600ms. 1. Use the REVIEW or to scroll to adjust the flash timing. Press SELECT to... the PHONE OPTIONS menu. 6. Hour Format You can be set the clock for either 12-hour or 24-hour (military) format. It can set from 100ms or...
... start over , press EXIT to return to the HOUR FORMAT menu. 12 Connections and Setup Flash Time Depending on the services you have with the phone company, you may need to HOUR FORMAT. 5. The default is 600ms. 1. Use the REVIEW or to scroll to adjust the flash timing. Press SELECT to... the PHONE OPTIONS menu. 6. Hour Format You can be set the clock for either 12-hour or 24-hour (military) format. It can set from 100ms or...

User Guide
Page 13
If you receive a call on the phone and you prefer to have incoming calls not interrupt or disturb your area code. Press SELECT button. 6. Press SELECT. When finished, press SELECT to the .... The default is displayed. 4. Use the REVIEW or button to scroll to CALL ALERT. 5. Local Area Code 1. Use the REVIEW or button to scroll to PHONE OPTIONS. 3. Use the REVIEW or button to scroll to clear all three digits and re-enter the area code. 5. Connections and Setup Call Alert Tone...
If you receive a call on the phone and you prefer to have incoming calls not interrupt or disturb your area code. Press SELECT button. 6. Press SELECT. When finished, press SELECT to the .... The default is displayed. 4. Use the REVIEW or button to scroll to CALL ALERT. 5. Local Area Code 1. Use the REVIEW or button to scroll to PHONE OPTIONS. 3. Use the REVIEW or button to scroll to clear all three digits and re-enter the area code. 5. Connections and Setup Call Alert Tone...

User Guide
Page 14
... area codes. Use the touch-tone pad to display when a valid CID signal is not displayed correctly, the phone may not be able to CODE # x. 14 These are needed in order for the phone to determine the number format to enter the code. Press DELETE to use this feature if you may...
... area codes. Use the touch-tone pad to display when a valid CID signal is not displayed correctly, the phone may not be able to CODE # x. 14 These are needed in order for the phone to determine the number format to enter the code. Press DELETE to use this feature if you may...

User Guide
Page 15
... and Setup Voice Mail Access Codes You can program a voice mail access code for each telephone line for quick access to your voice mail access phone number. • Use the REVIEW or button to move the cursor in the display. • Use the DELETE button to erase a mistake and re-enter...
... and Setup Voice Mail Access Codes You can program a voice mail access code for each telephone line for quick access to your voice mail access phone number. • Use the REVIEW or button to move the cursor in the display. • Use the DELETE button to erase a mistake and re-enter...

User Guide
Page 16
...to rest comfortably on the side of your head and over your mouth. 4. Dial a phone number. 7. Dial a phone number. 4. Connect a headset to the HEADSET jack on top of the base. 2. Dial a phone number. 4. Adjust the headset to 3 inches from your ear. 3. Press HEADSET when ...finished. Pick up the handset when finished. Press the HEADSET button, and the phone automatically selects an open line. 2. Hang up the handset and the phone automatically selects an open line. 2. Wait for a dial tone. 3. Press SPEAKER when finished. NOTE:...
...to rest comfortably on the side of your head and over your mouth. 4. Dial a phone number. 7. Dial a phone number. 4. Connect a headset to the HEADSET jack on top of the base. 2. Dial a phone number. 4. Adjust the headset to 3 inches from your ear. 3. Press HEADSET when ...finished. Pick up the handset when finished. Press the HEADSET button, and the phone automatically selects an open line. 2. Hang up the handset and the phone automatically selects an open line. 2. Wait for a dial tone. 3. Press SPEAKER when finished. NOTE:...

User Guide
Page 17
.... NOTE: Whether you are making or receiving a call on and automatically selects a line. 2. Receiving Calls with the Speakerphone When the phone rings, the corresponding line's indicator flashes rapidly. 1. When you are finished, press HEADSET. The speakerphone indicator turns on . The headset indicator...finished, press SPEAKER. NOTE: To converse using the headset. 2. Receiving Calls with the Optional Headset When the phone rings, the corresponding line's indicator flashes rapidly. 1. Place the handset in the cradle. Telephone Operation Receiving Calls with the Handset When...
.... NOTE: Whether you are making or receiving a call on and automatically selects a line. 2. Receiving Calls with the Speakerphone When the phone rings, the corresponding line's indicator flashes rapidly. 1. When you are finished, press HEADSET. The speakerphone indicator turns on . The headset indicator...finished, press SPEAKER. NOTE: To converse using the headset. 2. Receiving Calls with the Optional Headset When the phone rings, the corresponding line's indicator flashes rapidly. 1. Place the handset in the cradle. Telephone Operation Receiving Calls with the Handset When...

User Guide
Page 18
...call is on the telephone line cannot hear you to handset or headset cancels mute. 18 The mute indicator turns on the speakerphone. 2. The phone automatically selects a line and turns on . 2. Mute To have a private, off-line conversation, use . 1. Telephone Operation Pre-Dialing ...Telephone Numbers Pre-dialing lets you . Then 1. Press the DIAL button. Call Timer During a phone conversation, a built-in call timer displays the length of the 16 memory location buttons, or • Press DIRECTORY, followed by the REVIEW or...
...call is on the telephone line cannot hear you to handset or headset cancels mute. 18 The mute indicator turns on the speakerphone. 2. The phone automatically selects a line and turns on . 2. Mute To have a private, off-line conversation, use . 1. Telephone Operation Pre-Dialing ...Telephone Numbers Pre-dialing lets you . Then 1. Press the DIAL button. Call Timer During a phone conversation, a built-in call timer displays the length of the 16 memory location buttons, or • Press DIRECTORY, followed by the REVIEW or...

User Guide
Page 19
.... Flash Use the FLASH button to the default settings, press both the VOLUME or buttons simultaneously. 19 Pick up or press another line button. The phone automatically goes into speakerphone mode. The line is available through your local telephone company. Press REDIAL. Your telephone is preset but may be set to...
.... Flash Use the FLASH button to the default settings, press both the VOLUME or buttons simultaneously. 19 Pick up or press another line button. The phone automatically goes into speakerphone mode. The line is available through your local telephone company. Press REDIAL. Your telephone is preset but may be set to...

User Guide
Page 20
...corresponding line button. Telephone Operation Ringer Volume While the handset is on the cradle tap the VOLUME or button to a comfortable level The phone stores the setting when you release the button. To connect with both lines, hang up the handset or press SPEAKER if you are... loudness. The other party is automatically disconnected. While the handset is on hold . 2. You can program the do not disturb duration. 1. The phone generates a sample ring at the selected setting. To resume the conference call connects, press CONFER. When the second call with two calls: 1. To...
...corresponding line button. Telephone Operation Ringer Volume While the handset is on the cradle tap the VOLUME or button to a comfortable level The phone stores the setting when you release the button. To connect with both lines, hang up the handset or press SPEAKER if you are... loudness. The other party is automatically disconnected. While the handset is on hold . 2. You can program the do not disturb duration. 1. The phone generates a sample ring at the selected setting. To resume the conference call connects, press CONFER. When the second call with two calls: 1. To...

User Guide
Page 21
... Provided your selection. 4. The user can access the voice mail stored at the phone company. 21 Press the SELECT button to save your phone company offers voice messaging service and you can access the voice mail stored at the phone company. Pick up the handset, press HEADSET, or press SPEAKER. 4. Press VOICE MAIL...
... Provided your selection. 4. The user can access the voice mail stored at the phone company. 21 Press the SELECT button to save your phone company offers voice messaging service and you can access the voice mail stored at the phone company. Pick up the handset, press HEADSET, or press SPEAKER. 4. Press VOICE MAIL...
User Guide
Page 22
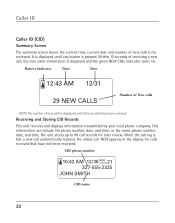
... reviewed. Receiving and Storing CID Records This unit receives and displays information transmitted by your local phone company. or the name, phone number, date, and time. Within 10 seconds of new calls to 99 call . CID phone number 10:42 AM 12/30 NEW CALL# 21 327-555-2325 JOHN SMITH CID name... and number of receiving a new call, the new caller information is displayed and the green NEW CALL indicator turns on. This information can include the phone number, date, and time;
... reviewed. Receiving and Storing CID Records This unit receives and displays information transmitted by your local phone company. or the name, phone number, date, and time. Within 10 seconds of new calls to 99 call . CID phone number 10:42 AM 12/30 NEW CALL# 21 327-555-2325 JOHN SMITH CID name... and number of receiving a new call, the new caller information is displayed and the green NEW CALL indicator turns on. This information can include the phone number, date, and time;

User Guide
Page 23
...1. Deleting All CID Records This feature allows you do not need to edit the name or number, press the STORE button followed by the phone company, the unit displays TO ADJUST. 23 Dialing Back When reviewing CID records, you scroll to scroll the call received was received from your ... Deleting a CID Record To delete the record showing in Memory section to edit and store the record. 2. Press the DELETE button again to Memory/Phone Directory Memory 1. Saving CID Records to confirm. Then follow the steps in the Storing a Name and Number in the display, press the DELETE button...
...1. Deleting All CID Records This feature allows you do not need to edit the name or number, press the STORE button followed by the phone company, the unit displays TO ADJUST. 23 Dialing Back When reviewing CID records, you scroll to scroll the call received was received from your ... Deleting a CID Record To delete the record showing in Memory section to edit and store the record. 2. Press the DELETE button again to Memory/Phone Directory Memory 1. Saving CID Records to confirm. Then follow the steps in the Storing a Name and Number in the display, press the DELETE button...

User Guide
Page 24
... while you must subscribe to either the standard Name/Number Caller ID Service or Caller ID with Call Waiting Service. 24 To adjust the phone number format, use this unit, you are on the phone and hear the call waiting tone in the display) who is calling when you are on the... phone, you see 10-digit numbers (i.e. 234-555-1234). 2. Use the REVIEW or button to dial back. You will only see (in the receiver. TO ADJUST ...
... while you must subscribe to either the standard Name/Number Caller ID Service or Caller ID with Call Waiting Service. 24 To adjust the phone number format, use this unit, you are on the phone and hear the call waiting tone in the display) who is calling when you are on the... phone, you see 10-digit numbers (i.e. 234-555-1234). 2. Use the REVIEW or button to dial back. You will only see (in the receiver. TO ADJUST ...


