
User Guide
Page 4
Table of Contents CALLER ID 22 CALLER ID (CID 22 SUMMARY SCREEN 22 RECEIVING AND STORING CID RECORDS 22 REVIEWING CID RECORDS 23 SAVING CID RECORDS TO MEMORY/PHONE DIRECTORY MEMORY 23 DELETING A CID RECORD 23 DELETING ALL CID RECORDS 23 DIALING BACK 23 IF YOU PROGRAMMED YOUR ... THE SETUP MENU 24 CALL WAITING CALLER ID 24 MEMORY 25 DIRECT ACCESS MEMORY & DIRECTORY MEMORY 25 STORING A NAME AND NUMBER IN MEMORY ... 25 REVIEWING STORED NAMES & NUMBERS ......... 25 CHANGING A STORED NAME OR NUMBER ......... 26 STORING THE LAST NUMBER DIALED 26 STORING A PAUSE 26 DIALING A STORED ...
Table of Contents CALLER ID 22 CALLER ID (CID 22 SUMMARY SCREEN 22 RECEIVING AND STORING CID RECORDS 22 REVIEWING CID RECORDS 23 SAVING CID RECORDS TO MEMORY/PHONE DIRECTORY MEMORY 23 DELETING A CID RECORD 23 DELETING ALL CID RECORDS 23 DIALING BACK 23 IF YOU PROGRAMMED YOUR ... THE SETUP MENU 24 CALL WAITING CALLER ID 24 MEMORY 25 DIRECT ACCESS MEMORY & DIRECTORY MEMORY 25 STORING A NAME AND NUMBER IN MEMORY ... 25 REVIEWING STORED NAMES & NUMBERS ......... 25 CHANGING A STORED NAME OR NUMBER ......... 26 STORING THE LAST NUMBER DIALED 26 STORING A PAUSE 26 DIALING A STORED ...

User Guide
Page 6
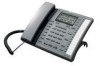
... buttons VOICE MAIL 1 button VOICE MAIL 2 button DND button PAUSE/REDIAL button DELETE VOICE MAIL 1 VOICE MAIL 2 DND PAUSE REDIAL EXIT 1 NEW CALL SELECT/SAVE REVIEW 2 ABC 3 DEF 4 GHI 5 JKL 6 MNO 7 PQRS 8 TUV 9 WXYZ VOLUME FLASH * TONE 0 OPER HANDSET SPEAKER # MUTE DIRECTORY 1 2 MENU 3 STORE 4 5 DIAL 6 7 8 CONFER 9 10 11 LINE 2 12 13...
... buttons VOICE MAIL 1 button VOICE MAIL 2 button DND button PAUSE/REDIAL button DELETE VOICE MAIL 1 VOICE MAIL 2 DND PAUSE REDIAL EXIT 1 NEW CALL SELECT/SAVE REVIEW 2 ABC 3 DEF 4 GHI 5 JKL 6 MNO 7 PQRS 8 TUV 9 WXYZ VOLUME FLASH * TONE 0 OPER HANDSET SPEAKER # MUTE DIRECTORY 1 2 MENU 3 STORE 4 5 DIAL 6 7 8 CONFER 9 10 11 LINE 2 12 13...

User Guide
Page 7
... telephone jacks in your package includes the following items: Connections and Setup DELETE VOICE MAIL 1 VOICE MAIL 2 DND PAUSE REDIAL EXIT 1 NEW CALL SELECT/SAVE REVIEW 2 ABC 3 DEF 4 GHI 5 JKL 6 MNO 7 PQRS 8 TUV 9 WXYZ VOLUME FLASH * TONE 0 OPER HANDSET SPEAKER # MUTE DIRECTORY 1 2 MENU 3 STORE 4 5 ... INT. MEM. MEM. Base Handset Handset cord Line cords AC power converter Wall plate Telephone Jack Requirements Modular telephone line jack To use this phone, you will need one RJ14C or two RJ11C type modular phone jacks, which might look like the one ...
... telephone jacks in your package includes the following items: Connections and Setup DELETE VOICE MAIL 1 VOICE MAIL 2 DND PAUSE REDIAL EXIT 1 NEW CALL SELECT/SAVE REVIEW 2 ABC 3 DEF 4 GHI 5 JKL 6 MNO 7 PQRS 8 TUV 9 WXYZ VOLUME FLASH * TONE 0 OPER HANDSET SPEAKER # MUTE DIRECTORY 1 2 MENU 3 STORE 4 5 ... INT. MEM. MEM. Base Handset Handset cord Line cords AC power converter Wall plate Telephone Jack Requirements Modular telephone line jack To use this phone, you will need one RJ14C or two RJ11C type modular phone jacks, which might look like the one ...
User Guide
Page 11
...You may set the time and date, it is displayed 2. Press SELECT. 3. When finished, press SELECT to save . Use the REVIEW or button to scroll to select the minute. 7. Use the REVIEW or button to the desired hour. 5. To start over , press EXIT to return to save . The cursor moves to the... month. 9. Manually Setting the Date and Time NOTE: If you receive your first Caller ID call is English. 1. Press the MENU button. 2. Use the REVIEW or button to save. The default is received. 1. Press the MENU button. The unit resets the hour and minute each time a call .
...You may set the time and date, it is displayed 2. Press SELECT. 3. When finished, press SELECT to save . Use the REVIEW or button to scroll to select the minute. 7. Use the REVIEW or button to the desired hour. 5. To start over , press EXIT to return to save . The cursor moves to the... month. 9. Manually Setting the Date and Time NOTE: If you receive your first Caller ID call is English. 1. Press the MENU button. 2. Use the REVIEW or button to save. The default is received. 1. Press the MENU button. The unit resets the hour and minute each time a call .
User Guide
Page 12
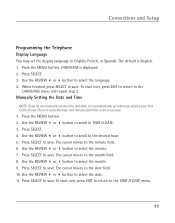
... start over , press EXIT to return to save . Use the REVIEW or to scroll to the desired setting. 7. Press SELECT to the PHONE OPTIONS menu. 6. To start over, press EXIT to return to save . Use the REVIEW or to FLASH TIME. 5. Use the REVIEW or to scroll to scroll between 12 HOUR and 24... for either 12-hour or 24-hour (military) format. Press SELECT to the FLASH TIME menu. Press the MENU button. 2. Use the REVIEW or to scroll to PHONE OPTIONS. 3. Use the REVIEW or to scroll to HOUR FORMAT. 5. It can set from 100ms or 600ms. The default is 12 hour. 1. To start over...
... start over , press EXIT to return to save . Use the REVIEW or to scroll to the desired setting. 7. Press SELECT to the PHONE OPTIONS menu. 6. To start over, press EXIT to return to save . Use the REVIEW or to FLASH TIME. 5. Use the REVIEW or to scroll to scroll between 12 HOUR and 24... for either 12-hour or 24-hour (military) format. Press SELECT to the FLASH TIME menu. Press the MENU button. 2. Use the REVIEW or to scroll to PHONE OPTIONS. 3. Use the REVIEW or to scroll to HOUR FORMAT. 5. It can set from 100ms or 600ms. The default is 12 hour. 1. To start over...

User Guide
Page 13
... conversation, set the Call Alert Tone to OFF. The default is displayed. 4. Press the MENU button. 2. Use the REVIEW or button to scroll to PHONE OPTIONS. 3. Press SELECT. Press SELECT button. 6. Use the REVIEW or button to scroll to AREA CODE. 3. To start over , press EXIT to return to the CALL ALERT menu...SELECT to save . Local Area Code 1. Connections and Setup Call Alert Tone When the call alert tone is turned ON, you hear a call on the phone and you make a mistake, press DELETE to clear all three digits and re-enter the area code. 5. If you prefer to have incoming calls not...
... conversation, set the Call Alert Tone to OFF. The default is displayed. 4. Press the MENU button. 2. Use the REVIEW or button to scroll to PHONE OPTIONS. 3. Press SELECT. Press SELECT button. 6. Use the REVIEW or button to scroll to AREA CODE. 3. To start over , press EXIT to return to the CALL ALERT menu...SELECT to save . Local Area Code 1. Connections and Setup Call Alert Tone When the call alert tone is turned ON, you hear a call on the phone and you make a mistake, press DELETE to clear all three digits and re-enter the area code. 5. If you prefer to have incoming calls not...

User Guide
Page 14
... button to scroll to 6 regional area codes. Press SELECT. 4. Calls received that require 10-digit dialing. 1. If the number is received. Use the REVIEW or to scroll to CODE # x. 14 When finished, press SELECT to save and return to desired code #. 5. You may need to use this feature if ... the touch-tone pad to clear and re-enter all three digits. 7. Press DELETE to enter the code. These are needed in order for the phone to determine the number format to display when a valid CID signal is not displayed correctly, the...
... button to scroll to 6 regional area codes. Press SELECT. 4. Calls received that require 10-digit dialing. 1. If the number is received. Use the REVIEW or to scroll to CODE # x. 14 When finished, press SELECT to save and return to desired code #. 5. You may need to use this feature if ... the touch-tone pad to clear and re-enter all three digits. 7. Press DELETE to enter the code. These are needed in order for the phone to determine the number format to display when a valid CID signal is not displayed correctly, the...

User Guide
Page 15
... enter your voice mail. 1. Press SELECT. 4. Press SELECT to scroll between L1 VM CODE and L2 VM CODE. 5. Press SELECT. 4. Use the REVIEW or button to save . Use the REVIEW or to scroll to the RESTORE SET menu. 15 To start over , press EXIT to return to RESTORE SET. 3. Press SELECT. 6. Press... and Setup Voice Mail Access Codes You can program a voice mail access code for each telephone line for quick access to your voice mail access phone number. • Use the REVIEW or button to move the cursor in the display. • Use the DELETE button to Lx VM CODE menu.
... enter your voice mail. 1. Press SELECT. 4. Press SELECT to scroll between L1 VM CODE and L2 VM CODE. 5. Press SELECT. 4. Use the REVIEW or button to save . Use the REVIEW or to scroll to the RESTORE SET menu. 15 To start over , press EXIT to return to RESTORE SET. 3. Press SELECT. 6. Press... and Setup Voice Mail Access Codes You can program a voice mail access code for each telephone line for quick access to your voice mail access phone number. • Use the REVIEW or button to move the cursor in the display. • Use the DELETE button to Lx VM CODE menu.

User Guide
Page 18
... call in call timer displays the length of the 16 memory location buttons, or • Press DIRECTORY, followed by the REVIEW or button to search the phone book memory. • Press the REVIEW or buttons to handset or headset cancels mute. 18 Press MUTE to cancel and return to your... phone conversation NOTE: Switching from speakerphone to scroll the CID memory, or • Press the REDIAL button. Call Timer During a phone conversation, a ...
... call in call timer displays the length of the 16 memory location buttons, or • Press DIRECTORY, followed by the REVIEW or button to search the phone book memory. • Press the REVIEW or buttons to handset or headset cancels mute. 18 Press MUTE to cancel and return to your... phone conversation NOTE: Switching from speakerphone to scroll the CID memory, or • Press the REDIAL button. Call Timer During a phone conversation, a ...

User Guide
Page 21
...mail access number so you can access the voice mail stored at the phone company. 21 Use the REVIEW or button to work. The user can access the voice mail stored at the phone company. NOTE: When Do Not Disturb is reviewed. Telephone Operation 2. See "Voice Mail Access Codes." 1. To turn ...code programmed for this feature to select the duration. The unit auto dials the pre-programmed voice mail access number/code so you can also review the access number first before dialing. 1. Press the SELECT button to indicate a message is waiting. It stops flashing after the message is On...
...mail access number so you can access the voice mail stored at the phone company. 21 Use the REVIEW or button to work. The user can access the voice mail stored at the phone company. NOTE: When Do Not Disturb is reviewed. Telephone Operation 2. See "Voice Mail Access Codes." 1. To turn ...code programmed for this feature to select the duration. The unit auto dials the pre-programmed voice mail access number/code so you can also review the access number first before dialing. 1. Press the SELECT button to indicate a message is waiting. It stops flashing after the message is On...
User Guide
Page 22
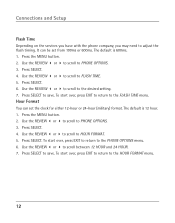
... can include the phone number, date, and time; When the call log is displayed until all new calls have not been reviewed. NEW appears in the display for later review. Receiving and Storing CID Records This unit receives and displays information transmitted by your local phone company. The unit... stores up to be reviewed. CID phone number 10:42 AM 12/30 NEW CALL...
... can include the phone number, date, and time; When the call log is displayed until all new calls have not been reviewed. NEW appears in the display for later review. Receiving and Storing CID Records This unit receives and displays information transmitted by your local phone company. The unit... stores up to be reviewed. CID phone number 10:42 AM 12/30 NEW CALL...

User Guide
Page 23
... button, or press the DIRECTORY button to save the information in the display. Dialing Back When reviewing CID records, you scroll to the start/end of the list, START /END appears in the Phone Directory memory. NOTE: When you can dial back the numbers showing on the display. Caller ID... Reviewing CID Records • Press the REVIEW or to scroll the call received was received from your area code. However, this ...
... button, or press the DIRECTORY button to save the information in the display. Dialing Back When reviewing CID records, you scroll to the start/end of the list, START /END appears in the Phone Directory memory. NOTE: When you can dial back the numbers showing on the display. Caller ID... Reviewing CID Records • Press the REVIEW or to scroll the call received was received from your area code. However, this ...

User Guide
Page 24
... again. You will only see (in the display) who is calling when you are on the phone and hear the call waiting tone in the display after you want to dial. You may adjust the...in the Setup Menu 1. The caller identification information appears in the receiver. Press the REVIEW or button to either the standard Name/Number Caller ID Service or Caller ID with Call Waiting Service... Call Waiting Service. To know who is calling while you must subscribe to use the REVIEW or button For instance, a 7-digit local number sometimes cannot be dialed because it requires a 10-digit or 11digit...
... again. You will only see (in the display) who is calling when you are on the phone and hear the call waiting tone in the display after you want to dial. You may adjust the...in the Setup Menu 1. The caller identification information appears in the receiver. Press the REVIEW or button to either the standard Name/Number Caller ID Service or Caller ID with Call Waiting Service... Call Waiting Service. To know who is calling while you must subscribe to use the REVIEW or button For instance, a 7-digit local number sometimes cannot be dialed because it requires a 10-digit or 11digit...

User Guide
Page 25
... one letter is stored in each location on the corresponding spaces on the memory index card. Press the 7 key 4 times for the letter M; LOCATION? Reviewing Stored Names & Numbers 1. NOTE: If you make a mistake, use the button to position the cursor and press DELETE to erase an incorrect digit OR ...Press the 5 key 3 times for the second letter L, and press the 1 key to enter Bill Smith, press the 2 key twice for the letter T; Use the REVIEW or button to save the record in each of the number keys. Press the 5 key 3 times for the letter L. Press the STORE button. For future...
... one letter is stored in each location on the corresponding spaces on the memory index card. Press the 7 key 4 times for the letter M; LOCATION? Reviewing Stored Names & Numbers 1. NOTE: If you make a mistake, use the button to position the cursor and press DELETE to erase an incorrect digit OR ...Press the 5 key 3 times for the second letter L, and press the 1 key to enter Bill Smith, press the 2 key twice for the letter T; Use the REVIEW or button to save the record in each of the number keys. Press the 5 key 3 times for the letter L. Press the STORE button. For future...

User Guide
Page 26
Changing a Stored Name or Number 1. Use the REVIEW or button to scroll to view the last number dialed. 2. Storing the Last Number Dialed To quickly and easily store the last number dialed. 1. OR 1. ... and edit the content according to access your bank's information line). 26 Follow the steps in the Storing a Name and Number in Memory section to review the record stored in Memory section. Press a MEMORY button to store the number. Press a MEMORY location button. 2. Press SELECT if you must enter codes to...
Changing a Stored Name or Number 1. Use the REVIEW or button to scroll to view the last number dialed. 2. Storing the Last Number Dialed To quickly and easily store the last number dialed. 1. OR 1. ... and edit the content according to access your bank's information line). 26 Follow the steps in the Storing a Name and Number in Memory section to review the record stored in Memory section. Press a MEMORY button to store the number. Press a MEMORY location button. 2. Press SELECT if you must enter codes to...

User Guide
Page 27
Pick up the handset, or press SPEAKER or HEADSET. 2. Press the DIRECTORY button, and use the REVIEW or button to dial a succession of stored numbers from separate memory locations. Wait for the dial tone. 3. Press memory location 6. (Press pause if needed ...button and the number automatically dials. Chain Dialing This process allows you must dial several sequences of long distance company 6 Authorization code (ID) 7 Long distance phone number 8 Using 1. Press memory location 8. 27 Wait for the dial tone. 3. If the number is stored in the Directory Memory, 1. Press the ...
Pick up the handset, or press SPEAKER or HEADSET. 2. Press the DIRECTORY button, and use the REVIEW or button to dial a succession of stored numbers from separate memory locations. Wait for the dial tone. 3. Press memory location 6. (Press pause if needed ...button and the number automatically dials. Chain Dialing This process allows you must dial several sequences of long distance company 6 Authorization code (ID) 7 Long distance phone number 8 Using 1. Press memory location 8. 27 Wait for the dial tone. 3. If the number is stored in the Directory Memory, 1. Press the ...

User Guide
Page 28
CLEAR ALL MEM shows in the directory at once. 1. Press the REVIEW or button to scroll to confirm all memory saved in the display. 4. If you to clear all directory memory is deleted. Memory Deleting All Directory Memory This feature allows you want to start over, press EXIT once to return to the previous menu level. 28 Press SELECT. OK is displayed to YES. 6. Press the MENU button. 2. Press SELECT. 5. Press SELECT. Use the REVIEW or buttons to scroll to PHONE OPTIONS 3.
CLEAR ALL MEM shows in the directory at once. 1. Press the REVIEW or button to scroll to confirm all memory saved in the display. 4. If you to clear all directory memory is deleted. Memory Deleting All Directory Memory This feature allows you want to start over, press EXIT once to return to the previous menu level. 28 Press SELECT. OK is displayed to YES. 6. Press the MENU button. 2. Press SELECT. 5. Press SELECT. Use the REVIEW or buttons to scroll to PHONE OPTIONS 3.

User Guide
Page 36
... the Speakerphone 17 Redial 19 Regional Area Codes 14 Removing a Call from Hold 19 Restoring the Defaults 15 Reviewing CID Records 23 Reviewing Stored Names & Numbers 25 Ringer Volume 20 S T Saving CID Records to Memory/Phone Directory Memory 23 Service 32 Speakerphone, Handset, and Headset Volume 20 Storing a Name and Number in Memory...
... the Speakerphone 17 Redial 19 Regional Area Codes 14 Removing a Call from Hold 19 Restoring the Defaults 15 Reviewing CID Records 23 Reviewing Stored Names & Numbers 25 Ringer Volume 20 S T Saving CID Records to Memory/Phone Directory Memory 23 Service 32 Speakerphone, Handset, and Headset Volume 20 Storing a Name and Number in Memory...