Owners Manual
Page 1
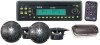
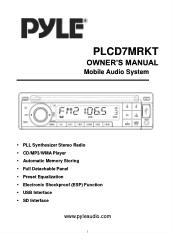
PLCD7MRKT OWNER'S MANUAL Mobile Audio System PLL Synthesizer Stereo Radio CD/MP3/WMA Player Automatic Memory Storing Full Detachable Panel Preset Equalization Electronic Shockproof (ESP) Function USB Interface SD Interface www.pyleaudio.com 1
PLCD7MRKT OWNER'S MANUAL Mobile Audio System PLL Synthesizer Stereo Radio CD/MP3/WMA Player Automatic Memory Storing Full Detachable Panel Preset Equalization Electronic Shockproof (ESP) Function USB Interface SD Interface www.pyleaudio.com 1
Owners Manual
Page 2
... before installation ......... 3 DIN Front-Mount (Method A 3 Installing the unit 3 Removing the unit 4 DIN Rear-Mount (Method B 5 Using the detachable front panel ...... 6 Wiring Connection 7 Operation 8 Location of keys 8 Switching the unit on/off 9 Faceplate release 9 Sound adjustment 9 Loudness 9 Display information 9 Liquid crystal display 9 ESP function 9 Reset function 9 Radio operation 10 Switching to radio mode 10... Display information 12 WMA operation 12 USB play operation 12 SD operation 13 Disc notes 13 Remote control 15 Specification 16 Trouble shooting 17 2
... before installation ......... 3 DIN Front-Mount (Method A 3 Installing the unit 3 Removing the unit 4 DIN Rear-Mount (Method B 5 Using the detachable front panel ...... 6 Wiring Connection 7 Operation 8 Location of keys 8 Switching the unit on/off 9 Faceplate release 9 Sound adjustment 9 Loudness 9 Display information 9 Liquid crystal display 9 ESP function 9 Reset function 9 Radio operation 10 Switching to radio mode 10... Display information 12 WMA operation 12 USB play operation 12 SD operation 13 Disc notes 13 Remote control 15 Specification 16 Trouble shooting 17 2
Owners Manual
Page 3
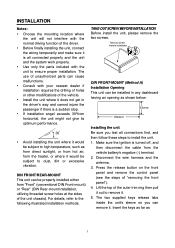
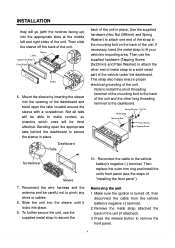
.../REAR-MOUNT This unit can remove it would be subject to high temperature, such as 3 Take out screw before installation. The use of the unit chassis). Disconnect the wire harness and the antenna. 3. Press the release button on the front panel and remove the control panel (see the steps of the driver. Before finally installing the...
.../REAR-MOUNT This unit can remove it would be subject to high temperature, such as 3 Take out screw before installation. The use of the unit chassis). Disconnect the wire harness and the antenna. 3. Press the release button on the front panel and remove the control panel (see the steps of the driver. Before finally installing the...
Owners Manual
Page 4
... 1. Then use the supplied metal strap to fit your vehicle‟s mounting area. Reconnect the wire harness and the antenna and be able to secure the sleeve in place. Press the release button to the vehicle battery‟s negative (-) terminal. Make sure the ignition is turned off the ...contact, so examine which ones will go (with a screwdriver. Spring Washer Hex Nut Metal Strap Mounting Bolt Plain Washer Tapping Screw Screwdriver Sleeve 7. Then replace the outer trim ring and install the unit‟s front panel (see the steps of the unit (if attached). 3. Dashboard...
... 1. Then use the supplied metal strap to fit your vehicle‟s mounting area. Reconnect the wire harness and the antenna and be able to secure the sleeve in place. Press the release button to the vehicle battery‟s negative (-) terminal. Make sure the ignition is turned off the ...contact, so examine which ones will go (with a screwdriver. Spring Washer Hex Nut Metal Strap Mounting Bolt Plain Washer Tapping Screw Screwdriver Sleeve 7. Then replace the outer trim ring and install the unit‟s front panel (see the steps of the unit (if attached). 3. Dashboard...
Owners Manual
Page 5
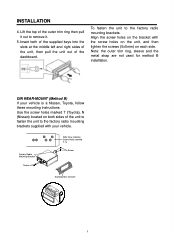
... the metal strap are not used for method B installation. To fasten the unit to remove it. 5. DIN REAR-MOUNT (Method B) If your vehicle. Align the screw holes on the bracket with your vehicle is a Nissan, Toyota, follow these mounting instructions. Use the screw holes marked T (Toyota), N (Nissan) located on each side. INSTALLATION 4. Factory Radio Mounting Bracket Screw Side View showing Screw...
... the metal strap are not used for method B installation. To fasten the unit to remove it. 5. DIN REAR-MOUNT (Method B) If your vehicle. Align the screw holes on the bracket with your vehicle is a Nissan, Toyota, follow these mounting instructions. Use the screw holes marked T (Toyota), N (Nissan) located on each side. INSTALLATION 4. Factory Radio Mounting Bracket Screw Side View showing Screw...

Owners Manual
Page 6
... front panel, insert the panel into the housing and make sure the panel is properly installed. Otherwise, the display will not look the same or some keys will not function properly. 6 Precautions when handling 1. Do not drop the front panel. 2. Keep ... any volatile agents (e.g. Do not attempt to high temperatures or direct sunlight. 6. Press the release button ( ) on the display or control buttons when removing or installing the front panel. 3. Do not put pressure on the front panel and pull off the front panel. 2. It may result in the case...
... front panel, insert the panel into the housing and make sure the panel is properly installed. Otherwise, the display will not look the same or some keys will not function properly. 6 Precautions when handling 1. Do not drop the front panel. 2. Keep ... any volatile agents (e.g. Do not attempt to high temperatures or direct sunlight. 6. Press the release button ( ) on the display or control buttons when removing or installing the front panel. 3. Do not put pressure on the front panel and pull off the front panel. 2. It may result in the case...

Owners Manual
Page 7
WIRING CONNECTION ISO CONNECTION 7
WIRING CONNECTION ISO CONNECTION 7

Owners Manual
Page 8
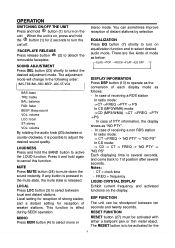
MON 5. EQ 8. | 8 (Skip backward) 9. | 9 (Skip forward) 10. (Eject button) 11. BAND/LOUD 23. SEL/VOL 24. DIR+ 17. RDM 19. RPT 20. Reset button 8 USB interface 12. disc slot 6. AS/PS/SCH 15. MUTE 25. OPERATION LOCATION OF KEYS 1. 2. (release button) 3. AUX IN 13. DSP 14. DIR18. MODE 16. SD interface 27. IR 26. INT 21. 22. LOC 4. LCD 7.
MON 5. EQ 8. | 8 (Skip backward) 9. | 9 (Skip forward) 10. (Eject button) 11. BAND/LOUD 23. SEL/VOL 24. DIR+ 17. RDM 19. RPT 20. Reset button 8 USB interface 12. disc slot 6. AS/PS/SCH 15. MUTE 25. OPERATION LOCATION OF KEYS 1. 2. (release button) 3. AUX IN 13. DSP 14. DIR18. MODE 16. SD interface 27. IR 26. INT 21. 22. LOC 4. LCD 7.
Owners Manual
Page 9
...radio mode: ->CT ->FREQ ->PTY -> PS In CD (MP3/WMA) mode: ->CD (MP3/WMA) ->CT ->FREQ ->PTY ->PS In case of each display mode as "NO PTY". - LOUDNESS Press and hold button (1) to turn on , press and hold again to cancel this function. MONO Press MON button (4) to detach the removable faceplate. RESET FUNCTION RESET...either a ballpoint pen or thin metal object. Notes: - Local setting for reception of strong station, and a distant setting for the 9 MUTE Press MUTE button (24) to select the desired adjustment mode. OPERATION SWITCHING ON/OFF THE UNIT Press and hold the BAND...
...radio mode: ->CT ->FREQ ->PTY -> PS In CD (MP3/WMA) mode: ->CD (MP3/WMA) ->CT ->FREQ ->PTY ->PS In case of each display mode as "NO PTY". - LOUDNESS Press and hold button (1) to turn on , press and hold again to cancel this function. MONO Press MON button (4) to detach the removable faceplate. RESET FUNCTION RESET...either a ballpoint pen or thin metal object. Notes: - Local setting for reception of strong station, and a distant setting for the 9 MUTE Press MUTE button (24) to select the desired adjustment mode. OPERATION SWITCHING ON/OFF THE UNIT Press and hold the BAND...
Owners Manual
Page 10
Error symbol on the display. AUTOMATIC MEMORY STORING & PROGRAM SCANNING - please use a cotton swab soaked in the display together with the printed side uppermost into the corresponding preset number button. If a CD is already inserted in the driver: Press the MODE button (15) until one of ...shortly to - The radio will change in the driver: Gently insert the CD with the memory band and frequency. SELECTING THE FREQUENCY BAND In radio mode, press the BAND button (22) to select the desired band. CD playback should begin. the manual tuning mode is completed. - ...
Error symbol on the display. AUTOMATIC MEMORY STORING & PROGRAM SCANNING - please use a cotton swab soaked in the display together with the printed side uppermost into the corresponding preset number button. If a CD is already inserted in the driver: Press the MODE button (15) until one of ...shortly to - The radio will change in the driver: Gently insert the CD with the memory band and frequency. SELECTING THE FREQUENCY BAND In radio mode, press the BAND button (22) to select the desired band. CD playback should begin. the manual tuning mode is completed. - ...

Owners Manual
Page 11
... disc is assigned as selecting each track on the current disc. If the MP3 disc does not contain any directory, there is activated as Digital Audio Mode selection button in MP3 operation. If selected one time. Press again to cancel the function. EJECTING A DISC Press button (10) to stop intro ... searches the tract at once. The MP3 disc is not pressed. 11 The MP3 playback begins. Press it is no MP3 disc inserted in the driver: Gently insert the MP3 disc (with the printed side on top) into "Searching track directly" in MP3/WMA disc. The unit searches the track ...
... disc is assigned as selecting each track on the current disc. If the MP3 disc does not contain any directory, there is activated as Digital Audio Mode selection button in MP3 operation. If selected one time. Press again to cancel the function. EJECTING A DISC Press button (10) to stop intro ... searches the tract at once. The MP3 disc is not pressed. 11 The MP3 playback begins. Press it is no MP3 disc inserted in the driver: Gently insert the MP3 disc (with the printed side on top) into "Searching track directly" in MP3/WMA disc. The unit searches the track ...

Owners Manual
Page 12
...times. Press SEL button to confirm. The unit searches files and directories that have the same character which is inputted by using TUNE/SEEK/TRACK UP/DOWN buttons and SEL button to confirm and start the title search. Searching From Root ... display will start to play MP3/WMA files automatically. When you can connect an USB driver through the interface, the unit will search the MP3/ WMA files in Digital Audio CD. KEY Assigned IN Searching mode (Table 1) AS/PS Mode Select SEL ENTER M1 A, B, C, 1 M2 D, E, F, 2 M3 G, H, I, 3 M4 J, K, L, 4 M5 M, N, O, 5/...
...times. Press SEL button to confirm. The unit searches files and directories that have the same character which is inputted by using TUNE/SEEK/TRACK UP/DOWN buttons and SEL button to confirm and start the title search. Searching From Root ... display will start to play MP3/WMA files automatically. When you can connect an USB driver through the interface, the unit will search the MP3/ WMA files in Digital Audio CD. KEY Assigned IN Searching mode (Table 1) AS/PS Mode Select SEL ENTER M1 A, B, C, 1 M2 D, E, F, 2 M3 G, H, I, 3 M4 J, K, L, 4 M5 M, N, O, 5/...

Owners Manual
Page 13
..., heart) may cause the battery to use discs with the MP3 operation described above. OPERATION Note: The main unit can only support standard USB-memory discs that has important files in it not to use non-standard shape discs (e.g. Depth of any wrong operation may ...any discs, as below. When you should remove the battery from the USB interface. Notes on CD-Rs (recordable CDs)/CD-RWs (rewritable CDs): 1. SUPPORTED MP3/WMA DECODING MODES The main unit supports MP3/WMA (Windows Media Audio) decoding modes as it to play . Attempting to work. square...
..., heart) may cause the battery to use discs with the MP3 operation described above. OPERATION Note: The main unit can only support standard USB-memory discs that has important files in it not to use non-standard shape discs (e.g. Depth of any wrong operation may ...any discs, as below. When you should remove the battery from the USB interface. Notes on CD-Rs (recordable CDs)/CD-RWs (rewritable CDs): 1. SUPPORTED MP3/WMA DECODING MODES The main unit supports MP3/WMA (Windows Media Audio) decoding modes as it to play . Attempting to work. square...

Owners Manual
Page 14
... play a CD-RW which has been written for the recording, some CD-Rs/CD-RWs may not be played on this unit. (see following recommendations: a: Use CD-RWs with speed 1x to 4x and write with speed 1x to 2x. When naming a MP3 file, be in the ISO9660 level 1 or level... play back, please see *1) *1: To have more reliable play a CD-R and CD-RW that is not finalized. (Please refer to 2x. Use CD-Rs with speed 1x to 8x and write with speed 1x to the manual of the disc and the equipment used for more information on MP3 files (MP3 Version Only): 1. c.
... play a CD-RW which has been written for the recording, some CD-Rs/CD-RWs may not be played on this unit. (see following recommendations: a: Use CD-RWs with speed 1x to 4x and write with speed 1x to 2x. When naming a MP3 file, be in the ISO9660 level 1 or level... play back, please see *1) *1: To have more reliable play a CD-R and CD-RW that is not finalized. (Please refer to 2x. Use CD-Rs with speed 1x to 8x and write with speed 1x to the manual of the disc and the equipment used for more information on MP3 files (MP3 Version Only): 1. c.
Owners Manual
Page 15
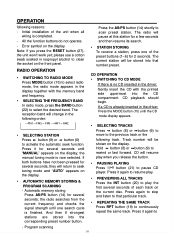
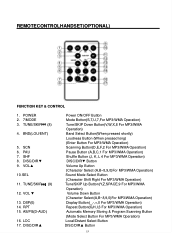
... VOL▲ 10. LOC 17. SCN 6. DISC/DIR▼ 9. TUNE/SKIP (9) 12. DSP(0) 14. DISC/DIR▲ Power ON/OFF Button Mode Botton(S,T,U,7,For MP3/WMA Operation) Tune/SKIP Down Button(V,W,X,8 For MP3/WMA Operation) Band Select Button(When pressed shortly) Loudness Button (When...For MP3/WMA Operation) Display Button(_,-,+,0 For MP3/WMA Operation) Repeat Button(G,H,I,3 For MP3/WMA Operation) Automatic Memory Storing & Program Scanning Button (Mode Select Button For MP3/WMA Operation) Local/Distant Select Button DISC/DIR▲ Button 15 TUNE/SKIP (8) 4. VOL ▼ 13. REMOTECONTROLHANDSET(...
... VOL▲ 10. LOC 17. SCN 6. DISC/DIR▼ 9. TUNE/SKIP (9) 12. DSP(0) 14. DISC/DIR▲ Power ON/OFF Button Mode Botton(S,T,U,7,For MP3/WMA Operation) Tune/SKIP Down Button(V,W,X,8 For MP3/WMA Operation) Band Select Button(When pressed shortly) Loudness Button (When...For MP3/WMA Operation) Display Button(_,-,+,0 For MP3/WMA Operation) Repeat Button(G,H,I,3 For MP3/WMA Operation) Automatic Memory Storing & Program Scanning Button (Mode Select Button For MP3/WMA Operation) Local/Distant Select Button DISC/DIR▲ Button 15 TUNE/SKIP (8) 4. VOL ▼ 13. REMOTECONTROLHANDSET(...
Owners Manual
Page 16
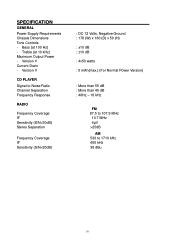
Treble (at 100 Hz) - SPECIFICATION GENERAL Power Supply Requirements Chassis Dimensions Tone Controls - Version V CD PLAYER Signal to Noise Ratio Channel Separation Frequency Response RADIO Frequency Coverage IF Sensitivity (S/N=30dB) Stereo Separation Frequency Coverage IF Sensitivity (S/N=20dB) : DC 12 Volts, Negative Ground : 178 (W) x 160 (D) x 50 (H) : ±10 dB : ±10 ...
Treble (at 100 Hz) - SPECIFICATION GENERAL Power Supply Requirements Chassis Dimensions Tone Controls - Version V CD PLAYER Signal to Noise Ratio Channel Separation Frequency Response RADIO Frequency Coverage IF Sensitivity (S/N=30dB) Stereo Separation Frequency Coverage IF Sensitivity (S/N=20dB) : DC 12 Volts, Negative Ground : 178 (W) x 160 (D) x 50 (H) : ±10 dB : ±10 ...
Owners Manual
Page 17
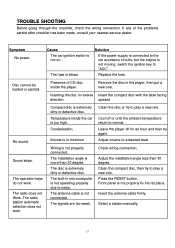
...radio station automatic selection does not work . Check wiring connection. Disc cannot be loaded or ejected. upward. Volume is not connected. Adjust the installation angle less than 30 degree. Press the RESET button. Presence of the problems persist after checklist has been made, consult your nearest service...a station manually. 17 Cause The car ignition switch is blown. The fuse is not on. If any of CD disc inside the car is extremely dirty or detective disc. Solution If the power supply is connected to "ACC". Replace the fuse. The ...
...radio station automatic selection does not work . Check wiring connection. Disc cannot be loaded or ejected. upward. Volume is not connected. Adjust the installation angle less than 30 degree. Press the RESET button. Presence of the problems persist after checklist has been made, consult your nearest service...a station manually. 17 Cause The car ignition switch is blown. The fuse is not on. If any of CD disc inside the car is extremely dirty or detective disc. Solution If the power supply is connected to "ACC". Replace the fuse. The ...


