Pyle PLCD14MRKT Support and Manuals
Get Help and Manuals for this Pyle item
View All Support Options Below
Free Pyle PLCD14MRKT manuals!
Problems with Pyle PLCD14MRKT?
Ask a Question
Free Pyle PLCD14MRKT manuals!
Problems with Pyle PLCD14MRKT?
Ask a Question
Most Recent Pyle PLCD14MRKT Questions

Blue Power Antenna Wire/amplifier
What do I connect the blue power antenna wire/amplifier connect to in waterproof box?
What do I connect the blue power antenna wire/amplifier connect to in waterproof box?
(Posted by jimmel25 8 years ago)
Popular Pyle PLCD14MRKT Manual Pages
PLCD14MRKT Manual 1 - Page 1
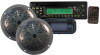
PLCD13MR
OWNER'S MANUAL
Mobile Audio System
• MP3/CD Player
• PLL Synthesizer Stereo Radio
• Compact Disc Player
• Automatic Memory Storing
• Full Detachable Panel
• Preset Equalization
• Electronic Shockproof (ESP) Function
• Auxiliary Input Function
• Remote Control
www.pyleaudio.com
PLCD14MRKT Manual 1 - Page 2
... 3 Take out screw before installation.........3 DIN Front-Mount (Method A 3
Installing the unit 3 Removing the unit 4 DIN Rear-Mount (Method B 5 Using the detachable front panel ......6 Wiring Connection 7 Operation 8 Location of keys 8...tracks by AMS/D-AUD button 11 Display information 12 WMA operation 12 Remote Control Handset 13 Disc notes 14 Specification 15 Trouble shooting 16
2
PLCD14MRKT Manual 1 - Page 3
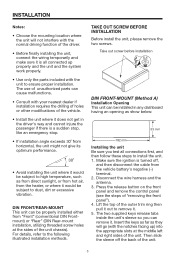
...far as they will not interfere with the normal driving function of the driver.
• Before finally installing the unit, connect the wiring temporarily and make sure it is all connections first... system work properly.
• Use only the parts included with the unit to dust, dirt or excessive vibration. TAKE OUT SCREW BEFORE INSTALLATION Before install the unit, please remove the two screws. Disconnect...
PLCD14MRKT Manual 1 - Page 4

... Nut (M5mm) and Spring Washer) to attach one end of the strap to the dashboard. Then replace the outer trim ring and install the unit's front panel. (see the steps of the unit (if attached). 3. Make sure the...back of the unit. Then use the supplied metal strap to a solid metal part of the unit in place. Note to install the short threading terminal of the mounting bolt to the back of the unit ...
PLCD14MRKT Manual 1 - Page 5

...ring, sleeve and the metal strap are not used for method B installation.
5 Align the screw holes on the bracket with your vehicle is a Nissan, Toyota, follow these mounting instructions. Side view showing Screw Holes marked T, N
Factory Radio Mounting Bracket
...
Use the screw holes marked T (Toyota), N (Nissan) located on each side. INSTALLATION
DIN REAR-MOUNT (Method B) If your vehicle.
PLCD14MRKT Manual 1 - Page 6

...the front panel. Keep front panel into the housing and make sure the panel is properly installed. Otherwise, abnormality occurs on the contacts, they can be removed with a clean and dry ... expose the front panel to disassemble the front panel.
2. Protective Case
Front Panel
INSTALLING THE FRONT PANEL To install the front panel, insert the panel into the case. It may result in anywhere...
PLCD14MRKT Manual 1 - Page 9
...remote sensor IR (26).
When AMS button (18) is pressed long (several seconds). Initial installation of seconds.
several tens of the unit when all allowed double function button
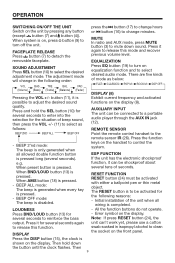
ESP FUNCTION
is... seconds to enter into the selection for
- All the function buttons do not operate. Error symbol on the front panel.
Press and hold down sound.
Press BND/LOUD button (13...
PLCD14MRKT Manual 1 - Page 10

....
Press any one
following order:
mono or stereo mode. Local setting for • SELECTING TRACKS
several seconds, they will change in the driver: Keep pressing MODE button (6) shortly until one of the preset... LOC button (2) to seek tuning mode and "AUTO" appears on the display, the manual tuning mode is drawn into the number button. the memory band and frequency. You can...
PLCD14MRKT Manual 1 - Page 11

... TRACKS IN SINGLE STEP Press button (16) or button (17) to move to confirm entry of Digital Audio. Press it is already inserted in the driver: Keep pressing MOD button (6) shortly until you feel some resistance. "Searching track directly" => "Searching Directory or File Name"=> "Navigation" from root by following track. The...
PLCD14MRKT Manual 1 - Page 14

... than 5 times. B. Be sure to use discs with following recommendations:
a.Use CD-RWs with speed 1x to 4x and write with speed 1x to the manual of any discs, as it . Notes on the recording status, conditions of the disc and the equipment used for this unit. (See *1)
*1: To have more...
PLCD14MRKT Manual 1 - Page 15
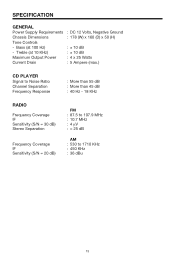
SPECIFICATION
GENERAL Power Supply Requirements Chassis Dimensions Tone Controls - Treble (at 100 Hz) - Bass (at 10 KHz) Maximum Output Power Current Drain
: DC 12 Volts, Negative ...
PLCD14MRKT Manual 1 - Page 16

... automatic selection does not work .
Select a station manually.
16
8800-0C3010-05
Leave the player off or...is more than 30 degrees.
The installation angle is not properly connected.
TROUBLE SHOOTING
Before going through the check...Replace the fuse. Disc cannot be
Presence of the problems persist after check list has been made, consult your nearest service...
Pyle PLCD14MRKT Reviews
We have not received any reviews for Pyle yet.