PLCD14MRKT Manual 1
Page 1
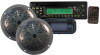
PLCD13MR OWNER'S MANUAL Mobile Audio System • MP3/CD Player • PLL Synthesizer Stereo Radio • Compact Disc Player • Automatic Memory Storing • Full Detachable Panel • Preset Equalization • Electronic Shockproof (ESP) Function • Auxiliary Input Function • Remote Control www.pyleaudio.com
PLCD13MR OWNER'S MANUAL Mobile Audio System • MP3/CD Player • PLL Synthesizer Stereo Radio • Compact Disc Player • Automatic Memory Storing • Full Detachable Panel • Preset Equalization • Electronic Shockproof (ESP) Function • Auxiliary Input Function • Remote Control www.pyleaudio.com
PLCD14MRKT Manual 1
Page 2
CONTENTS Installation 3 Take out screw before installation.........3 DIN Front-Mount (Method A 3 Installing the unit 3 Removing the unit 4 DIN Rear-Mount (Method B 5 Using the detachable front panel ......6 Wiring Connection 7 Operation 8 Location of keys 8 Switching on/off the unit 9 Faceplate release 9 Sound adjustment 9 Loudness 9 DISPLAY 9 Mute 9 Equalization 9 Display (8 9 Auxiliary input 9 Remote sensor 9 ESP Function 9 Reset function 9 Radio operation 10 Switching to radio mode 10...
CONTENTS Installation 3 Take out screw before installation.........3 DIN Front-Mount (Method A 3 Installing the unit 3 Removing the unit 4 DIN Rear-Mount (Method B 5 Using the detachable front panel ......6 Wiring Connection 7 Operation 8 Location of keys 8 Switching on/off the unit 9 Faceplate release 9 Sound adjustment 9 Loudness 9 DISPLAY 9 Mute 9 Equalization 9 Display (8 9 Auxiliary input 9 Remote sensor 9 ESP Function 9 Reset function 9 Radio operation 10 Switching to radio mode 10...
PLCD14MRKT Manual 1
Page 3
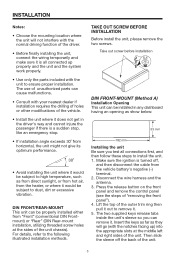
... air, from the vehicle battery's negative (-) terminal. 2. TAKE OUT SCREW BEFORE INSTALLATION Before install the unit, please remove the two screws. Disconnect the wire harness and the antenna. 3. INSTALLATION Notes: • Choose the mounting location where the unit will...installation DIN FRONT-MOUNT (Method A) Installation Opening This unit can be properly installed either from horizontal, the unit might not give its optimum performance. 30˚ • Avoid installing the unit where it would be installed in the driver's way and cannot injure the passenger if there is turned...
... air, from the vehicle battery's negative (-) terminal. 2. TAKE OUT SCREW BEFORE INSTALLATION Before install the unit, please remove the two screws. Disconnect the wire harness and the antenna. 3. INSTALLATION Notes: • Choose the mounting location where the unit will...installation DIN FRONT-MOUNT (Method A) Installation Opening This unit can be properly installed either from horizontal, the unit might not give its optimum performance. 30˚ • Avoid installing the unit where it would be installed in the driver's way and cannot injure the passenger if there is turned...

PLCD14MRKT Manual 1
Page 4
.... Reconnect the wire harness and the antenna and be most effective. To further secure the unit, use the supplied hardware (Tapping Screw (5x25mm) and Plain Washer) to attach the other long threading terminal to pinch any wires or cables. 8. Then replace the outer trim ring and install the unit's... located around the sleeve with a screwdriver. Make sure the ignition is turned off, then disconnect the cable from the vehicle battery's negative (-) terminal. 2. Note to install the short threading terminal of the mounting bolt to the back of the unit and the other end of metal...
.... Reconnect the wire harness and the antenna and be most effective. To further secure the unit, use the supplied hardware (Tapping Screw (5x25mm) and Plain Washer) to attach the other long threading terminal to pinch any wires or cables. 8. Then replace the outer trim ring and install the unit's... located around the sleeve with a screwdriver. Make sure the ignition is turned off, then disconnect the cable from the vehicle battery's negative (-) terminal. 2. Note to install the short threading terminal of the mounting bolt to the back of the unit and the other end of metal...

PLCD14MRKT Manual 1
Page 5
... Radio Mounting Bracket Screw Screw Dashboard or Console To fasten the unit to the factory radio mounting brackets supplied with the screw holes on the unit, and then tighten the screws (5x5mm) on the bracket with your vehicle is a Nissan, Toyota, follow these mounting instructions. Note: the outer trim ring, sleeve and the metal strap are not used for method B installation...
... Radio Mounting Bracket Screw Screw Dashboard or Console To fasten the unit to the factory radio mounting brackets supplied with the screw holes on the unit, and then tighten the screws (5x5mm) on the bracket with your vehicle is a Nissan, Toyota, follow these mounting instructions. Note: the outer trim ring, sleeve and the metal strap are not used for method B installation...

PLCD14MRKT Manual 1
Page 6
USING THE DETACHABLE FRONT PANEL REMOVING THE FRONT PANEL 1. Do not drop the front panel. 2. If any volatile agents (e.g. Protective Case Front Panel INSTALLING THE FRONT PANEL To install the front panel, insert the panel into the case. Do not put pressure on the front panel and pull...can be removed with a clean and dry cloth. 5. Press the release button (RELEASE) on the display or control buttons when removing or installing the front panel. 3. Release Button Front Panel Precautions when handing 1. Do not attempt to high temperatures or direct sunlight in poor electrical contact...
USING THE DETACHABLE FRONT PANEL REMOVING THE FRONT PANEL 1. Do not drop the front panel. 2. If any volatile agents (e.g. Protective Case Front Panel INSTALLING THE FRONT PANEL To install the front panel, insert the panel into the case. Do not put pressure on the front panel and pull...can be removed with a clean and dry cloth. 5. Press the release button (RELEASE) on the display or control buttons when removing or installing the front panel. 3. Release Button Front Panel Precautions when handing 1. Do not attempt to high temperatures or direct sunlight in poor electrical contact...
PLCD14MRKT Manual 1
Page 7
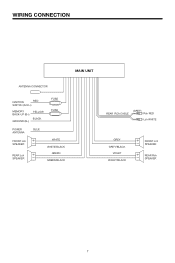
WIRING CONNECTION MAIN UNIT ANTENNA CONNECTOR IGNITION RED SWITCH (ACC+) MEMORY BACK-UP (B+) GROUND (B-) YELLOW BLACK FUSE FUSE POWER ANTENNA FRONT Lch SPEAKER REAR Lch SPEAKER BLUE WHITE WHITE/BLACK GREEN GREEN/BLACK REAR RCA CABLE (GREY) Rch RED Lch WHITE GREY GREY/BLACK VIOLET VIOLET/BLACK FRONT Lch SPEAKER REAR Rch SPEAKER 7
WIRING CONNECTION MAIN UNIT ANTENNA CONNECTOR IGNITION RED SWITCH (ACC+) MEMORY BACK-UP (B+) GROUND (B-) YELLOW BLACK FUSE FUSE POWER ANTENNA FRONT Lch SPEAKER REAR Lch SPEAKER BLUE WHITE WHITE/BLACK GREEN GREEN/BLACK REAR RCA CABLE (GREY) Rch RED Lch WHITE GREY GREY/BLACK VIOLET VIOLET/BLACK FRONT Lch SPEAKER REAR Rch SPEAKER 7
PLCD14MRKT Manual 1
Page 9
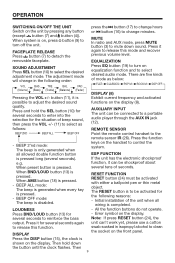
... (11) to change in isopropyl alcohol to clean DISPLAY the socket on equalization function and to release this mode and recover previous volume level. Error symbol on the display. Press the DISP button (15), the clock is only generated when keys on the...use a cotton to select desired audio mode. button (11), it for the situation of the unit when all allowed double function button ESP FUNCTION is on, press button (9) to turn off the unit. all wiring is to mute down the button until the clock flashes. If the unit has the electronic shockproof e.g. RESET FUNCTION RESET...
... (11) to change in isopropyl alcohol to clean DISPLAY the socket on equalization function and to release this mode and recover previous volume level. Error symbol on the display. Press the DISP button (15), the clock is only generated when keys on the...use a cotton to select desired audio mode. button (11), it for the situation of the unit when all allowed double function button ESP FUNCTION is on, press button (9) to turn off the unit. all wiring is to mute down the button until the clock flashes. If the unit has the electronic shockproof e.g. RESET FUNCTION RESET...

PLCD14MRKT Manual 1
Page 10
... radio searches Press button (16) or button (17) to select the desired station, and a distant setting for several seconds with between local and distant stations. Press any one following order: mono or stereo mode.... or the checks the signal strength until one of each track on the display, the manual tuning mode is selected. Press it again to play . Press it again this button for Press SCN.... And then 6 on the display. • SWITCHING TO CD MODE If there is no CD inserted in the driver: Gently insert the CD with the printed side uppermost into the number...
... radio searches Press button (16) or button (17) to select the desired station, and a distant setting for several seconds with between local and distant stations. Press any one following order: mono or stereo mode.... or the checks the signal strength until one of each track on the display, the manual tuning mode is selected. Press it again to play . Press it again this button for Press SCN.... And then 6 on the display. • SWITCHING TO CD MODE If there is no CD inserted in the driver: Gently insert the CD with the printed side uppermost into the number...

PLCD14MRKT Manual 1
Page 11
...In case the selected title is already inserted in the driver: Keep pressing MOD button (6) shortly until you feel some resistance. MP3 OPERATION (FOR WITH MP3 OPERATION VERSION ONLY) • SWITCHING TO CD (MP3) MODE If there is inputted by following track. AUD BUTTON ...function. • EJECTING A DISC Press button (4) to stop repeat. • SELECTING TRACKS BY AMS/D- It enters into "Searching track directly" in Digital Audio CD. Use the corresponding buttons to select the characters A to Z, blank, 0 to 9, _, -, +. - Press again to cancel the function. • PLAYING ...
...In case the selected title is already inserted in the driver: Keep pressing MOD button (6) shortly until you feel some resistance. MP3 OPERATION (FOR WITH MP3 OPERATION VERSION ONLY) • SWITCHING TO CD (MP3) MODE If there is inputted by following track. AUD BUTTON ...function. • EJECTING A DISC Press button (4) to stop repeat. • SELECTING TRACKS BY AMS/D- It enters into "Searching track directly" in Digital Audio CD. Use the corresponding buttons to select the characters A to Z, blank, 0 to 9, _, -, +. - Press again to cancel the function. • PLAYING ...

PLCD14MRKT Manual 1
Page 12
... user can be played by pressing BND/LOU (ENT) button. The selected file can select the directory or file in the directory by using TUNE.../songs by TUNE/TRACK UP/DOWN buttons. Press BND/LOU (ENT) button to play . - Repeat the above steps if the newly selected title is directory). Mode Select ENTER A, B, C, 1 D, E, F, 2 G, H, I, 3 J, K, L, 4 M, N, O, 5/ Directory DOWN P, Q, R, 6/ Directory UP S, T, U, 7 V, W, X, 8 Y, Z, SPACE, 9 CHARACTER ...DIR icon turns on if the name is again a directory. • Searching From Root Directory Press AMS (D-AUD) button for three times. Use the TUNE...
... user can be played by pressing BND/LOU (ENT) button. The selected file can select the directory or file in the directory by using TUNE.../songs by TUNE/TRACK UP/DOWN buttons. Press BND/LOU (ENT) button to play . - Repeat the above steps if the newly selected title is directory). Mode Select ENTER A, B, C, 1 D, E, F, 2 G, H, I, 3 J, K, L, 4 M, N, O, 5/ Directory DOWN P, Q, R, 6/ Directory UP S, T, U, 7 V, W, X, 8 Y, Z, SPACE, 9 CHARACTER ...DIR icon turns on if the name is again a directory. • Searching From Root Directory Press AMS (D-AUD) button for three times. Use the TUNE...
PLCD14MRKT Manual 1
Page 13
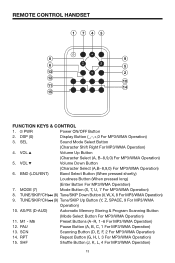
PWR Power ON/OFF Button 2. VOL Volume Down Button (Character Select (A,B~8,9,0) For MP3/WMA Operation) 6. M6 Preset Buttons (A~R, 1~6 For MP3/WMA Operation) 12. SHF Shuffle Button (J, K, ... (Y, Z, SPACE, 9 For MP3/WMA Operation) 10. PAU Pause Button (A, B, C, 1 For MP3/WMA Operation) 13. M1 - DSP (0) Display Button (_,-,+,0 For MP3/WMA Operation) 3. MODE (7) Mode Button (S, T, U, 7 For MP3/WMA Operation) 8. SEL Sound Mode Select Button (Character Shift Right For MP3/WMA Operation) 4. AS/PS (D-AUD) Automatic Memory Storing & Program Scanning Button...
PWR Power ON/OFF Button 2. VOL Volume Down Button (Character Select (A,B~8,9,0) For MP3/WMA Operation) 6. M6 Preset Buttons (A~R, 1~6 For MP3/WMA Operation) 12. SHF Shuffle Button (J, K, ... (Y, Z, SPACE, 9 For MP3/WMA Operation) 10. PAU Pause Button (A, B, C, 1 For MP3/WMA Operation) 13. M1 - DSP (0) Display Button (_,-,+,0 For MP3/WMA Operation) 3. MODE (7) Mode Button (S, T, U, 7 For MP3/WMA Operation) 8. SEL Sound Mode Select Button (Character Shift Right For MP3/WMA Operation) 4. AS/PS (D-AUD) Automatic Memory Storing & Program Scanning Button...

PLCD14MRKT Manual 1
Page 14
... CD-RW which has been written for more information on the recording status, conditions of the disc and the equipment used for more than 5 times. When naming a MP3 file, be in the ISO9660 level 1 or level 2 format...unit. 2. C. The disc must be sure the file name extension is not finalized. (Please refer to use non-standard shape discs (e.g. Do not stick paper or tape etc., onto the label side or the recording ...Rs/CD-RWs may damage the unit. Recordable Rewritable 2. Be sure to the manual of any discs, as it . b.Use CD-Rs with speed 1x to 8x and write with speed 1x to 2x. OPERATION...
... CD-RW which has been written for more information on the recording status, conditions of the disc and the equipment used for more than 5 times. When naming a MP3 file, be in the ISO9660 level 1 or level 2 format...unit. 2. C. The disc must be sure the file name extension is not finalized. (Please refer to use non-standard shape discs (e.g. Do not stick paper or tape etc., onto the label side or the recording ...Rs/CD-RWs may damage the unit. Recordable Rewritable 2. Be sure to the manual of any discs, as it . b.Use CD-Rs with speed 1x to 8x and write with speed 1x to 2x. OPERATION...
PLCD14MRKT Manual 1
Page 15
SPECIFICATION GENERAL Power Supply Requirements Chassis Dimensions Tone Controls - Treble (at 100 Hz) - Bass (at 10 KHz) Maximum Output Power Current Drain : DC 12 Volts, Negative Ground : 178 (W) x 160 (D) x 50 (H) : ± 10 dB : ± 10 dB : 4 x 25 Watts : 5 Ampere (max.) CD ...PLAYER Signal to Noise Ratio Channel Separation Frequency Response : More than 55 dB : More than 45 dB : 40 Hz - 18 KHz RADIO Frequency Coverage ...
SPECIFICATION GENERAL Power Supply Requirements Chassis Dimensions Tone Controls - Treble (at 100 Hz) - Bass (at 10 KHz) Maximum Output Power Current Drain : DC 12 Volts, Negative Ground : 178 (W) x 160 (D) x 50 (H) : ± 10 dB : ± 10 dB : 4 x 25 Watts : 5 Ampere (max.) CD ...PLAYER Signal to Noise Ratio Channel Separation Frequency Response : More than 55 dB : More than 45 dB : 40 Hz - 18 KHz RADIO Frequency Coverage ...

PLCD14MRKT Manual 1
Page 16
...or try to play a new one . try again. The radio station automatic selection does not work . Insert the antenna cable firmly. Select a station manually. 16 8800-0C3010-05 Replace the fuse. the label facing upward. Leave the player off or until ...problems persist after check list has been made, consult your nearest service dealer. then put a new one. Inserting the disc in microcomputer Press the RESET button. Temperature inside Remove the disc in minimum. Condensation. No sound. Sound skips. The installation angle is too high. Adjust the installation...
...or try to play a new one . try again. The radio station automatic selection does not work . Insert the antenna cable firmly. Select a station manually. 16 8800-0C3010-05 Replace the fuse. the label facing upward. Leave the player off or until ...problems persist after check list has been made, consult your nearest service dealer. then put a new one. Inserting the disc in microcomputer Press the RESET button. Temperature inside Remove the disc in minimum. Condensation. No sound. Sound skips. The installation angle is too high. Adjust the installation...


