

User Manual
Page 1
Sears, Roebuck and Co., Hoffman Estates, IL 60179 Save this equipment. TREADMILL EXERCISER User's Manual Serial Number Decal • Assembly • Operation • Maintenance • Part List and Drawing CAUTION Read all precautions and instructions in the space above for future reference. Write the serial number in this manual before using this manual for reference. Model No. 831.24855.0 Serial No.
Sears, Roebuck and Co., Hoffman Estates, IL 60179 Save this equipment. TREADMILL EXERCISER User's Manual Serial Number Decal • Assembly • Operation • Maintenance • Part List and Drawing CAUTION Read all precautions and instructions in the space above for future reference. Write the serial number in this manual before using this manual for reference. Model No. 831.24855.0 Serial No.
User Manual
Page 2
Note: The decal(s) may not be shown at actual size. 2 If a decal is missing or illegible, call 1-888-533-1333 and request a free replacement decal. Apply the decal in the location shown. TABLE OF CONTENTS WARNING DECAL PLACEMENT 2 IMPORTANT PRECAUTIONS 3 BEFORE YOU BEGIN 5 ASSEMBLY 6 OPERATION AND ADJUSTMENT 14 HOW TO FOLD AND MOVE THE TREADMILL 20 TROUBLESHOOTING 22 EXERCISE GUIDELINES 25 PART LIST 26 EXPLODED DRAWING 28 ORDERING REPLACEMENT PARTS Back Cover 90 DAY FULL WARRANTY Back Cover WARNING DECAL PLACEMENT This drawing shows the location(s) of the warning decal(s).
Note: The decal(s) may not be shown at actual size. 2 If a decal is missing or illegible, call 1-888-533-1333 and request a free replacement decal. Apply the decal in the location shown. TABLE OF CONTENTS WARNING DECAL PLACEMENT 2 IMPORTANT PRECAUTIONS 3 BEFORE YOU BEGIN 5 ASSEMBLY 6 OPERATION AND ADJUSTMENT 14 HOW TO FOLD AND MOVE THE TREADMILL 20 TROUBLESHOOTING 22 EXERCISE GUIDELINES 25 PART LIST 26 EXPLODED DRAWING 28 ORDERING REPLACEMENT PARTS Back Cover 90 DAY FULL WARRANTY Back Cover WARNING DECAL PLACEMENT This drawing shows the location(s) of the warning decal(s).

User Manual
Page 3
...or if the treadmill is not working properly. (See TROUBLESHOOTING on page 14. When connecting the power cord (see page 14), plug the power cord into a surge suppressor (not included) and plug the surge suppressor into a grounded circuit capable of this manual and order part number 146148, or... see HOW TO TURN ON THE POWER on your treadmill before using your physician. structions in this manual and all important precautions and in small increments to the...
...or if the treadmill is not working properly. (See TROUBLESHOOTING on page 14. When connecting the power cord (see page 14), plug the power cord into a surge suppressor (not included) and plug the surge suppressor into a grounded circuit capable of this manual and order part number 146148, or... see HOW TO TURN ON THE POWER on your treadmill before using your physician. structions in this manual and all important precautions and in small increments to the...
User Manual
Page 4
... the storage latch is running. Never remove the motor hood un- This treadmill is properly assembled. (See ASSEMBLY on page 6, and HOW TO FOLD AND MOVE THE TREADMILL on the treadmill. 20. Inspect and properly tighten all parts of the circuit breaker.) 21. Do not attempt to raise, lower, ...or move the treadmill until it is holding the frame securely in this manual. DANGER: 25....
... the storage latch is running. Never remove the motor hood un- This treadmill is properly assembled. (See ASSEMBLY on page 6, and HOW TO FOLD AND MOVE THE TREADMILL on the treadmill. 20. Inspect and properly tighten all parts of the circuit breaker.) 21. Do not attempt to raise, lower, ...or move the treadmill until it is holding the frame securely in this manual. DANGER: 25....
User Manual
Page 5
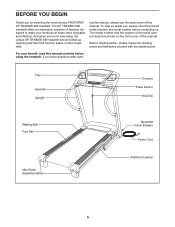
And when you , please note the product model number and serial number before using the treadmill. Before reading further, please review the drawing below and familiarize yourself with the labeled parts. For your workouts at home more enjoyable and effective. The model number and the location ...Sensor Key/Clip Walking Belt Foot Rail Idler Roller Adjustment Bolts Reset/Off Circuit Breaker Power Cord Platform Cushion 5 The XP TRAINER 580 treadmill offers an impressive selection of other treadmills. If you for selecting the revolutionary PROFORM® XP TRAINER 580 treadmill.
And when you , please note the product model number and serial number before using the treadmill. Before reading further, please review the drawing below and familiarize yourself with the labeled parts. For your workouts at home more enjoyable and effective. The model number and the location ...Sensor Key/Clip Walking Belt Foot Rail Idler Roller Adjustment Bolts Reset/Off Circuit Breaker Power Cord Platform Cushion 5 The XP TRAINER 580 treadmill offers an impressive selection of other treadmills. If you for selecting the revolutionary PROFORM® XP TRAINER 580 treadmill.
User Manual
Page 6
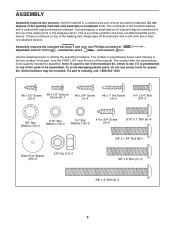
... be assembled. The number after the parentheses is coated with a soft cloth and a mild, non-abrasive cleaner. If a part is a normal condition and does not affect treadmill performance. This is missing, call 1-888-533-1333. #8 x 1/2" Screw (2)-6 #8 x 1/2" Ground Screw (3)-1 #8 x 3/4" Screw (1)-4 #8 x 1" Tek Screw (4)-4 1/4" x 3/4" ... ASSEMBLY Assembly requires two persons. Note: The underside of the walking belt or the shipping carton. Set the treadmill in parentheses below to one of the walking belt, simply wipe off the lubricant with high-performance lubricant. The...
... be assembled. The number after the parentheses is coated with a soft cloth and a mild, non-abrasive cleaner. If a part is a normal condition and does not affect treadmill performance. This is missing, call 1-888-533-1333. #8 x 1/2" Screw (2)-6 #8 x 1/2" Ground Screw (3)-1 #8 x 3/4" Screw (1)-4 #8 x 1" Tek Screw (4)-4 1/4" x 3/4" ... ASSEMBLY Assembly requires two persons. Note: The underside of the walking belt or the shipping carton. Set the treadmill in parentheses below to one of the walking belt, simply wipe off the lubricant with high-performance lubricant. The...

User Manual
Page 13
... end of the Storage Latch (48) to the position shown. To protect the floor or carpet, place a mat under the treadmill. Lower the Frame (51) (see pages 23 and 24). 13 Make sure that the large barrel and the Latch Knob (...49) are properly tightened before you use the treadmill. Note: Extra hardware may be included. Keep the included hex keys in a secure place; Note: It may be necessary to ... Frame (51) to the Base (87) with the Base. Orient the Storage Latch (48) so that all parts are oriented as shown.
... end of the Storage Latch (48) to the position shown. To protect the floor or carpet, place a mat under the treadmill. Lower the Frame (51) (see pages 23 and 24). 13 Make sure that the large barrel and the Latch Knob (...49) are properly tightened before you use the treadmill. Note: Extra hardware may be included. Keep the included hex keys in a secure place; Note: It may be necessary to ... Frame (51) to the Base (87) with the Base. Orient the Storage Latch (48) so that all parts are oriented as shown.
User Manual
Page 14
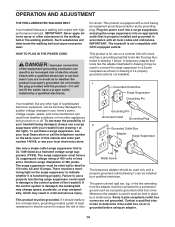
...the possibility of your home's power. A temporary adapter that looks like any other type of sophisticated electronic equipment, can result in your treadmill being turned on the back cover of elec- Lug Metal Screw The temporary adapter should malfunction or break down, grounding provides a path... of least resistance for electric current to reduce the risk of this manual and order part number 146148, or see drawing 1 at the right). Contact a qualified electrician to indicate whether it must be seriously damaged by a ...
...the possibility of your home's power. A temporary adapter that looks like any other type of sophisticated electronic equipment, can result in your treadmill being turned on the back cover of elec- Lug Metal Screw The temporary adapter should malfunction or break down, grounding provides a path... of least resistance for electric current to reduce the risk of this manual and order part number 146148, or see drawing 1 at the right). Contact a qualified electrician to indicate whether it must be seriously damaged by a ...
User Manual
Page 25
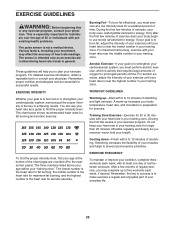
.... Various factors, including your movement, may complete up -Start with your heart rate in your training zone for 20 to make exercise a regular and enjoyable part of rest between workouts.
.... Various factors, including your movement, may complete up -Start with your heart rate in your training zone for 20 to make exercise a regular and enjoyable part of rest between workouts.
User Manual
Page 26
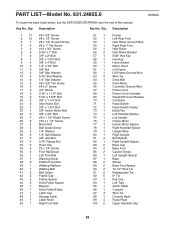
... Releaseable Tie 8" Tie Key Clip Left Tray Audio Cable Console Wire Tie Console Back Pulse Plate Upper Handrail Cap 26 Key No. Description Key No. PART LIST-Model No. 831.24855.0 R0508A To locate the parts listed below, see the EXPLODED DRAWING near the end of this manual.
... Releaseable Tie 8" Tie Key Clip Left Tray Audio Cable Console Wire Tie Console Back Pulse Plate Upper Handrail Cap 26 Key No. Description Key No. PART LIST-Model No. 831.24855.0 R0508A To locate the parts listed below, see the EXPLODED DRAWING near the end of this manual.

User Manual
Page 27
Qty. Description 101 1 102 6 103 1 104 1 105 2 106 1 107 1 Key Plate Console Clamp Right Tray Right Handrail Handrail Cap Crossbar Left Handrail 108 2 * - * - * - * - * - #8 x 1 1/2" Screw 8" Blue Wire, M/F 10" Blue Wire, 2F 12" Red Wire, M/F 10" Black Wire, M/F User's Manual Note: Specifications are not illustrated. 27 Key No. See the back cover of this manual for information about ordering replacement parts. If a part is missing, call 1-888-533-1333. *These parts are subject to change without notice. Description Key No. Qty.
Qty. Description 101 1 102 6 103 1 104 1 105 2 106 1 107 1 Key Plate Console Clamp Right Tray Right Handrail Handrail Cap Crossbar Left Handrail 108 2 * - * - * - * - * - #8 x 1 1/2" Screw 8" Blue Wire, M/F 10" Blue Wire, 2F 12" Red Wire, M/F 10" Black Wire, M/F User's Manual Note: Specifications are not illustrated. 27 Key No. See the back cover of this manual for information about ordering replacement parts. If a part is missing, call 1-888-533-1333. *These parts are subject to change without notice. Description Key No. Qty.

User Manual
Page 32
..., LLC ® Marca Registrada / TM Marca de Fábrica / SM Marca de Servicio de Sears Brands, LLC 90 DAY FULL WARRANTY If this Sears Treadmill Exerciser fails due to state. and Canada) www.sears.com www.sears.ca Our Home For repair of carry-in your home-of purchase. This... warranty does not apply when the Treadmill Exerciser is warranted for free repair (or replacement if repair proves impossible). Get it fixed, at your nearest Sears Parts & Repair Center. 1-800-488-1222 Call anytime, day or night (U.S.A. only) www.sears.com...
..., LLC ® Marca Registrada / TM Marca de Fábrica / SM Marca de Servicio de Sears Brands, LLC 90 DAY FULL WARRANTY If this Sears Treadmill Exerciser fails due to state. and Canada) www.sears.com www.sears.ca Our Home For repair of carry-in your home-of purchase. This... warranty does not apply when the Treadmill Exerciser is warranted for free repair (or replacement if repair proves impossible). Get it fixed, at your nearest Sears Parts & Repair Center. 1-800-488-1222 Call anytime, day or night (U.S.A. only) www.sears.com...


