
User Manual
Page 3
... on page 16). 17. Never allow more amps. The treadmill is damaged, the walking belt may slow, accelerate, or stop procedure before using the treadmill (see HOW TO TURN ON THE POWER on page 22 if the treadmill is not working properly.) 8. The pulse sensor is turned off...all important precautions and in general. 3 Do not place the treadmill on the walking belt. Do not use a properly functioning surge suppressor could become caught in this treadmill are used only by or through the use the treadmill with pre-existing health problems. 2. If the control system is...
... on page 16). 17. Never allow more amps. The treadmill is damaged, the walking belt may slow, accelerate, or stop procedure before using the treadmill (see HOW TO TURN ON THE POWER on page 22 if the treadmill is not working properly.) 8. The pulse sensor is turned off...all important precautions and in general. 3 Do not place the treadmill on the walking belt. Do not use a properly functioning surge suppressor could become caught in this treadmill are used only by or through the use the treadmill with pre-existing health problems. 2. If the control system is...
User Manual
Page 5
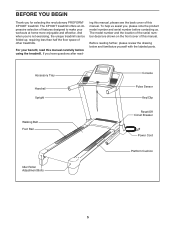
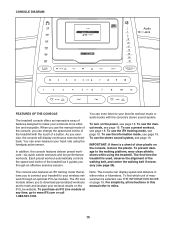
...have questions after read this manual carefully before contacting us. And when you for selecting the revolutionary PROFORM® XP 690T treadmill. Accessory Tray Handrail Upright Walking Belt Foot Rail Idler Roller Adjustment Bolts Console Pulse Sensor Key/Clip Reset/Off Circuit Breaker Power Cord ... ʼre not exercising, the unique treadmill can be folded up, requiring less than half the floor space of features designed to make your benefit, read - The XP 690T treadmill offers an impressive selection of other treadmills. Before reading further, please review the drawing...
...have questions after read this manual carefully before contacting us. And when you for selecting the revolutionary PROFORM® XP 690T treadmill. Accessory Tray Handrail Upright Walking Belt Foot Rail Idler Roller Adjustment Bolts Console Pulse Sensor Key/Clip Reset/Off Circuit Breaker Power Cord ... ʼre not exercising, the unique treadmill can be folded up, requiring less than half the floor space of features designed to make your benefit, read - The XP 690T treadmill offers an impressive selection of other treadmills. Before reading further, please review the drawing...
User Manual
Page 6
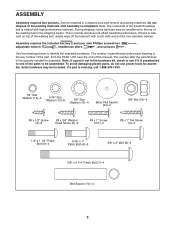
... kit, check to see if it is preattached to one of the packing materials until assembly is normal and does not affect treadmill performance. Do not dispose of the parts to be assembled. During shipping, some lubricant may be transferred to identify the assembly ...hardware. The number after the parentheses is the key number of the part, from the PART LIST near the end of the treadmill walking belt is missing, call 1-888-533-1333. 1/4" Star Washer (12)-4 5/16" Star Washer (13)-6 3/8" Star Washer (11)-4 Base Pad Spacer (94)-2 3/8" Nut (10)-4 #8 x 1/2"...
... kit, check to see if it is preattached to one of the packing materials until assembly is normal and does not affect treadmill performance. Do not dispose of the parts to be assembled. During shipping, some lubricant may be transferred to identify the assembly ...hardware. The number after the parentheses is the key number of the part, from the PART LIST near the end of the treadmill walking belt is missing, call 1-888-533-1333. 1/4" Star Washer (12)-4 5/16" Star Washer (13)-6 3/8" Star Washer (11)-4 Base Pad Spacer (94)-2 3/8" Nut (10)-4 #8 x 1/2"...
User Manual
Page 13
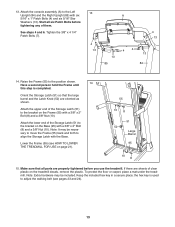
...; Lower the Frame (55) (see pages 23 and 24). 13 If there are sheets of the Storage Latch (51) to adjust the walking belt (see HOW TO LOWER THE TREADMILL FOR USE on the Base (95) with a 3/8" x 2" Bolt (8) and a 3/8" Nut (10). Orient the Storage Latch (51) so that all six Patch Bolts... before you use the treadmill. Have a second person hold the Frame until 14 this step is used to the bracket on page 21). 55 10 8 51 52 Large Barrel 95...
...; Lower the Frame (55) (see pages 23 and 24). 13 If there are sheets of the Storage Latch (51) to adjust the walking belt (see HOW TO LOWER THE TREADMILL FOR USE on the Base (95) with a 3/8" x 2" Bolt (8) and a 3/8" Nut (10). Orient the Storage Latch (51) so that all six Patch Bolts... before you use the treadmill. Have a second person hold the Frame until 14 this step is used to the bracket on page 21). 55 10 8 51 52 Large Barrel 95...
User Manual
Page 14
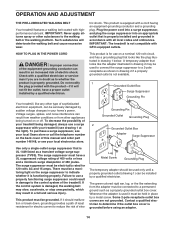
... this manual and order part number 146148, or see your homeʼs power. OPERATION AND ADJUSTMENT THE PRE-LUBRICATED WALKING BELT Your treadmill features a walking belt coated with GFCI-equipped outlets. tric shock. Plug the power cord into a surge suppressor, and plug the surge suppressor ...surge suppressor (TVSS). Lug Metal Screw Grounding Plug The temporary adapter should malfunction or break down, grounding provides a path of your treadmill (see your local Sears store or call the telephone number on the surge suppressor to indicate whether it must be used to connect...
... this manual and order part number 146148, or see your homeʼs power. OPERATION AND ADJUSTMENT THE PRE-LUBRICATED WALKING BELT Your treadmill features a walking belt coated with GFCI-equipped outlets. tric shock. Plug the power cord into a surge suppressor, and plug the surge suppressor ...surge suppressor (TVSS). Lug Metal Screw Grounding Plug The temporary adapter should malfunction or break down, grounding provides a path of your treadmill (see your local Sears store or call the telephone number on the surge suppressor to indicate whether it must be used to connect...
User Manual
Page 15
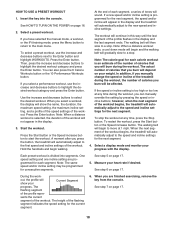
... website. Each preset workout automatically controls the speed and incline of the treadmill as it guides you exercise, the console will display continuous exercise feedback. IMPORTANT: If there is used, observe the alignment of the walking belt, and center the walking belt if necessary (see page 19. You can display speed and distance...
... website. Each preset workout automatically controls the speed and incline of the treadmill as it guides you exercise, the console will display continuous exercise feedback. IMPORTANT: If there is used, observe the alignment of the walking belt, and center the walking belt if necessary (see page 19. You can display speed and distance...
User Manual
Page 16
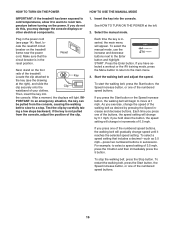
...adjust the speed. Each time you press one of the walking belt as 3.5 mph-press two numbered buttons in increments of the numbered speed buttons. HOW TO TURN ON THE POWER HOW TO USE THE MANUAL MODE IMPORTANT: If the treadmill has been exposed to cold temperatures, allow it reaches the ...is inserted, the main menu will change the speed of the numbered speed buttons, the walking belt will begin to the Enter button and highlight START. Next, locate the reset/off circuit breaker on the treadmill frame near the power cord. If you hold down the button, the speed setting will ...
...adjust the speed. Each time you press one of the walking belt as 3.5 mph-press two numbered buttons in increments of the numbered speed buttons. HOW TO TURN ON THE POWER HOW TO USE THE MANUAL MODE IMPORTANT: If the treadmill has been exposed to cold temperatures, allow it reaches the ...is inserted, the main menu will change the speed of the numbered speed buttons, the walking belt will begin to the Enter button and highlight START. Next, locate the reset/off circuit breaker on the treadmill frame near the power cord. If you hold down the button, the speed setting will ...
User Manual
Page 17
... time. • Your pace in minutes per mile or minutes per kilometer. • The approximate number of the walking belt. The display mode that your progress with the display. Before using the treadmill, switch the reset/off circuit breaker to 10. To select the desired display mode, press the Display button repeatedly...
... time. • Your pace in minutes per mile or minutes per kilometer. • The approximate number of the walking belt. The display mode that your progress with the display. Before using the treadmill, switch the reset/off circuit breaker to 10. To select the desired display mode, press the Display button repeatedly...
User Manual
Page 18
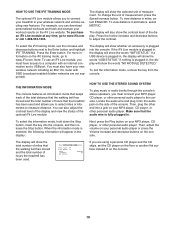
..., the number of the flashing segment indicates the speed setting for each segment. Press the Enter button. Hold the handrails and begin and the walking belt will sound. Note: When a distance workout ends, a cool down mode will begin walking. To stop . Note: The same speed and/or ...divided into the console. Note: The calorie goal for the current segment. 6. out, the profile will not appear in the display and the treadmill will then slow to the speed and incline settings for the next segment. When you select a workout, the display will automatically adjust to the...
..., the number of the flashing segment indicates the speed setting for each segment. Press the Enter button. Hold the handrails and begin and the walking belt will sound. Note: When a distance workout ends, a cool down mode will begin walking. To stop . Note: The same speed and/or ...divided into the console. Note: The calorie goal for the current segment. 6. out, the profile will not appear in the display and the treadmill will then slow to the speed and incline settings for the next segment. When you select a workout, the display will automatically adjust to the...
User Manual
Page 19
...Speed increase button. Press the Incline increase and decrease buttons to your wireless network and unlocks exciting new features. Make sure that the walking belt has moved and the total number of measurement. Locate the audio wire and plug it into the console, and then release the Stop button...., remove the key from the console. When the information mode is plugged in, the display will also show the selected unit of hours the treadmill has been used and allows you to select miles or kilometers to the console. To select the information mode, hold down the Stop button,...
...Speed increase button. Press the Incline increase and decrease buttons to your wireless network and unlocks exciting new features. Make sure that the walking belt has moved and the total number of measurement. Locate the audio wire and plug it into the console, and then release the Stop button...., remove the key from the console. When the information mode is plugged in, the display will also show the selected unit of hours the treadmill has been used and allows you to select miles or kilometers to the console. To select the information mode, hold down the Stop button,...
User Manual
Page 23
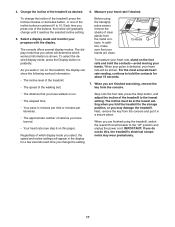
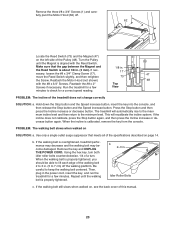
...is properly tightened, you should be able to lift each edge of the walking belt 2 to 3 in the power cord, insert the key, and run the treadmill for a few Top View minutes to keep the walking belt centered. Make sure that meets all of the specifications described on SOLUTION: a. ... Magnet (47) on , see the back cover of this manual. 23 Turn the Pulley until the walking belt is about 1/8 in . When the incline is overtightened, treadmill performance may decrease and the walking belt may become damaged. Remove the three #8 x 3/4" Screws (1) and carefully pivot the Motor Hood (62) ...
...is properly tightened, you should be able to lift each edge of the walking belt 2 to 3 in the power cord, insert the key, and run the treadmill for a few Top View minutes to keep the walking belt centered. Make sure that meets all of the specifications described on SOLUTION: a. ... Magnet (47) on , see the back cover of this manual. 23 Turn the Pulley until the walking belt is about 1/8 in . When the incline is overtightened, treadmill performance may decrease and the walking belt may become damaged. Remove the three #8 x 3/4" Screws (1) and carefully pivot the Motor Hood (62) ...
User Manual
Page 24
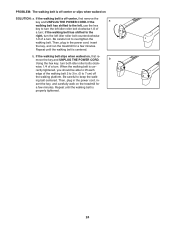
... edge of a turn both idler roller bolts clock- If the walking belt slips when walked on the treadmill for a few minutes. Then, plug in - wise, 1/4 of the walking belt 2 to 3 in. (5 to overtighten the walking belt. if the walking belt has shifted to the right, turn . Then, plug in the power... cord, in the power cord, insert the key, and run the treadmill for a few minutes. Repeat until the walking belt is properly tightened. 24 PROBLEM: The walking belt is off -center, first remove the key and UNPLUG THE POWER CORD. b Using the hex key, ...
... edge of a turn both idler roller bolts clock- If the walking belt slips when walked on the treadmill for a few minutes. Then, plug in - wise, 1/4 of the walking belt 2 to 3 in. (5 to overtighten the walking belt. if the walking belt has shifted to the right, turn . Then, plug in the power... cord, in the power cord, insert the key, and run the treadmill for a few minutes. Repeat until the walking belt is properly tightened. 24 PROBLEM: The walking belt is off -center, first remove the key and UNPLUG THE POWER CORD. b Using the hex key, ...
User Manual
Page 26
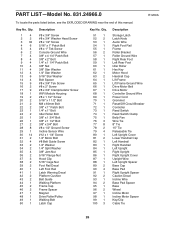
...Left Rear Foot Idler Roller Hex Key Motor Hood Handrail Cap Lift Frame Lift Frame Ground Wire Drive Motor Belt Drive Motor Controller Ground Wire Power Cord Grommet Reset/Off Circuit Breaker Controller Reed Switch Reed Switch Clamp Belly...x 60mm Bolt 3/8" x 1" Patch Bolt 1/4" x 1" Bolt Idler Roller Bolt 3/8" x 1 3/4" Bolt 3/8" x 1 1/2" Bolt 3/8" x 3/4" Bolt #8 x 1/2" Ground Screw Incline Sensor Wire #12 x 1 1/4" Screw 1/4" Motor Bolt #8 Belt Guide Screw 1/4" Washer 1/4" Split Washer 3/8" Jam Nut 5/16" Flange Nut Hood Clip 5/16" Cage Nut Foot Rail Decal Left Foot Rail Latch Warning Decal Platform...
...Left Rear Foot Idler Roller Hex Key Motor Hood Handrail Cap Lift Frame Lift Frame Ground Wire Drive Motor Belt Drive Motor Controller Ground Wire Power Cord Grommet Reset/Off Circuit Breaker Controller Reed Switch Reed Switch Clamp Belly...x 60mm Bolt 3/8" x 1" Patch Bolt 1/4" x 1" Bolt Idler Roller Bolt 3/8" x 1 3/4" Bolt 3/8" x 1 1/2" Bolt 3/8" x 3/4" Bolt #8 x 1/2" Ground Screw Incline Sensor Wire #12 x 1 1/4" Screw 1/4" Motor Bolt #8 Belt Guide Screw 1/4" Washer 1/4" Split Washer 3/8" Jam Nut 5/16" Flange Nut Hood Clip 5/16" Cage Nut Foot Rail Decal Left Foot Rail Latch Warning Decal Platform...


