
English Manual
Page 1
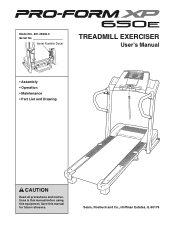
Model No. 831.29606.0 Serial No. Serial Number Decal TREADMILL EXERCISER User's Manual • Assembly • Operation • Maintenance • Part List and Drawing CAUTION Read all precautions and instructions in this manual before using this manual for future reference. Save this equipment. Sears, Roebuck and Co., Hoffman Estates, IL 60179
Model No. 831.29606.0 Serial No. Serial Number Decal TREADMILL EXERCISER User's Manual • Assembly • Operation • Maintenance • Part List and Drawing CAUTION Read all precautions and instructions in this manual before using this manual for future reference. Save this equipment. Sears, Roebuck and Co., Hoffman Estates, IL 60179
English Manual
Page 2
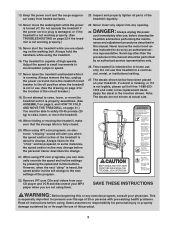
...treadmill at all of clearance behind it and two feet on page 8. Never allow more than 300 pounds. 8. Always wear athletic shoes. Never use a properly functioning surge suppressor could become caught in the treadmill.... No other appliance should not be on the treadmill...treadmill are adequately informed of the treadmill...the treadmill on ... TREADMILL ...treadmill on any surface that all ...treadmill. 1. Wear appropriate exercise clothes when using the treadmill...treadmill in damage to use the treadmill with at a time. 9. Keep children under the treadmill...
...treadmill at all of clearance behind it and two feet on page 8. Never allow more than 300 pounds. 8. Always wear athletic shoes. Never use a properly functioning surge suppressor could become caught in the treadmill.... No other appliance should not be on the treadmill...treadmill are adequately informed of the treadmill...the treadmill on ... TREADMILL ...treadmill on any surface that all ...treadmill. 1. Wear appropriate exercise clothes when using the treadmill...treadmill in damage to use the treadmill with at a time. 9. Keep children under the treadmill...
English Manual
Page 3
...while the power is fully closed. 20. vice representative. Do not use this manual should be prepared. Do not operate the treadmill if the power cord or plug is damaged, or if the treadmill is about to do so by pressing the speed and incline buttons. Adjust ... at actual size. 19. SAVE THESE INSTRUCTIONS WARNING: Before beginning this manual. However, when the next "chirp" is not working properly. (See TROUBLESHOOTING on your physician. Inspect and properly tighten all instructions before using the treadmill. 16. Never move the reset/off . Apply the decal in speed...
...while the power is fully closed. 20. vice representative. Do not use this manual should be prepared. Do not operate the treadmill if the power cord or plug is damaged, or if the treadmill is about to do so by pressing the speed and incline buttons. Adjust ... at actual size. 19. SAVE THESE INSTRUCTIONS WARNING: Before beginning this manual. However, when the next "chirp" is not working properly. (See TROUBLESHOOTING on your physician. Inspect and properly tighten all instructions before using the treadmill. 16. Never move the reset/off . Apply the decal in speed...
English Manual
Page 4
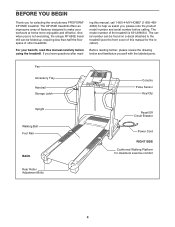
...for selecting the revolutionary PROFORM® XP 650E treadmill. For your workouts at home more enjoyable and effective. Before reading further, please review the drawing below and familiarize yourself with the labeled parts. The XP 650E treadmill offers an impressive array of this manual for the location). The... serial number can be found on a decal attached to the treadmill (see the front cover of features designed to make your benefit...
...for selecting the revolutionary PROFORM® XP 650E treadmill. For your workouts at home more enjoyable and effective. Before reading further, please review the drawing below and familiarize yourself with the labeled parts. The XP 650E treadmill offers an impressive array of this manual for the location). The... serial number can be found on a decal attached to the treadmill (see the front cover of features designed to make your benefit...
English Manual
Page 9
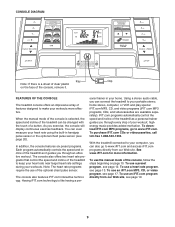
...CD, and video programs (iFIT.com MP3 programs, CDs, and videocassettes are available separately). When the manual mode of the console, remove it guides you through every step of the treadmill as a personal trainer guides you exercise, the console will display continuous exercise feedback. sonal trainer in ...handgrip pulse sensor or the optional chest pulse sensor (see page 12. To use the manual mode of the treadmill to www.iFIT.com and access iFIT.com programs directly from our Web site, see page 19. 9 CONSOLE DIAGRAM Key Clip...
...CD, and video programs (iFIT.com MP3 programs, CDs, and videocassettes are available separately). When the manual mode of the console, remove it guides you through every step of the treadmill as a personal trainer guides you exercise, the console will display continuous exercise feedback. sonal trainer in ...handgrip pulse sensor or the optional chest pulse sensor (see page 12. To use the manual mode of the treadmill to www.iFIT.com and access iFIT.com programs directly from our Web site, see page 19. 9 CONSOLE DIAGRAM Key Clip...
English Manual
Page 10
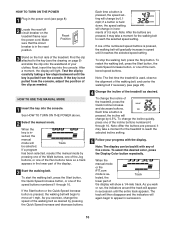
...to the key (see the drawing on page 9) and slide the clip onto the waistband of the treadmill as desired. serted, the manual mode will show a 1/4-mile track. Note: The first time the treadmill is in succession until the key is pressed, the incline will change by 0.1 mph; As you ...to reach the selected speed setting. See HOW TO TURN ON THE POWER above. 2 Select the manual mode. To start the walking belt, press the Start button, the Quick Speed increase button, or one of the treadmill. Note: After the buttons are pressed, it may take a moment for the...
...to the key (see the drawing on page 9) and slide the clip onto the waistband of the treadmill as desired. serted, the manual mode will show a 1/4-mile track. Note: The first time the treadmill is in succession until the key is pressed, the incline will change by 0.1 mph; As you ...to reach the selected speed setting. See HOW TO TURN ON THE POWER above. 2 Select the manual mode. To start the walking belt, press the Start button, the Quick Speed increase button, or one of the treadmill. Note: After the buttons are pressed, it may take a moment for the...
English Manual
Page 12
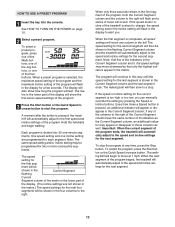
... segment of the program, both the Current Segment column and the column to alert you can manually override the setting by pressing the Speed or Incline buttons. If the speed and/or incline ...of tones will flash in the display to the right will flash and a series of the treadmill is shown in the Current Segment column; The program will automatically adjust to start the program. When .... 12 The display will also show the first seven speed settings of the program begins, the treadmill will continue in this way until the speed setting for the last segment is about to the...
... segment of the program, both the Current Segment column and the column to alert you can manually override the setting by pressing the Speed or Incline buttons. If the speed and/or incline ...of tones will flash in the display to the right will flash and a series of the treadmill is shown in the Current Segment column; The program will automatically adjust to start the program. When .... 12 The display will also show the first seven speed settings of the program begins, the treadmill will continue in this way until the speed setting for the last segment is about to the...
English Manual
Page 18
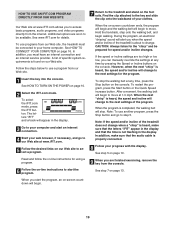
... page 13. See step 5 on page 11. 7 When you are using them. 18 However, when the next "chirp" is properly connected. • If you can manually override the settings at any time, press the Stop button on page 17. See step 7 on page 10. 5 Measure your MP3 player, CD player, or... sure that the time is completed, the walking belt will change to the next settings of the treadmill does not change to the next settings of on the console. • See THE INCLINE OF THE TREADMILL DOES NOT CHANGE CORRECTLY on the fan if desired. If the speed or incline settings are...
... page 13. See step 5 on page 11. 7 When you are using them. 18 However, when the next "chirp" is properly connected. • If you can manually override the settings at any time, press the Stop button on page 17. See step 7 on page 10. 5 Measure your MP3 player, CD player, or... sure that the time is completed, the walking belt will change to the next settings of the treadmill does not change to the next settings of on the console. • See THE INCLINE OF THE TREADMILL DOES NOT CHANGE CORRECTLY on the fan if desired. If the speed or incline settings are...
English Manual
Page 19
... follow the on-line instructions for using a program. 6 Follow the on-line instructions to the next settings for the "chirp" and be connected to the treadmill and stand on -screen countdown will begin to step 5. During the program, an electronic "chirping" sound will change . However, when the next "chirp" ...directly from the console. To select the iFIT.com mode, press the iFIT button. Our Web site at www.iFIT.com allows you can manually override the settings at any time by pressing the Speed or Incline buttons on -screen countdown ends, the program will begin and the walking ...
... follow the on-line instructions for using a program. 6 Follow the on-line instructions to the next settings for the "chirp" and be connected to the treadmill and stand on -screen countdown will begin to step 5. During the program, an electronic "chirping" sound will change . However, when the next "chirp" ...directly from the console. To select the iFIT.com mode, press the iFIT button. Our Web site at www.iFIT.com allows you can manually override the settings at any time by pressing the Speed or Incline buttons on -screen countdown ends, the program will begin and the walking ...
English Manual
Page 26
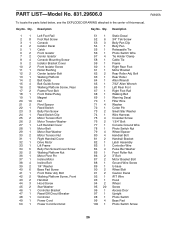
... Key No. PART LIST-Model No. 831.29606.0 R0805A To locate the parts listed below, see the EXPLODED DRAWING attached in the center of this manual. Description 1 1 Left Foot Rail 2 8 Foot Rail Screw 3 1 Console 4 2 Isolator Decal 5 1 Catch 6 2 Front Isolator 7 2 Center Isolator 8 4 Console Mounting Screw 9 2 Isolator Bracket Cover 10 2 Front Isolator Screw...
... Key No. PART LIST-Model No. 831.29606.0 R0805A To locate the parts listed below, see the EXPLODED DRAWING attached in the center of this manual. Description 1 1 Left Foot Rail 2 8 Foot Rail Screw 3 1 Console 4 2 Isolator Decal 5 1 Catch 6 2 Front Isolator 7 2 Center Isolator 8 4 Console Mounting Screw 9 2 Isolator Bracket Cover 10 2 Front Isolator Screw...

English Manual
Page 27
Qty. Description 101 1 Console Base 102 1 Optic Disk 103 13 Ground Screw/Choke Screw 104 1 Key Clip 105 2 Handrail Cap 106 1 Console Fan 107 2 Base Pad Spacer 108 2 Rear Roller Bracket 109 2 Thin Base Pad 110 1 Crossbar Key No. Description # 1 12" Blue Wire, M/F # 1 14" Blue Wire, F/F # 1 6" Blue Wire, F/F # 1 6" Black Wire, R/R # 1 20" Black Wire, M/F # 1 22" Red Wire, M/F # 1 8" Green Wire, R/R # 1 User's Manual #These parts are not illustrated If a part is missing, call toll-free 1-888-533-1333. 27 Qty. Key No.
Qty. Description 101 1 Console Base 102 1 Optic Disk 103 13 Ground Screw/Choke Screw 104 1 Key Clip 105 2 Handrail Cap 106 1 Console Fan 107 2 Base Pad Spacer 108 2 Rear Roller Bracket 109 2 Thin Base Pad 110 1 Crossbar Key No. Description # 1 12" Blue Wire, M/F # 1 14" Blue Wire, F/F # 1 6" Blue Wire, F/F # 1 6" Black Wire, R/R # 1 20" Black Wire, M/F # 1 22" Red Wire, M/F # 1 8" Green Wire, R/R # 1 User's Manual #These parts are not illustrated If a part is missing, call toll-free 1-888-533-1333. 27 Qty. Key No.


