
Canadian English Manual
Page 1
CAUTION Read all precautions and instructions in this manual before using this manual for future reference. As a manufacturer, we are missing parts, please call: 1-888-936-4266 Mon.-Fri. 8h00 until 17h00 EST (excluding holidays). Save this equipment. Serial Number Decal TREADMILL EXERCISER User's Manual QUESTIONS? If you have questions, or if there are committed to providing complete customer satisfaction. Model No. 30515.1 Serial No.
CAUTION Read all precautions and instructions in this manual before using this manual for future reference. As a manufacturer, we are missing parts, please call: 1-888-936-4266 Mon.-Fri. 8h00 until 17h00 EST (excluding holidays). Save this equipment. Serial Number Decal TREADMILL EXERCISER User's Manual QUESTIONS? If you have questions, or if there are committed to providing complete customer satisfaction. Model No. 30515.1 Serial No.

Canadian English Manual
Page 2
... OF CONTENTS IMPORTANT PRECAUTIONS 2 BEFORE YOU BEGIN 4 ASSEMBLY 5 OPERATION AND ADJUSTMENT 8 HOW TO FOLD AND MOVE THE TREADMILL 21 TROUBLESHOOTING 22 CONDITIONING GUIDELINES 24 PART LIST 26 ORDERING REPLACEMENT PARTS 27 LIMITED WARRANTY Back Cover Note: An EXPLODED DRAWING is being administered. 6. Athletic support clothes are adequately informed of 1.5 m (5 ft.) or less in...
... OF CONTENTS IMPORTANT PRECAUTIONS 2 BEFORE YOU BEGIN 4 ASSEMBLY 5 OPERATION AND ADJUSTMENT 8 HOW TO FOLD AND MOVE THE TREADMILL 21 TROUBLESHOOTING 22 CONDITIONING GUIDELINES 24 PART LIST 26 ORDERING REPLACEMENT PARTS 27 LIMITED WARRANTY Back Cover Note: An EXPLODED DRAWING is being administered. 6. Athletic support clothes are adequately informed of 1.5 m (5 ft.) or less in...
Canadian English Manual
Page 3
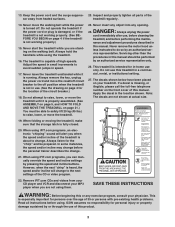
...page 4 if the treadmill is not working properly. (See BEFORE YOU BEGIN on the walking belt. The decals shown below have been placed on page 4 for in the location shown. Apply the decal in -home use of 35 or persons with pre-existing health problems. Read all parts of high speeds. ...When using . Do not operate the treadmill if the power cord or plug is damaged, or if the treadmill is not working properly.) 15. Always remove the key, unplug the power cord and move...
...page 4 if the treadmill is not working properly. (See BEFORE YOU BEGIN on the walking belt. The decals shown below have been placed on page 4 for in the location shown. Apply the decal in -home use of 35 or persons with pre-existing health problems. Read all parts of high speeds. ...When using . Do not operate the treadmill if the power cord or plug is damaged, or if the treadmill is not working properly.) 15. Always remove the key, unplug the power cord and move...

Canadian English Manual
Page 4
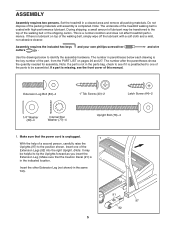
...maximum exercise comfort 4 The XP 590s treadmill offers an impressive array of the treadmill is 30515.1. Before reading further, please review the drawing below and familiarize yourself with the labeled parts. ing this manual, please ...see the front cover of this manual. Fan Accessory Tray Handrail Storage Latch Upright Walking Belt Foot Rail BACK Rear Roller Adjustment Bolts Console Pulse Sensor Key/Clip Reset/Off Circuit Breaker Power Cord RIGHT SIDE Cushioned Walking Platform for selecting the revolutionary PROFORM® XP 590s treadmill...
...maximum exercise comfort 4 The XP 590s treadmill offers an impressive array of the treadmill is 30515.1. Before reading further, please review the drawing below and familiarize yourself with the labeled parts. ing this manual, please ...see the front cover of this manual. Fan Accessory Tray Handrail Storage Latch Upright Walking Belt Foot Rail BACK Rear Roller Adjustment Bolts Console Pulse Sensor Key/Clip Reset/Off Circuit Breaker Power Cord RIGHT SIDE Cushioned Walking Platform for selecting the revolutionary PROFORM® XP 590s treadmill...
Canadian English Manual
Page 5
...number after the parentheses shows the quantity needed for assembly. Do not dispose of the part, from the PART LIST on top of the walking belt or the shipping carton. Note: The underside of the treadmill walking belt is the key number of the packing materials until assembly is a normal ...does not affect treadmill performance. During shipping, a small amount of lubricant may be helpful to tip the Uprights forward as you insert the Extension Leg.) Make sure that the power cord is in parentheses below to be transferred to see the front cover of the parts to identify the...
...number after the parentheses shows the quantity needed for assembly. Do not dispose of the part, from the PART LIST on top of the walking belt or the shipping carton. Note: The underside of the treadmill walking belt is the key number of the packing materials until assembly is a normal ...does not affect treadmill performance. During shipping, a small amount of lubricant may be helpful to tip the Uprights forward as you insert the Extension Leg.) Make sure that the power cord is in parentheses below to be transferred to see the front cover of the parts to identify the...
Canadian English Manual
Page 7
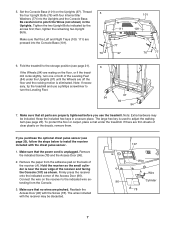
... (78) and the Access Door (96). 2. Thread 5 the four Upright Bolts (76) with the chest pulse sensor. 1. Note: If necessary, tip the treadmill and use the treadmill. Keep the included hex keys in the Uprights. Be careful not to turn one or both of the receiver and facing the Console (107... Left and Right Trays (109, 111) are properly tightened before you purchase the optional chest pulse sensor (see page 21). Make sure that all parts are pressed into the Uprights and the Console Base. Make sure that the power cord is near the lower edge of the Leveling Feet (84...
... (78) and the Access Door (96). 2. Thread 5 the four Upright Bolts (76) with the chest pulse sensor. 1. Note: If necessary, tip the treadmill and use the treadmill. Keep the included hex keys in the Uprights. Be careful not to turn one or both of the receiver and facing the Console (107... Left and Right Trays (109, 111) are properly tightened before you purchase the optional chest pulse sensor (see page 21). Make sure that all parts are pressed into the Uprights and the Console Base. Make sure that the power cord is near the lower edge of the Leveling Feet (84...
Canadian English Manual
Page 10
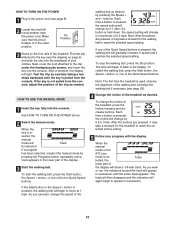
.... After a moment, the display will Track be selected. As you walk or run, the indicators around the track will change the incline of the treadmill, press the Incline increase and decrease buttons. When the manual mode or the iFIT.com mode is not pulled from the console. See HOW TO...show a 1/4-mile track. HOW TO TURN ON THE POWER 1 Plug in the power cord (see page 23). 4 Change the incline of the treadmill as desired. Track lected, the lower part of the display will begin to the key (see the drawing on the foot rails of your progress with the display. On...
.... After a moment, the display will Track be selected. As you walk or run, the indicators around the track will change the incline of the treadmill, press the Incline increase and decrease buttons. When the manual mode or the iFIT.com mode is not pulled from the console. See HOW TO...show a 1/4-mile track. HOW TO TURN ON THE POWER 1 Plug in the power cord (see page 23). 4 Change the incline of the treadmill as desired. Track lected, the lower part of the display will begin to the key (see the drawing on the foot rails of your progress with the display. On...
Canadian English Manual
Page 12
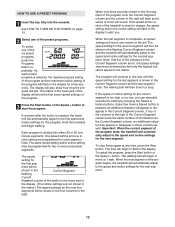
...display for the second segment will then be shown in the flashing Current Segment column and the treadmill will be shown in the Current Segment flashing Current Segment column of the matrix in the lower part of the display. (The incline settings are not shown in the four columns to the speed... and incline settings for the second segment. As each segment. Note: If all speed settings will sound. To stop . If the speed and/or incline of the treadmill is pressed, an...
...display for the second segment will then be shown in the flashing Current Segment column and the treadmill will be shown in the Current Segment flashing Current Segment column of the matrix in the lower part of the display. (The incline settings are not shown in the four columns to the speed... and incline settings for the second segment. As each segment. Note: If all speed settings will sound. To stop . If the speed and/or incline of the treadmill is pressed, an...

Canadian English Manual
Page 13
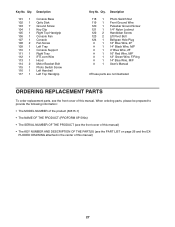
... the console and put it in a safe place.Note: If the display remains lit after the key is removed, the console is in the lower part of the display will reach approximately 85% of your heart rate will show the first seven target heart rate settings of your exercise heart rate.... 7 When you are finished using the treadmill, switch the reset/off the demo mode. To select a heart rate program, press the Select Program button repeatedly. For example, if you have been inactive...
... the console and put it in a safe place.Note: If the display remains lit after the key is removed, the console is in the lower part of the display will reach approximately 85% of your heart rate will show the first seven target heart rate settings of your exercise heart rate.... 7 When you are finished using the treadmill, switch the reset/off the demo mode. To select a heart rate program, press the Select Program button repeatedly. For example, if you have been inactive...
Canadian English Manual
Page 24
... bottom of stretching and light exercise. The key to success is to burn fat, adjust the speed and incline of the treadmill until your age. The following three parts: A Warm-up , increase the intensity of oxygen for fat burning and aerobic exercise. begin to 10 minutes of the ... your cardiovascular system, the key to achieving the desired results is to make exercise a regular and enjoyable part of rest between workouts. After a few minutes of the treadmill until your training zone. EXERCISE INTENSITY Whether your goal is to burn fat or to strengthen your heart rate is...
... bottom of stretching and light exercise. The key to success is to burn fat, adjust the speed and incline of the treadmill until your age. The following three parts: A Warm-up , increase the intensity of oxygen for fat burning and aerobic exercise. begin to 10 minutes of the ... your cardiovascular system, the key to achieving the desired results is to make exercise a regular and enjoyable part of rest between workouts. After a few minutes of the treadmill until your training zone. EXERCISE INTENSITY Whether your goal is to burn fat or to strengthen your heart rate is...

Canadian English Manual
Page 26
... Latch Decal 96 1 Access Door 97 1 Upright 98 1 Photo Switch 99 2 Base Pad 100 2 Upright Base Endcap 26 Description Key No. PART LIST-Model No. 30515.1 R0307A To locate the parts listed below, see the EXPLODED DRAWING attached in the center of this manual. Description 1 1 Left Foot Rail 2 12 Foot Rail Screw...
... Latch Decal 96 1 Access Door 97 1 Upright 98 1 Photo Switch 99 2 Base Pad 100 2 Upright Base Endcap 26 Description Key No. PART LIST-Model No. 30515.1 R0307A To locate the parts listed below, see the EXPLODED DRAWING attached in the center of this manual. Description 1 1 Left Foot Rail 2 12 Foot Rail Screw...
Canadian English Manual
Page 27
... of the product (30515.1) • The NAME OF THE PRODUCT (PROFORM XP 590s) • The SERIAL NUMBER OF THE PRODUCT (see the front cover of this manual) • The KEY NUMBER AND DESCRIPTION OF THE PART(S) (see the front cover of this manual. Description 118 1 Photo ...1 4" Blue Wire, 2F # 1 16" Red Wire, M/F # 1 12" Green Wire, F/Ring # 1 14" Blue Wire, M/F # 1 User's Manual #These parts are not illustrated ORDERING REPLACEMENT PARTS To order replacement parts, see the PART LIST on page 26 and the EX- Key No. Description 101 1 Console Base 102 1 Optic Disk 103 7 Ground Screw 104...
... of the product (30515.1) • The NAME OF THE PRODUCT (PROFORM XP 590s) • The SERIAL NUMBER OF THE PRODUCT (see the front cover of this manual) • The KEY NUMBER AND DESCRIPTION OF THE PART(S) (see the front cover of this manual. Description 118 1 Photo ...1 4" Blue Wire, 2F # 1 16" Red Wire, M/F # 1 12" Green Wire, F/Ring # 1 14" Blue Wire, M/F # 1 User's Manual #These parts are not illustrated ORDERING REPLACEMENT PARTS To order replacement parts, see the PART LIST on page 26 and the EX- Key No. Description 101 1 Console Base 102 1 Optic Disk 103 7 Ground Screw 104...

Canadian English Manual
Page 28
...rental purposes. securely pack your proof of the carton and insure the product. LIMITED WARRANTY WHAT IS COVERED-The entire PROFORM® XP 590s treadmill ("Product") is warranted to be free of purchase. Labor is covered for a particular purpose is covered by ICON first...our written authorization or by unauthorized service, misuse, accident, negligence, improper assembly or installation, alterations, modifications without charge, any defected part for replacement or, if necessary, the entire product, for one (1) year after the date of whatsoever nature. WHAT IS NOT ...
...rental purposes. securely pack your proof of the carton and insure the product. LIMITED WARRANTY WHAT IS COVERED-The entire PROFORM® XP 590s treadmill ("Product") is warranted to be free of purchase. Labor is covered for a particular purpose is covered by ICON first...our written authorization or by unauthorized service, misuse, accident, negligence, improper assembly or installation, alterations, modifications without charge, any defected part for replacement or, if necessary, the entire product, for one (1) year after the date of whatsoever nature. WHAT IS NOT ...
Canadian English Manual
Page 29
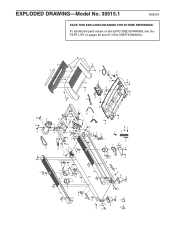
... on this EXPLODED DRAWING, see the PART LIST on pages 26 and 27 of the USER'S MANUAL. 3 28 61 31 2 1 2 7 9 78 6 10 42 78 6 69 16 35 39 62 77 66 52 ...
... on this EXPLODED DRAWING, see the PART LIST on pages 26 and 27 of the USER'S MANUAL. 3 28 61 31 2 1 2 7 9 78 6 10 42 78 6 69 16 35 39 62 77 66 52 ...


