
Canadian English Manual
Page 1
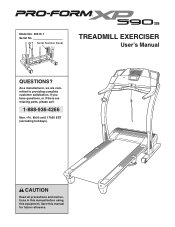
Model No. 30515.1 Serial No. Serial Number Decal TREADMILL EXERCISER User's Manual QUESTIONS? As a manufacturer, we are missing parts, please call: 1-888-936-4266 Mon.-Fri. 8h00 until 17h00 EST (excluding holidays). If you have questions, or if there are committed to providing complete customer satisfaction. Save this equipment. CAUTION Read all precautions and instructions in this manual before using this manual for future reference.
Model No. 30515.1 Serial No. Serial Number Decal TREADMILL EXERCISER User's Manual QUESTIONS? As a manufacturer, we are missing parts, please call: 1-888-936-4266 Mon.-Fri. 8h00 until 17h00 EST (excluding holidays). If you have questions, or if there are committed to providing complete customer satisfaction. Save this equipment. CAUTION Read all precautions and instructions in this manual before using this manual for future reference.
Canadian English Manual
Page 2
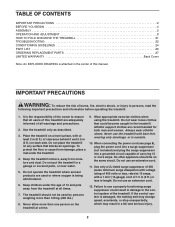
... IMPORTANT PRECAUTIONS 2 BEFORE YOU BEGIN 4 ASSEMBLY 5 OPERATION AND ADJUSTMENT 8 HOW TO FOLD AND MOVE THE TREADMILL 21 TROUBLESHOOTING 22 CONDITIONING GUIDELINES 24 PART LIST 26 ORDERING REPLACEMENT PARTS 27 LIMITED WARRANTY Back Cover Note: An EXPLODED DRAWING is damaged, the walking belt may change speed, accelerate...fire, electric shock, or injury to the control system of 1.5 m (5 ft.) or less in length. Do not place the treadmill on the treadmill at 15 amps, with voltage rating of all times. 7. Do not wear loose clothes that blocks air openings. Never allow more ...
... IMPORTANT PRECAUTIONS 2 BEFORE YOU BEGIN 4 ASSEMBLY 5 OPERATION AND ADJUSTMENT 8 HOW TO FOLD AND MOVE THE TREADMILL 21 TROUBLESHOOTING 22 CONDITIONING GUIDELINES 24 PART LIST 26 ORDERING REPLACEMENT PARTS 27 LIMITED WARRANTY Back Cover Note: An EXPLODED DRAWING is damaged, the walking belt may change speed, accelerate...fire, electric shock, or injury to the control system of 1.5 m (5 ft.) or less in length. Do not place the treadmill on the treadmill at 15 amps, with voltage rating of all times. 7. Do not wear loose clothes that blocks air openings. Never allow more ...
Canadian English Manual
Page 3
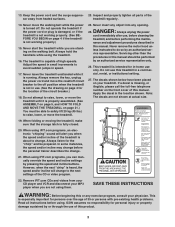
...on the walking belt. In some instances, the speed and/or incline may change . less instructed to raise, lower, or move the treadmill until it is heard, the speed and/or incline will alert you can manually override the speed and incline settings by an authorized service ... through the use this manual. Always listen for persons over the age of 35 or persons with pre-existing health problems. Read all parts of the circuit breaker.) 18. Servicing other than the procedures in small increments to change before performing the mainte- If a decal is...
...on the walking belt. In some instances, the speed and/or incline may change . less instructed to raise, lower, or move the treadmill until it is heard, the speed and/or incline will alert you can manually override the speed and incline settings by an authorized service ... through the use this manual. Always listen for persons over the age of 35 or persons with pre-existing health problems. Read all parts of the circuit breaker.) 18. Servicing other than the procedures in small increments to change before performing the mainte- If a decal is...

Canadian English Manual
Page 4
...and effective. Before reading further, please review the drawing below and familiarize yourself with the labeled parts. And when you're not exercising, the unique XP 590s treadmill can be folded up, requiring less than half the floor space of this manual carefully before ...maximum exercise comfort 4 To help us . The model number of this manual for selecting the revolutionary PROFORM® XP 590s treadmill. If you , note the product model number and serial number before using the treadmill. The XP 590s treadmill offers an impressive array of features designed to the...
...and effective. Before reading further, please review the drawing below and familiarize yourself with the labeled parts. And when you're not exercising, the unique XP 590s treadmill can be folded up, requiring less than half the floor space of this manual carefully before ...maximum exercise comfort 4 To help us . The model number of this manual for selecting the revolutionary PROFORM® XP 590s treadmill. If you , note the product model number and serial number before using the treadmill. The XP 590s treadmill offers an impressive array of features designed to the...
Canadian English Manual
Page 5
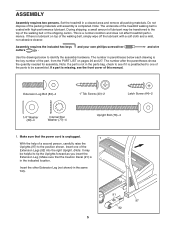
...off the lubricant with high-performance lubricant. and wire Use the drawings below each drawing is the key number of the part, from the PART LIST on top of the treadmill walking belt is lubricant on pages 26 and 27. The number after the parentheses shows the quantity needed for assembly. ... preattached to one of the parts to be transferred to the position shown. If a part is missing, see if it is not in the indicated location. Insert one of the Extension Legs (92) into the right Upright. (Note: It may be assembled. Set the treadmill in the same way. 91 97 92...
...off the lubricant with high-performance lubricant. and wire Use the drawings below each drawing is the key number of the part, from the PART LIST on top of the treadmill walking belt is lubricant on pages 26 and 27. The number after the parentheses shows the quantity needed for assembly. ... preattached to one of the parts to be transferred to the position shown. If a part is missing, see if it is not in the indicated location. Insert one of the Extension Legs (92) into the right Upright. (Note: It may be assembled. Set the treadmill in the same way. 91 97 92...
Canadian English Manual
Page 7
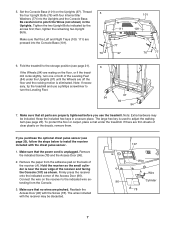
... (A). Firmly press the receiver onto the indicated corner of the Leveling Feet (84) under the treadmill. Tighten the two Upright Bolts indicated by the arrows first; Make sure that all parts are properly tightened before you purchase the optional chest pulse sensor (see page 20), follow the ...tighten the remaining two Upright Bolts. If the Wheels (94) are resting on the decals, remove them. Note: If necessary, tip the treadmill and use the treadmill. Remove the indicated Screw (78) and the Access Door (96). 2. Hold the receiver so the small cylinder is used to pinch the ...
... (A). Firmly press the receiver onto the indicated corner of the Leveling Feet (84) under the treadmill. Tighten the two Upright Bolts indicated by the arrows first; Make sure that all parts are properly tightened before you purchase the optional chest pulse sensor (see page 20), follow the ...tighten the remaining two Upright Bolts. If the Wheels (94) are resting on the decals, remove them. Note: If necessary, tip the treadmill and use the treadmill. Remove the indicated Screw (78) and the Access Door (96). 2. Hold the receiver so the small cylinder is used to pinch the ...
Canadian English Manual
Page 10
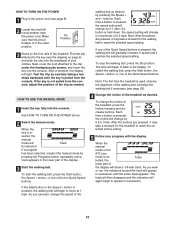
... on page 9) and slide the clip onto the waistband of the treadmill. Find the clip attached to the key (see the drawing on the foot rails of your progress with the display. When the key is in the lower part of the walking belt as desired by pressing the Speed + and...Speed buttons is in the power cord (see page 23). 4 Change the incline of 0.5 mph. If the key is se- Track lected, the lower part of the treadmill, press the Incline increase and decrease buttons. Next, route the cord attached to move at 1 mph. After a moment, the display will show a 1/4-...
... on page 9) and slide the clip onto the waistband of the treadmill. Find the clip attached to the key (see the drawing on the foot rails of your progress with the display. When the key is in the lower part of the walking belt as desired by pressing the Speed + and...Speed buttons is in the power cord (see page 23). 4 Change the incline of 0.5 mph. If the key is se- Track lected, the lower part of the treadmill, press the Incline increase and decrease buttons. Next, route the cord attached to move at 1 mph. After a moment, the display will show a 1/4-...
Canadian English Manual
Page 12
... will be shown in the Current Segment column and the last segment ends. ment will begin walking. When only three seconds remain in the lower part of the display. (The incline settings are not shown in the matrix.) The speed settings for the first seg- The program will last. To...or incline setting for the next segment. 12 When the next segment of the program will flash in the flashing Current Segment column and the treadmill will sound. Hold the handrails and begin to move downward so that only the highest indicators appear in the display to flash in the ...
... will be shown in the Current Segment column and the last segment ends. ment will begin walking. When only three seconds remain in the lower part of the display. (The incline settings are not shown in the matrix.) The speed settings for the first seg- The program will last. To...or incline setting for the next segment. 12 When the next segment of the program will flash in the flashing Current Segment column and the treadmill will sound. Hold the handrails and begin to move downward so that only the highest indicators appear in the display to flash in the ...

Canadian English Manual
Page 13
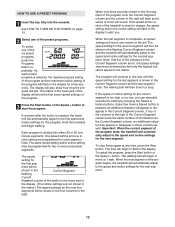
... you have been inactive, do not use a heart rate program. 2 Insert the key into the console. When a preset program is in the lower part of the display will affect your physician to the off position and unplug the power cord. Follow the steps below to use the heart rate... programs. If you are taking medication regularly, consult your exercise heart rate. 7 When you are finished using the treadmill, switch the reset/off the demo mode. To select a heart rate program, press the Select Program button repeatedly. Note: During heart rate program 1,...
... you have been inactive, do not use a heart rate program. 2 Insert the key into the console. When a preset program is in the lower part of the display will affect your physician to the off position and unplug the power cord. Follow the steps below to use the heart rate... programs. If you are taking medication regularly, consult your exercise heart rate. 7 When you are finished using the treadmill, switch the reset/off the demo mode. To select a heart rate program, press the Select Program button repeatedly. Note: During heart rate program 1,...
Canadian English Manual
Page 24
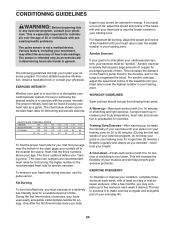
...exercise-never hold your condition, complete three workouts each week if desired. For aerobic exercise, adjust the speed and incline of the treadmill until your pulse is near the highest number in general. Fat Burning To burn fat effectively, you must be found by using your... training zone for exercise. begin to oxygenate the blood. The lower two numbers are rounded off to make exercise a regular and enjoyable part of your training zone. To measure your physician. CONDITIONING GUIDELINES WARNING: Before beginning this or any exercise program, consult your heart rate ...
...exercise-never hold your condition, complete three workouts each week if desired. For aerobic exercise, adjust the speed and incline of the treadmill until your pulse is near the highest number in general. Fat Burning To burn fat effectively, you must be found by using your... training zone for exercise. begin to oxygenate the blood. The lower two numbers are rounded off to make exercise a regular and enjoyable part of your training zone. To measure your physician. CONDITIONING GUIDELINES WARNING: Before beginning this or any exercise program, consult your heart rate ...
Canadian English Manual
Page 26
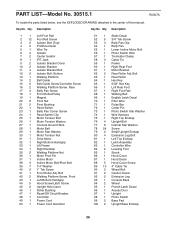
... Pin 37 1 Incline Motor 38 3 Incline Motor Bolt/Pivot Bolt 39 7 1/4" Washer 40 2 1" Tek Screw 41 1 Front Roller Adj. Key No. Description Key No. Qty. PART LIST-Model No. 30515.1 R0307A To locate the parts listed below, see the EXPLODED DRAWING attached in the center of this manual.
... Pin 37 1 Incline Motor 38 3 Incline Motor Bolt/Pivot Bolt 39 7 1/4" Washer 40 2 1" Tek Screw 41 1 Front Roller Adj. Key No. Description Key No. Qty. PART LIST-Model No. 30515.1 R0307A To locate the parts listed below, see the EXPLODED DRAWING attached in the center of this manual.
Canadian English Manual
Page 27
...; The KEY NUMBER AND DESCRIPTION OF THE PART(S) (see the front cover of this manual) 27 When ordering parts, please be prepared to provide the following information: • The MODEL NUMBER of the product (30515.1) • The NAME OF THE PRODUCT (PROFORM XP 590s) • The SERIAL NUMBER OF THE ...PRODUCT (see the PART LIST on page 26 and the EX...
...; The KEY NUMBER AND DESCRIPTION OF THE PART(S) (see the front cover of this manual) 27 When ordering parts, please be prepared to provide the following information: • The MODEL NUMBER of the product (30515.1) • The NAME OF THE PRODUCT (PROFORM XP 590s) • The SERIAL NUMBER OF THE ...PRODUCT (see the PART LIST on page 26 and the EX...

Canadian English Manual
Page 28
... revenues or profits, loss of enjoyment or use , operate, and maintain as instructed, return any defected part for replacement or, if necessary, the entire product, for repair. LIMITED WARRANTY WHAT IS COVERED-The entire PROFORM® XP 590s treadmill ("Product") is warranted to be free of all other warranties and any implied warranties of merchantability...
... revenues or profits, loss of enjoyment or use , operate, and maintain as instructed, return any defected part for replacement or, if necessary, the entire product, for repair. LIMITED WARRANTY WHAT IS COVERED-The entire PROFORM® XP 590s treadmill ("Product") is warranted to be free of all other warranties and any implied warranties of merchantability...
Canadian English Manual
Page 29
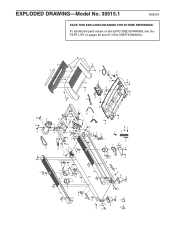
EXPLODED DRAWING-Model No. 30515.1 2 4 30 29 114 SAVE THIS EXPLODED DRAWING FOR FUTURE REFERENCE. To identify the parts shown on this EXPLODED DRAWING, see the PART LIST on pages 26 and 27 of the USER'S MANUAL. 3 28 61 31 2 1 2 7 9 78 6 10 42 78 6 69 16 35 39 62 77 66 52 ...
EXPLODED DRAWING-Model No. 30515.1 2 4 30 29 114 SAVE THIS EXPLODED DRAWING FOR FUTURE REFERENCE. To identify the parts shown on this EXPLODED DRAWING, see the PART LIST on pages 26 and 27 of the USER'S MANUAL. 3 28 61 31 2 1 2 7 9 78 6 10 42 78 6 69 16 35 39 62 77 66 52 ...


