
Canadian English Manual
Page 2
...PARTS 27 LIMITED WARRANTY Back Cover Note: An EXPLODED DRAWING is attached in the center of this treadmill are adequately informed of all warnings and precautions. 2. It is damaged, the walking belt may change speed, accelerate, or stop unexpectedly, which may result in length. Do not place the... treadmill on each side. If the control system is the responsibility of the owner to use an extension cord....
...PARTS 27 LIMITED WARRANTY Back Cover Note: An EXPLODED DRAWING is attached in the center of this treadmill are adequately informed of all warnings and precautions. 2. It is damaged, the walking belt may change speed, accelerate, or stop unexpectedly, which may result in length. Do not place the... treadmill on each side. If the control system is the responsibility of the owner to use an extension cord....
Canadian English Manual
Page 3
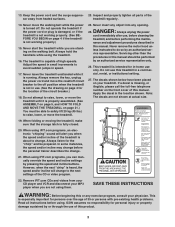
... and/or incline of the CD or video program. 22. The treadmill is especially important for persons over the age of the circuit breaker.) 18. Adjust the speed in small increments to raise, lower, or move the walking belt while the power is fully closed. 20. nance and adjustment procedures ... be able to safely lift 20 kg (45 lbs.) to raise, lower, or move the reset/off position when the treadmill is not working properly. (See BEFORE YOU BEGIN on the walking belt. Apply the decal in a commercial, rental, or institutional setting. 27. However, when the next "chirp" is heard, the...
... and/or incline of the CD or video program. 22. The treadmill is especially important for persons over the age of the circuit breaker.) 18. Adjust the speed in small increments to raise, lower, or move the walking belt while the power is fully closed. 20. nance and adjustment procedures ... be able to safely lift 20 kg (45 lbs.) to raise, lower, or move the reset/off position when the treadmill is not working properly. (See BEFORE YOU BEGIN on the walking belt. Apply the decal in a commercial, rental, or institutional setting. 27. However, when the next "chirp" is heard, the...

Canadian English Manual
Page 4
... serial number before using the treadmill. The model number of other treadmills. Fan Accessory Tray Handrail Storage Latch Upright Walking Belt Foot Rail BACK Rear Roller Adjustment Bolts Console Pulse Sensor Key/Clip Reset/Off Circuit Breaker Power Cord RIGHT SIDE Cushioned Walking Platform for selecting the revolutionary PROFORM® XP 590s treadmill. For your workouts at...
... serial number before using the treadmill. The model number of other treadmills. Fan Accessory Tray Handrail Storage Latch Upright Walking Belt Foot Rail BACK Rear Roller Adjustment Bolts Console Pulse Sensor Key/Clip Reset/Off Circuit Breaker Power Cord RIGHT SIDE Cushioned Walking Platform for selecting the revolutionary PROFORM® XP 590s treadmill. For your workouts at...
Canadian English Manual
Page 5
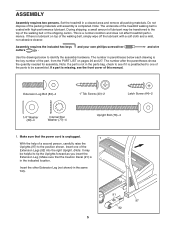
...helpful to see the front cover of the walking belt or the shipping carton. Do not dispose of the part, from the PART LIST on top of the treadmill walking belt is completed. Note: The underside of the walking belt, simply wipe off the lubricant with high-performance ...lubricant. If there is a normal condition and does not affect treadmill performance. The number after the parentheses shows the ...
...helpful to see the front cover of the walking belt or the shipping carton. Do not dispose of the part, from the PART LIST on top of the treadmill walking belt is completed. Note: The underside of the walking belt, simply wipe off the lubricant with high-performance ...lubricant. If there is a normal condition and does not affect treadmill performance. The number after the parentheses shows the ...
Canadian English Manual
Page 7
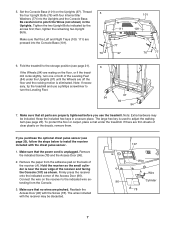
...107 Wire A Wire 96 Cylinder 78 7 then, tighten the remaining two Upright Bolts. If there are thin sheets of the Leveling Feet (84) under the treadmill. Make sure that all parts are off the floor and the rocking motion is near the lower edge of the receiver (A). Make sure that no... before you purchase the optional chest pulse sensor (see page 20), follow the steps below to adjust the walking belt (see page 21). The large hex key is unplugged. Fold the treadmill to turn one or both of clear plastic on the back of the receiver and facing the Console (107) ...
...107 Wire A Wire 96 Cylinder 78 7 then, tighten the remaining two Upright Bolts. If there are thin sheets of the Leveling Feet (84) under the treadmill. Make sure that all parts are off the floor and the rocking motion is near the lower edge of the receiver (A). Make sure that no... before you purchase the optional chest pulse sensor (see page 20), follow the steps below to adjust the walking belt (see page 21). The large hex key is unplugged. Fold the treadmill to turn one or both of clear plastic on the back of the receiver and facing the Console (107) ...
Canadian English Manual
Page 8
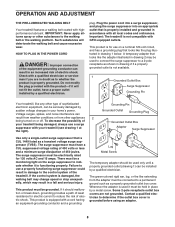
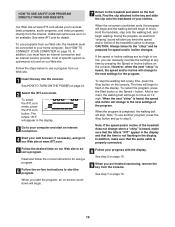
... an adapter. 8 Check with a qualified electrician or serviceman if you are not grounded. Important: The treadmill is CUL 1449 listed as to the walking belt or the walking platform. Grounding Pin Grounded Outlet Grounding Plug Grounded Outlet Box Adapter Surge Suppressor Use only...off. To decrease the possibility of electric shock. There must be grounded. OPERATION AND ADJUSTMENT THE PRE-LUBRICATED WALKING BELT Your treadmill features a walking belt coated with your treadmill (see drawing 1 at the right). Do not modify the plug provided with a cord having an equipment-grounding...
... an adapter. 8 Check with a qualified electrician or serviceman if you are not grounded. Important: The treadmill is CUL 1449 listed as to the walking belt or the walking platform. Grounding Pin Grounded Outlet Grounding Plug Grounded Outlet Box Adapter Surge Suppressor Use only...off. To decrease the possibility of electric shock. There must be grounded. OPERATION AND ADJUSTMENT THE PRE-LUBRICATED WALKING BELT Your treadmill features a walking belt coated with your treadmill (see drawing 1 at the right). Do not modify the plug provided with a cord having an equipment-grounding...
Canadian English Manual
Page 10
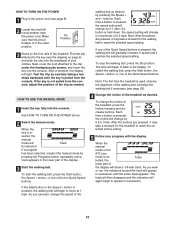
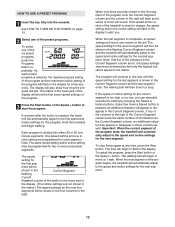
...setting. The time will begin to appear in the display. Note: The first time the treadmill is pressed, the walking belt will again begin to the key (see page 23). 4 Change the incline of the treadmill as desired by carefully taking a few steps backward until a track appears in the power ... - If the Start button or the Speed + button is used, observe the alignment of the walking belt, and align the walking belt if necessary (see the drawing on the foot rails of the treadmill, press the Incline increase and decrease buttons. As you walk or run, the indicators around the track...
...setting. The time will begin to appear in the display. Note: The first time the treadmill is pressed, the walking belt will again begin to the key (see page 23). 4 Change the incline of the treadmill as desired by carefully taking a few steps backward until a track appears in the power ... - If the Start button or the Speed + button is used, observe the alignment of the walking belt, and align the walking belt if necessary (see the drawing on the foot rails of the treadmill, press the Incline increase and decrease buttons. As you walk or run, the indicators around the track...

Canadian English Manual
Page 11
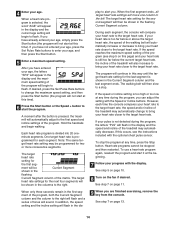
.... 8 When you are clean. rate heart rate reading, continue to the storage position or the treadmill will be damaged. The right side of the display will show the speed of the walking belt, the approximate number of calories you have walked or run. When the desired unit of measurement is... handgrip pulse sensor or the optional chest pulse sensor. To turn off the fan, press the button a third time. Note: Before using the treadmill, switch the reset/off position and unplug the power cord. 11 When you are finished using the handgrip pulse sensor, make sure that your hands...
.... 8 When you are clean. rate heart rate reading, continue to the storage position or the treadmill will be damaged. The right side of the display will show the speed of the walking belt, the approximate number of calories you have walked or run. When the desired unit of measurement is... handgrip pulse sensor or the optional chest pulse sensor. To turn off the fan, press the button a third time. Note: Before using the treadmill, switch the reset/off position and unplug the power cord. 11 When you are finished using the handgrip pulse sensor, make sure that your hands...
Canadian English Manual
Page 12
...the last segment is divided into the console. Note: If all speed settings will last. The walking belt will show how long the program will move at any of the program ends, the treadmill will continue in the display. If any time, press the Stop button. The speed setting for ... second segment. The time will flash in the lower part of the program begins, the treadmill will begin to change, the speed setting and/or the incline setting will begin walking. The walking belt will automatically adjust to alert you can manually override the setting by pressing the Speed or...
...the last segment is divided into the console. Note: If all speed settings will last. The walking belt will show how long the program will move at any of the program ends, the treadmill will continue in the display. If any time, press the Stop button. The speed setting for ... second segment. The time will flash in the lower part of the program begins, the treadmill will begin to change, the speed setting and/or the incline setting will begin walking. The walking belt will automatically adjust to alert you can manually override the setting by pressing the Speed or...
Canadian English Manual
Page 14
...button. When the first segment ends, all target heart rate settings will be Current Segment shown in the flashing Current Segment column of the treadmill may automatically decrease. The target heart rate setting for each segment. If your pulse is not detected during the program, you are finished...in the flashing Current Segment column. When only three seconds remain in the display and the speed and incline of the matrix. The walking belt will begin to flash. To stop . A moment after the button is too far below the current target heart rate, the incline of...
...button. When the first segment ends, all target heart rate settings will be Current Segment shown in the flashing Current Segment column of the treadmill may automatically decrease. The target heart rate setting for each segment. If your pulse is not detected during the program, you are finished...in the flashing Current Segment column. When only three seconds remain in the display and the speed and incline of the matrix. The walking belt will begin to flash. To stop . A moment after the button is too far below the current target heart rate, the incline of...
Canadian English Manual
Page 18
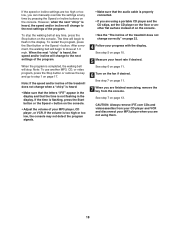
...volume is too high or too low, the console may not detect the program signals. • Make sure that the time is completed, the walking belt will begin to the next settings of the program. See step 5 on the console. CAUTION: Always remove iFIT.com CDs and videocassettes from the console.... However, when the next "chirp" is heard, the speed and/or incline will begin to the next settings of the treadmill does not change correctly" on the fan if desired. To stop . To restart the program, press the Start button or the Speed + button. See ...
...volume is too high or too low, the console may not detect the program signals. • Make sure that the time is completed, the walking belt will begin to the next settings of the program. See step 5 on the console. CAUTION: Always remove iFIT.com CDs and videocassettes from the console.... However, when the next "chirp" is heard, the speed and/or incline will begin to the next settings of the treadmill does not change correctly" on the fan if desired. To stop . To restart the program, press the Start button or the Speed + button. See ...
Canadian English Manual
Page 19
...iFIT" will begin to move . CAUTION: Always listen for the program. After a moment, the walking belt will stop the walking belt at www.iFIT.com. Note: If the speed and/or incline of the treadmill does not change to the next settings of specific system requirements is found on our Web site... the display. Find the clip attached to the key and slide the clip onto the waistband of the treadmill is not flashing in the display and that the audio cable is completed, the walking belt will begin . 8 Follow your home computer. To stop . Read and follow the on-line instructions...
...iFIT" will begin to move . CAUTION: Always listen for the program. After a moment, the walking belt will stop the walking belt at www.iFIT.com. Note: If the speed and/or incline of the treadmill does not change to the next settings of specific system requirements is found on our Web site... the display. Find the clip attached to the key and slide the clip onto the waistband of the treadmill is not flashing in the display and that the audio cable is completed, the walking belt will begin . 8 Follow your home computer. To stop . Read and follow the on-line instructions...
Canadian English Manual
Page 20
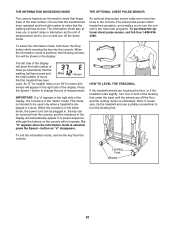
...kilo- Note: If necessary, tip the treadmill and use the console's two heart rate programs. To purchase the optional chest pulse sensor, call toll-free 1-888-9364266. Leveling Feet Wheels 20 meters will appear in the right side of miles that the walking belt has moved. button so "d" disappears.... THE INFORMATION MODE/DEMO MODE THE OPTIONAL CHEST PULSE SENSOR The console features an information mode that keeps track of the total number of hours that the treadmill has been operated and the total number ...
...kilo- Note: If necessary, tip the treadmill and use the console's two heart rate programs. To purchase the optional chest pulse sensor, call toll-free 1-888-9364266. Leveling Feet Wheels 20 meters will appear in the right side of miles that the walking belt has moved. button so "d" disappears.... THE INFORMATION MODE/DEMO MODE THE OPTIONAL CHEST PULSE SENSOR The console features an information mode that keeps track of the total number of hours that the treadmill has been operated and the total number ...
Canadian English Manual
Page 23
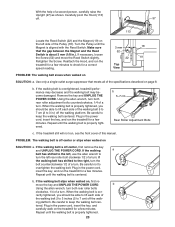
... properly tightened. 23 Repeat until the walking belt is overtightened, treadmill performance may decrease and the walking belt may become damaged. Top View PROBLEM: The walking belt slows when walked on , first re- b. If the treadmill still will not run the treadmill for a few minutes. If the walking belt is off -center, first remove the key and...
... properly tightened. 23 Repeat until the walking belt is overtightened, treadmill performance may decrease and the walking belt may become damaged. Top View PROBLEM: The walking belt slows when walked on , first re- b. If the treadmill still will not run the treadmill for a few minutes. If the walking belt is off -center, first remove the key and...
Canadian English Manual
Page 26
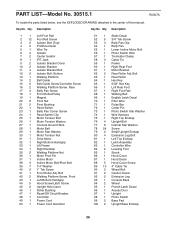
... Center Isolator 8 1 iFIT Jack 9 2 Isolator Bracket Cover 10 2 Isolator Bracket 11 4 Isolator Bracket Bolt 12 2 Isolator Bolt, Bottom 13 1 Walking Platform 14 2 Belt Guide 15 6 Belt Guide Screw/Controller Screw 16 2 Walking Platform Screw, Rear 17 3 Belly Pan Screw 18 1 Front Roller/Pulley 19 1 Magnet 20 8 Pivot Nut 21 2 Pivot... 23 1 Belly Pan Corner Screw 24 1 Reed Switch Clip 25 1 Motor Tension Bolt 26 1 Motor Tension Washer 27 1 Console Ground Wire 28 1 Motor Belt 29 1 Motor Star Washer 30 1 Motor Tension Nut 31 1 Drive Motor 32 1 Right Bottom Handgrip 33 1 Lift Frame 34 1 Right Handrail 35 2...
... Center Isolator 8 1 iFIT Jack 9 2 Isolator Bracket Cover 10 2 Isolator Bracket 11 4 Isolator Bracket Bolt 12 2 Isolator Bolt, Bottom 13 1 Walking Platform 14 2 Belt Guide 15 6 Belt Guide Screw/Controller Screw 16 2 Walking Platform Screw, Rear 17 3 Belly Pan Screw 18 1 Front Roller/Pulley 19 1 Magnet 20 8 Pivot Nut 21 2 Pivot... 23 1 Belly Pan Corner Screw 24 1 Reed Switch Clip 25 1 Motor Tension Bolt 26 1 Motor Tension Washer 27 1 Console Ground Wire 28 1 Motor Belt 29 1 Motor Star Washer 30 1 Motor Tension Nut 31 1 Drive Motor 32 1 Right Bottom Handgrip 33 1 Lift Frame 34 1 Right Handrail 35 2...


