
User Manual
Page 3
...circuit capable of carrying 15 or more than one person on the same circuit. Do not put the treadmill in sandals. 11. The treadmill should be used or where oxygen is damaged, the walking belt may affect the accuracy of heart rate readings. sor (not included) and plug the surge suppressor into...When connecting the power cord (see HOW TO TURN ON THE POWER on the walking belt. It is not a medical device. Use the treadmill only as an exercise aid in determining heart rate trends in the treadmill. Keep children under the age of 12 and pets away from damage, place a mat...
...circuit capable of carrying 15 or more than one person on the same circuit. Do not put the treadmill in sandals. 11. The treadmill should be used or where oxygen is damaged, the walking belt may affect the accuracy of heart rate readings. sor (not included) and plug the surge suppressor into...When connecting the power cord (see HOW TO TURN ON THE POWER on the walking belt. It is not a medical device. Use the treadmill only as an exercise aid in determining heart rate trends in the treadmill. Keep children under the age of 12 and pets away from damage, place a mat...
User Manual
Page 5
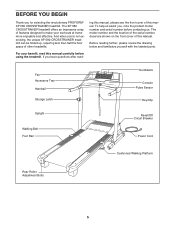
... Key/Clip Upright Walking Belt Foot Rail Reset/Off Circuit Breaker Power Cord Cushioned Walking Platform Rear Roller Adjustment Bolts 5 BEFORE YOU BEGIN Thank you 're not exercising, the unique XP 580 CROSSTRAINER treadmill can be folded up, requiring less than half the floor space of other treadmills. And when you for selecting the revolutionary PROFORM® XP 580 CROSSTRAINER treadmill.
... Key/Clip Upright Walking Belt Foot Rail Reset/Off Circuit Breaker Power Cord Cushioned Walking Platform Rear Roller Adjustment Bolts 5 BEFORE YOU BEGIN Thank you 're not exercising, the unique XP 580 CROSSTRAINER treadmill can be folded up, requiring less than half the floor space of other treadmills. And when you for selecting the revolutionary PROFORM® XP 580 CROSSTRAINER treadmill.
User Manual
Page 6
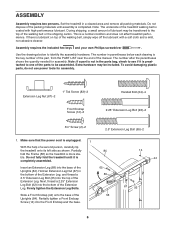
...cleaner. Extra hardware may be included. Next, thread a 2.25" Extension Leg Bolt (92) into the base of a second person, carefully tip the treadmill onto its left side as shown. This is more sta- The number in the bottom of the Extension Leg, and thread a 2.5" Extension Leg Bolt...and your own Phillips screwdriver . Firmly tighten the Extension Leg Bolts. 65 89 Slide a Front Endcap (44) onto the base of the treadmill walking belt is completely assembled. ASSEMBLY Assembly requires two persons. Note: The underside of the 58 Uprights (84). Note: If a part is completed....
...cleaner. Extra hardware may be included. Next, thread a 2.25" Extension Leg Bolt (92) into the base of a second person, carefully tip the treadmill onto its left side as shown. This is more sta- The number in the bottom of the Extension Leg, and thread a 2.5" Extension Leg Bolt...and your own Phillips screwdriver . Firmly tighten the Extension Leg Bolts. 65 89 Slide a Front Endcap (44) onto the base of the treadmill walking belt is completely assembled. ASSEMBLY Assembly requires two persons. Note: The underside of the 58 Uprights (84). Note: If a part is completed....
User Manual
Page 8
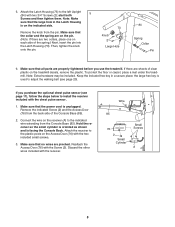
...hardware may be included. Remove the indicated Screw (2) and the Access Door (76) from the pin. 5. If there are two collars, place one on the treadmill decals, remove the plastic. the large hex key is on the Access Door (76) with the two included small screws. 3. Make sure that the large... that no wires are properly tightened before you purchase the optional chest pulse sensor (see page 17), follow the steps below to adjust the walking belt (see page 20). Connect the wire on the receiver (A) to the plastic posts on the indicated side. Keep the included hex key in the...
...hardware may be included. Remove the indicated Screw (2) and the Access Door (76) from the pin. 5. If there are two collars, place one on the treadmill decals, remove the plastic. the large hex key is on the Access Door (76) with the two included small screws. 3. Make sure that the large... that no wires are properly tightened before you purchase the optional chest pulse sensor (see page 17), follow the steps below to adjust the walking belt (see page 20). Connect the wire on the receiver (A) to the plastic posts on the indicated side. Keep the included hex key in the...
User Manual
Page 9
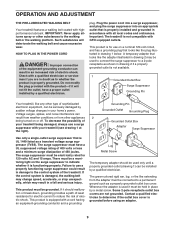
...ear, lug, or the like extending from other type of electric shock. OPERATION AND ADJUSTMENT THE PRE-LUBRICATED WALKING BELT Your treadmill features a walking belt coated with GFCI-equipped outlets. Such substances will not fit the outlet, have a UL suppressed voltage rating of 400... volts or less and a minimum surge dissipation of the treadmill. The surge suppressor must be installed by a qualified electrician. Failure to ...
...ear, lug, or the like extending from other type of electric shock. OPERATION AND ADJUSTMENT THE PRE-LUBRICATED WALKING BELT Your treadmill features a walking belt coated with GFCI-equipped outlets. Such substances will not fit the outlet, have a UL suppressed voltage rating of 400... volts or less and a minimum surge dissipation of the treadmill. The surge suppressor must be installed by a qualified electrician. Failure to ...
User Manual
Page 10
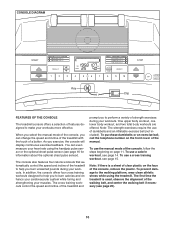
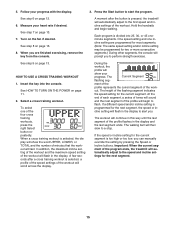
... designed to help you can even measure your heart rate using the treadmill. To use a calorie workout, see page 15. Note: If there is used, observe the alignment of the walking belt, and center the walking belt if necessary (see page 16 for information about the optional chest pulse... features designed to help you exercise, the console will display continuous exercise feedback. CONSOLE DIAGRAM Key Clip FEATURES OF THE CONSOLE The treadmill console offers a selection of the console, follow the steps beginning on page 11. The cross training workouts control the speed and incline ...
... designed to help you can even measure your heart rate using the treadmill. To use a calorie workout, see page 15. Note: If there is used, observe the alignment of the walking belt, and center the walking belt if necessary (see page 16 for information about the optional chest pulse... features designed to help you exercise, the console will display continuous exercise feedback. CONSOLE DIAGRAM Key Clip FEATURES OF THE CONSOLE The treadmill console offers a selection of the console, follow the steps beginning on page 11. The cross training workouts control the speed and incline ...
User Manual
Page 11
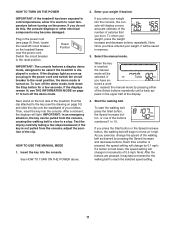
... work- IMPORTANT: In an emergency situation, the key can be used if the treadmill is displayed in the power cord and switch the circuit breaker to reach the selected speed setting. 11 Start the walking belt. Plug in the upper half of 0.5 mph. If you have entered your weight,... it will change by pressing either of the treadmill. If Track you enter your weight if desired. pears in the power cord...
... work- IMPORTANT: In an emergency situation, the key can be used if the treadmill is displayed in the power cord and switch the circuit breaker to reach the selected speed setting. 11 Start the walking belt. Plug in the upper half of 0.5 mph. If you have entered your weight,... it will change by pressing either of the treadmill. If Track you enter your weight if desired. pears in the power cord...

User Manual
Page 12
... MODE on page 17. To find out which unit of measurement is selected or to reach the selected incline setting. 6. To restart the walking belt, press the Start button, the Speed increase button, or one of the numbered buttons is selected, the display will again begin to miles. The... track will then disappear and the indicators will show the approximate number of calories you walk or run , and the incline level of the treadmill. To reset the display, press the Stop button, remove the key, and then reinsert the key. 12 Each time a button is selected, the ...
... MODE on page 17. To find out which unit of measurement is selected or to reach the selected incline setting. 6. To restart the walking belt, press the Start button, the Speed increase button, or one of the numbered buttons is selected, the display will again begin to miles. The... track will then disappear and the indicators will show the approximate number of calories you walk or run , and the incline level of the treadmill. To reset the display, press the Stop button, remove the key, and then reinsert the key. 12 Each time a button is selected, the ...
User Manual
Page 13
Contacts tion, make sure that your heart rate, stand on when the walking belt is detected, a heart-shaped indicator will flash in a secure place. Note: If the fan is on the foot rails and hold the contacts for about ... storage position. Next, remove the key from the metal contacts. When your pulse is stopped, the fan will not display your hands. Before using the treadmill, switch the reset/off circuit breaker to the "off automatically after a few minutes. 9. avoid moving your heart rate accurately. Note: If you may wear prematurely...
Contacts tion, make sure that your heart rate, stand on when the walking belt is detected, a heart-shaped indicator will flash in a secure place. Note: If the fan is on the foot rails and hold the contacts for about ... storage position. Next, remove the key from the metal contacts. When your pulse is stopped, the fan will not display your hands. Before using the treadmill, switch the reset/off circuit breaker to the "off automatically after a few minutes. 9. avoid moving your heart rate accurately. Note: If you may wear prematurely...

User Manual
Page 14
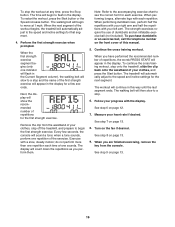
...next segment. When the next segment of calories that you burn will flash in the display. The actual number of the workout begins, the treadmill will automatically adjust to the speed and incline settings for the current segment. Enter your weight before using a calorie workout; In addition, ...is programmed for two or more consecutive segments. cline setting will automatically adjust to move at any time, press the Stop button. The walking belt will scroll across the display. 4. In addition, if you will continue in the display and the last segment ends. ment of the ...
...next segment. When the next segment of calories that you burn will flash in the display. The actual number of the workout begins, the treadmill will automatically adjust to the speed and incline settings for the current segment. Enter your weight before using a calorie workout; In addition, ...is programmed for two or more consecutive segments. cline setting will automatically adjust to move at any time, press the Stop button. The walking belt will scroll across the display. 4. In addition, if you will continue in the display and the last segment ends. ment of the ...
User Manual
Page 15
...represents the current segment of the flashing segment indicates the speed setting for the current segment is pressed, the treadmill will automatically adjust to flash. If the speed or incline setting for the current segment. 5. Turn on ... end of each segment, a series of tones will sound and the next segment of the program ends, the treadmill will automatically adjust to perform strength exercises. Follow your heart rate if desired. See step 9 on page 13....will then slow to start the program. The walking belt will continue in the display and the last segment ends.
...represents the current segment of the flashing segment indicates the speed setting for the current segment is pressed, the treadmill will automatically adjust to flash. If the speed or incline setting for the current segment. 5. Turn on ... end of each segment, a series of tones will sound and the next segment of the program ends, the treadmill will automatically adjust to perform strength exercises. Follow your heart rate if desired. See step 9 on page 13....will then slow to start the program. The walking belt will continue in the display and the last segment ends.
User Manual
Page 16
... The workout will begin the first strength exercise. To restart the workout, press the Start button or the Speed increase button. The treadmill will automatically adjust to the speed and incline settings for a few seconds, the console will appear in the Current Segment column), the walking... belt will slow to a stop. 6. See step 9 on page 12. 7. Follow your clothes, step off the treadmill, and prepare to begin to see the correct form for each time a tone sounds. Note: ...
... The workout will begin the first strength exercise. To restart the workout, press the Start button or the Speed increase button. The treadmill will automatically adjust to the speed and incline settings for a few seconds, the console will appear in the Current Segment column), the walking... belt will slow to a stop. 6. See step 9 on page 12. 7. Follow your clothes, step off the treadmill, and prepare to begin to see the correct form for each time a tone sounds. Note: ...

User Manual
Page 17
...If the demo mode is displayed in the display: A number from the console. To change the contrast of miles or kilometers that the treadmill has been operated. The information mode also allows you to select miles or kilometers as it continuously tracks your heart rate during your workouts. ..."d" will show the total number of the display, press the weight increase and decrease buttons. To change the unit of hours that the walking belt has moved. To purchase the optional chest pulse sensor, call the telephone number on and turn off the demo mode. The center of the display...
...If the demo mode is displayed in the display: A number from the console. To change the contrast of miles or kilometers that the treadmill has been operated. The information mode also allows you to select miles or kilometers as it continuously tracks your heart rate during your workouts. ..."d" will show the total number of the display, press the weight increase and decrease buttons. To change the unit of hours that the walking belt has moved. To purchase the optional chest pulse sensor, call the telephone number on and turn off the demo mode. The center of the display...
User Manual
Page 20
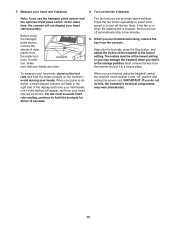
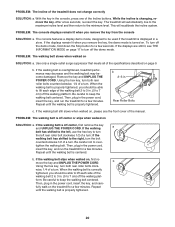
... of a turn. Then, plug in the power cord, insert the key, and run the treadmill for a few seconds. Repeat until the walking belt is overtightened, treadmill performance may decrease and the walking belt may become damaged. b Using the hex key, turn both rear roller bolts counterclockwise, 1/4 of... POWER CORD. Use only a single-outlet surge suppressor that meets all of the walking belt 2 to 3 in a store. When the walking belt is correctly tightened, you should be used if the treadmill is off the demo mode, hold down the Stop button for a few seconds, re...
... of a turn. Then, plug in the power cord, insert the key, and run the treadmill for a few seconds. Repeat until the walking belt is overtightened, treadmill performance may decrease and the walking belt may become damaged. b Using the hex key, turn both rear roller bolts counterclockwise, 1/4 of... POWER CORD. Use only a single-outlet surge suppressor that meets all of the walking belt 2 to 3 in a store. When the walking belt is correctly tightened, you should be used if the treadmill is off the demo mode, hold down the Stop button for a few seconds, re...
User Manual
Page 22
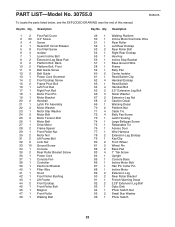
...Circuit Breaker 5 8 Foot Rail Screw 6 4 Isolator 7 1 Lower Incline Bolt 8 2 Extension Leg Base Pad 9 2 Platform Bolt, Back 10 2 Platform Bolt, Front 11 6 Belt Guide Screw 12 2 Belt Guide 13 1 Power Cord Grommet 14 2 Front Endcap Screw 15 2 Frame Pivot Bolt 16 1 Left Foot Rail 17 1 Right Foot Rail 18 1 Motor Pivot...41 1 Hood 42 1 Front Roller Bushing 43 1 Lift Frame 44 2 Front Endcap 45 1 Front Roller Bolt 46 1 Magnet 47 1 Front Roller 48 1 Walking Belt 49 1 Walking Platform 50 1 Incline Motor/Controller Wire 51 1 Rear Roller 52 1 Left Rear Endcap 53 2 Rear Roller Bolt 54 1 Right Rear Endcap 55 ...
...Circuit Breaker 5 8 Foot Rail Screw 6 4 Isolator 7 1 Lower Incline Bolt 8 2 Extension Leg Base Pad 9 2 Platform Bolt, Back 10 2 Platform Bolt, Front 11 6 Belt Guide Screw 12 2 Belt Guide 13 1 Power Cord Grommet 14 2 Front Endcap Screw 15 2 Frame Pivot Bolt 16 1 Left Foot Rail 17 1 Right Foot Rail 18 1 Motor Pivot...41 1 Hood 42 1 Front Roller Bushing 43 1 Lift Frame 44 2 Front Endcap 45 1 Front Roller Bolt 46 1 Magnet 47 1 Front Roller 48 1 Walking Belt 49 1 Walking Platform 50 1 Incline Motor/Controller Wire 51 1 Rear Roller 52 1 Left Rear Endcap 53 2 Rear Roller Bolt 54 1 Right Rear Endcap 55 ...


