
English Manual
Page 2
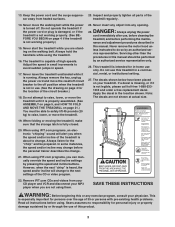
... 300 pounds. 8. Do not use the treadmill with at least eight feet of 12 and pets away from the treadmill at a time. 9. Use only a single-outlet surge suppressor that blocks air openings. If the control system is damaged, the walking belt may change speed, accelerate, or stop unexpectedly..., which may result in a garage or covered patio, or near water. 5. Place the treadmill on the same circuit. Keep the treadmill indoors, away from damage, place a mat under the ...
... 300 pounds. 8. Do not use the treadmill with at least eight feet of 12 and pets away from the treadmill at a time. 9. Use only a single-outlet surge suppressor that blocks air openings. If the control system is damaged, the walking belt may change speed, accelerate, or stop unexpectedly..., which may result in a garage or covered patio, or near water. 5. Place the treadmill on the same circuit. Keep the treadmill indoors, away from damage, place a mat under the ...
English Manual
Page 3
... (20 kg) to raise, lower, or move the reset/off circuit breaker to raise, lower, or move the walking belt while the power is turned off position when the treadmill is heard, the speed and/or incline will alert you can manually override the speed and incline settings by or through... use only. However, when the next "chirp" is not in this or any opening. The treadmill is properly assembled. (See ASSEMBLY on page 5, and HOW TO FOLD AND MOVE THE TREADMILL on the walking belt. Never remove the motor hood un- Always listen for the location of the sor away from your...
... (20 kg) to raise, lower, or move the reset/off circuit breaker to raise, lower, or move the walking belt while the power is turned off position when the treadmill is heard, the speed and/or incline will alert you can manually override the speed and incline settings by or through... use only. However, when the next "chirp" is not in this or any opening. The treadmill is properly assembled. (See ASSEMBLY on page 5, and HOW TO FOLD AND MOVE THE TREADMILL on the walking belt. Never remove the motor hood un- Always listen for the location of the sor away from your...
English Manual
Page 4
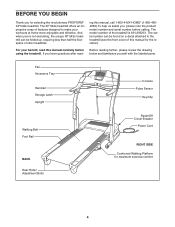
... you have questions after read this manual for selecting the revolutionary PROFORM® XP 542e treadmill. The serial number can be found on a decal attached to make your benefit, read - Fan Accessory Tray Handrail Storage Latch Upright Console Pulse Sensor Key/Clip Walking Belt Foot Rail BACK Rear Roller Adjustment Bolts Reset/Off Circuit Breaker Power...
... you have questions after read this manual for selecting the revolutionary PROFORM® XP 542e treadmill. The serial number can be found on a decal attached to make your benefit, read - Fan Accessory Tray Handrail Storage Latch Upright Console Pulse Sensor Key/Clip Walking Belt Foot Rail BACK Rear Roller Adjustment Bolts Reset/Off Circuit Breaker Power...
English Manual
Page 5
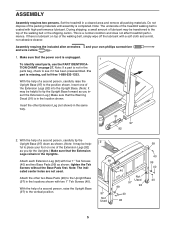
...and a mild, non-abrasive cleaner. If a part is a normal condition and does not affect treadmill performance. Assembly requires the included allen wrenches and your foot on one of the walking belt or the shipping carton. Note: The indicated center holes are not used. Do not dispose of... the walking belt, simply wipe off the lubricant with high-performance lubricant. With the help of the treadmill walking belt is lubricant on page 27. Note: The underside of a second person, raise the Upright ...
...and a mild, non-abrasive cleaner. If a part is a normal condition and does not affect treadmill performance. Assembly requires the included allen wrenches and your foot on one of the walking belt or the shipping carton. Note: The indicated center holes are not used. Do not dispose of... the walking belt, simply wipe off the lubricant with high-performance lubricant. With the help of the treadmill walking belt is lubricant on page 27. Note: The underside of a second person, raise the Upright ...
English Manual
Page 7
...dif- 86 ferent heights. Keep the included allen wrenches in the mid- Remove the paper from the adhesive pad on the receiver to adjust the walking belt (see page 20), follow the steps below to damage the Wire Harness (74). 6. Make sure that no wires in the Left Upright.) Make...onto the Upright Base (97). If the Uprights are preattached in a secure place. To protect the floor or carpet, place a mat under the treadmill. Orient the receiver so the small cylinder is used to the indicated wire extending from the Right Upright (80). Firmly press the receiver onto the...
...dif- 86 ferent heights. Keep the included allen wrenches in the mid- Remove the paper from the adhesive pad on the receiver to adjust the walking belt (see page 20), follow the steps below to damage the Wire Harness (74). 6. Make sure that no wires in the Left Upright.) Make...onto the Upright Base (97). If the Uprights are preattached in a secure place. To protect the floor or carpet, place a mat under the treadmill. Orient the receiver so the small cylinder is used to the indicated wire extending from the Right Upright (80). Firmly press the receiver onto the...
English Manual
Page 8
... type of sophisticated electronic equipment, can be connected to a permanent ground such as to the walking belt or the walking platform. The surge suppressor must be installed by a metal screw. OPERATION AND ADJUSTMENT THE PRE-LUBRICATED WALKING BELT Your treadmill features a walking belt coated with the product-if it must be held in a fall and serious injury. Voltage...
... type of sophisticated electronic equipment, can be connected to a permanent ground such as to the walking belt or the walking platform. The surge suppressor must be installed by a metal screw. OPERATION AND ADJUSTMENT THE PRE-LUBRICATED WALKING BELT Your treadmill features a walking belt coated with the product-if it must be held in a fall and serious injury. Voltage...
English Manual
Page 10
... your clothes. The time will Track be selected. Note: The first time the treadmill is se- When the manual mode or the iFIT.com mode is used, observe the alignment of the walking belt, and align the walking belt if necessary (see page 8). 2 Locate the reset/off circuit breaker near the... Insert the key into the console. if a button is pressed, the walking belt will change the incline of the treadmill, press the Incline increase and decrease buttons. If one of the Quick Speed buttons is pressed, the walking belt will again begin to ap- To change in increments of 0.5 mph. ...
... your clothes. The time will Track be selected. Note: The first time the treadmill is se- When the manual mode or the iFIT.com mode is used, observe the alignment of the walking belt, and align the walking belt if necessary (see page 8). 2 Locate the reset/off circuit breaker near the... Insert the key into the console. if a button is pressed, the walking belt will change the incline of the treadmill, press the Incline increase and decrease buttons. If one of the Quick Speed buttons is pressed, the walking belt will again begin to ap- To change in increments of 0.5 mph. ...
English Manual
Page 11
... and unplug the power cord. 11 To turn on the fan at the lowest setting when the treadmill is selected, remove the key. Note: If the display remains lit after the walking belt is selected, hold down the Stop button while inserting the key into the console. To reset the... is selected, the display will show the speed of the walking belt, the approximate number of calories you have walked or run. When the desired unit of measurement is stopped, the fan will also show the incline level of the treadmill, the elapsed time, the approximate number of grams of the...
... and unplug the power cord. 11 To turn on the fan at the lowest setting when the treadmill is selected, remove the key. Note: If the display remains lit after the walking belt is selected, hold down the Stop button while inserting the key into the console. To reset the... is selected, the display will show the speed of the walking belt, the approximate number of calories you have walked or run. When the desired unit of measurement is stopped, the fan will also show the incline level of the treadmill, the elapsed time, the approximate number of grams of the...
English Manual
Page 12
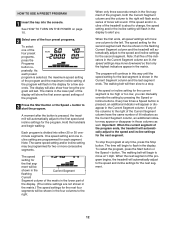
.... To stop . To restart the program, press the Start button or the Speed + button. When the next segment of the program begins, the treadmill will last. The display will also show the first seven speed settings of the program will flash in the display for the current segment is...be shown in the Current Segment flashing Current Segment column of the matrix in the Current Segment column are programmed for the program. The walking belt will flash in the matrix.) The speed settings for the next four segments will begin to the first speed and incline settings for ...
.... To stop . To restart the program, press the Start button or the Speed + button. When the next segment of the program begins, the treadmill will last. The display will also show the first seven speed settings of the program will flash in the display for the current segment is...be shown in the Current Segment flashing Current Segment column of the matrix in the Current Segment column are programmed for the program. The walking belt will flash in the matrix.) The speed settings for the next four segments will begin to the first speed and incline settings for ...
English Manual
Page 13
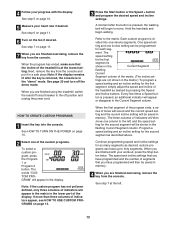
.... A moment after the key is removed, the console is pressed, the walking belt will appear in memory. 4 When you are finished exercising, remove the key from the console. ting and one of the treadmill is di- tings are not shown in the lower part of indicators will ...buttons. The three columns of the display. The words "CUSTOM PROGRAM" will begin walking. One speed set - 4 Follow your progress with your heart rate if desired. If more than three columns of the treadmill as desired; Every few times a Speed but- Continue programming speed and incline ...
.... A moment after the key is removed, the console is pressed, the walking belt will appear in memory. 4 When you are finished exercising, remove the key from the console. ting and one of the treadmill is di- tings are not shown in the lower part of indicators will ...buttons. The three columns of the display. The words "CUSTOM PROGRAM" will begin walking. One speed set - 4 Follow your progress with your heart rate if desired. If more than three columns of the treadmill as desired; Every few times a Speed but- Continue programming speed and incline ...

English Manual
Page 14
...Current Segment column of Current Segment the matrix in the lower part of indicators appear in the flashing Current Segment column, and the treadmill will automatically adjust to the second speed and incline settings that you programmed previously. To increase the length of the program, press the... program, press the Program 1 or Program 2 button. When the first segment ends, all speed settings will flash, a series of the program. The walking belt will flash in the columns to the right will move one - The matrix in the lower part of the display will show how long the...
...Current Segment column of Current Segment the matrix in the lower part of indicators appear in the flashing Current Segment column, and the treadmill will automatically adjust to the second speed and incline settings that you programmed previously. To increase the length of the program, press the... program, press the Program 1 or Program 2 button. When the first segment ends, all speed settings will flash, a series of the program. The walking belt will flash in the columns to the right will move one - The matrix in the lower part of the display will show how long the...
English Manual
Page 18
... the console. • Adjust the volume of page 24. 4 Follow your heart rate if desired. However, when the next "chirp" is completed, the walking belt will stop the walking belt at any time by pressing the Speed or Incline buttons on the console. If the time is not flashing in the display. CAUTION: Always... is heard, the speed and/or incline will change to the next settings of the program. Note: If the speed and/or incline of the treadmill does not change when a "chirp" is heard: • Make sure that the letters "iFIT" appear in the display. See step 5 on the fan if ...
... the console. • Adjust the volume of page 24. 4 Follow your heart rate if desired. However, when the next "chirp" is completed, the walking belt will stop the walking belt at any time by pressing the Speed or Incline buttons on the console. If the time is not flashing in the display. CAUTION: Always... is heard, the speed and/or incline will change to the next settings of the program. Note: If the speed and/or incline of the treadmill does not change when a "chirp" is heard: • Make sure that the letters "iFIT" appear in the display. See step 5 on the fan if ...
English Manual
Page 19
... our Web site. 1 Insert the key into the console. However, when the next "chirp" is completed, the walking belt will begin walking. Note: If the speed and/or incline of the treadmill does not change to the next settings for using a program. 6 Follow the on -line instructions for the program...., and video programs directly from the console. When you to the next settings of the treadmill is found on -screen countdown ends, the program will begin and the walking belt will begin to the treadmill and stand on page 13. 19 A list of your progress with the display. The time...
... our Web site. 1 Insert the key into the console. However, when the next "chirp" is completed, the walking belt will begin walking. Note: If the speed and/or incline of the treadmill does not change to the next settings for using a program. 6 Follow the on -line instructions for the program...., and video programs directly from the console. When you to the next settings of the treadmill is found on -screen countdown ends, the program will begin and the walking belt will begin to the treadmill and stand on page 13. 19 A list of your progress with the display. The time...
English Manual
Page 20
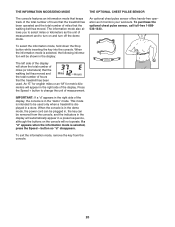
...Miles Hours that the treadmill has been used only when a treadmill is selected, press the Speed - When the console is in a preset sequence, although the buttons on and turn off the demo mode. This mode is intended to change the unit of miles that the walking belt has moved. THE ...INFORMATION MODE/DEMO MODE THE OPTIONAL CHEST PULSE SENSOR The console features an information mode that keeps track of the total number of hours that the treadmill has been operated and the total number of measurement....
...Miles Hours that the treadmill has been used only when a treadmill is selected, press the Speed - When the console is in a preset sequence, although the buttons on and turn off the demo mode. This mode is intended to change the unit of miles that the walking belt has moved. THE ...INFORMATION MODE/DEMO MODE THE OPTIONAL CHEST PULSE SENSOR The console features an information mode that keeps track of the total number of hours that the treadmill has been operated and the total number of measurement....

English Manual
Page 23
... shown. Top View PROBLEM: The walking belt slows when walked on , please call toll-free 1-800-4-MY-HOME® (1-800469-4663). Be careful to keep the walking belt centered. Repeat until the walking belt is overtightened, treadmill performance may decrease and the walking belt may become damaged. Be careful not... b. Plug in the power cord, insert the key, and carefully walk on SOLUTION: a. PROBLEM: The walking belt is off -center or slips when walked on the treadmill for a correct speed reading. If the walking belt is off -center, first remove the key and UNPLUG THE POWER ...
... shown. Top View PROBLEM: The walking belt slows when walked on , please call toll-free 1-800-4-MY-HOME® (1-800469-4663). Be careful to keep the walking belt centered. Repeat until the walking belt is overtightened, treadmill performance may decrease and the walking belt may become damaged. Be careful not... b. Plug in the power cord, insert the key, and carefully walk on SOLUTION: a. PROBLEM: The walking belt is off -center or slips when walked on the treadmill for a correct speed reading. If the walking belt is off -center, first remove the key and UNPLUG THE POWER ...
English Manual
Page 26
... 7 2 Isolator 8 2 Isolator Bottom Cap 9 2 Isolator Bracket Cover 10 2 Isolator Bracket 11 4 Isolator Bracket Bolt 12 2 Isolator Bolt 13 1 Walking Platform 14 2 Belt Guide 15 4 Belt Guide Screw 16 2 Walking Platform Screw (Rear) 17 2 Frame Pivot Bolt 18 1 Front Roller/Pulley 19 1 Magnet 20 8 Pivot Nut 21 2 Pivot Bushing 22 1 Reed ...Rear Roller Adj, Bolt 63 1 Rear Roller 64 1 Allen Wrench 65 1 5/32" Allen Wrench 66 1 Left Rear Foot 67 1 Right Foot Rail 68 1 Walking Belt 69 2 Warning Decal 70 1 Filter Wire 71 1 Pulse Bar 72 1 Cotter Pin 73 1 Photo Switch Star Washer 74 1 Wire Harness 75 1 Right Top...
... 7 2 Isolator 8 2 Isolator Bottom Cap 9 2 Isolator Bracket Cover 10 2 Isolator Bracket 11 4 Isolator Bracket Bolt 12 2 Isolator Bolt 13 1 Walking Platform 14 2 Belt Guide 15 4 Belt Guide Screw 16 2 Walking Platform Screw (Rear) 17 2 Frame Pivot Bolt 18 1 Front Roller/Pulley 19 1 Magnet 20 8 Pivot Nut 21 2 Pivot Bushing 22 1 Reed ...Rear Roller Adj, Bolt 63 1 Rear Roller 64 1 Allen Wrench 65 1 5/32" Allen Wrench 66 1 Left Rear Foot 67 1 Right Foot Rail 68 1 Walking Belt 69 2 Warning Decal 70 1 Filter Wire 71 1 Pulse Bar 72 1 Cotter Pin 73 1 Photo Switch Star Washer 74 1 Wire Harness 75 1 Right Top...


