

English Manual
Page 1
...-3756 Mon.-Fri., 6 a.m.-6 p.m. USER'S MANUAL Patent Pending Visit our website at www.proform.com new products, prizes, fitness tips, and much more! MST CAUTION Read all precautions and instructions in this manual before using this manual for future reference. PFEX01010 Serial No. TO AVOID UNNECESSARY DELAYS, PLEASE CALL DIRECT TO OUR TOLL-FREE CUSTOMER HOT LINE. The trained technicians on our customer...
...-3756 Mon.-Fri., 6 a.m.-6 p.m. USER'S MANUAL Patent Pending Visit our website at www.proform.com new products, prizes, fitness tips, and much more! MST CAUTION Read all precautions and instructions in this manual before using this manual for future reference. PFEX01010 Serial No. TO AVOID UNNECESSARY DELAYS, PLEASE CALL DIRECT TO OUR TOLL-FREE CUSTOMER HOT LINE. The trained technicians on our customer...

English Manual
Page 2
... TROUBLE-SHOOTING 11 CONDITIONING GUIDELINES 12 PART LIST 14 EXPLODED DRAWING 15 HOW TO ORDER REPLACEMENT PARTS Back Cover LIMITED WARRANTY Back Cover IMPORTANT PRECAUTIONS WARNING: To reduce the risk of 35 or persons with pre-existing health problems. Read all instructions before using. tions before using the recumbent cycle. 1. Do not use only. Keep the recumbent cycle away from the recumbent cycle at all times. 10. The pulse sensor...
... TROUBLE-SHOOTING 11 CONDITIONING GUIDELINES 12 PART LIST 14 EXPLODED DRAWING 15 HOW TO ORDER REPLACEMENT PARTS Back Cover LIMITED WARRANTY Back Cover IMPORTANT PRECAUTIONS WARNING: To reduce the risk of 35 or persons with pre-existing health problems. Read all instructions before using. tions before using the recumbent cycle. 1. Do not use only. Keep the recumbent cycle away from the recumbent cycle at all times. 10. The pulse sensor...

English Manual
Page 3
... toll-free at 1-800-999-3756, Monday through Friday, 6 a.m. BEFORE YOU BEGIN Congratulations for increasing cardiovascular fitness, building endurance, and toning the entire body. If you use the PROFORM® VR 900 EKG. To help us assist you enjoy this manual). Water Bottle Holder* Resistance Knob Backrest Seat Console Book Holder Handlebar Pulse Sensor FRONT Pedal Strap Pedal Seat Knob REAR RIGHT SIDE *No water bottle is PFEX01010. The model number...
... toll-free at 1-800-999-3756, Monday through Friday, 6 a.m. BEFORE YOU BEGIN Congratulations for increasing cardiovascular fitness, building endurance, and toning the entire body. If you use the PROFORM® VR 900 EKG. To help us assist you enjoy this manual). Water Bottle Holder* Resistance Knob Backrest Seat Console Book Holder Handlebar Pulse Sensor FRONT Pedal Strap Pedal Seat Knob REAR RIGHT SIDE *No water bottle is PFEX01010. The model number...

English Manual
Page 4
... Locknut (45)-2 M8 x 38mm Button Bolt (24)-4 M10 x 25mm Button Screw (71)-10 M10 x 75mm Carriage Bolt (72)-2 M6 x 38mm Button Bolt (14)-7 M8 x 100mm Button Bolt (63)-3 4 Assembly requires the included tools and your own adjustable wrench driver . If a part is completed. The number in parenthesis below to the quantity needed for shipping. The second number refers to identify the small parts used in a cleared area and...
... Locknut (45)-2 M8 x 38mm Button Bolt (24)-4 M10 x 25mm Button Screw (71)-10 M10 x 75mm Carriage Bolt (72)-2 M6 x 38mm Button Bolt (14)-7 M8 x 100mm Button Bolt (63)-3 4 Assembly requires the included tools and your own adjustable wrench driver . If a part is completed. The number in parenthesis below to the quantity needed for shipping. The second number refers to identify the small parts used in a cleared area and...

English Manual
Page 5
... into the Frame. To install batteries, turn the console over, open the battery door, and insert two batteries into the indicated opening in the location shown. Refer to the front of the Resistance Cable (22) into the battery clip as shown. Insert the tip of the 2 Frame (1) with two M10 x 25mm Button Screws (71) and two M10 Split Washers (17). Attach the Front Stabilizer (2) to...
... into the Frame. To install batteries, turn the console over, open the battery door, and insert two batteries into the indicated opening in the location shown. Refer to the front of the Resistance Cable (22) into the battery clip as shown. Insert the tip of the 2 Frame (1) with two M10 x 25mm Button Screws (71) and two M10 Split Washers (17). Attach the Front Stabilizer (2) to...

English Manual
Page 6
Next, connect the Reed Switch Wire (18) and the two Pulse Wires (33) to the Handlebar Post (6) 6 with four M4 x 16mm Screws (21). Press the Resistance Knob (75) onto the Resistance Control (22). Thread the Seat Knob (74) clockwise into the Seat Carriage until it to the Upright with four M10 x 25mm Button Screws (71) and four M10 Split Washers (17). Attach the Console (9) to the corresponding wires on 7 the Frame (1). Refer...
Next, connect the Reed Switch Wire (18) and the two Pulse Wires (33) to the Handlebar Post (6) 6 with four M4 x 16mm Screws (21). Press the Resistance Knob (75) onto the Resistance Control (22). Thread the Seat Knob (74) clockwise into the Seat Carriage until it to the Upright with four M10 x 25mm Button Screws (71) and four M10 Split Washers (17). Attach the Console (9) to the corresponding wires on 7 the Frame (1). Refer...

English Manual
Page 7
... Frame (8). 15 11. Attach the Seat Frame and the 9 Backrest Frame to the Carriage Bar with four M6 x 22mm Button Screws (29) and four M8 Washers (55). 61 11 12 8 14 27 55 29 7 Attach the Rear Stabilizer to the Seat Carriage (11) with two M6 x 38mm Button Bolts (14) and two M6... Nylon Locknuts (15). Slide a Seat Handle (61) onto one...
... Frame (8). 15 11. Attach the Seat Frame and the 9 Backrest Frame to the Carriage Bar with four M6 x 22mm Button Screws (29) and four M8 Washers (55). 61 11 12 8 14 27 55 29 7 Attach the Rear Stabilizer to the Seat Carriage (11) with two M6 x 38mm Button Bolts (14) and two M6... Nylon Locknuts (15). Slide a Seat Handle (61) onto one...

English Manual
Page 8
... sure that all parts are properly tightened before you use the recumbent cycle. tion and press the end of the pedals, turn the knob counter- Note: After assembly is marked with three M6 x 38mm Button Bolts (14) and three M6 Washers (54). 13 8 54 14 13. Attach the Backrest (13) to Press the straps decrease the back onto the tabs resistance, turn the resistance knob Resistance Knob straps, first pull the...
... sure that all parts are properly tightened before you use the recumbent cycle. tion and press the end of the pedals, turn the knob counter- Note: After assembly is marked with three M6 x 38mm Button Bolts (14) and three M6 Washers (54). 13 8 54 14 13. Attach the Backrest (13) to Press the straps decrease the back onto the tabs resistance, turn the resistance knob Resistance Knob straps, first pull the...

English Manual
Page 9
... springs in miles per hour. Locate the battery door on page 12.) Calories-Displays the approximate number of fat calories you resume. Distance-Displays the total distance you have pedaled, in your heart rate when the pulse sensor is not loosened enough, it may scratch the frame). As you pedal. cise, the seat Seat should be in the farthest Knob position. To adjust the seat, first turn the seat knob counterclockwise to...
... springs in miles per hour. Locate the battery door on page 12.) Calories-Displays the approximate number of fat calories you resume. Distance-Displays the total distance you have pedaled, in your heart rate when the pulse sensor is not loosened enough, it may scratch the frame). As you pedal. cise, the seat Seat should be in the farthest Knob position. To adjust the seat, first turn the seat knob counterclockwise to...

English Manual
Page 10
... pedals are not moved and the monitor buttons are positioned as an exercise aid in determining heart rate trends in general. 10 Avoid moving your hands excessively or squeeze the metal contacts too tightly. When the power is not selected. 3. When the power Mode Arrows is not shown, press the on the top and bottom of heart rate readings. Speed, time, distance, fat calo- To use the pulse sensor...
... pedals are not moved and the monitor buttons are positioned as an exercise aid in determining heart rate trends in general. 10 Avoid moving your hands excessively or squeeze the metal contacts too tightly. When the power is not selected. 3. When the power Mode Arrows is not shown, press the on the top and bottom of heart rate readings. Speed, time, distance, fat calo- To use the pulse sensor...

English Manual
Page 11
..., locate the Reed Switch (18). If the Belt is properly adjusted, reattach the side shields and pedals. doing so may interfere with heart rate readings. • For the most accurate heart rate reading, hold the metal contacts too tightly; Regularly tighten both pedals. MAINTENANCE AND TROUBLE-SHOOTING Inspect and properly tighten all parts of the Crank is correctly adjusted, reattach the left side shield. To clean the recumbent cycle, use...
..., locate the Reed Switch (18). If the Belt is properly adjusted, reattach the side shields and pedals. doing so may interfere with heart rate readings. • For the most accurate heart rate reading, hold the metal contacts too tightly; Regularly tighten both pedals. MAINTENANCE AND TROUBLE-SHOOTING Inspect and properly tighten all parts of the Crank is correctly adjusted, reattach the left side shield. To clean the recumbent cycle, use...

English Manual
Page 12
..., adjust the intensity of your age. the highest number is the recommended heart rate for fat burning; Then, stop pedaling and measure your exercise program. CONDITIONING GUIDELINES The following three parts: A warm-up increases your training zone as a guide. The pulse sensor is make exercise a regular and enjoyable part of your exercise until your heart rate is near the middle number in your heart rate as you must be found by using...
..., adjust the intensity of your age. the highest number is the recommended heart rate for fat burning; Then, stop pedaling and measure your exercise program. CONDITIONING GUIDELINES The following three parts: A warm-up increases your training zone as a guide. The pulse sensor is make exercise a regular and enjoyable part of your exercise until your heart rate is near the middle number in your heart rate as you must be found by using...

English Manual
Page 13
... the inner thigh of the achilles tendons, bend your extended leg. Repeat 3 times for 15 counts, then relax. Stretches: Hamstrings, lower back and groin. 3. Move slowly as possible. To cause further stretching of your back leg as possible. Reach toward you stretch-never bounce. 1. Calf...as well. Hold for each leg. Hold for balance, reach back and grasp one leg in front of knees and back. 2. Quadriceps Stretch With one leg extended. Toe Touch Stretch Stand with your hips. SUGGESTED STRETCHES The correct form for several basic stretches is ...
... the inner thigh of the achilles tendons, bend your extended leg. Repeat 3 times for 15 counts, then relax. Stretches: Hamstrings, lower back and groin. 3. Move slowly as possible. To cause further stretching of your back leg as possible. Reach toward you stretch-never bounce. 1. Calf...as well. Hold for each leg. Hold for balance, reach back and grasp one leg in front of knees and back. 2. Quadriceps Stretch With one leg extended. Toe Touch Stretch Stand with your hips. SUGGESTED STRETCHES The correct form for several basic stretches is ...

English Manual
Page 14
... manual for information about ordering replacement parts. 14 Qty. Description 1 1 Frame 2 1 Front Stabilizer 3 1 Rear Stabilizer 4 1 Left Side Shield 5 1 Right Side Shield 6 1 Upright 7 1 Carriage Bar 8 1 Backrest Frame 9 1 Console 10 2 Handlebar Endcap 11 1 Seat Carriage 12 1 Seat 13 1 Backrest 14 7 M6 x 38mm Button Bolt 15 4 M6 Nylon Locknut 16 1 Handlebar 17 10 M10 Split Washer 18 1 Extension Wire 19 1 Pulley/Crank 20 1 Reed Switch/Wire 21 14 M4 x 16mm Screw 22 1 Resistance Control/Cable...
... manual for information about ordering replacement parts. 14 Qty. Description 1 1 Frame 2 1 Front Stabilizer 3 1 Rear Stabilizer 4 1 Left Side Shield 5 1 Right Side Shield 6 1 Upright 7 1 Carriage Bar 8 1 Backrest Frame 9 1 Console 10 2 Handlebar Endcap 11 1 Seat Carriage 12 1 Seat 13 1 Backrest 14 7 M6 x 38mm Button Bolt 15 4 M6 Nylon Locknut 16 1 Handlebar 17 10 M10 Split Washer 18 1 Extension Wire 19 1 Pulley/Crank 20 1 Reed Switch/Wire 21 14 M4 x 16mm Screw 22 1 Resistance Control/Cable...
English Manual
Page 15
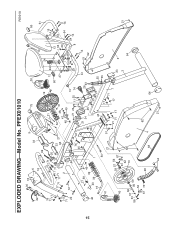
PFEX01010 R0901A 22 35 71 17 17 71 22 42 30 18 6 9 33 75 38 16 69 37 19 10 24 17 71 20 21 12 24 17 71 17 71 17 71 2 72 42 33 65 21 76 67 45 32 47 46 48 31 49 21 25 10 11 25 74 60 27 55 15 55 29 29 13 55 29 8 21 58 45 32 20 39 1 19 21 34 26 56 43 61 26 63 25 25 55 21 14 62 50 55 41 21 51 17 17 71 40 66 57 53 56 36 59 59 57 56 67 53 52 62 70 21 17 7 71 17 23 5 3 64 52 67 73 28 62 68 4 64 60 61 14 15 54 54 14 54 14 21 15 44 21 EXPLODED DRAWING-Model No.
PFEX01010 R0901A 22 35 71 17 17 71 22 42 30 18 6 9 33 75 38 16 69 37 19 10 24 17 71 20 21 12 24 17 71 17 71 17 71 2 72 42 33 65 21 76 67 45 32 47 46 48 31 49 21 25 10 11 25 74 60 27 55 15 55 29 29 13 55 29 8 21 58 45 32 20 39 1 19 21 34 26 56 43 61 26 63 25 25 55 21 14 62 50 55 41 21 51 17 17 71 40 66 57 53 56 36 59 59 57 56 67 53 52 62 70 21 17 7 71 17 23 5 3 64 52 67 73 28 62 68 4 64 60 61 14 15 54 54 14 54 14 21 15 44 21 EXPLODED DRAWING-Model No.

English Manual
Page 16
... from the date of whatsoever nature. LIMITED WARRANTY ICON Health & Fitness, Inc. (ICON), warrants this product to give the following information: • The MODEL NUMBER of the product (PFEX01010) • The NAME of the product (PROFORM® VR 900 EKG recumbent cycle) • The SERIAL NUMBER of the product (see the front cover of this manual). ICON is a registered trademark of ICON Health & Fitness, Inc. ICON HEALTH & FITNESS, INC., 1500 S. 1000 W., LOGAN, UT...
... from the date of whatsoever nature. LIMITED WARRANTY ICON Health & Fitness, Inc. (ICON), warrants this product to give the following information: • The MODEL NUMBER of the product (PFEX01010) • The NAME of the product (PROFORM® VR 900 EKG recumbent cycle) • The SERIAL NUMBER of the product (see the front cover of this manual). ICON is a registered trademark of ICON Health & Fitness, Inc. ICON HEALTH & FITNESS, INC., 1500 S. 1000 W., LOGAN, UT...


