
Uk Manual
Page 2
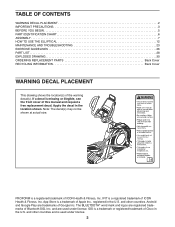
...under license. TABLE OF CONTENTS WARNING DECAL PLACEMENT 2 IMPORTANT PRECAUTIONS 3 BEFORE YOU BEGIN 5 PART IDENTIFICATION CHART 6 ASSEMBLY 7 HOW TO USE THE ELLIPTICAL 12 MAINTENANCE AND TROUBLESHOOTING 23 EXERCISE GUIDELINES 26 PART LIST 28 EXPLODED DRAWING 30 ORDERING REPLACEMENT PARTS Back Cover RECYCLING ...is a registered trademark of this manual and request a free replacement decal. Note: The decal(s) may not be shown at actual size. PROFORM is a registered trademark of Cisco in the U.S. Apply the decal in the location shown. If a decal is a trademark or registered ...
...under license. TABLE OF CONTENTS WARNING DECAL PLACEMENT 2 IMPORTANT PRECAUTIONS 3 BEFORE YOU BEGIN 5 PART IDENTIFICATION CHART 6 ASSEMBLY 7 HOW TO USE THE ELLIPTICAL 12 MAINTENANCE AND TROUBLESHOOTING 23 EXERCISE GUIDELINES 26 PART LIST 28 EXPLODED DRAWING 30 ORDERING REPLACEMENT PARTS Back Cover RECYCLING ...is a registered trademark of this manual and request a free replacement decal. Note: The decal(s) may not be shown at actual size. PROFORM is a registered trademark of Cisco in the U.S. Apply the decal in the location shown. If a decal is a trademark or registered ...

Uk Manual
Page 6
... parts may be included. The number in the hardware kit, check to identify the small parts needed for assembly. M10 Locknut (99)-4 M4 x 16mm Screw (104)-4 #8 x 12mm Screw (52)-4 M10 x 20mm Screw (144)-12 M10 x 45mm Bolt (143)-4 M10 x 70mm Screw (139)-2 M10 x 75mm ...
... parts may be included. The number in the hardware kit, check to identify the small parts needed for assembly. M10 Locknut (99)-4 M4 x 16mm Screw (104)-4 #8 x 12mm Screw (52)-4 M10 x 20mm Screw (144)-12 M10 x 45mm Bolt (143)-4 M10 x 70mm Screw (139)-2 M10 x 75mm ...
Uk Manual
Page 7
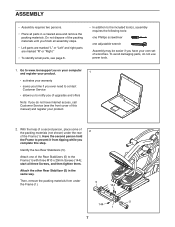
... area and remove the packing materials. With the help of a second person, place some of the Rear Stabilizers (5) to the included tool(s), assembly requires the following tools: one Phillips screwdriver one of the packing materials (not shown) under the Frame (1). 5 144 5 144 1 7 Attach one ... until you complete this manual) and register your own set of this step. Then, remove the packing materials from tipping while you finish all assembly steps. • Left parts are marked "L" or "Left" and right parts are marked "R" or "Right." • To identify small parts...
... area and remove the packing materials. With the help of a second person, place some of the Rear Stabilizers (5) to the included tool(s), assembly requires the following tools: one Phillips screwdriver one of the packing materials (not shown) under the Frame (1). 5 144 5 144 1 7 Attach one ... until you complete this manual) and register your own set of this step. Then, remove the packing materials from tipping while you finish all assembly steps. • Left parts are marked "L" or "Left" and right parts are marked "R" or "Right." • To identify small parts...

Uk Manual
Page 29
... Flat Head Screw M8 Small Washer M2.6 x 33mm Screw Center Ramp Cover M4 x 10mm Self-tapping Screw Left Lower Grip Right Lower Grip User's Manual Assembly Tool Grease Packet Note: Specifications are not illustrated. 29 Description Key No. For information about ordering replacement parts, see the back cover of this manual...
... Flat Head Screw M8 Small Washer M2.6 x 33mm Screw Center Ramp Cover M4 x 10mm Self-tapping Screw Left Lower Grip Right Lower Grip User's Manual Assembly Tool Grease Packet Note: Specifications are not illustrated. 29 Description Key No. For information about ordering replacement parts, see the back cover of this manual...


