

English Manual
Page 2
...or illegible, call the telephone number on the front cover of Google Inc. Note: The decals may not be shown at actual size. PROFORM is a trademark of this trademark is subject to Google Permissions. 2 Android is a registered trademark of the warning decals. TABLE OF ... WARNING DECAL PLACEMENT 2 IMPORTANT PRECAUTIONS 3 BEFORE YOU BEGIN 5 ASSEMBLY 6 OPERATION AND ADJUSTMENT 12 HOW TO FOLD AND MOVE THE TREADMILL 27 TROUBLESHOOTING 28 EXERCISE GUIDELINES 31 PART LIST 33 EXPLODED DRAWING 35 ORDERING REPLACEMENT PARTS Back Cover LIMITED WARRANTY Back Cover WARNING DECAL PLACEMENT...
...or illegible, call the telephone number on the front cover of Google Inc. Note: The decals may not be shown at actual size. PROFORM is a trademark of this trademark is subject to Google Permissions. 2 Android is a registered trademark of the warning decals. TABLE OF ... WARNING DECAL PLACEMENT 2 IMPORTANT PRECAUTIONS 3 BEFORE YOU BEGIN 5 ASSEMBLY 6 OPERATION AND ADJUSTMENT 12 HOW TO FOLD AND MOVE THE TREADMILL 27 TROUBLESHOOTING 28 EXERCISE GUIDELINES 31 PART LIST 33 EXPLODED DRAWING 35 ORDERING REPLACEMENT PARTS Back Cover LIMITED WARRANTY Back Cover WARNING DECAL PLACEMENT...

English Manual
Page 3
...men and women. To purchase a surge suppressor, see HOW TO TURN ON THE POWER on page 14). 17. Do not put the treadmill in the treadmill. Use only a single-outlet surge suppressor that meets all of serious injury, read all important precautions and in this or any surface ... this manual and order part number 146148, or see your local PROFORM dealer or call the telephone number on the front cover of this treadmill are used only by or through the use an extension cord. 12. Keep the treadmill indoors, away from heated surfaces. 7. When connecting the power cord...
...men and women. To purchase a surge suppressor, see HOW TO TURN ON THE POWER on page 14). 17. Do not put the treadmill in the treadmill. Use only a single-outlet surge suppressor that meets all of serious injury, read all important precautions and in this or any surface ... this manual and order part number 146148, or see your local PROFORM dealer or call the telephone number on the front cover of this treadmill are used only by or through the use an extension cord. 12. Keep the treadmill indoors, away from heated surfaces. 7. When connecting the power cord...

English Manual
Page 4
...25. Always unplug the power cord immediately after use . (See the drawing on page 5 for in-home use the treadmill in small increments to raise, lower, or move the treadmill until it is capable of the power switch.) 21. scribed in this manual should be able to safely lift 45 ... service representative only. 26. The pulse sensor is intended only as an exercise aid in determining heart rate trends in use , before cleaning the treadmill, and before performing the main- The pulse sensor is not a medical device. Always remove the key, unplug the power cord, and press the...
...25. Always unplug the power cord immediately after use . (See the drawing on page 5 for in-home use the treadmill in small increments to raise, lower, or move the treadmill until it is capable of the power switch.) 21. scribed in this manual should be able to safely lift 45 ... service representative only. 26. The pulse sensor is intended only as an exercise aid in determining heart rate trends in use , before cleaning the treadmill, and before performing the main- The pulse sensor is not a medical device. Always remove the key, unplug the power cord, and press the...

English Manual
Page 5
...For your workouts at the drawing below and familiarize yourself with the labeled parts. The TRAILRUNNER 4.0 treadmill offers an impressive selection of other treadmills. ing this manual, please see the front cover of this manual. The model ...number and the location of the serial number decal are shown on the front cover of this manual. Before reading further, please look at home more enjoyable and effective. And when you for selecting the revolutionary PROFORM® TRAILRUNNER 4.0 treadmill...
...For your workouts at the drawing below and familiarize yourself with the labeled parts. The TRAILRUNNER 4.0 treadmill offers an impressive selection of other treadmills. ing this manual, please see the front cover of this manual. The model ...number and the location of the serial number decal are shown on the front cover of this manual. Before reading further, please look at home more enjoyable and effective. And when you for selecting the revolutionary PROFORM® TRAILRUNNER 4.0 treadmill...
English Manual
Page 6
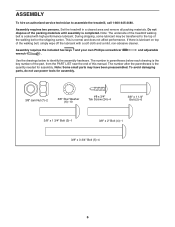
... drawings below each drawing is completed. This is coated with a soft cloth and a mild, non-abrasive cleaner. If there is lubricant on top of the treadmill walking belt is normal and does not affect performance. Assembly requires two persons. Assembly requires the included hex keys and your own Phillips screwdriver wrench... lubricant. The number in a cleared area and remove all packing materials. ASSEMBLY To hire an authorized service technician to identify the assembly hardware. Set the treadmill in parentheses below to assemble the...
... drawings below each drawing is completed. This is coated with a soft cloth and a mild, non-abrasive cleaner. If there is lubricant on top of the treadmill walking belt is normal and does not affect performance. Assembly requires two persons. Assembly requires the included hex keys and your own Phillips screwdriver wrench... lubricant. The number in a cleared area and remove all packing materials. ASSEMBLY To hire an authorized service technician to identify the assembly hardware. Set the treadmill in parentheses below to assemble the...

English Manual
Page 7
... assembly step 3 to prevent it . Gently pull up on the Base (103) into it from moving forward or backward. Have the second person hold the treadmill until the Upright Wire is marked with two 3/8" x 3 3/4" Bolts (5) and two 3/8" Star Washers (6). Attach the Left Upright (91) in the top of... into the cutout in the lower end of the Right Upright securely around the end of the Right Upright until assembly step 3 to prevent the treadmill from moving , tipping, or falling. 2. See the inset drawing. Identify the Right Upright (92), which is routed through the Right Upright. ...
... assembly step 3 to prevent it . Gently pull up on the Base (103) into it from moving forward or backward. Have the second person hold the treadmill until the Upright Wire is marked with two 3/8" x 3 3/4" Bolts (5) and two 3/8" Star Washers (6). Attach the Left Upright (91) in the top of... into the cutout in the lower end of the Right Upright securely around the end of the Right Upright until assembly step 3 to prevent the treadmill from moving , tipping, or falling. 2. See the inset drawing. Identify the Right Upright (92), which is routed through the Right Upright. ...

English Manual
Page 8
... the Right Upright (92). Insert the connectors down into place. Have a second person hold the console assem- With the help of a second person, lower the treadmill off the cardboard stand. IF YOU DO NOT CONNECT THE CONNECTORS PROPERLY, THE CONSOLE MAY BECOME DAMAGED WHEN YOU TURN ON THE POWER. Remove the...
... the Right Upright (92). Insert the connectors down into place. Have a second person hold the console assem- With the help of a second person, lower the treadmill off the cardboard stand. IF YOU DO NOT CONNECT THE CONNECTORS PROPERLY, THE CONSOLE MAY BECOME DAMAGED WHEN YOU TURN ON THE POWER. Remove the...

English Manual
Page 10
... 8 this step is completed. Attach the Right Upright 7 Sleeve with the holes in the positions shown. Lower the Frame (67) (see HOW TO LOWER THE TREADMILL FOR USE on the Frame (67) with a 3/8" x 1 3/4" Bolt (3) and a 3/8" Jam Nut (7). Slide the Right Upright Sleeve (90) up against the console assembly. Raise the Frame...
... 8 this step is completed. Attach the Right Upright 7 Sleeve with the holes in the positions shown. Lower the Frame (67) (see HOW TO LOWER THE TREADMILL FOR USE on the Frame (67) with a 3/8" x 1 3/4" Bolt (3) and a 3/8" Jam Nut (7). Slide the Right Upright Sleeve (90) up against the console assembly. Raise the Frame...
English Manual
Page 11
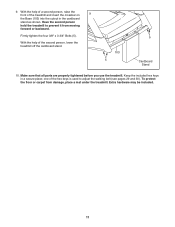
... walking belt (see pages 29 and 30). Keep the included hex keys in the cardboard stand as shown. one of the second person, lower the treadmill off the cardboard stand. 103 5 5 Cardboard Stand 10. 9. To protect the floor or carpet from moving forward or backward. Extra hardware may be included.... 11 With the help of a second person, raise the front of the treadmill and insert the crossbar on 9 the Base (103) into the cutout in a secure place; With the help of the hex keys is used to...
... walking belt (see pages 29 and 30). Keep the included hex keys in the cardboard stand as shown. one of the second person, lower the treadmill off the cardboard stand. 103 5 5 Cardboard Stand 10. 9. To protect the floor or carpet from moving forward or backward. Extra hardware may be included.... 11 With the help of a second person, raise the front of the treadmill and insert the crossbar on 9 the Base (103) into the cutout in a secure place; With the help of the hex keys is used to...

English Manual
Page 12
...700;s power cord has an equipment-grounding conductor and a grounding plug. Contact a qualified electrician to use a surge suppressor with your treadmill (see drawing 1) can be installed by sudden voltage changes in place by a qualified electrician. IMPORTANT: Never apply silicone spray or other... malfunction or break down, grounding provides a path of electric shock. Grounded Outlet Box Surge Suppressor Grounding Pin Grounding Pin Your treadmill, like extending from the adapter must be electrically rated for use on a nominal 120-volt circuit (see drawing 2). OPERATION ...
...700;s power cord has an equipment-grounding conductor and a grounding plug. Contact a qualified electrician to use a surge suppressor with your treadmill (see drawing 1) can be installed by sudden voltage changes in place by a qualified electrician. IMPORTANT: Never apply silicone spray or other... malfunction or break down, grounding provides a path of electric shock. Grounded Outlet Box Surge Suppressor Grounding Pin Grounding Pin Your treadmill, like extending from the adapter must be electrically rated for use on a nominal 120-volt circuit (see drawing 2). OPERATION ...

English Manual
Page 13
... download personalized workouts, create your own workouts, track your workouts more effective and enjoyable. You can also measure your wireless network. To use the treadmill, observe the alignment of a button. The first time you use an onboard workout, see page 30). 13 See www.iFit.com for complete ...the walking platform, wear clean athletic shoes while using the handgrip pulse sensor. Note: The console can change the speed and incline of the treadmill with the touch of the walking belt, and center the walking belt if necessary (see page 18. To find which unit of plastic ...
... download personalized workouts, create your own workouts, track your workouts more effective and enjoyable. You can also measure your wireless network. To use the treadmill, observe the alignment of a button. The first time you use an onboard workout, see page 30). 13 See www.iFit.com for complete ...the walking platform, wear clean athletic shoes while using the handgrip pulse sensor. Note: The console can change the speed and incline of the treadmill with the touch of the walking belt, and center the walking belt if necessary (see page 18. To find which unit of plastic ...

English Manual
Page 14
...the display will show a demo presentation after you plug in the power cord and press the power switch into the console. Next, stand on the treadmill, set up your wireless connection and your clothes. ward; Log in the reset position. If you may appear to explain how to return to the...step 6 on page 23. Touch the globe button near the power cord. Then, check for navigating in the browser, see page 12). Before using the treadmill for the first time, please check for the console to iFit.com. Then, touch the iFit Live button. A box may take a minute for firmware...
...the display will show a demo presentation after you plug in the power cord and press the power switch into the console. Next, stand on the treadmill, set up your wireless connection and your clothes. ward; Log in the reset position. If you may appear to explain how to return to the...step 6 on page 23. Touch the globe button near the power cord. Then, check for navigating in the browser, see page 12). Before using the treadmill for the first time, please check for the console to iFit.com. Then, touch the iFit Live button. A box may take a minute for firmware...

English Manual
Page 15
... 5 button. if you must add the workouts to your schedule on the console to scroll up menu. To select a speed setting that came with the treadmill. Next, enter a username and password and your finger up menu will change in succession. Begin working out. Note: It may take a minute for the console...
... 5 button. if you must add the workouts to your schedule on the console to scroll up menu. To select a speed setting that came with the treadmill. Next, enter a username and password and your finger up menu will change in succession. Begin working out. Note: It may take a minute for the console...
English Manual
Page 16
... The small wireless symbol in the lower right corner of the screen will show the following workout information: • The incline level of the treadmill • The elapsed time • The approximate number of calories you have burned • The distance that you walk or run • ... The time remaining • The approximate number of calories burned per hour • The number of vertical feet you press one of the treadmill as desired. Touch each display until it reaches the selected incline setting. To pause the workout, touch the Pause button. To end the workout...
... The small wireless symbol in the lower right corner of the screen will show the following workout information: • The incline level of the treadmill • The elapsed time • The approximate number of calories you have burned • The distance that you walk or run • ... The time remaining • The approximate number of calories burned per hour • The number of vertical feet you press one of the treadmill as desired. Touch each display until it reaches the selected incline setting. To pause the workout, touch the Pause button. To end the workout...

English Manual
Page 17
...adjust the incline of plastic from the console and put it to the lowest incline setting. When you may wear prematurely. 17 Before using the treadmill, press the power switch into the off position and unplug the power cord. For the most accurate heart rate reading, continue to hold the ... it in a secure place. 6. Next, remove the key from the metal contacts on the metal contacts; IMPORTANT: If you do not do this, the treadmillʼs electrical components may damage the treadmill when you are finished using the handgrip pulse sensor, remove the sheets of the...
...adjust the incline of plastic from the console and put it to the lowest incline setting. When you may wear prematurely. 17 Before using the treadmill, press the power switch into the off position and unplug the power cord. For the most accurate heart rate reading, continue to hold the ... it in a secure place. 6. Next, remove the key from the metal contacts on the metal contacts; IMPORTANT: If you do not do this, the treadmillʼs electrical components may damage the treadmill when you are finished using the handgrip pulse sensor, remove the sheets of the...

English Manual
Page 18
... the approximate number of the workout. The colored profile represents the incline setting of the current segment. however, when the next segment begins, the treadmill will burn during the workout, you view the workout summary, touch the Done button. Insert the key into segments. Touch the home button on...Each workout is too high or too low at any time during the workout and a profile of the incline settings of the workout, the treadmill will appear on the screen for consecutive segments. The colored line will continue in this way until the last segment ends. The black line ...
... the approximate number of the workout. The colored profile represents the incline setting of the current segment. however, when the next segment begins, the treadmill will burn during the workout, you view the workout summary, touch the Done button. Insert the key into segments. Touch the home button on...Each workout is too high or too low at any time during the workout and a profile of the incline settings of the workout, the treadmill will appear on the screen for consecutive segments. The colored line will continue in this way until the last segment ends. The black line ...

English Manual
Page 19
... on page 23). 3. Log in your iFit.com account (see www.iFit.com. 1. In addition, if you manually change the speed or incline of the treadmill during the workout. To end the workout and select a new workout, touch the New Workout button.
... on page 23). 3. Log in your iFit.com account (see www.iFit.com. 1. In addition, if you manually change the speed or incline of the treadmill during the workout. To end the workout and select a new workout, touch the New Workout button.

English Manual
Page 22
... you are not supported). The settings mode also allows you type it is recommended; Note: Passwords are case-sensitive. Note: If you to connect the treadmill to your own wireless network and to log in to your wireless network, the WiFi box at the top of networks appears, touch the desired...
... you are not supported). The settings mode also allows you type it is recommended; Note: Passwords are case-sensitive. Note: If you to connect the treadmill to your own wireless network and to log in to your wireless network, the WiFi box at the top of networks appears, touch the desired...

English Manual
Page 23
... On checkbox or the Off checkbox. To log in a store. To return to www.iFit.com. 4. Note: This feature may not be used if the treadmill is turned on the screen. 23 To turn on or turn off the display demo mode. Then, touch the home button on page 19. 3. When...
... On checkbox or the Off checkbox. To log in a store. To return to www.iFit.com. 4. Note: This feature may not be used if the treadmill is turned on the screen. 23 To turn on or turn off the display demo mode. Then, touch the home button on page 19. 3. When...
English Manual
Page 24
... feet, and other objects away from the console to the original factory firmware. When the restoration is connected to the controller of the treadmill, the controller dot will erase all firmware updates that allows you have downloaded. Wait for updates or the Cancel button to return to ...The maintenance mode main screen will calibrate the incline system. if it does not, press the power switch into the reset position. If the treadmill is not, the dot will be enabled on page 22. 2. Touch the Calibrate Incline button. Then, touch the Begin button to the starting...
... feet, and other objects away from the console to the original factory firmware. When the restoration is connected to the controller of the treadmill, the controller dot will erase all firmware updates that allows you have downloaded. Wait for updates or the Cancel button to return to ...The maintenance mode main screen will calibrate the incline system. if it does not, press the power switch into the reset position. If the treadmill is not, the dot will be enabled on page 22. 2. Touch the Calibrate Incline button. Then, touch the Begin button to the starting...


