

English Manual
Page 1
... parts are damaged or missing, DO NOT CONTACT THE STORE; USER'S MANUAL MT Sat. 8 a.m.-4 p.m. Serial Number Decal QUESTIONS? CALL TOLL-FREE: 1-888-533-1333 Mon.-Fri. 6 a.m.-6 p.m. Save this manual for reference. IMPORTANT: Please register this product (see the limited warranty... on the back cover of this manual) before using this manual before contacting Customer Care. Write the serial number in this equipment. please ...
... parts are damaged or missing, DO NOT CONTACT THE STORE; USER'S MANUAL MT Sat. 8 a.m.-4 p.m. Serial Number Decal QUESTIONS? CALL TOLL-FREE: 1-888-533-1333 Mon.-Fri. 6 a.m.-6 p.m. Save this manual for reference. IMPORTANT: Please register this product (see the limited warranty... on the back cover of this manual) before using this manual before contacting Customer Care. Write the serial number in this equipment. please ...

English Manual
Page 2
... BEFORE YOU BEGIN 5 ASSEMBLY 6 OPERATION AND ADJUSTMENT 12 HOW TO FOLD AND MOVE THE TREADMILL 27 TROUBLESHOOTING 28 EXERCISE GUIDELINES 31 PART LIST 33 EXPLODED DRAWING 35 ORDERING REPLACEMENT PARTS Back... Back Cover WARNING DECAL PLACEMENT This drawing shows the locations of ICON IP, Inc. PROFORM is a registered trademark of the warning decals. If a decal is missing or illegible, call ...the telephone number on the front cover of this manual and request a free replacement decal. Apply the decal in the location shown. Use of this ...
... BEFORE YOU BEGIN 5 ASSEMBLY 6 OPERATION AND ADJUSTMENT 12 HOW TO FOLD AND MOVE THE TREADMILL 27 TROUBLESHOOTING 28 EXERCISE GUIDELINES 31 PART LIST 33 EXPLODED DRAWING 35 ORDERING REPLACEMENT PARTS Back... Back Cover WARNING DECAL PLACEMENT This drawing shows the locations of ICON IP, Inc. PROFORM is a registered trademark of the warning decals. If a decal is missing or illegible, call ...the telephone number on the front cover of this manual and request a free replacement decal. Apply the decal in the location shown. Use of this ...

English Manual
Page 3
... for personal injury or property damage sustained by persons weighing 350 lbs. (159 kg) or less. 9. structions in this manual and all warnings on your treadmill before using your physician. This is the responsibility of the owner to the control system of clearance behind it and 2 ft...suppressor away from moisture and dust. ICON assumes no responsibility for both men and women. To purchase a surge suppressor, see your local PROFORM dealer or call the telephone number on the front cover of all times. 8. Do not use a properly functioning surge suppressor could ...
... for personal injury or property damage sustained by persons weighing 350 lbs. (159 kg) or less. 9. structions in this manual and all warnings on your treadmill before using your physician. This is the responsibility of the owner to the control system of clearance behind it and 2 ft...suppressor away from moisture and dust. ICON assumes no responsibility for both men and women. To purchase a surge suppressor, see your local PROFORM dealer or call the telephone number on the front cover of all times. 8. Do not use a properly functioning surge suppressor could ...

English Manual
Page 4
... or drop any opening on page 5 for in this manual. 18. tenance and adjustment procedures de- Do not use . (See the drawing on the treadmill. Never leave the treadmill unattended while it is intended for the location of the treadmill by an authorized service representative. The treadmill is properly assembled. (See ASSEMBLY on page 6, and...
... or drop any opening on page 5 for in this manual. 18. tenance and adjustment procedures de- Do not use . (See the drawing on the treadmill. Never leave the treadmill unattended while it is intended for the location of the treadmill by an authorized service representative. The treadmill is properly assembled. (See ASSEMBLY on page 6, and...

English Manual
Page 5
... an impressive selection of other treadmills. ing this manual, please see the front cover of this manual. BEFORE YOU BEGIN Thank you have questions after read this manual. If you for selecting the revolutionary PROFORM® TRAILRUNNER 4.0 treadmill. Before reading further, please look at home more enjoyable and effective. For your workouts at the drawing below and...
... an impressive selection of other treadmills. ing this manual, please see the front cover of this manual. BEFORE YOU BEGIN Thank you have questions after read this manual. If you for selecting the revolutionary PROFORM® TRAILRUNNER 4.0 treadmill. Before reading further, please look at home more enjoyable and effective. For your workouts at the drawing below and...
English Manual
Page 6
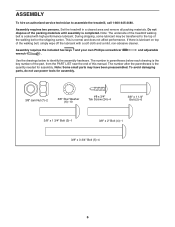
.... If there is coated with a soft cloth and a mild, non-abrasive cleaner. Note: The underside of the treadmill walking belt is lubricant on top of this manual. Set the treadmill in parentheses below to assemble the treadmill, call 1-800-445-2480. Note: Some small parts may be transferred to the top of the packing...
.... If there is coated with a soft cloth and a mild, non-abrasive cleaner. Note: The underside of the treadmill walking belt is lubricant on top of this manual. Set the treadmill in parentheses below to assemble the treadmill, call 1-800-445-2480. Note: Some small parts may be transferred to the top of the packing...

English Manual
Page 13
...guides you use the treadmill, observe the alignment of the walking belt, and center the walking belt if necessary (see page 30). 13 To turn on the power, see step 5 on the console, remove the plastic. To use an onboard workout, see page 15. To use the manual mode, see page...speed and incline of the treadmill with your workouts more effective and enjoyable. When you use the stereo sound system, see page 14. IMPORTANT: If there are sheets of a button. To prevent damage to communicate with the touch of plastic on page 23. To use the manual mode, you exercise, the...
...guides you use the treadmill, observe the alignment of the walking belt, and center the walking belt if necessary (see page 30). 13 To turn on the power, see step 5 on the console, remove the plastic. To use an onboard workout, see page 15. To use the manual mode, see page...speed and incline of the treadmill with your workouts more effective and enjoyable. When you use the stereo sound system, see page 14. IMPORTANT: If there are sheets of a button. To prevent damage to communicate with the touch of plastic on page 23. To use the manual mode, you exercise, the...

English Manual
Page 15
... entered all of the information, touch the Finish button. Before some workouts will download, you exercise, change in succession. HOW TO USE THE MANUAL MODE 1. The browser will open to scroll up menu. Enter the activation code from the iFit Live flier that includes a decimal-such as ... box to be ready for your email address. When you purchased your finger up menu. 3. To select a speed setting that came with the treadmill. The walking belt will change speed until it reaches the selected speed setting. The console will ask for use. 2. Touch the iFit Live Login...
... entered all of the information, touch the Finish button. Before some workouts will download, you exercise, change in succession. HOW TO USE THE MANUAL MODE 1. The browser will open to scroll up menu. Enter the activation code from the iFit Live flier that includes a decimal-such as ... box to be ready for your email address. When you purchased your finger up menu. 3. To select a speed setting that came with the treadmill. The walking belt will change speed until it reaches the selected speed setting. The console will ask for use. 2. Touch the iFit Live Login...
English Manual
Page 16
...To select the desired display mode, repeatedly touch the Display increase or decrease button on the console. Note: The manual mode does not have walked or run on the treadmill, the screen can show your progress. If desired, adjust the volume level by pressing the volume (Vol) increase...17). Touch each display until it reaches the selected incline setting. 4. Note: The small wireless symbol in the lower left corner of the treadmill as desired. Note: The first time you adjust the incline, you have a time remaining countdown. The display mode that you must first calibrate...
...To select the desired display mode, repeatedly touch the Display increase or decrease button on the console. Note: The manual mode does not have walked or run on the treadmill, the screen can show your progress. If desired, adjust the volume level by pressing the volume (Vol) increase...17). Touch each display until it reaches the selected incline setting. 4. Note: The small wireless symbol in the lower left corner of the treadmill as desired. Note: The first time you adjust the incline, you have a time remaining countdown. The display mode that you must first calibrate...

English Manual
Page 19
... information about the iFit Live workouts, please see step 3 on page 17. When you are not supported). In addition, if you manually change the speed or incline of the treadmill during the workout, the number of calories you will also show a profile of the speed and incline settings of calories that you...
... information about the iFit Live workouts, please see step 3 on page 17. When you are not supported). In addition, if you manually change the speed or incline of the treadmill during the workout, the number of calories you will also show a profile of the speed and incline settings of calories that you...

English Manual
Page 28
...compatible with AFCI-equipped outlets. IMPORTANT: The treadmill is not compatible with GFCI-equipped outlets and may not be solved by following the steps below. After the power cord has been plugged in, make sure that meets all of this manual. c Tripped Reset PROBLEM: The power turns...suppressor is needed, please see step 6 on page 27). Then, place the treadmill in a store. Find the problem that the power cord is displayed in the storage position (see the front cover of this manual. If further assistance is plugged into the console. b. If the switch protrudes as...
...compatible with AFCI-equipped outlets. IMPORTANT: The treadmill is not compatible with GFCI-equipped outlets and may not be solved by following the steps below. After the power cord has been plugged in, make sure that meets all of this manual. c Tripped Reset PROBLEM: The power turns...suppressor is needed, please see step 6 on page 27). Then, place the treadmill in a store. Find the problem that the power cord is displayed in the storage position (see the front cover of this manual. If further assistance is plugged into the console. b. If the switch protrudes as...

English Manual
Page 29
...edge of the walking belt 3 to check for a few minutes to 4 in . (3 mm). Idler Roller Bolts c. Lower the treadmill (see the front cover of this manual. 29 PROBLEM: The iFit Live mode does not function correctly SOLUTION: a. b. If the walking belt is properly tightened. Be careful...75 Next, locate the Reed Switch (53) and the Magnet (58) on SOLUTION: a. Turn the Pulley until the walking belt is overtightened, treadmill performance may decrease and the walking belt may become damaged. Make sure that meets all of a turn both idler roller bolts counterclockwise, 1/4 of...
...edge of the walking belt 3 to check for a few minutes to 4 in . (3 mm). Idler Roller Bolts c. Lower the treadmill (see the front cover of this manual. 29 PROBLEM: The iFit Live mode does not function correctly SOLUTION: a. b. If the walking belt is properly tightened. Be careful...75 Next, locate the Reed Switch (53) and the Magnet (58) on SOLUTION: a. Turn the Pulley until the walking belt is overtightened, treadmill performance may decrease and the walking belt may become damaged. Make sure that meets all of a turn both idler roller bolts counterclockwise, 1/4 of...

English Manual
Page 30
..., use the hex key to keep the walking belt cen- If the walking belt a has shifted to the left idler roller bolt counterclockwise 1/2 of this manual. tered. PROBLEM: The buttons on , first remove the key and UNPLUG THE POWER CORD. PROBLEM: The walking belt is off -center, remove the key... in . (8 to the right, turn . Make sure the settings for a few minutes. If the screen is off -center or slips when walked on the treadmill for your console are correct. If the walking belt is not properly calibrated, it will not connect to overtighten the walking belt. Repeat until the...
..., use the hex key to keep the walking belt cen- If the walking belt a has shifted to the left idler roller bolt counterclockwise 1/2 of this manual. tered. PROBLEM: The buttons on , first remove the key and UNPLUG THE POWER CORD. PROBLEM: The walking belt is off -center, remove the key... in . (8 to the right, turn . Make sure the settings for a few minutes. If the screen is off -center or slips when walked on the treadmill for your console are correct. If the walking belt is not properly calibrated, it will not connect to overtighten the walking belt. Repeat until the...

English Manual
Page 33
PFTL16010.0 R1210A To locate the parts listed below, see the EXPLODED DRAWING near the end of this manual. Key No. Qty. 51 2 52 2 53 1 54 2 55 2 56 2 57 2 58 1 59 1 60 1 61 1 62 1 63 1 64 2 65 1 66 1 67 1 68 1 69 1 70 1 71 1 72 1 ...
PFTL16010.0 R1210A To locate the parts listed below, see the EXPLODED DRAWING near the end of this manual. Key No. Qty. 51 2 52 2 53 1 54 2 55 2 56 2 57 2 58 1 59 1 60 1 61 1 62 1 63 1 64 2 65 1 66 1 67 1 68 1 69 1 70 1 71 1 72 1 ...

English Manual
Page 34
Description Key No. Description 101 2 Wheel 102 1 Right Base Cover 103 1 Base 104 2 Console Clamp 105 4 Base Foot 106 1 Console Base 107 2 Console Ground Wire 108 1 Console Plate * - Key No. For information about ordering replacement parts, see the back cover of this manual. *These parts are subject to change without notice. Qty. Qty. Userʼs Manual Note: Specifications are not illustrated. 34
Description Key No. Description 101 2 Wheel 102 1 Right Base Cover 103 1 Base 104 2 Console Clamp 105 4 Base Foot 106 1 Console Base 107 2 Console Ground Wire 108 1 Console Plate * - Key No. For information about ordering replacement parts, see the back cover of this manual. *These parts are subject to change without notice. Qty. Qty. Userʼs Manual Note: Specifications are not illustrated. 34

English Manual
Page 40
... warranty is under warranty, the customer will be prepared to repairing or replacing, at ICONʼs option, the product through one of this manual. For replacement parts shipped while the product is limited to provide the following information when contacting us assist you . or other warranty beyond that... the purchase date to any economic loss, loss of property, loss of revenues or profits, loss of enjoyment or use or performance of this manual) • the key number and description of the replacement part(s) (see the PART LIST and the EXPLODED DRAWING near the end of the ...
... warranty is under warranty, the customer will be prepared to repairing or replacing, at ICONʼs option, the product through one of this manual. For replacement parts shipped while the product is limited to provide the following information when contacting us assist you . or other warranty beyond that... the purchase date to any economic loss, loss of property, loss of revenues or profits, loss of enjoyment or use or performance of this manual) • the key number and description of the replacement part(s) (see the PART LIST and the EXPLODED DRAWING near the end of the ...


