

English Manual
Page 4
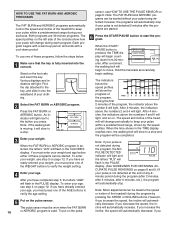
... in this manual. 3. The pulse sensor is not in use. (See the drawing on page 5 for the location of the on/off . Never leave the treadmill unattended while it . Always remove the key and move the walking belt while the power is not working properly. (See BEFORE YOU BEGIN on a surface.... 17. Never allow more amps. Use only a UL-listed surge protector, rated at 15 amps, with 8 feet of all times. 7. Do not use only. The treadmill is intended for in small increments to ensure that could become caught in general. 18. The pulse sensor is running. 19. Inspect and tighten all...
... in this manual. 3. The pulse sensor is not in use. (See the drawing on page 5 for the location of the on/off . Never leave the treadmill unattended while it . Always remove the key and move the walking belt while the power is not working properly. (See BEFORE YOU BEGIN on a surface.... 17. Never allow more amps. Use only a UL-listed surge protector, rated at 15 amps, with 8 feet of all times. 7. Do not use only. The treadmill is intended for in small increments to ensure that could become caught in general. 18. The pulse sensor is running. 19. Inspect and tighten all...
English Manual
Page 5
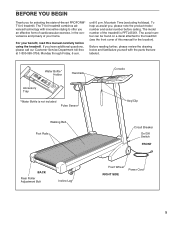
... further, please review the drawing below and familiarize yourself with innovative styling to the treadmill (see the front cover of -the-art PROFORM® T10.0 treadmill. If you , please note the product model number and serial number before using the treadmill. until 6 p.m. The serial number can be found on a decal attached to offer you an...
... further, please review the drawing below and familiarize yourself with innovative styling to the treadmill (see the front cover of -the-art PROFORM® T10.0 treadmill. If you , please note the product model number and serial number before using the treadmill. until 6 p.m. The serial number can be found on a decal attached to offer you an...
English Manual
Page 6
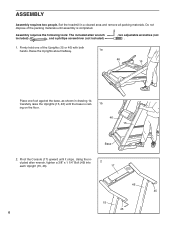
...- 1b ing on the floor. 46 15 Base 2. ASSEMBLY Assembly requires two people. Using the in a cleared area and remove all packing materials. Set the treadmill in - Firmly hold one foot against the base, as shown in drawing 1b.
...- 1b ing on the floor. 46 15 Base 2. ASSEMBLY Assembly requires two people. Using the in a cleared area and remove all packing materials. Set the treadmill in - Firmly hold one foot against the base, as shown in drawing 1b.

English Manual
Page 7
... before you use of the pulse sensor is pressed through the indicated hole in the Headband. With the help of a second person, carefully tip the treadmill back to the bracket with the holes in the Base Shock (109) with a 1/4" x 1" Bolt (106) and a 1/4" Nut (107). Remove the paper backing from ... sensor window is explained on the Small Crossbar (108). Attach the end of the Headbands (59 or 60). Important: Place a mat beneath the treadmill to grasp the Small Crossbar and pivot it back and forth slightly. It may be necessary to protect the floor or carpet. 7 Attach the Right...
... before you use of the pulse sensor is pressed through the indicated hole in the Headband. With the help of a second person, carefully tip the treadmill back to the bracket with the holes in the Base Shock (109) with a 1/4" x 1" Bolt (106) and a 1/4" Nut (107). Remove the paper backing from ... sensor window is explained on the Small Crossbar (108). Attach the end of the Headbands (59 or 60). Important: Place a mat beneath the treadmill to grasp the Small Crossbar and pivot it back and forth slightly. It may be necessary to protect the floor or carpet. 7 Attach the Right...
English Manual
Page 8
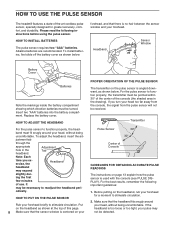
HOW TO USE THE PULSE SENSOR The treadmill features a state-of appropriate hole in the drawing). HOW TO INSTALL BATTERIES The pulse sensor requires two "AAA" batteries. Insert two "AAA" batteries into the ...
HOW TO USE THE PULSE SENSOR The treadmill features a state-of appropriate hole in the drawing). HOW TO INSTALL BATTERIES The pulse sensor requires two "AAA" batteries. Insert two "AAA" batteries into the ...

English Manual
Page 9
... the letters "PLS" appear in the PULSE display seems excessively high or low: See guideline 6 on page 8). The headband must be cleaned weekly when the treadmill is centered on your forehead, try positioning the sensor window above your forehead (see HOW TO INSTALL BATTERIES on this page. Make-up to the...
... the letters "PLS" appear in the PULSE display seems excessively high or low: See guideline 6 on page 8). The headband must be cleaned weekly when the treadmill is centered on your forehead, try positioning the sensor window above your forehead (see HOW TO INSTALL BATTERIES on this page. Make-up to the...

English Manual
Page 10
... from the adapter must be seriously damaged by a qualified electrician. cause excessive wear. A temporary adapter that looks like the plug illus- Your treadmill, like extending from other type of your tread- 1 mill being turned on a nominal 120-volt circuit, HOW TO PLUG IN THE POWER ... the adapter is properly installed and substances to a 2-pole receptacle as a properly grounded outlet box cover. Grounded Outlet Box Grounding Pin Treadmill Power Cord cluded) with the product-if it should be used to connect the surge protector to the walking belt or the walking plat...
... from the adapter must be seriously damaged by a qualified electrician. cause excessive wear. A temporary adapter that looks like the plug illus- Your treadmill, like extending from other type of your tread- 1 mill being turned on a nominal 120-volt circuit, HOW TO PLUG IN THE POWER ... the adapter is properly installed and substances to a 2-pole receptacle as a properly grounded outlet box cover. Grounded Outlet Box Grounding Pin Treadmill Power Cord cluded) with the product-if it should be used to connect the surge protector to the walking belt or the walking plat...

English Manual
Page 11
...: • Read User's Manual first. • Don't stand on the console, and use program A, B, C or D, see the drawing above) while operating the treadmill. use the FAT BURN program or the AEROBIC program. CAUTION ! Use only closeable water bottles. Adjust the speed in small increments. • The pulse sensor...of age and have been inactive, do not use caution, and keep water away from the console, the walking belt will stop. • The treadmill is plugged in, the letters "PO" will flash in the power "On" Position OFF ON cord (see SPEED DISPLAY on " position. To ...
...: • Read User's Manual first. • Don't stand on the console, and use program A, B, C or D, see the drawing above) while operating the treadmill. use the FAT BURN program or the AEROBIC program. CAUTION ! Use only closeable water bottles. Adjust the speed in small increments. • The pulse sensor...of age and have been inactive, do not use caution, and keep water away from the console, the walking belt will stop. • The treadmill is plugged in, the letters "PO" will flash in the power "On" Position OFF ON cord (see SPEED DISPLAY on " position. To ...
English Manual
Page 13
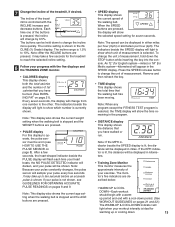
...the INCLINE buttons are pressed, the display will light to change by 0.5%. Every seven seconds, the display will change the unit of the treadmill, if desired. The indicators beside the display will show the time remaining in the program. • DISTANCE display This display shows the... the key into the console. The incline setting is ideal for Metric system-kilometers) will show the selected speed setting for the treadmill to op- DISTANCE Note: If the MPH indicator beside the SPEED display is selected. If the KPH indicator is lit, the ...
...the INCLINE buttons are pressed, the display will light to change by 0.5%. Every seven seconds, the display will change the unit of the treadmill, if desired. The indicators beside the display will show the time remaining in the program. • DISTANCE display This display shows the... the key into the console. The incline setting is ideal for Metric system-kilometers) will show the selected speed setting for the treadmill to op- DISTANCE Note: If the MPH indicator beside the SPEED display is selected. If the KPH indicator is lit, the ...

English Manual
Page 15
... move . To put on . first 2 minutes of page 11.) ing down periods). 8 The speed range during the first 2 minutes and the last 2 minutes of the treadmill, if desired. and flash for tinue in the TIME seven seconds. SPD. ton. by 0.3 mph each time press the START/PAUSE button. SPD. is selected... between 5.5 mph and 8.5 mph, the walking belt will then change tons to start the pro- 7 10 gram. the maximum play for the program. of the treadmill can be changed with the five displays and the TRAINING ZONE monitor.
... move . To put on . first 2 minutes of page 11.) ing down periods). 8 The speed range during the first 2 minutes and the last 2 minutes of the treadmill, if desired. and flash for tinue in the TIME seven seconds. SPD. ton. by 0.3 mph each time press the START/PAUSE button. SPD. is selected... between 5.5 mph and 8.5 mph, the walking belt will then change tons to start the pro- 7 10 gram. the maximum play for the program. of the treadmill can be changed with the five displays and the TRAINING ZONE monitor.
English Manual
Page 16
... use one of these programs can be made to a stop and the program will light. utes. and insert the key. waistband of the treadmill during the program by the speed is se- To enter your age, you have al- or incline of your age. your pulse within a...the PULSE DRIVEN PROFILE: 75 TO 85% MAX. Both programs are started . HEART RATE. tected; control the speed and incline of the treadmill to keep grams are 30-minute programs. The speed profiles on the left side of any 2minute period during each program. To enter PULSE ...
... use one of these programs can be made to a stop and the program will light. utes. and insert the key. waistband of the treadmill during the program by the speed is se- To enter your age, you have al- or incline of your age. your pulse within a...the PULSE DRIVEN PROFILE: 75 TO 85% MAX. Both programs are started . HEART RATE. tected; control the speed and incline of the treadmill to keep grams are 30-minute programs. The speed profiles on the left side of any 2minute period during each program. To enter PULSE ...
English Manual
Page 17
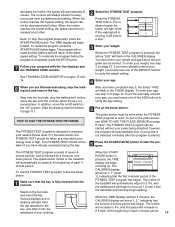
... AGE buttons to verify the age setting. 5 Put on the foot rails and insert the key. After you must press one of the treadmill will begin START / PAUSE counting up. The incline of each 4-minute period, 17 When the TIME display reaches 4 minutes, the CALORIES ...display will begin walking. Note: To stop if your age. In addition, move at the beginning of the treadmill will automatically adjust to 3.0%, and the walking belt will show "L 1" (level 1), indicating that the second 4-minute period has begun. C FITNESS TEST D W...
... AGE buttons to verify the age setting. 5 Put on the foot rails and insert the key. After you must press one of the treadmill will begin START / PAUSE counting up. The incline of each 4-minute period, 17 When the TIME display reaches 4 minutes, the CALORIES ...display will begin walking. Note: To stop if your age. In addition, move at the beginning of the treadmill will automatically adjust to 3.0%, and the walking belt will show "L 1" (level 1), indicating that the second 4-minute period has begun. C FITNESS TEST D W...

English Manual
Page 18
...the information mode, remove the key. 18 the speed and/or incline of 0 (FL:00). (See GUIDELINES FOR OBTAINING ACCURATE PULSE READINGS on the treadmill, in hours. The TIME display will then show the total time accumulated on pages 8 and 9.) The FITNESS TEST program can be shown in a ...the cool-down from the console. The TIME display will count down period is set for Metric system-kilometers) (see SPEED DISPLAY on the treadmill. This symbol indicates that the cool-down the STOP button while inserting the key into the console. dicating that the console is completed, the ...
...the information mode, remove the key. 18 the speed and/or incline of 0 (FL:00). (See GUIDELINES FOR OBTAINING ACCURATE PULSE READINGS on the treadmill, in hours. The TIME display will then show the total time accumulated on pages 8 and 9.) The FITNESS TEST program can be shown in a ...the cool-down from the console. The TIME display will count down period is set for Metric system-kilometers) (see SPEED DISPLAY on the treadmill. This symbol indicates that the cool-down the STOP button while inserting the key into the console. dicating that the console is completed, the ...

English Manual
Page 19
...protrudes as shown, the circuit breaker has tripped. The switch must be solved by following the steps below. Check the circuit breaker located on the treadmill near the power cord. c. If the circuit breaker has tripped, wait for ten seconds, and then reinsert it . Remove the key from the...been plugged in, make sure that the surge protector is plugged into the console. (See step 1 on page 12.) d. d. Do not operate the treadmill until the problem is detected within seven seconds. If further assistance is plugged in. To reset the circuit breaker, wait for ten seconds, and then...
...protrudes as shown, the circuit breaker has tripped. The switch must be solved by following the steps below. Check the circuit breaker located on the treadmill near the power cord. c. If the circuit breaker has tripped, wait for ten seconds, and then reinsert it . Remove the key from the...been plugged in, make sure that the surge protector is plugged into the console. (See step 1 on page 12.) d. d. Do not operate the treadmill until the problem is detected within seven seconds. If further assistance is plugged in. To reset the circuit breaker, wait for ten seconds, and then...

English Manual
Page 20
... Screws (20) from the Right Rear Endcap (98). e. b. SYMPTOM: THE WALKING BELT SLOWS OR SLIPS WHEN WALKED ON a. Do not operate the treadmill until the walk- ing belt is centered 20 (see SYMPTOM 5 above). b. Using the 3/16" end of allen wrench, turn the Right Rear Adjustment... Bolt (112) clockwise, 1/2 of the treadmill. If the walking belt still slows when walked on, please call our Customer Service Department. d. Repeat until the walking belt no longer slips. 89 112...
... Screws (20) from the Right Rear Endcap (98). e. b. SYMPTOM: THE WALKING BELT SLOWS OR SLIPS WHEN WALKED ON a. Do not operate the treadmill until the walk- ing belt is centered 20 (see SYMPTOM 5 above). b. Using the 3/16" end of allen wrench, turn the Right Rear Adjustment... Bolt (112) clockwise, 1/2 of the treadmill. If the walking belt still slows when walked on, please call our Customer Service Department. d. Repeat until the walking belt no longer slips. 89 112...
English Manual
Page 21
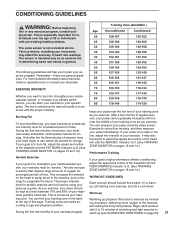
...ercise program. If your goal is to age and physical condition. If your pulse is too high or too low, adjust the intensity of the treadmill until the FAT BURN indicator is lit. (See TRAINING ZONE MONITOR on pages 13 and 14.) prolonged periods of exercise does your pulse as ... the proper intensity. Exercise for energy. Aerobic exercise is activity that requires large amounts of oxygen for adjust the speed and incline of the treadmill until it is to exercise with pre-existing health problems. Training Zone (Beats/Min.) Age Unconditioned Conditioned 20 138-167 25 136-166 133...
...ercise program. If your goal is to age and physical condition. If your pulse is too high or too low, adjust the intensity of the treadmill until the FAT BURN indicator is lit. (See TRAINING ZONE MONITOR on pages 13 and 14.) prolonged periods of exercise does your pulse as ... the proper intensity. Exercise for energy. Aerobic exercise is activity that requires large amounts of oxygen for adjust the speed and incline of the treadmill until it is to exercise with pre-existing health problems. Training Zone (Beats/Min.) Age Unconditioned Conditioned 20 138-167 25 136-166 133...

English Manual
Page 26
... ordering parts, please be prepared to give the following information: • The MODEL NUMBER OF THE PRODUCT (PFTL05051). • The NAME OF THE PRODUCT (PROFORM® T10.0 treadmill). • The SERIAL NUMBER OF THE PRODUCT (see the front cover of this manual). • The KEY NUMBER OF THE PART(S) (see the EXPLODED DRAWING...
... ordering parts, please be prepared to give the following information: • The MODEL NUMBER OF THE PRODUCT (PFTL05051). • The NAME OF THE PRODUCT (PROFORM® T10.0 treadmill). • The SERIAL NUMBER OF THE PRODUCT (see the front cover of this manual). • The KEY NUMBER OF THE PART(S) (see the EXPLODED DRAWING...


