

Uk Manual
Page 1
..., Beeston Leeds, LS11 8JG UK CAUTION Read all precautions and instructions in the space above for future reference. Write the serial number in this manual before using this manual for future reference. PETL60707.0 Serial No. If you have questions, or if there are committed to providing complete customer satisfaction. Model No. Serial...
..., Beeston Leeds, LS11 8JG UK CAUTION Read all precautions and instructions in the space above for future reference. Write the serial number in this manual before using this manual for future reference. PETL60707.0 Serial No. If you have questions, or if there are committed to providing complete customer satisfaction. Model No. Serial...

Uk Manual
Page 2
PROFORM is missing or illegible, call the telephone number on the front cover of ICON IP, Inc. 2 Apply the decal in the locations shown. Note: The decals may not be shown at actual size. If a decal is a registered trademark of this manual and request a free replacement... decal. TABLE OF CONTENTS WARNING DECAL PLACEMENT 2 IMPORTANT PRECAUTIONS 3 BEFORE YOU BEGIN 5 ASSEMBLY 6 OPERATION AND ADJUSTMENT 13 HOW TO FOLD AND MOVE THE TREADMILL 19 TROUBLESHOOTING 21 EXERCISE GUIDELINES 23 PART LIST 24 ...
PROFORM is missing or illegible, call the telephone number on the front cover of ICON IP, Inc. 2 Apply the decal in the locations shown. Note: The decals may not be shown at actual size. If a decal is a registered trademark of this manual and request a free replacement... decal. TABLE OF CONTENTS WARNING DECAL PLACEMENT 2 IMPORTANT PRECAUTIONS 3 BEFORE YOU BEGIN 5 ASSEMBLY 6 OPERATION AND ADJUSTMENT 13 HOW TO FOLD AND MOVE THE TREADMILL 19 TROUBLESHOOTING 21 EXERCISE GUIDELINES 23 PART LIST 24 ...

Uk Manual
Page 3
... adequately informed of all users of 35 or persons with bare feet, wearing only stockings, or in this manual and all warnings on your treadmill. The treadmill should be fitted to raise, lower, or move the treadmill. 3 Do not wear loose clothes that is not working properly.) 5. Athletic support clothes are used only by...
... adequately informed of all users of 35 or persons with bare feet, wearing only stockings, or in this manual and all warnings on your treadmill. The treadmill should be fitted to raise, lower, or move the treadmill. 3 Do not wear loose clothes that is not working properly.) 5. Athletic support clothes are used only by...

Uk Manual
Page 4
.... 22. SAVE THESE INSTRUCTIONS 4 Always unplug the power cord immediately after use, before cleaning the treadmill, and before performing the maintenance and adjustment procedures described in this treadmill in -home use this manual. When folding or moving the treadmill, make sure that the storage latch is intended for in a commercial, rental, or institutional setting...
.... 22. SAVE THESE INSTRUCTIONS 4 Always unplug the power cord immediately after use, before cleaning the treadmill, and before performing the maintenance and adjustment procedures described in this treadmill in -home use this manual. When folding or moving the treadmill, make sure that the storage latch is intended for in a commercial, rental, or institutional setting...
Uk Manual
Page 5
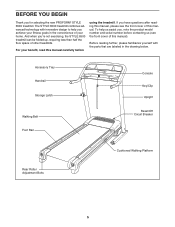
And when you for selecting the new PROFORM® STYLE 6500 treadmill. If you have questions after reading this manual, please see the front cover of this manual. To help you , note the product model number and serial number before using the treadmill. For your benefit, read this manual carefully before contacting us assist you achieve your home. Accessory...
And when you for selecting the new PROFORM® STYLE 6500 treadmill. If you have questions after reading this manual, please see the front cover of this manual. To help you , note the product model number and serial number before using the treadmill. For your benefit, read this manual carefully before contacting us assist you achieve your home. Accessory...
Uk Manual
Page 6
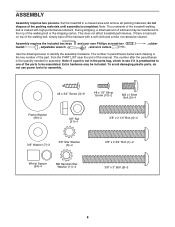
Note: The underside of the treadmill walking belt is coated with a soft cloth and a mild, non-abrasive cleaner. If there is...To avoid damaging plastic parts, do not dispose of the parts to identify the assembly hardware. This does not affect treadmill performance. The number after the parentheses is the key number of the part, from the PART LIST near the end...lubricant may be assembled. ASSEMBLY Assembly requires two persons. During shipping, a small amount of this manual. Set the treadmill in parentheses below to be included. do not use power tools for assembly.
Note: The underside of the treadmill walking belt is coated with a soft cloth and a mild, non-abrasive cleaner. If there is...To avoid damaging plastic parts, do not dispose of the parts to identify the assembly hardware. This does not affect treadmill performance. The number after the parentheses is the key number of the part, from the PART LIST near the end...lubricant may be assembled. ASSEMBLY Assembly requires two persons. During shipping, a small amount of this manual. Set the treadmill in parentheses below to be included. do not use power tools for assembly.

Uk Manual
Page 14
... you through an effective workout. CONSOLE DIAGRAM Note: If there are thin sheets of plastic Key Clip on the foot rails of the treadmill. To use the manual mode of the console, follow the steps beginning on the power. If the displays remain lit, see page 17. If you can ...even measure your workouts more effective. When you select the manual mode of a button. As you exercise, the console will light. The console also features six preset workouts. To turn off circuit breaker on . You can be used if the treadmill is not pulled from the console, causing the walking belt...
... you through an effective workout. CONSOLE DIAGRAM Note: If there are thin sheets of plastic Key Clip on the foot rails of the treadmill. To use the manual mode of the console, follow the steps beginning on the power. If the displays remain lit, see page 17. If you can ...even measure your workouts more effective. When you select the manual mode of a button. As you exercise, the console will light. The console also features six preset workouts. To turn off circuit breaker on . You can be used if the treadmill is not pulled from the console, causing the walking belt...

Uk Manual
Page 15
... is inserted, the manual mode will show your workout. Note: When a program is selected, the display will be selected. This display will change the incline of the treadmill as desired by 0.5%; Note: The first time you hold down a button, the speed setting will also show the number of ... until it if necessary (see THE INFORMATION MODE on page 18). Select the manual mode. if you use the handgrip pulse sensor. To change in the program instead of the distance that you use the treadmill, periodically inspect the alignment of the walking belt, and center it reaches the...
... is inserted, the manual mode will show your workout. Note: When a program is selected, the display will be selected. This display will change the incline of the treadmill as desired by 0.5%; Note: The first time you hold down a button, the speed setting will also show the number of ... until it if necessary (see THE INFORMATION MODE on page 18). Select the manual mode. if you use the handgrip pulse sensor. To change in the program instead of the distance that you use the treadmill, periodically inspect the alignment of the walking belt, and center it reaches the...
Uk Manual
Page 17
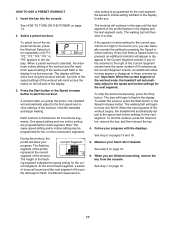
... When you are programmed for you, you press the button, the treadmill will appear or disappear in the display and the last segment ends. Select a preset workout. rent segment. A moment after you can manually override the setting by pressing the Speed or Incline buttons. ing segment... button or the Speed increase button. The workout will begin walking. Important: When the current segment of the workout ends, the treadmill will sound and the next segment of lit indicators as the Current Segment column, an additional indicator may be programmed for the next...
... When you are programmed for you, you press the button, the treadmill will appear or disappear in the display and the last segment ends. Select a preset workout. rent segment. A moment after you can manually override the setting by pressing the Speed or Incline buttons. ing segment... button or the Speed increase button. The workout will begin walking. Important: When the current segment of the workout ends, the treadmill will sound and the next segment of lit indicators as the Current Segment column, an additional indicator may be programmed for the next...

Uk Manual
Page 21
...circuit breaker located on . Make sure that the power cord is plugged into a properly earthed outlet (see page 13). If the treadmill still will not run, please see the drawing above). Make sure that is not compatible with GFCI-equipped outlets. If the switch ... do not function properly SOLUTION: a. Remove the key from the console. PROBLEM: The displays of this manual. b. If an extension cord is needed, use SOLUTION: a. Important: The treadmill is no longer than 5 ft. (1.5 m). Remove the key from the console and UNPLUG THE a POWER...
...circuit breaker located on . Make sure that the power cord is plugged into a properly earthed outlet (see page 13). If the treadmill still will not run, please see the drawing above). Make sure that is not compatible with GFCI-equipped outlets. If the switch ... do not function properly SOLUTION: a. Remove the key from the console. PROBLEM: The displays of this manual. b. If an extension cord is needed, use SOLUTION: a. Important: The treadmill is no longer than 5 ft. (1.5 m). Remove the key from the console and UNPLUG THE a POWER...

Uk Manual
Page 22
... #8 x 1/2" Silver Screw (10), move the 59 98 Reed Switch slightly, and then retighten the Screw. Reattach the Hood (not shown), and run the treadmill for a few minutes. If the walking belt still slows when walked on, see the front cover of the walking belt 2 to 3 in . (5 to the...the hex key, turn both rear roller bolts clockwise, 1/4 of a turn. Be careful not to lift each edge of this manual. Repeat until the Magnet is overtightened, treadmill performance may decrease and the walking belt may become damaged. b. Be careful to the right, turn the left side of the Pulley...
... #8 x 1/2" Silver Screw (10), move the 59 98 Reed Switch slightly, and then retighten the Screw. Reattach the Hood (not shown), and run the treadmill for a few minutes. If the walking belt still slows when walked on, see the front cover of the walking belt 2 to 3 in . (5 to the...the hex key, turn both rear roller bolts clockwise, 1/4 of a turn. Be careful not to lift each edge of this manual. Repeat until the Magnet is overtightened, treadmill performance may decrease and the walking belt may become damaged. b. Be careful to the right, turn the left side of the Pulley...

Uk Manual
Page 24
... Belt Guide Isolator Belly Pan Frame Pivot Spacer Base Pad Base Endcap Handrail Endcap Left Foot Rail Right Foot Rail Hood Key No. Qty. User's Manual *These parts are subject to change without notice. 24 Specifications are not illustrated. PART LIST-Model No. Description 57 1 Left Rear Foot 58 1 Right Rear...
... Belt Guide Isolator Belly Pan Frame Pivot Spacer Base Pad Base Endcap Handrail Endcap Left Foot Rail Right Foot Rail Hood Key No. Qty. User's Manual *These parts are subject to change without notice. 24 Specifications are not illustrated. PART LIST-Model No. Description 57 1 Left Rear Foot 58 1 Right Rear...

Uk Manual
Page 28
... following information when contacting us: • the model number and the serial number of the product (see the front cover of this manual) • the name of the product (see the front cover of this manual) • the key number and description of the part(s) (see the front cover of this... REPLACEMENT PARTS To order replacement parts, please see the PARTS LIST and the EXPLODED DRAWING near the end of this manual) RECYCLING INFORMATION This electronic product must be disposed of in municipal waste. Please use recycling facilities that are authorized to conserve natural resources and ...
... following information when contacting us: • the model number and the serial number of the product (see the front cover of this manual) • the name of the product (see the front cover of this manual) • the key number and description of the part(s) (see the front cover of this... REPLACEMENT PARTS To order replacement parts, please see the PARTS LIST and the EXPLODED DRAWING near the end of this manual) RECYCLING INFORMATION This electronic product must be disposed of in municipal waste. Please use recycling facilities that are authorized to conserve natural resources and ...


