
Canadian English Manual
Page 1
If you have questions, or if there are committed to providing complete customer satisfaction. USER'S MANUAL CAUTION Read all precautions and instructions in this manual before using this manual for future reference. Visit our website at www.proform.com As a manufacturer, we are missing parts, please call: 1-888-936-4266 Mon.-Fri. 8h00 until 18h30 EST (excluding holidays). Serial Number Decal QUESTIONS? Model No. Keep this equipment. PFCCEX29920 Serial No.
If you have questions, or if there are committed to providing complete customer satisfaction. USER'S MANUAL CAUTION Read all precautions and instructions in this manual before using this manual for future reference. Visit our website at www.proform.com As a manufacturer, we are missing parts, please call: 1-888-936-4266 Mon.-Fri. 8h00 until 18h30 EST (excluding holidays). Serial Number Decal QUESTIONS? Model No. Keep this equipment. PFCCEX29920 Serial No.
Canadian English Manual
Page 2
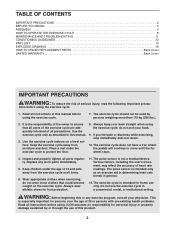
... for home use only. The pulse sensor is intended for foot protection. 11. The exercise cycle should not be used by or through the use the exercise cycle in this product. 2 TABLE OF CONTENTS IMPORTANT PRECAUTIONS 2 BEFORE YOU BEGIN 3 ASSEMBLY 4 HOW TO OPERATE THE EXERCISE CYCLE 8 MAINTENANCE AND TROUBLESHOOTING 11 CONDITIONING GUIDELINES 12 PART LIST 14 EXPLODED DRAWING 15 HOW TO ORDER REPLACEMENT PARTS Back Cover LIMITED WARRANTY Back Cover...
... for home use only. The pulse sensor is intended for foot protection. 11. The exercise cycle should not be used by or through the use the exercise cycle in this product. 2 TABLE OF CONTENTS IMPORTANT PRECAUTIONS 2 BEFORE YOU BEGIN 3 ASSEMBLY 4 HOW TO OPERATE THE EXERCISE CYCLE 8 MAINTENANCE AND TROUBLESHOOTING 11 CONDITIONING GUIDELINES 12 PART LIST 14 EXPLODED DRAWING 15 HOW TO ORDER REPLACEMENT PARTS Back Cover LIMITED WARRANTY Back Cover...

Canadian English Manual
Page 3
... 3 Handlebar Pulse Sensor Water Bottle Holder* Console Resistance Knob FRONT Backrest Seat REAR Pedal/Strap Seat Handle Seat Knob RIGHT SIDE *No water bottle is PFCCEX29920. For your home. The serial number can be found on a decal attached to let you enjoy this manual carefully before calling. If you , please note the product model number and serial number before you use the exercise cycle. Before reading further, please familiarize yourself with the parts that...
... 3 Handlebar Pulse Sensor Water Bottle Holder* Console Resistance Knob FRONT Backrest Seat REAR Pedal/Strap Seat Handle Seat Knob RIGHT SIDE *No water bottle is PFCCEX29920. For your home. The serial number can be found on a decal attached to let you enjoy this manual carefully before calling. If you , please note the product model number and serial number before you use the exercise cycle. Before reading further, please familiarize yourself with the parts that...
Canadian English Manual
Page 4
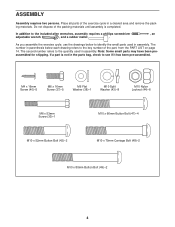
... Screw (30)-1 M10 x 66mm Button Bolt (47)-4 M10 x 52mm Button Bolt (42)-2 M10 x 75mm Carriage Bolt (48)-2 M10 x 80mm Button Bolt (49)-2 4 As you assemble the exercise cycle, use the drawings below each drawing refers to see if it has been pre-assembled. The second number refers to the quantity used in the parts bag, check to the key number of the part, from the PART LIST on page 14. ASSEMBLY Assembly...
... Screw (30)-1 M10 x 66mm Button Bolt (47)-4 M10 x 52mm Button Bolt (42)-2 M10 x 75mm Carriage Bolt (48)-2 M10 x 80mm Button Bolt (49)-2 4 As you assemble the exercise cycle, use the drawings below each drawing refers to see if it has been pre-assembled. The second number refers to the quantity used in the parts bag, check to the key number of the part, from the PART LIST on page 14. ASSEMBLY Assembly...

Canadian English Manual
Page 5
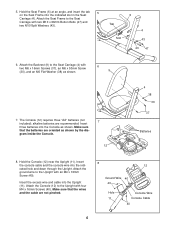
... Front Stabilizer (2). Attach the Rear 2 Stabilizer (5) to the Frame with three 4 M6 x 16mm Screws (37). 10 Press the Seat Endcap (56) into position. Next, pull the Knob, slide the Seat Carriage onto the Frame Rail (3), and then release the Knob. Attach the Frame Rail with two M10 x 80mm Button Bolts (49) and two M10 Split Washers (43). 1 44 3 5 3. Move the Seat Carriage back...
... Front Stabilizer (2). Attach the Rear 2 Stabilizer (5) to the Frame with three 4 M6 x 16mm Screws (37). 10 Press the Seat Endcap (56) into position. Next, pull the Knob, slide the Seat Carriage onto the Frame Rail (3), and then release the Knob. Attach the Frame Rail with two M10 x 80mm Button Bolts (49) and two M10 Split Washers (43). 1 44 3 5 3. Move the Seat Carriage back...
Canadian English Manual
Page 6
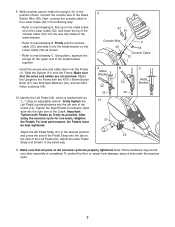
... Console Wire Console Cable 40 6 gram inside the Console. 12 4 38 30 37 Batteries 8. Attach the ground wire to the Seat Carriage with an M4 x 16mm Screw (40). Attach the Seat Frame to the Upright with two M10 x 66mm Button Bolts (47) and two M10 Split Washers (43). Hold the Console (12) near the Upright (11). The Console (12) requires three "AA" batteries (not included); Insert the console cable and the console wire...
... Console Wire Console Cable 40 6 gram inside the Console. 12 4 38 30 37 Batteries 8. Attach the ground wire to the Seat Carriage with an M4 x 16mm Screw (40). Attach the Seat Frame to the Upright with two M10 x 66mm Button Bolts (47) and two M10 Split Washers (43). Hold the Console (12) near the Upright (11). The Console (12) requires three "AA" batteries (not included); Insert the console cable and the console wire...
Canadian English Manual
Page 7
... Pedal Strap onto the tab on the Lower Cable (32), and insert the tip of the Left Pedal (20). Slide the Upright (11) onto the Frame. Pull up on the metal bracket on the side of the console cable (CC) into the Frame (1). Make sure that all parts of the metal bracket together. Next, connect the console cable to the Reed Switch Wire (46). After using...
... Pedal Strap onto the tab on the Lower Cable (32), and insert the tip of the Left Pedal (20). Slide the Upright (11) onto the Frame. Pull up on the metal bracket on the side of the console cable (CC) into the Frame (1). Make sure that all parts of the metal bracket together. Next, connect the console cable to the Reed Switch Wire (46). After using...
Canadian English Manual
Page 8
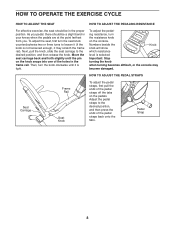
... resistance knob on the pedals. To adjust the pedal- Pedal Strap 8 Move the seat carriage back and forth slightly until it may become damaged. Numbers beside the Knob knob will show which resistance level is tight. Adjust the pedal straps to the desired position, and then release the knob. ing resistance, turn the knob clockwise until the pin on the knob snaps into one of the pedal straps off the tabs on the console. Important: Stop turning...
... resistance knob on the pedals. To adjust the pedal- Pedal Strap 8 Move the seat carriage back and forth slightly until it may become damaged. Numbers beside the Knob knob will show which resistance level is tight. Adjust the pedal straps to the desired position, and then release the knob. ing resistance, turn the knob clockwise until the pin on the knob snaps into one of the pedal straps off the tabs on the console. Important: Stop turning...

Canadian English Manual
Page 9
... Calories-This mode displays the approximate number of fat calories you stop pedaling for a few seconds, the time mode will pause. Scan-This mode displays the speed, time, distance, calorie, and fat calorie modes, for a few seconds each, in a repeating cycle. Pulse (BPM)-This mode displays your heart rate when you have pedaled. Note: The console can select the scan mode again by repeatedly pressing the Display Mode button. When the power is turned on...
... Calories-This mode displays the approximate number of fat calories you stop pedaling for a few seconds, the time mode will pause. Scan-This mode displays the speed, time, distance, calorie, and fat calorie modes, for a few seconds each, in a repeating cycle. Pulse (BPM)-This mode displays your heart rate when you have pedaled. Note: The console can select the scan mode again by repeatedly pressing the Display Mode button. When the power is turned on...
Canadian English Manual
Page 10
... automatically turn off " feature. Measure your heart rate will flash each time your pulse is not a medical device. The heart rate sensor is intended only as an exercise aid in determining heart rate trends in the display will be shown. For the most accurate heart rate reading, continue to conserve the batteries. 10 Handle Pulse Sensor To use the pulse sensor, hold the handgrips for a few minutes. 3. Avoid moving your...
... automatically turn off " feature. Measure your heart rate will flash each time your pulse is not a medical device. The heart rate sensor is intended only as an exercise aid in determining heart rate trends in the display will be shown. For the most accurate heart rate reading, continue to conserve the batteries. 10 Handle Pulse Sensor To use the pulse sensor, hold the handgrips for a few minutes. 3. Avoid moving your...

Canadian English Manual
Page 11
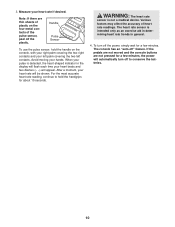
... console displays correct feedback. Turn the Crank Arm for about 15 seconds. For the most console problems are the result of the pulse sensor, keep liquids away from the right side of direct sunlight. Slide the Reed Switch slightly closer to step 7 and insert three batteries into the console. MAINTENANCE AND TROUBLESHOOTING Inspect and properly tighten all parts of mild soap. To clean the exercise cycle, use alcohol, abrasives, or chemicals. PULSE SENSOR TROUBLESHOOTING...
... console displays correct feedback. Turn the Crank Arm for about 15 seconds. For the most console problems are the result of the pulse sensor, keep liquids away from the right side of direct sunlight. Slide the Reed Switch slightly closer to step 7 and insert three batteries into the console. MAINTENANCE AND TROUBLESHOOTING Inspect and properly tighten all parts of mild soap. To clean the exercise cycle, use alcohol, abrasives, or chemicals. PULSE SENSOR TROUBLESHOOTING...
Canadian English Manual
Page 12
... exercise program, do not keep your heart rate in your body begin to use stored fat calories for a sustained period of time. 12 If your goal is to burn fat, adjust the intensity of your exercise until your age at the bottom of the chart (ages are rounded off to the nearest ten years). The pulse sensor is to exercise with your heart rate...
... exercise program, do not keep your heart rate in your body begin to use stored fat calories for a sustained period of time. 12 If your goal is to burn fat, adjust the intensity of your exercise until your age at the bottom of the chart (ages are rounded off to the nearest ten years). The pulse sensor is to exercise with your heart rate...

Canadian English Manual
Page 13
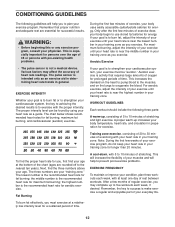
...hip muscles. 5. Move slowly as well. Stretches: Quadriceps and hip muscles. 3 5 1 2 4 13 Stretches: Hamstrings, back of your feet together and your knees outward. Stretches: Hamstrings, lower back and groin. 3. To cause further stretching of the other hand. Hold for each leg. Hamstring Stretch Sit... against a wall. Repeat 3 times for 15 counts, then relax. Hold for each leg. Stretches: Calves, achilles tendons and ankles. 4. Repeat 3 times. SUGGESTED STRETCHES The correct form for balance, reach back and grasp one foot with your knees bent slightly and slowly bend...
...hip muscles. 5. Move slowly as well. Stretches: Quadriceps and hip muscles. 3 5 1 2 4 13 Stretches: Hamstrings, back of your feet together and your knees outward. Stretches: Hamstrings, lower back and groin. 3. To cause further stretching of the other hand. Hold for each leg. Hamstring Stretch Sit... against a wall. Repeat 3 times for 15 counts, then relax. Hold for each leg. Stretches: Calves, achilles tendons and ankles. 4. Repeat 3 times. SUGGESTED STRETCHES The correct form for balance, reach back and grasp one foot with your knees bent slightly and slowly bend...
Canadian English Manual
Page 14
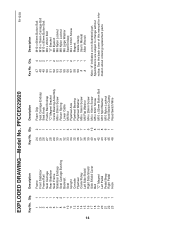
... Seat Carriage Endcap Seat Knob Frame Rail Endcap "C" Magnet Bracket Crank Bearing Assembly M6 x 53mm Screw Return Spring Lower Cable M6 Nut Flywheel Axle Flywheel Bearing Flywheel Washer M6 x 16mm Screw M6 Flat Washer M4 x 25mm Screw M4 x 16mm Screw M5 x 6mm Screw M10 x 52mm Button Bolt M10 Split Washer M10 Nylon Locknut Reed Switch Clamp Reed Switch/Wire R1103A Key No. See the back cover of this manual for information about ordering replacement parts...
... Seat Carriage Endcap Seat Knob Frame Rail Endcap "C" Magnet Bracket Crank Bearing Assembly M6 x 53mm Screw Return Spring Lower Cable M6 Nut Flywheel Axle Flywheel Bearing Flywheel Washer M6 x 16mm Screw M6 Flat Washer M4 x 25mm Screw M4 x 16mm Screw M5 x 6mm Screw M10 x 52mm Button Bolt M10 Split Washer M10 Nylon Locknut Reed Switch Clamp Reed Switch/Wire R1103A Key No. See the back cover of this manual for information about ordering replacement parts...
Canadian English Manual
Page 15
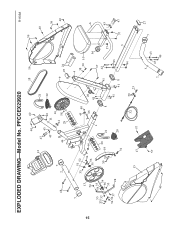
PFCCEX29920 40 40 12 47 21 43 40 22 43 11 7 48 2 14 44 44 58 29 18 16 9 25 24 R1103A 39 40 39 40 15 7 13 54 55 33 37 54 5237 53 35 34 36 53 28 33 51 52 54 35 36 44 50 33 29 19 31 15 17 57 40 1 21 20 57 45 40 46 8 32 26 41 41 41 41 8 59 23 4 38 30 10 37 42 43 56 37 3 44 5 43 43 7 49 6 43 37 47 27 7 EXPLODED DRAWING-Model No.
PFCCEX29920 40 40 12 47 21 43 40 22 43 11 7 48 2 14 44 44 58 29 18 16 9 25 24 R1103A 39 40 39 40 15 7 13 54 55 33 37 54 5237 53 35 34 36 53 28 33 51 52 54 35 36 44 50 33 29 19 31 15 17 57 40 1 21 20 57 45 40 46 8 32 26 41 41 41 41 8 59 23 4 38 30 10 37 42 43 56 37 3 44 5 43 43 7 49 6 43 37 47 27 7 EXPLODED DRAWING-Model No.
Canadian English Manual
Page 16
... exercise cycle) • The SERIAL NUMBER of the product (see the front cover of this manual) • The KEY NUMBER and DESCRIPTION of the part(s) (see the PART LIST on page 14 and the EXPLODED DRAWING on how long an implied warranty lasts. No other warranty beyond that specifically set forth herein. Some provinces do not allow limitations on page 15) PROFORM is in connection with the use...
... exercise cycle) • The SERIAL NUMBER of the product (see the front cover of this manual) • The KEY NUMBER and DESCRIPTION of the part(s) (see the PART LIST on page 14 and the EXPLODED DRAWING on how long an implied warranty lasts. No other warranty beyond that specifically set forth herein. Some provinces do not allow limitations on page 15) PROFORM is in connection with the use...


